tucked pelvis

Running: Part 6: Upper Body

Running: Part 6: Upper Body

Michelle Ball, Gokhale Method teacher
Date

Welcome to the sixth blog post in our series on running. My name is Michelle Ball, and I am a Gokhale Method® teacher living in Tasmania. I am also a lifelong runner and am passionate about sharing the benefits of healthy posture with the running community, be that beginners, seasoned runners, or anyone in between. Even if you walk rather than run, the posture principles outlined in this post can still help you to enjoy an active and pain-free body well into old age.

Running with a well-positioned upper body

In this post we will consider the upper body. Runners are inclined to pay far less attention to the upper half of the body than the lower half, as they focus on gait pattern, cadence, footwork, and propulsion. This is hardly surprising, but the lower body, while super-busy, really is just half the story. 

Healthy posture in the upper body brings the following benefits:

  • Protected spinal structures
  • Improved biomechanics
  • Unimpeded flow and momentum
  • Support that makes the body feel lighter
  • Athletic appearance

4 elite female runners in profile showing healthy form.
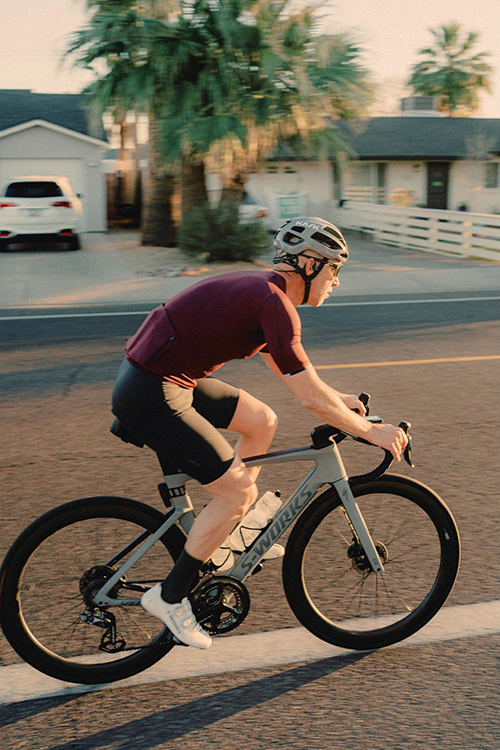
Healthy posture principles are important for the upper body as well as the lower. Implementing them can both protect your spine, and bring mechanical advantage to your running. Unsplash

I have found the upper body principles that we teach in the Gokhale Method® in-person Foundations and Pop-up courses, and our online Elements course, made a world of difference to my running. Let me share some key points with you. . .

Anchoring your ribs

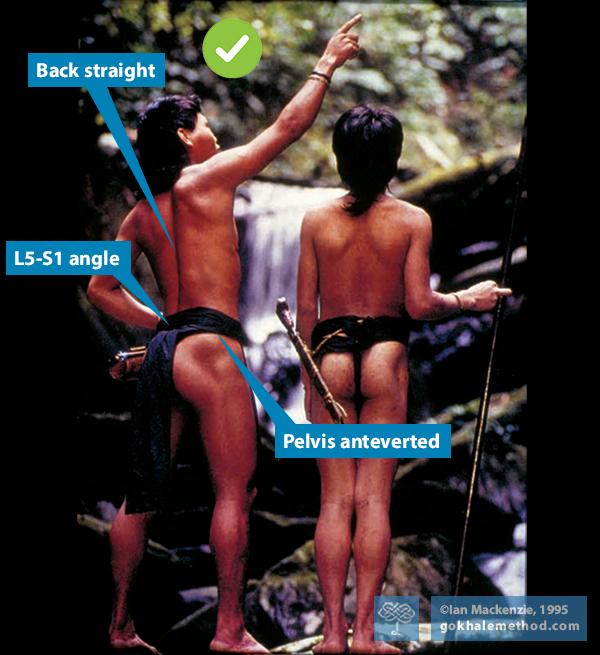
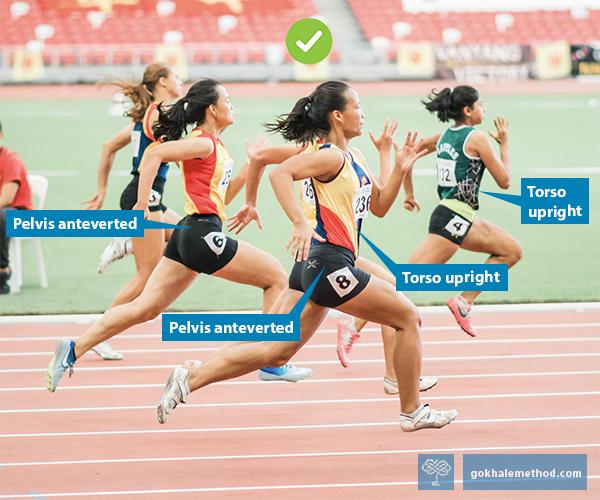
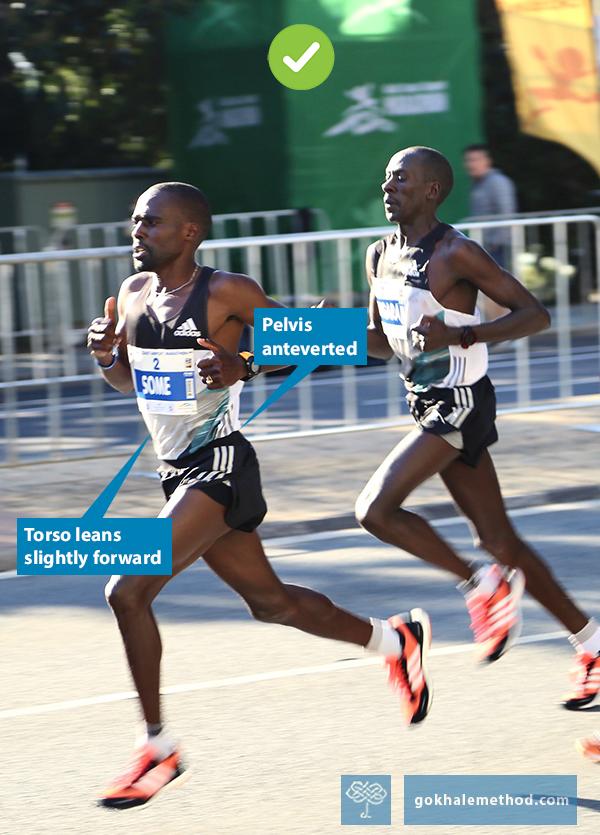
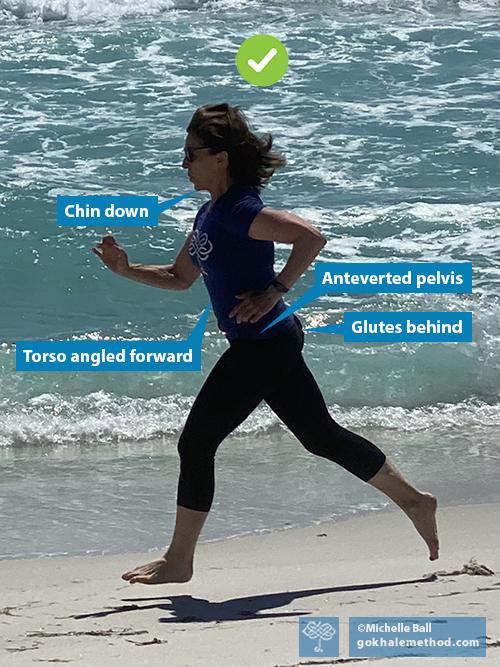
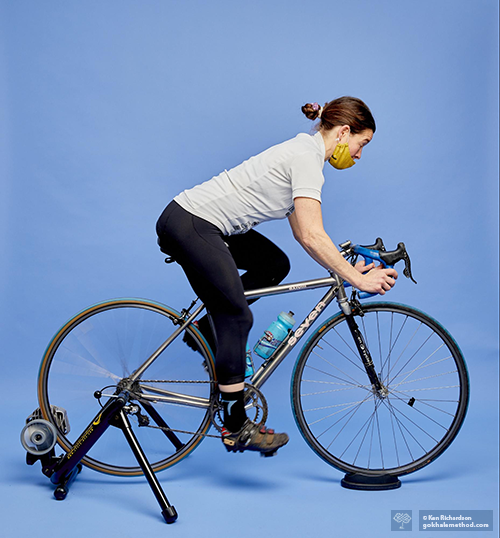
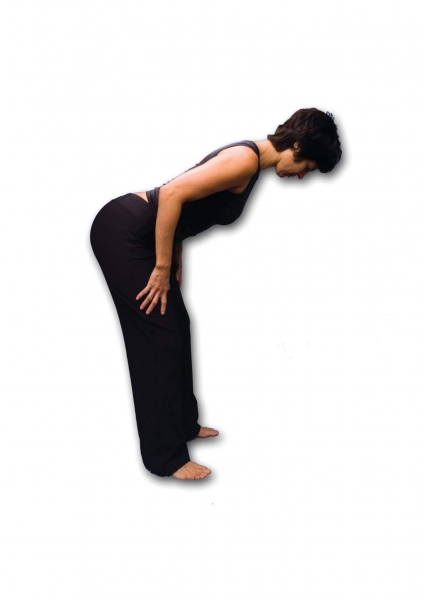
As explained in my previous post, Running: Part 5: Anteverted Pelvis, a forward leaning position when running helps to avoid compression in the lower back. In our culture it is common that people have tight lower back muscles (erector spinae), and weak opposing muscles of the torso (internal obliques). This creates a sway back, which pulls the torso into a backward leaning position. A deliberate forward lean will help counter this. 

Gokhale Method teacher Michelle Ball running angled forward, side view.
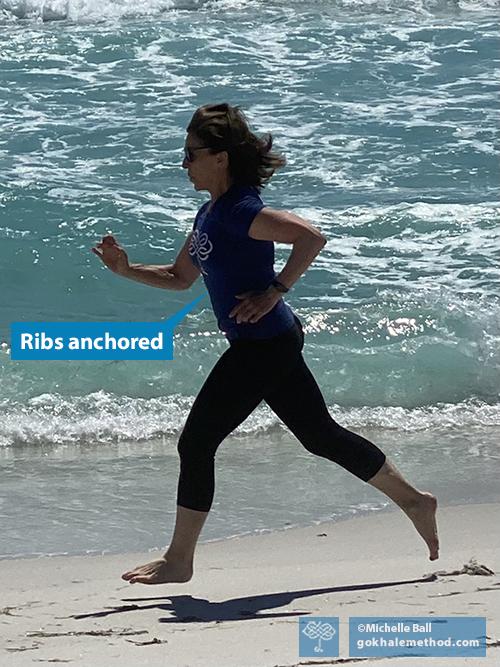
Here you can see me keeping a consistent forward angle throughout my torso, neck, and head.

Most people will benefit from some degree of forward rotation of the thorax to fully correct a sway and bring their torso into a straight and healthy alignment. This adjustment can be made and maintained by engagement of the internal oblique muscles, or rib anchor, as we Gokhale Method teachers call it. The rib anchor can be learned with a simple but precise maneuver which you can learn here

Female runner (upper body) in profile showing swayback and lifted chin.
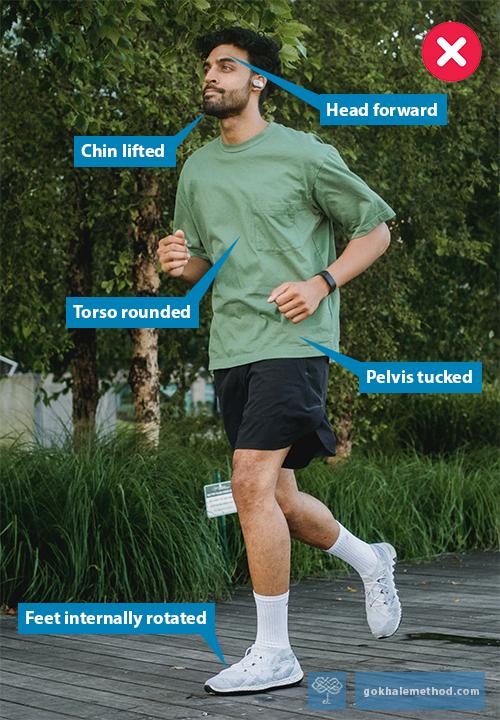
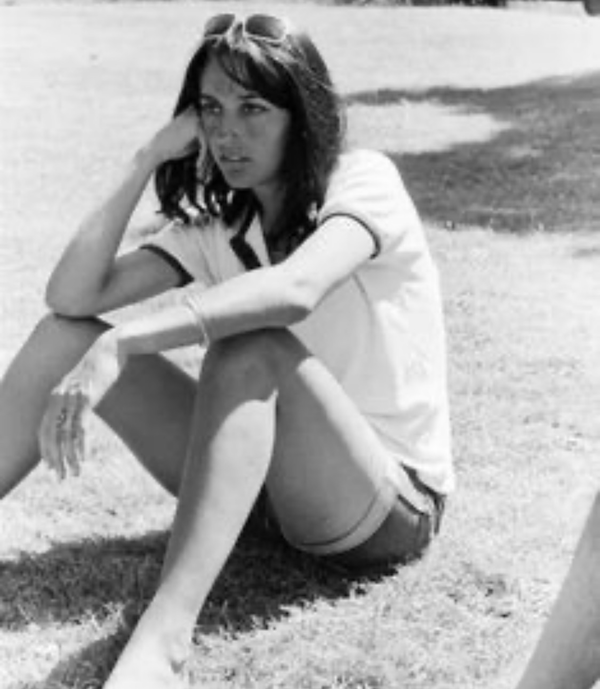
Overly contracted back and neck muscles can give a misleading feeling and appearance of being upright. In reality, overly muscles are pulling the lumbar and cervical spine into compression, threatening discs and nerves. Pexels

Deeper support and protection for your spine

Running is classed as a “high impact” activity. This is one reason to run with the best posture and technique you can. Even if you are running smoothly with impeccable form, running will generate additional forces that impact the spine on landing. Perhaps that is how “jogging” got its name! 

Using your inner corset while running lends natural protection to the joints, discs, and nerves of the spine in two important ways. Firstly, it creates and maintains length, and secondly, it confers stability, preventing untoward twisting, forward, back, and sideways movement. The trunk and pelvis remain a single unit, with no jiggling from micro-flexing and extension, or bobbing up and down—and the head travels at a continuous level, sparing the neck. In these respects good running form is the same as good walking form. The spine and its tissues are saved from both acute injury and long-term wear and tear. How to find and deploy your inner corset is explained in detail in Esther’s bestselling book, 8 Steps to a Pain-Free Back.

An S-shaped spine medical illustration from 1990, and a J-shape spine from 1911.
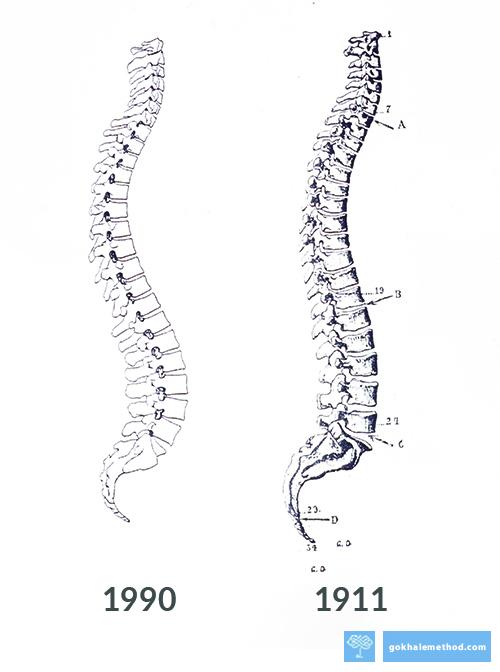
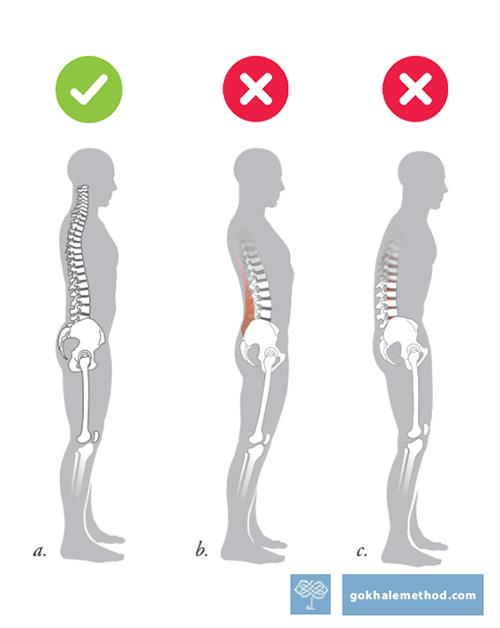
These two medical illustrations from 8 Steps to a Pain-Free Back show how, in modern times (e.g., 1990), deeper spinal curves have come to be regarded as normal and desirable. The Gokhale Method advocates a return to a straighter, longer spinal shape (e.g., 1911). 

Avoiding neck pain while running

Deep engagement of the inner corset will preserve length in the lumbar spine, and this supportive structure also encourages length in the cervical spine, or neck. In addition, locally, the longus colli muscle, which attaches to the front and side of the neck and upper thoracic vertebrae, needs to be engaged to draw the neck back into a tall, lengthened position in line with your body. 

 Anatomical drawing of the longus colli muscle.

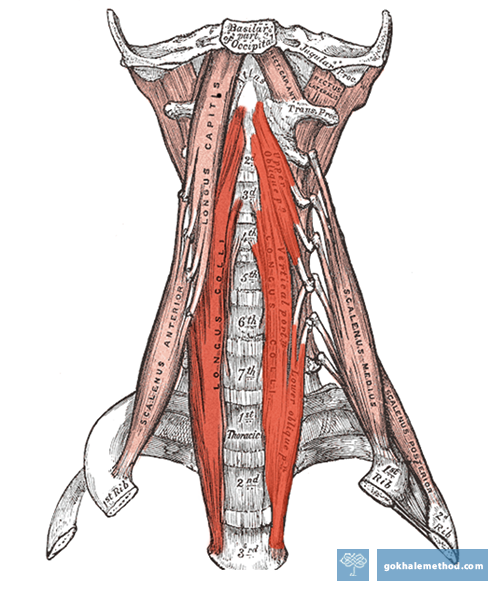
The longus colli muscle (seen here in red) draws the vertebrae of the neck back into a healthy, tall, and spacious alignment. Wikimedia

Gliding your head up and back, while allowing your chin to rest down, will provide stable and relaxed carriage for your head, and a happier neck. You can learn how to glide your head back here.

Woman running with head and neck back in line with body, side view
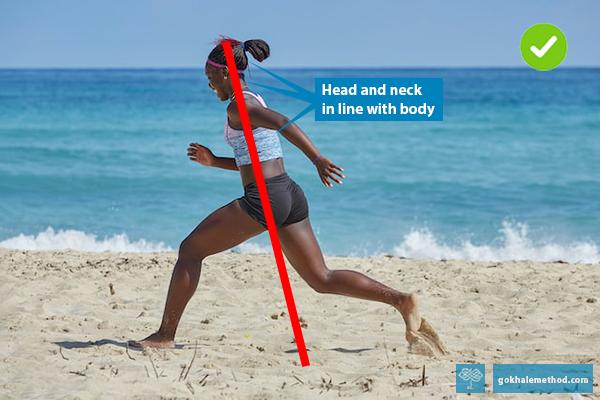
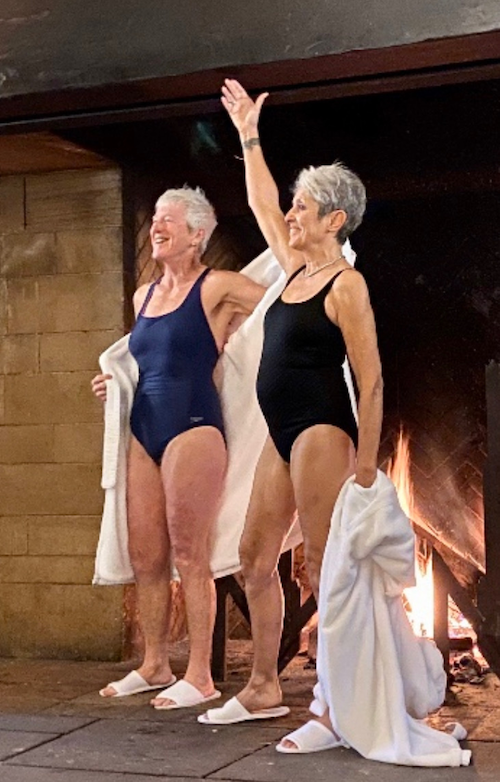
Your head and neck want to remain back in line with your body, even as you lean forward. 

Man running with tucked pelvis, internal rotation of feet and legs, rounded torso, and forward head carriage
You don’t want to jut your chin forward and let your head literally run ahead of you. Pexels

Trunk stability

The trunk stability that protects the spine also enables efficiency when running, as energy is not dissipated into incidental movements that detract from forward motion. It enables all propulsion to be well channeled, rather than just pulling the spine around. As running expert Marc Cucazella reminds us, ‌“You‌ ‌can’t‌ ‌fire‌ ‌a‌ ‌cannon‌ ‌from‌ ‌a‌ ‌canoe.”‌ In the upper body this propulsion comes from the arms.

Arm movements in running

Whereas in glidewalking the arms largely rest, in running the arms actively contribute to propulsion and alternate with the leg action. In sprinting the arms are especially important, moving straight forward and back like pistons on either side of the body. The arms‌ ‌are bent at‌ ‌45 degrees ‌or‌ ‌slightly‌ ‌more,‌ with the hands‌ ‌moved ‌in‌ ‌a‌ ‌circular‌, ‌‌rearward‌ ‌pull motion,‌ ‌‌as‌ ‌if‌ ‌you‌ ‌were‌ ‌chopping‌ ‌wood.‌ The arms‌ ‌then‌ ‌recoil‌ ‌forward,‌ ‌very slightly rotating‌ the shoulders‌.‌ What you don’t want is the arms to be crossing the midline of your body and pulling you off balance. Arm action can be much more relaxed at an easy jogging pace or in distance running. 

4 elite female sprinters in profile showing strong arm action.
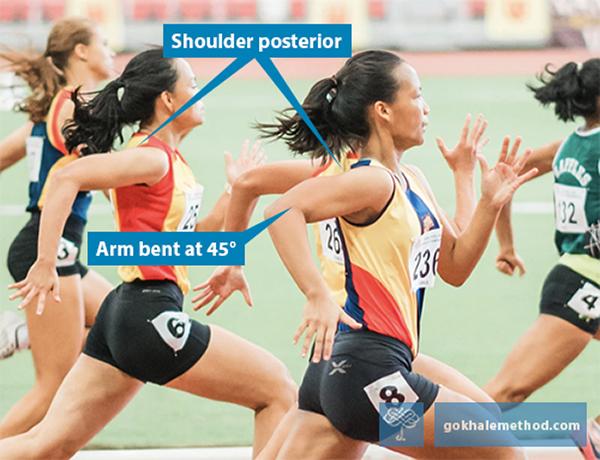
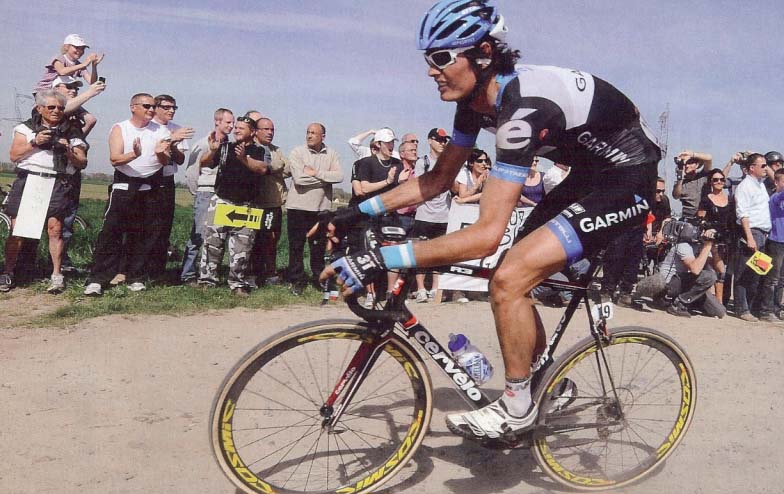
The vigorous piston action of the arms in sprinting requires a well-configured shoulder joint. Unsplash

Whatever your running speed, it is extremely important that the shoulders be well positioned, so that the joint—where the bone of the upper arm, shoulder blade, and collarbone meet—can connect well, and the soft tissues, nerves, and circulation can function optimally. You want your shoulders to be happily at home in their natural, posterior position. You can learn how to roll your shoulders back here.

Open, posterior shoulders will also help you to access breathing in your upper chest. If you tend to hunch forward, draw your elbows more together behind you to assist the external rotation of your shoulders.

Relaxed and bouncy shoulders

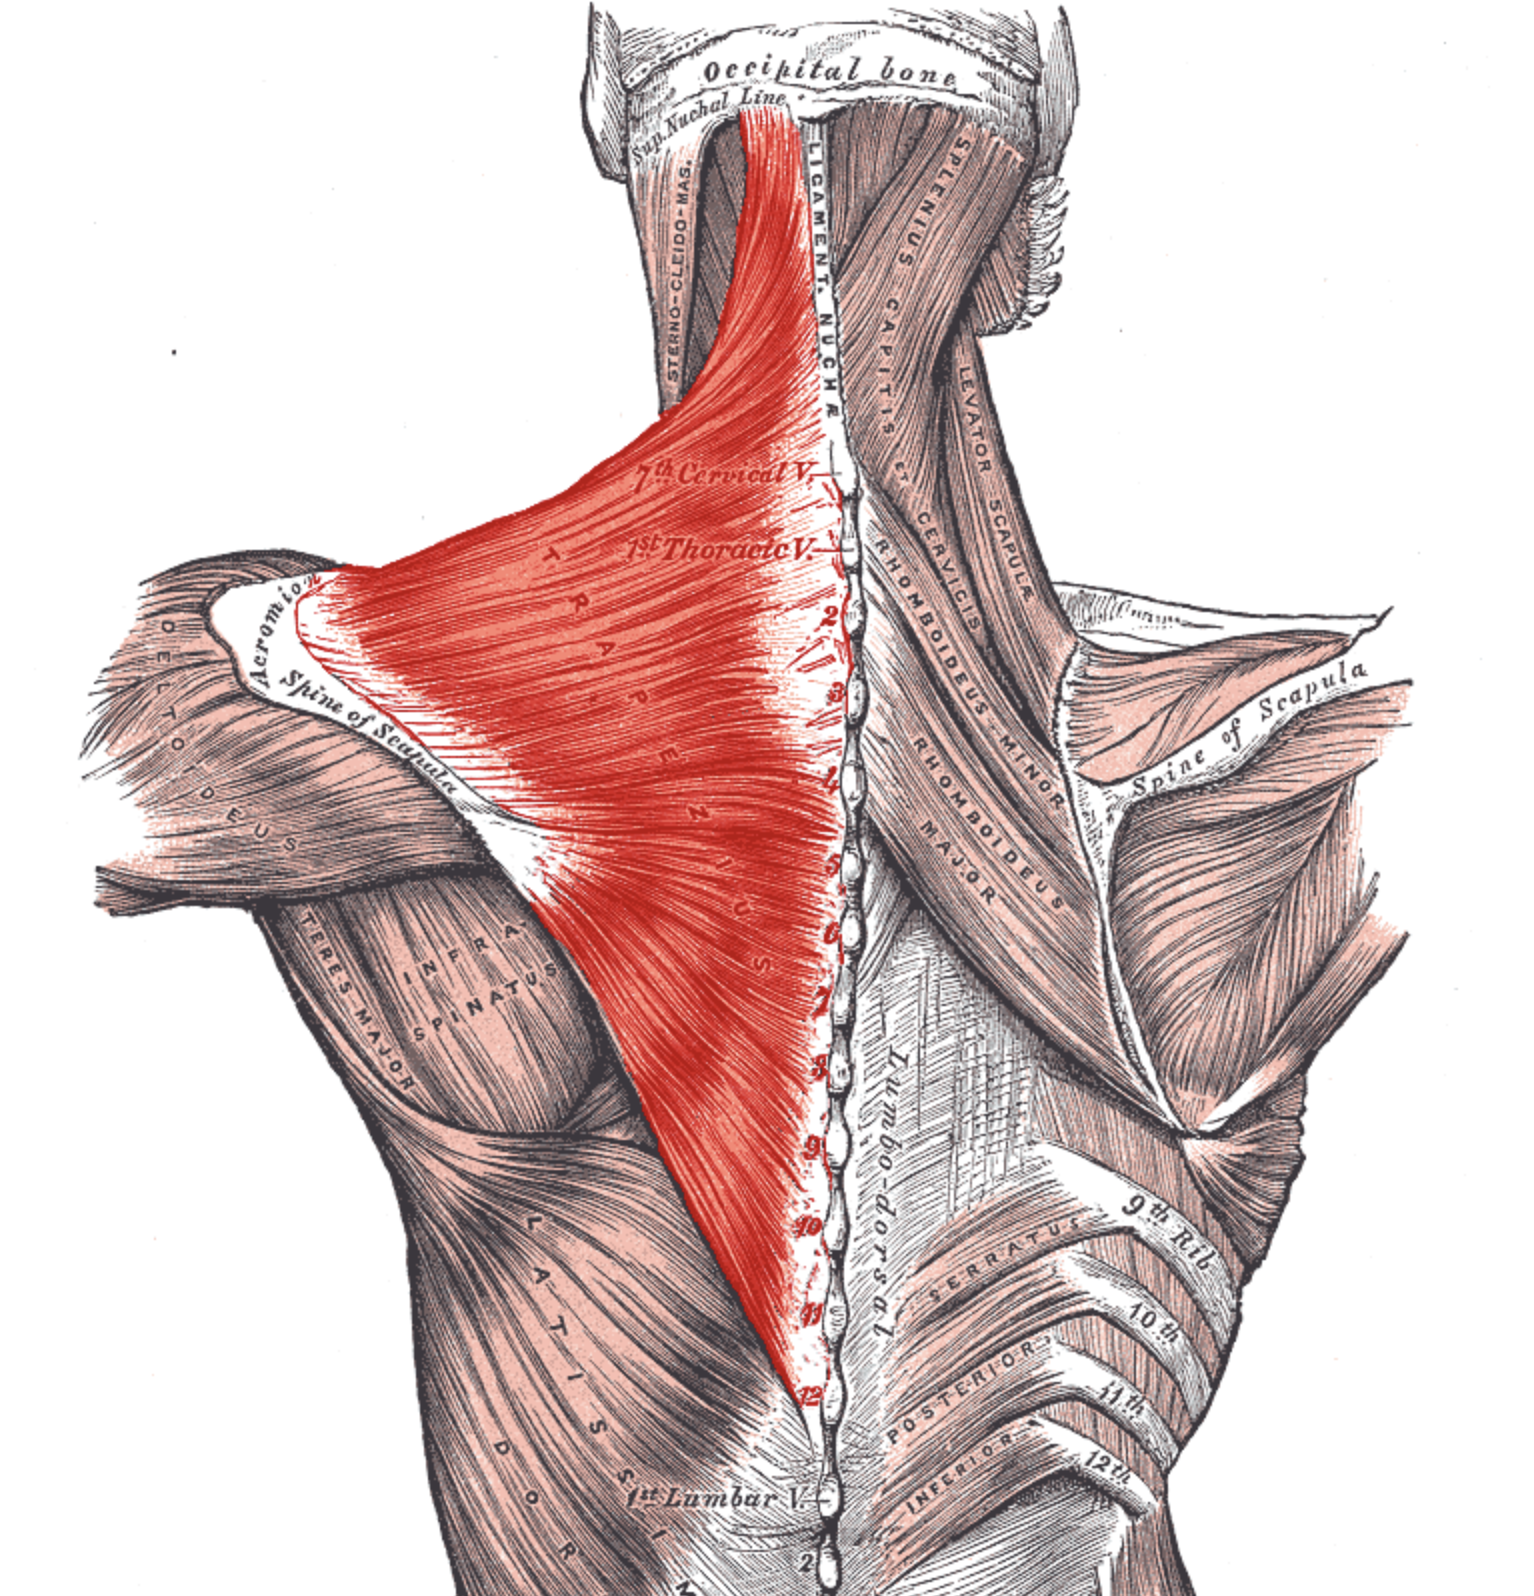
In gentler jogging and long distance running, the shoulder area can be more relaxed. Healthy alignment within the shoulder joint is still important for the hundreds of to-and-fro arm reps, and to cushion the impacts traveling through the joint with every stride. A healthy postural relationship between the upper back, the shoulder girdle, and the neck will help the shoulders to be responsive rather than held tight, and to bounce a little as you run. 

Anatomical drawing of the trapezius muscle.
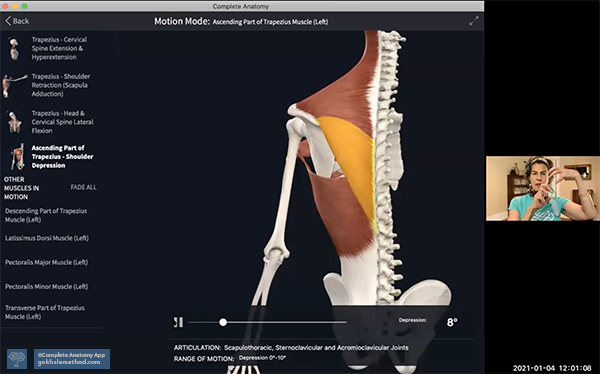
The trapezius muscle is at the center of healthy upper back, neck, and shoulder posture. It helps the shoulder to lift, lower, and gently bounce through impactful movement. Wikimedia

Stick or twist?

The synchronized alternation of arm and leg movement is vital for momentum and balance during running. This will be integrated by the torso twisting somewhat. There is a counter movement of pelvic rotation backward as the chest moves forward on the opposite side. The key is neither to over stiffen, nor over twist the torso. A stiff body keeps the hips from extending fully, can shorten your stride, and puts more pressure on the knees and leg joints. Over twisting can cause a “sloppy” run and impinge on the spinal joints. This is where staying tall with a strong inner corset is invaluable, as the inner corset allows healthy rotation both through and beyond it.  

In particular, avoid an upper/lower torso separation with twisting happening almost entirely at the T12/L1 junction, where the ribs meet the lumbar area. Twisting here is sometimes misguidedly encouraged to help power the arms, especially in fitness walking classes. However, there is no ball and socket joint at T12/L1 that makes swiveling here a good idea for the spine! 

South African sprinter Wayde van Niekerk running, side view
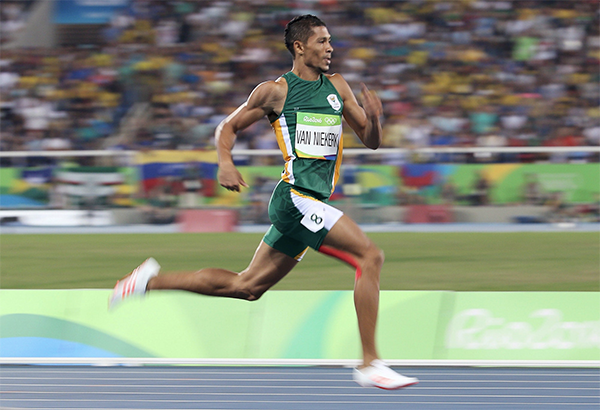
This runner’s torso shows considerable rotation, but it is distributed along the spine—it does not twist at just one point. South African sprinter Wayde van Niekerk sets a world record at the 2016 Olympics. Alessandro Bianchi / Reuters

Olympic gold medalist Tirunesh Dibaba running, front view
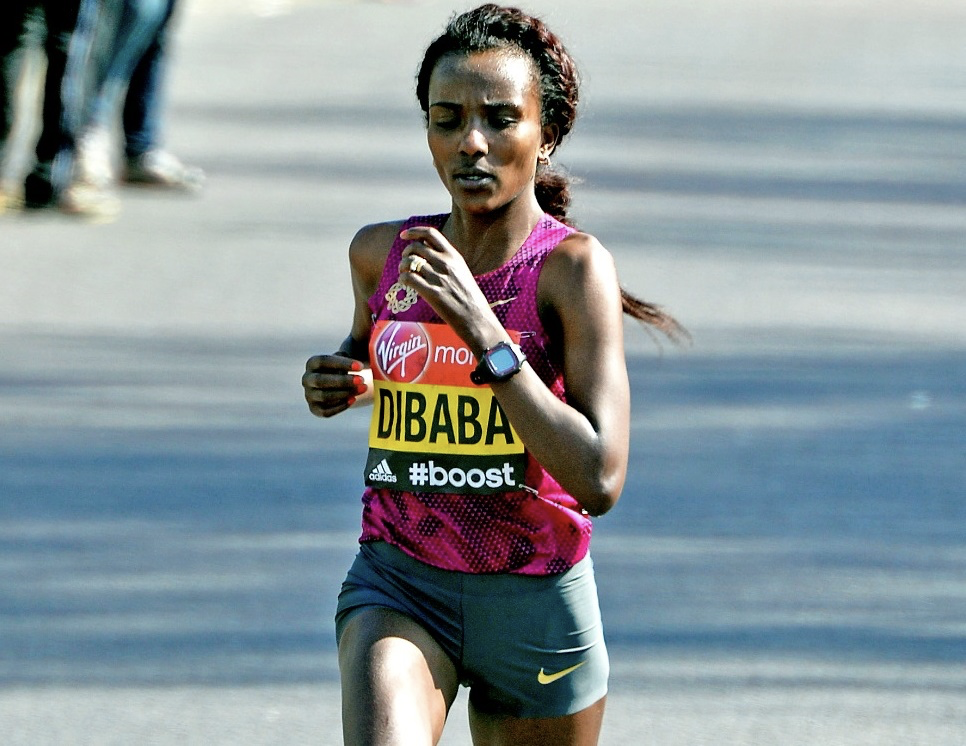
Olympic gold medalist Tirunesh Dibaba also shows even rotation of her torso from hip to opposite shoulder. I’ve also noticed that most East African runners have a significantly higher arm carriage, and are among the best runners in the world. Bretta Riches – Run Forefoot

If you would like guidance on any aspect of your posture and/or running, including your head, neck or shoulder position, consider scheduling an Initial Consultation, online or in person, with a Gokhale Method teacher.

Here are previous running posts you might like:

Running P1: Introduction, Esther Gokhale

Running P2: Meet Your Feet, Michelle Ball 

Running P3: How to choose running shoes, Michelle Ball 

Running P4: Taking care of your knees, Michelle Ball

Running P5: Anteverted Pelvis

If you would like to find out more about how the Gokhale Method can help support you, sign up to join one of our upcoming FREE Online Workshops.

Running: Part 5: Anteverted Pelvis

Running: Part 5: Anteverted Pelvis

Michelle Ball, Gokhale Method teacher
Date

Welcome to the fifth blog post in our series on running. My name is Michelle Ball, and I am a Gokhale Method® teacher living in Tasmania. I am also a lifelong runner and am passionate about sharing the benefits of healthy posture with the running community, be that beginners, seasoned runners, or anyone in between. Even if you don’t run, but do want an active and pain-free body well into old age, this blog post is for you!

What is an anteverted pelvis? 

Pelvis refers to the bony pelvis, and means basin, or bowl, in Latin. Anteverted means tipped, turned, or inclined forward, from the Latin ante to go before or in front, and vertere to turn. So we are referring to a pelvis that tips forward. 


The angled belt line of the Ubong tribesman on the left shows that his pelvis is anteverted—mildly tipped forward. Contrary to popular belief, an anteverted pelvis does not cause excessive lumbar lordosis (sway back) when there is a healthy angle at the L5-S1 junction. His back remains surprisingly straight by conventional standards. 

Three standing figures in profile showing anteverted, “neutral”, and tucked pelvis
(a.) An anteverted pelvis facilitates heath posture. The commonly advocated “neutral pelvis.” (b.) is actually mildly tucked and does not allow the correct lumbo-sacral angle and stacking of the spine. (c.) A markedly tucked (retroverted) pelvis leads to a tense, compressed lumbar area, or to slumping., 

How an anteverted pelvis benefits the spine:

As you see in the image above, an anteverted pelvis (see example (a.)), is the foundation for a healthy, straighter, more vertical spine, which does not sway or round. It provides the correct orientation for the sacrum to support the L5-S1 disc, which is wedge-shaped, and then for the L5 vertebra and those above to stack well. A tucked pelvis, over time, will likely cause the L5-S1 disc to suffer wear and tear, bulging, or worse, and put pressure on the sciatic nerve roots.


(a.) An anteverted pelvis preserves the wedge-shaped L5-S1 disc. (b.) A tucked pelvis cannot accommodate this and the lower discs will suffer undue pressure and bulging toward the nerve roots.


Like the Ubong tribesmen and people throughout the nonindustrialized world, these elite runners show both an anteverted pelvis and an upright torso. Unsplash

Running leaning forward

Some running coaches teach a forward lean of the torso, which I agree reproduces some of the benefits of a healthy L5-S1 angle for runners who are currently stiff at that joint and therefore slightly tucked if they remain upright. Leaning forward helps compensate for any lack of L5-S1 angle, and harnesses power from the energy of impact when the back leg pushes off. 

Leaning forward is strongly advocated in the ChiRunning technique, which was developed by Danny Dreyer. You can watch Esther in conversation with Danny here, where he explains his approach.

Graphic over photo of runner in profile showing benefits of leaning forward 
Danny Dreyer advocates a forward lean when running, with shoulders, hips and ankles aligned. This is a useful technique to help orient the pelvis, especially if the L5-S1 angle does not allow for the torso to be upright. It also provides additional momentum.


World-renowned Kenyan runners often run with a good L5-S1 angle that anteverts the pelvis, combined with only a slight forward lean. Flikr

Powerful glutes 

An anteverted pelvis also confers mechanical advantage to the buttock muscles. With the behind behind, they can contract powerfully to pull the legs back and aid propulsion. Under-developed glutes are a common casualty when the pelvis is tucked. 


You can see here that I am running with my pelvis anteverted, and a slight lean forward, both of which put my glutes behind to help power my stride.

It is important that, in an effort to get your behind behind, the anteverted pelvis is not mimicked by simply sticking your bottom back with tension (sway) in the lower back. The pelvis needs to settle into anteversion naturally, with healthy articulation at the L5-S1 joint, relaxed back muscles and hip joints, and healthy alignment throughout the body. Gokhale Method teachers have the techniques and expertise to help you get there without inadvertently creating more postural problems. 

Young woman running with behind behind but swayed back
This runner has her behind behind her—but, as the creases in her top confirm, she is tensing her back into a sway and lifting her front ribcage to get there. Pexels


This footballer has his behind behind with an anteverted pelvis that articulates at L5-S1. His torso remains largely straight, which enables him to twist with good length in his spine, rather than compounding compressed discs and nerves. Pixabay

I find it interesting that a forward-leaning stance which aligns the torso with the extended back leg and supports pelvic anteversion is also a key ingredient in learning to glidewalk. Glidewalking is taught in detail in our Gokhale Method® in-person Foundations and Pop-up courses, and our online Elements course. Glidewalking produces a natural, smooth and powerful gait, which in particular strengthens the glutes and the feet. Students who have learned glidewalking find their running improved by the Downtime Training™of simply walking—but walking well. 

Good hip health

The anteverted pelvis is part of nature’s blueprint for healthy human posture and sound biomechanics. It is no surprise therefore that it confers many benefits throughout the body. An anteverted pelvis gives the best fit and function for the hip joints, avoiding the misalignments that occur with tucking. Poorly aligned hips can cause bursitis, labral tears, and osteoarthritis within the joints, and soft tissue issues such as muscle strains, tendonitis, and ITB (iliotibial band) problems further down. 


Jogging or walking with a tucked pelvis encourages tight hip joints, internal rotation of the feet, legs, and hips, rounding of the torso, and forward head carriage. Pexels

Pain in the knees, lower legs, and feet 

When runners get pain in their knees, lower legs, or feet, one of the last places they are likely to look for a remedy is their pelvic position. They are far more likely to blame their shoes! While the right shoes are important, (see Running P3: How to choose running shoes), it is often a revelation for runners to realize how the angle of the pelvis affects their gait. 

One serious problem with tucking the pelvis that hits runners particularly hard is excessive heel strike. While this may also occur in walking with a tucked pelvis, running or even slow jogging will mean that an unduly forward thrusting front leg will suffer more impact. This may result in not only wear and tear, but immediate and painful damage, as the femoral head (top of the thigh bone) is jammed back into the hip socket, and the knee joint of a more forward and likely more straightened leg is jarred.  Sticking the heel forward is like ramming the brakes on while still stepping on the gas! The answer to a thudding heel strike is not to buy excessively padded shoes, but to antevert the pelvis.


A tucked pelvis points the thighs forward, resulting in an excessive heel strike and jarring through the front leg knee and hip. sportssurgeryclinic.com


This runner has her behind behind, but the orientation of her pelvis comes from a
swayed lumbar area, not from L5-S1. The front of her rib cage and chin are pulled up.
She is about to heel strike—bad news for her straightened front leg and hip joint.
Unsplash

Doing a much better job, an anteverted pelvis:

  • Puts the muscles and soft tissues, especially the glutes, in a position of mechanical advantage, without threatening the lumbar spine
  • Enables better weight distribution and therefore bone health 
  • Places the thigh in a healthier position to absorb forces in the hip socket 
  • Allows landing with a bent front knee, with better shock absorption 
  • Facilitates a light heel/midfoot landing, avoids excessive heel strike, is more energy-efficient

Female runner in back/profile view showing good form and anteverted pelvis 
This runner has good form. Her behind is behind because of a pronounced angle at L5-S1 (anteverted pelvis). Her back remains largely straight, her shoulders back, her neck tall. She will land without unduly jarring her joints. Unsplash

Support for the pelvic organs 

An important benefit of an anteverted pelvis is that the bones of the pubis are able to play their part in supporting the pelvic organs. Organ prolapse and incontinence can affect everyone, especially as we age, and is also a common problem in our culture for women during or after pregnancy. When the pelvis is tucked the organ support is overly reliant on the soft tissues of the pelvic floor, such as the Kegel muscle.

 Two diagrams in profile showing anteverted and tucked pelvis effect on pelvic organs.
(a.) With an anteverted pelvis, the pubic bone is positioned to support the pelvic organs. (b.) With a tucked pelvis, the Kegel muscle is obliged to assume this role.

There is nothing worse than getting a run in and having to use the bathroom, especially if there is not one available! Heather A. Dunfee is a physical therapist in the Mayo Clinic Healthy Living Program, and a certified Pregnancy and Postpartum Corrective Exercise Specialist. She does not refer specifically to the anteverted pelvis, but she is clear that tucking the pelvis is bad news:

For runners, good alignment can help your core to better absorb impact, preventing leaks. For example, a slight forward lean helps to put your deep core "canister" in the best alignment to do its job. Think about stacking your rib cage over your pelvis, something that comes naturally when running uphill. . . Hills are great because they force the body into a position of rib cage over pelvis and untuck the bum.

If you would like guidance on any aspect of your posture and/or running, including pelvic position, consider scheduling an Initial Consultation, online or in person, with a Gokhale Method teacher.

Here are previous running posts you might like:

Running P1: Introduction, Esther Gokhale

Running P2: Meet Your Feet, Michelle Ball 

Running P3: How to choose running shoes, Michelle Ball 

Running P4: Taking care of your knees, Michelle Ball

If you would like to find out more about how the Gokhale Method can help support you, sign up to join one of our upcoming FREE Online Workshops.

Susan’s Success Story

Susan’s Success Story

Susan Taormina
Date


Susan (left) enjoying time with her grandchild and family. 
Susan sent us this photo, commenting, “but check out the C-shaped spine—wow!”

I am a 70-year-old woman. As a young woman I was tall (5’10"), slender, and active as I would ever be raising my six children. 

For the most part, my body and I had a good relationship, but, over time and with the demands of my life, something problematic happened. My body began talking to me: my knee, psoas, sacrum, and lower back hurt, and I also suffered a loss of balance. I mainly saw a chiropractor but also physical therapists, massage therapists, and acupuncturists…the list is long. When you want to function and feel halfway decent, you try everything.

By the time I was 60, I had three fractures in my spine and a diagnosis of osteoporosis. For 10 years I worked hard to control the osteoporosis and did well rebuilding my bones, but even so, I am now 5’6", four inches shorter than I was. Perhaps it is vain to wish every day for the return of my stature, but to stand tall and straight has been a preoccupation. I tried to hide my posture under my clothes, but of course that doesn’t really work! 


Learning to stacksit gave Susan a much-improved position for her piano and organ playing.

In my thirties I started teaching piano and became a church organist. Recently, because of the pandemic, our church music has had to be prerecorded. On Sundays, when the recordings were broadcast, I saw myself seated at the organ and was astonished to see how small and bent over I was. This was not the way I had imagined myself looking. It was horrifying. I knew something had to change.


These people all have open chests and relaxed, posterior shoulders. Young children, our ancestors, 
and diverse populations in nonindustrialized areas of the world today share this healthy posture. 

In spite of the deterioration, I maintained hope of improvement. When I came across Esther Gokhale for the second time in a year, I paid attention. I was inspired by her TEDx talk, interviews, and website. There was wisdom and a depth of insight there that I had not seen before, and a pursuit of positive change that matched my own. There was something compelling in the testimonies of the Gokhale Method alumni, and Esther’s research into ancestral and primal postures. It all rang true and had evidence to back it up. I had to try the Gokhale Method.

For all my efforts and the various things I had tried, nothing up to that point had worked for me. I was afraid that Esther’s approach was not going to work either. I told myself I would give it a year. I started working with Esther and gave her my trust and commitment. I learned my new body awareness methodically through the 18 concise lessons of the Elements online program. At times I worried I would be disappointed again, but Esther’s expectation of a good outcome—combined with her integrity and tenacity—kept me moving forward. 


Susan used to tuck her pelvis and collapse her spine (left). Having learned to antevert her pelvis and 
use her inner corset (right), she now stands tall, regaining length in her torso.

An important step for me was understanding the difference between a tucked pelvis and an anteverted pelvis, and that I could make it happen in my own body. Doing the “inner corset” also made visible changes. I wasn’t bent over from fatigue by the end of the day. I was so grateful. I could be upright again, and I felt back to being myself. Previous to the Elements course, my body had become something to fear; it has now become something I take pleasure in.

So many things have gotten better. I had a tight psoas for decades, which caused pain in my groin. I don’t feel that anymore. Before if I fell asleep on my back, I would wake myself up snoring or run out of breath. That has gone. It had also been difficult to breath when walking; now all of my breathing is much better. Over the winter I have been enjoying barefoot walks along the beach, applying what I have learned about my feet. This attention is paying off and my feet are changing. A small bunion is reducing and the big toe is coming home (Esther said it probably would) while the other toes are relaxing straighter.


Cultivating kidney bean-shaped feet with strong arches helps take pressure off the delicate structures of the forefoot. Susan notices her bunion is reducing and her toes are starting to straighten.

The daily class on the 1-2-3 Move program is very important for me to maintain ongoing improvements—and it keeps me motivated. The online community helps me celebrate and practice what I have gained. I’m inspired by Esther’s beautiful visuals of healthy body alignment and architecture. 


Occasional anatomy snippets woven into the 1-2-3 Move classes 
help participants to understand their own body architecture.

Additionally, the Q&A session following each 13-minute class makes it easy to ask questions. Just last week someone asked a question about the role of rectus abdominis (the six-pack ab muscles) and a huge light shone for me; I realized how these muscles can tuck the pelvis and/or round me forward. Now I let that sort of tension go—and I can stand straighter! I’ve learned how to use my “inner corset” muscles, drawing my deeper abs in and upward like I’m going into ice-cold water. I regularly go quarry swimming, so I know exactly what that feels like!

This entire journey of finding out how my body works has been transformative for me. Best of all, the Gokhale Method has shown me how I can once again live my life upright and pain free. What a gift! 


Five Posture Tips to Power Your Cycling

Five Posture Tips to Power Your Cycling

Tiffany Mann, Gokhale Method Teacher
Date

This is Part 3 of a three-post series on cycling with healthy posture by Gokhale Method teacher and longtime cyclist Tiffany Mann. Read Part 1 and Part 2 here.


Gokhale Method teacher Tiffany Mann is passionate about 
combining her cycling and posture expertise.

Spring has arrived, and perhaps like many people, you want to spend more time on your bike! Maybe you’re already an avid cyclist looking for some tips to make cycling more comfortable and sustainable for years to come; or you’ve taken a break and are ready to step back on the pedals. Perhaps you just want to get up those hills! 

Even if you are a beginner, it is so satisfying and pleasurable to use your own muscle power to propel yourself on this simple machine; but it is still well worth looking at how to use your energy as economically as possible. Cycling doesn’t have to be superhard work, and you can benefit your posture at the same time.

My last blog post focused on keeping your arms, neck, and shoulders comfortable when cycling. In this post I want to pass on some simple tips on how best to pedal and use your legs efficiently. 

As in any physical activity, good form is essential for the best transfer of effort, minimizing fatigue, and reducing wear and tear on the body by using relevant muscles and sparing others. You can still get an excellent whole-body workout if you want to pedal hard, but your chance of injury will be far lower. 

Tip 1. Get your saddle height right 

Having your saddle either too high or too low can make pedaling miserable. The saddle wants to be at an optimal height for the foot, ankle, and lower leg to power the pedal rotation. Too low a saddle, as is unavoidable on too small a bike, and none of your joints can open up enough to transfer optimal power from the muscles. You want an almost full-length pedal stroke that gives a good transfer of power, starting from the glutes and hips, through the quads and to the feet. 


This saddle is too low for comfort and results in inefficient pedaling. 

Have the saddle too high, and the pelvis rocks up and down as each leg in turn overextends to reach the bottom of the pedal stroke. This is not only inefficient in terms of energy transfer but puts a lot of strain on the lower back and sacroiliac joints. If your hamstrings are a reasonable length, they can accommodate a good saddle height without any ill effect or abuse to the hips and low back. Some serious cyclists raise their saddle after they’ve reached a threshold number of miles or time on their bike, as their hamstrings have adapted and lengthened during the ride.  


We have all pedaled since we were toddlers on tricycles. Now that our coordination is more developed
and our
cycles better engineered, pedaling can become a more refined action!
Unsplash

Tip 2. Improve your pedaling power

In cycling, propulsion is from the glutes, thigh, and calf muscles, pushing down and pulling up on the pedals. Instead of just pushing downward on the pedals in a fixed-ankle, one-side-at-a-time action, you want to think of your pedaling motion as continual, circular and smooth, with the whole ankle involved. This takes strength and flexibility in the calf, which needs to alternately contract strongly and elongate. The Achilles tendon that attaches the calf muscles to the heel also gets a healthy workout as the foot moves through its circular motion. When done with good form, cycling not only strengthens our tissues, but can also lengthen them. Gokhale Method students who have learned to propel themselves in walking will already have a good deal of relevant muscle memory and power in their legs and feet and will likely be pleasantly surprised when returning to cycling.


A good pedaling action bestows both efficiency and healthy exercise
 for the foot, ankle, and lower leg.
Wikimedia

Tip 3. Use your feet

You don’t want to be sending your weight, as well as transferring the force of your pedal stroke, onto just the delicate toe bones. Instead, placing the more robust ball of your foot on the pedal will elicit the most power transfer. 

At the bottom of the pedal stroke (the 6 o’clock position) you want to pull the pedal back with your feet. The “pulling up” phase of the pedaling action is most effective when you are clipped into the pedals with cycling shoes, or toe straps, but you can still imagine you are “grabbing” up with your plantar foot muscles inside a regular shoe. Gokhale Method students will already have learned to use their feet strongly when walking by grabbing and then pushing the ground away and behind them, which translates well into cycling. You can learn this grabbing action from our Gokhale Moment Inchworm video here.

The feet are actively engaged. They grab and help push the pedal down, and at the downward-most position, they
start to pull back and then up.

When you are feeling more confident in your cycling and want the extra power that comes from being “attached” to your bicycle, cycling shoes and clipless pedals are a terrific investment that can really up your game. The more you use your feet and ankles the stronger they will become, serving you better in cycling, walking, running, dancing, and more. . .


Have your knees not too bent but not fully extended either. You want a small bend just like an athletic “ready position.” Slight external rotation of the legs and feet allows the knees to track well.

Tip 4. Keep your knees happy

Cycling should actually be good exercise for the knees as it uses the quadricep muscles on the front of the thigh that help stabilize the knee. However, a common threat to the knees is riding with the seat too low, (see Tip 1), which stresses the knee joint and causes inefficient pedaling form and fatigue. 

Your feet also want to be pointing outward just a little. Not quite as much as in healthy standing, which is 10°–15°, but enough to afford a degree of external rotation for your legs. Your knees will be happy tracking at this angle, the same as your feet. This helps avoid pronation in the feet and ankles, and pressure on the inside of your knees. 


These two look set for fun on their customized bike! The boy on the left sits well, while his friend could do with untucking his pelvis. You want your behind behind you and your back straight.

Tip 5. Antevert your pelvis 

A common threat to happy knees is riding with a tucked pelvis. Tucking the pelvis pushes the thighs into a more forward position than they would be in if the pelvis were anteverted. As a result, the far end of the thigh bones, where they form the upper half of the knee joints, are also more forward. These “overshot” knees then have a poor alignment for distributing downward force through the joint and into the lower legs and feet and are much more likely to suffer painful wear and tear. 

An anteverted pelvis serves both seated and standing pedaling positions well.

Good posture is a bit like a jigsaw puzzle—get a prize piece like the pelvis in the right position and many things fall into place. An anteverted rather than a tucked pelvis is often the missing piece for beneficial cycling posture. Having already set up some external rotation of your thigh bones, you will have created the space needed for your pelvis to tip and settle forward into anteversion. This puts your behind behind you, and from here, whether sitting or standing, your buttocks are in a position of mechanical advantage to drive your ride. Happy pedaling!


Riding with a tucked pelvis disadvantages the glutes and encourages a C-shaped spine.
It is very common in both amateur and professional cyclists. Unsplash


An anteverted pelvis brings your behind out behind you, giving more power to your pedaling, whether you are sitting or standing, and enabling a straight axis for your spine. 

If you are concerned about storing your bike securely with easy access, we recommend this article, which gives helpful advice on finding the best option to store your bike safely in a bike shed or a garden shed. Click here. 

If back pain or other musculoskeletal problems have been holding you back from cycling, or you would like to improve your fitness and posture when cycling, consider joining our Gokhale Exercise program. It will inspire and teach you how to apply Gokhale Method principles while on your bike, and in everything you do. Sign up for your 7-day free trial here.

If you are interested in learning the Gokhale Method principles referred to in this blog, in depth and customized to your needs, we recommend our Elements course (one-on-one coaching online), our Foundations Course (one-on-one or small groups in-person), or Pop-up Course (not available during COVID). 

Getting on a bike is a fabulous way to bring healthy activity, energy, and better posture into your life. We hope you feel inspired and empowered to do just that!

Please share your posture and cycling experiences here:

How Joan Baez Got Her Booty Back at Age 79

How Joan Baez Got Her Booty Back at Age 79

​​​​​​​Esther Gokhale
Date


Joan Baez has upgraded her posture since this photo was taken, with benefits for her whole body.

If you’ve been participating in our ongoing Posture 1-2-3 Challenge for alumni, chances are you’ve seen my longtime student, Joan Baez, who regularly joins in. At age 79, she’s sturdy and beautiful, with shapely legs, toned arms, and a peachy, perky butt. Although we’ve all enjoyed her bodacious pipes for many decades, she hasn’t always been such a well-rounded posture student. In her 20s and 30s, her boombox was highly functional, but her booty was lacking.

Case in point: in 1973, at age 32, Joan visited Sing Sing to perform for the people imprisoned there. Her set list included the rousing anthem “I Shall Be Released,” followed by “Viva Mi Patria Bolivia,” a duet with her sister Mimi Fariña. Here she is, singing and playing her trusty guitar, connecting with her audience, doe-eyed and full-voiced in her signature way.

But below the belt things are different. At 3:56 you see a shot of Joan’s behind, and that it doesn’t fill out her pants. Her pants fall poorly on her derriere, because there isn’t the tone and muscle to hold the folds. Her voice sings, but her glutes hit a flat note.


The folds in the fabric of Joan’s pants over her backside while standing upright indicate a tucked pelvis and underdeveloped glutes.

Part of the reason her glutes were not developed is that she used to tuck her pelvis, which puts the glutes in a position of mechanical disadvantage. Tucking the pelvis also sets the framework for rounding the upper spine. This curvature — and the pain it caused her neck — is what she came to me for and what we have worked to transform.


Joan tucking her pelvis while playing guitar and singing.


Young Joan demonstrating a tucked pelvis and rounded upper spine while sitting on the grass.

A flat butt and tucked pelvis aren’t uniquely Joan’s problems. In fact, “glute amnesia” is widespread in our industrialized, increasingly sedentary society. For those of you who share this problem, we’ve developed a special Free Online Workshop called Wake Up Your Glutes: They Snooze, You Lose. If you are available to attend tomorrow, I will be delighted to teach you how to rouse your glutes in their natural context, which is walking. 

Joan is quite diligent about doing her exercises and staying active. She has also done a lot of self-care in general, for her body, mind, and spirit. The results are obvious: 


Joan in my garden last year, preparing to pick some calendula with a deep, healthy hip-hinge and her behind well behind.


Joan celebrating her 79th birthday at Yosemite. Note her excellent muscle tone and beautiful upright posture. Image courtesy Joan Baez.

The moral of this story is that aging doesn’t have to mean decline. You can actually improve with age, as Joan has. Yes, it takes a certain amount of investment and learning and discipline in implementing, but you can change. You can improve. Let’s do it! Let’s join Joan, let’s get our walking shoes, and let’s be walking down the line...


Posture Differences in Elite and Plebeian Ancient Egyptians

Posture Differences in Elite and Plebeian Ancient Egyptians

Esther Gokhale
Date


This famous bust of Nefertiti (c. 1370 – c. 1330 BC) exhibits a forward-protruded head. Original image courtesy Wikipedia user Philip Pikart under CC-BY-SA 3.0.

In my travels, I enjoy visiting museums. In a concentrated space and in a short few hours, I am able to travel back in time and over large distances, and compare people from different cultures. What a remarkable gift from the craftspeople of the past!  

Many museums have a well-developed Egyptian collection. The Egyptians’ expertise in preserving their dead as well as the dry Egyptian climate has yielded a bounty of specimens from the distant past. Egyptian artifacts are often spectacular and modern audiences are drawn to Egyptian mummies, pyramids, thrones, and temples. So we get to enjoy glimpses into ancient Egypt remarkably easily.

Most people from the past, as evidenced by ancient art and sculpture, had excellent posture and musculoskeletal health. The pharaohs and upper crust of ancient Egypt, however, stand out as exceptions. Sitting on their thrones or standing in special ceremonies, they almost always have tucked pelvises and forward-protruding heads. Nefertiti (as seen above) is an example of an Egyptian royal who has her head “parked” extremely forward. Correspondingly, examinations of the mummified remains of pharaohs report advanced arthritis in the joints — much like what we find in modern populations.


Renenutet (shown here) and her husband Runy were part of Egyptian nobility in the reign of Seti I (1294 - 1279 BC). They served in local temples. Notice her tucked pelvis and protruded head and shoulders that are similar to problematic modern posture.


This relief from the 18th dynasty (c. 1335 BC) shows a royal couple (possibly Akhenaten and Nefertiti) in a garden. Notice their posture shows similar distortions to those we see in modern times: tucked pelvis, locked knees, lack of abdominal tone, and forward-protruded head. Original image courtesy Andreas Praefcke on Wikipedia.

By contrast, carvings and sculptures of Egyptian laborers — carrying palanquins, rowing ceremonial boats, and doing other manual work — have beautiful and healthy posture. They model an anteverted pelvis, erect spine, and vertical neck similar to those seen in non-industrial cultures the world over.


This funerary offering bearer (c. 1980 BC) shows excellent posture: a J-spine with anteverted pelvis and elongated spine, and posterior shoulders.


This close-up of the funerary offering bearer above shows her feet pointed slightly outwards and the placement of her behind behind her.


The workers on this funeral boat show excellent posture as they transport coffins in Ancient Egypt (c. 1980 BC).


This ancient Egyptian worker exhibits a perfect hip-hinge with shoulders remaining back.

What are we observing here? What made the pharaohs suffer the same poor musculoskeletal health we do? Was it affluence? Was it a departure from a working-class lifestyle? Was it a sedentary lifestyle? Was it fashion? 

If you live in a large city, you almost certainly have access to a collection of Egyptian art. The next time you visit the collection, please tell us about your observations. Or take a few photos and post or send them to us so we can comment on them.

“I’ve Been as Lucky as I’ve Been Unlucky:” Cynthia’s Story

“I’ve Been as Lucky as I’ve Been Unlucky:” Cynthia’s Story

Angela Häkkilä
Date

“I would do anything for Esther. She’s the epitome of goodness.” Like many Gokhale Method students local to the Bay Area, Cynthia deeply values her personal relationship with Esther. Cynthia is 72 years old and a native Californian. Her husband, Charlie, is also a native Californian, and they love their home state.

Cynthia has always valued being in good shape and pursuing outdoor activities. She started backpacking after she got her undergraduate degree in Spanish. She continued backpacking while teaching Spanish, and during a backpacking trip in the Canadian Rockies, she realized she actually wanted to be a geologist. She had with her a book on local geology, and says that “the exposure of the sedimentary, folded, metamorphosed strata in the Rockies would make anyone into a geologist.” She returned to school for a geology degree and began working at the United States Geological Survey (USGS).


The Canadian Rockies, where Cynthia first fell in love with geology. Image courtesy Matt Thomason on Unsplash.


As a young geologist in the mid-1970s, Cynthia spent long summers over 3 years doing fieldwork in remote locations in the Alaskan wilderness. She backpacked for recreation in California and also for fieldwork in Alaska with her boss: she was very strong, especially in her legs.


Cynthia doing geologic mapping in Alaska in the 1970s. Image supplied.
 

Earlier in her life, posture had been something Cynthia’s parents always stressed. She remembers her dad telling her to imagine a wire lifting her chest skyward. After working with Esther, she realized her lower back was swayed, probably as a result of sticking her chest out and pulling her shoulders back for so many years.

Cynthia first heard about Esther from her husband Charlie, who was referred to Esther for lower back pain by his physician. Cynthia decided to begin working with Esther for problems related to a severe accident, in which she was badly mauled by a black bear.
 

A sudden transition and new priorities
The harrowing attack occurred during geological fieldwork in the Alaskan wilderness, and left Cynthia with only 6 inches of her left arm below the shoulder. Nothing remained of her right arm. Thankfully, Cynthia was able to survive and heal from the bear attack and various follow-up operations, including amputations and debriding.

The bear attack meant that Cynthia had to learn a whole new relationship with her body. She needed different physical strengths than those she had before the accident. She initially had physical therapy for limberness and flexibility and subsequently developed a regimen of daily strengthening and stretching exercises. Cynthia thinks her problems with her lower back — which has inoperable disc problems, including degeneration and stenosis — and neck are a result of having lost her arms and having to wear artificial arms, which together weigh seven pounds and are connected by several straps behind her neck.

Another of Cynthia’s particular challenges derives from overuse of the parts of her body used to compensate for not having arms. She does a lot with her feet: for example, to open a door, she will often do a high kick and use her foot to turn the doorknob. While her husband was off doing his own fieldwork over nearly 40 summers, she used a high, raised barstool and leaned back to use her feet for tasks like cutting up her food and doing dishes. This contributed to her back strain.


For years, Cynthia used a modified barstool to reach the kitchen counter and used her feet for a variety of daily tasks. This resulted in a tucked pelvis. Image supplied.


Cynthia uses her feet and a pencil eraser to turn pages in a book too heavy to be held by her artificial arms. Image supplied.


A particularly unique aspect of Cynthia’s posture is asymmetry in her glutes, which results from having to frequently raise her right leg to do things in daily life. Although she was left-handed before her accident, it turns out she is strongly right-footed. This led to a pattern of frequently tucking her left buttock in order to lift her right leg higher.

Before the accident, Cynthia played Latin American and flamenco guitar, but the harmonica turned out to be the only instrument she could play without arms. She grew up loving the jazz standards her multi-instrumentalist dad introduced her to, and she now plays these same tunes with the band she manages and performs with. “It’s a real joy” to play the harmonica. Playing harmonica also contributes to her posture situation: while playing, Cynthia must frequently move her head side to side and up and down (for sharps and flats) to play her modified hands-free chromatic 12-hole harmonica. This translates to lots of neck work while playing, and can lead to strain.


Cynthia playing her modified 12-hole chromatic harmonica with her band. Image supplied.


A closer look at a different style of hands-free harmonica rack. Image courtesy Steven Wright on Pixabay.


Playing harmonica without posture instruction can lead to neck strain for any musician. Image courtesy Matt Seymour on Unsplash.


Support for her unique physiological needs is what Cynthia has been working on with Esther. Although their acquaintance stretches back decades, within the past year, Cynthia signed up for a series of six private lessons with Esther to focus on her particular problems.

The most obvious changes Cynthia has seen since beginning the Gokhale Method are improvements to her bodily symmetry, strength, and functionality. Cynthia is happy to report that she has “completely corrected” her gluteal asymmetry with glidewalking and strengthening exercises. Her private lessons and SpineTracker™have taught her how to anchor her ribs and to leave her imaginary tail behind her. Those techniques, along with hip-hinging, stacksitting, and tallstanding, have helped reduce her overuse injuries. With the addition of swimming and hiking, also done with good form, she keeps her back and body strong. Though her structural problems are such that she's not totally free of pain, it is definitely reduced and less frequent.
 

Multi-faceted woman
Cynthia is now a geologist emerita volunteer at the USGS. She hasn’t done any field work since 2010, but has a large number of geological samples from many years of collecting, to work with and to write research papers on. She continues to collaborate with other geologists in the US, especially in Alaska, and in Canada.

Along with playing harmonica, hiking remains one of Cynthia’s longtime passions. She recently traveled with her husband to view the famed California wildflower blooms. She’s now reconnected with friends from elementary and high school — some of whom she’s known since kindergarten — to do a weekly hike. Hiking and walking are very important to Cynthia’s well-being. So is swimming for nearly an hour at a time, three times a week. Both swimming and hiking are done without her artificial arms on — "back to my core body," as she puts it. Both activities are opportunities for her to use Gokhale Method techniques to stretch, which really keeps her back from hurting.


A poppy superbloom in southern California. Image courtesy Mike Ostrovsky on Unsplash.


Without her “unbelievably fantastic husband,” Cynthia insists she couldn’t do any of these things. He helps her out of the pool, pulling her up by what remains of her left arm, and is her roadie for harmonica gigs, carrying her microphone, amplifier, and music stand and keeps her harmonica clean and functioning. She says, “I’m as lucky as I was unlucky…to have found my perfect soul mate.” Other than having lost her arms and the typical discomforts she has from getting older, “everything else couldn’t be better” in her life.


Cynthia and her husband, Charlie, doing geological fieldwork in the Alaska Range. Image supplied.


Increased functionality and reduced pain for young and old alike
In Cynthia’s opinion, the most helpful thing about Gokhale Method techniques is their daily utility in life. She feels strongly that if younger people can learn the Gokhale Method “before they’re old and hurting,” it will function as preventative care to help them avoid degeneration as they age. She plans to introduce her son and daughter-in-law to the Gokhale Method by taking a DVD copy of Back Pain: The Primal Posture Solution with her when she goes to visit them in Pittsburgh this summer. Cynthia wants to help them keep from falling prey to the posture problems so common in today’s twenty- and thirty-somethings: the habitually slouched and tucked posture of the laptop-and-cell-phone generation.

She also considers it “so important” to be able to counteract the unhealthy ergonomic design found all around us: backward-tilted car seats, forward-jutting headrests, airline seats, auditorium seats, and on and on. All of these, in Cynthia’s words, are “fighting against good posture,” and she wishes Esther could have been consulted during the design stage. Thankfully, for now, the Gokhale Method is available to help Cynthia — and all of us — navigate a human-made world not designed for healthful posture.

How to Choose a Bike Seat for Good Posture (Part 2)

How to Choose a Bike Seat for Good Posture (Part 2)

Esther Gokhale
Date

In our part 1 blog post on the topic of bikes, we went over how to find the right frame for you. The next important step is to find the right seat for your body and your bike, since without a decent seat you may be uncomfortable, or may find it challenging to have healthy posture. Your seat should distribute your weight across regions comfortably; it should have padding, but not so much that it lacks support and stability; it should be set at an angle that allows your pelvis to antevert (that is, tip forward relative to the angle of your spine.) A good seat is crucial whether you prefer to be upright and stacksit, or if you prefer a racing style with a hiphinge. Here’s what you need to know about bike seats to find the right one for you:


Seat shape and angle: On most bike seats, it’s possible to change not just the height, but the horizontal position and the tilt of the seat. Make these adjustments carefully on any bike you plan to ride regularly. A small difference in the seat position can have a big difference on your posture as well as your comfort.

The angle of your bike seat—because it makes anteversion uncomfortable or because it tilts you too far forward or backward—may be causing you to tilt your pelvis in a direction that doesn’t allow for good back positioning. Many people prefer bike seats that carry most of their weight on their sitz bones (further back) rather than on the tissues under the pubic bone (further forward), because there are fewer sensitive nerves endings around your sitz bones. So if the front of your seat is tilted too far up (as in the image above left), this can encourage you to tuck your pelvis in an effort to relieve pressure on the pubic bone. And if the seat is really tilted too far up, it forces you into a tuck because of the backward slope of the seat—picture this as the opposite of the wedge you would use to facilitate stacksitting. If you try to sit on your bike with an anteverted pelvis (more angled than the angle of the hiphinge you need to reach your handlebars), and your seat causes you discomfort, you may need to angle the front of the seat downward.

Too much downward tilt is also problematic. If your seat makes you feel as though you are slipping forward off it when you antevert your pelvis, you will need to tip it back more so that you stay comfortably in place without having to brace all your weight against your handlebars. If your seat is tilted forward so that it doesn’t sufficiently ‘cradle’ your pelvis at the right angle, you may also be tucking in an effort to get your bottom further back on the seat.

It is possible that after playing with your seat to find a comfortable middle-ground, you will discover you need a new seat altogether. You should look for one that accommodates the shape and size of your sitz bones and carries your weight in the least-sensitive areas when you are properly hiphinging on your bike. Some seats are wider and may cause chafing against your thigh; you may need a cutout in your seat to relieve pressure under your public bone. To find a seat that matches your body, you may need to do a lot of testing!

Note that many newer “comfort” seats have a huge amount of padding and can amount to sitting on a small mound, rather than distributing your weight and ‘cradling’ your bottom. This extreme amount of padding can actually make it harder to comfortably antevert your pelvis:


Because these seats fall away from a padded peak, your weight is not well distributed; to find a comfortable spot for the pressure to land, you may end up tucking your pelvis so your sitz bones take all the force.

Older “saddle” style bike seats may appear too firm, but they can cradle your pelvis, distribute your weight comfortably, and promote stacking.


The slightly bowl-shaped curve of these seats provides lift in the back like a wedge, but catches your from sliding forward with the projection in the front.

Firmness and fabric covering on the seat will also make a difference in your riding experience. A slippery fabric may cause you to always be sliding around; a squishy seat may feel most comfortable at first, but end up chafing or lacking support. Finding the ideal seat is best accomplished through a lot of testing and laps around the block, so we recommend you find a very patient bike shop attendant to help you with this selection. You may need to purchase several seats so you can test them out on longer rides over several days before returning the rejects.

In addition to the more standard styles found in most bike shops, there are also many kinds of specialty seats available online which may work best for your needs and preferences:


Both of these seats provide a nice bowl shape that can support anteversion and comfortably distribute weight. Personal preference will dictate whether these fit your body, and enable a proper range of movement and a stable seat while on your bicycle.

Getting moving: When it’s time to actually get on your bike, how should you do it? The most gentle way to mount your bike will be to start by straddling the frame in front of the seat. Try doing this next to a railing or wall where you can brace yourself for balance, and move slowly while engaging your inner corset.


This young girl shows the ideal way to start your ride—straddle the frame and tallstand to align your pelvis and spine.

If you are not adept at swinging one leg through the air, or your balance isn’t what it used to be, a bike frame that dips very low in front (like comfort bikes) may be necessary to make getting on and off your bicycle easy. Make sure you can easily step over your frame without hurting your back or losing balance.


This comfort cruiser is ideal for maintaining a relaxed upright posture, and has a low bar in the front that makes getting on and off the bike a breeze!

Before you get up your seat, perform a shoulder roll and slowly reach your arms to your handlebars, to make sure you maintain good shoulder positioning with your elbows close to your sides, and no slump in the upper back. Keeping your shoulders in position may deepen the amount of bend you need to sit with, which will dictate how anteverted your pelvis should be.

When you get up onto your seat, you will have to perform an advanced hiphinge/stacksit, one that is done by bringing your hips back and up, rather than your torso down (while moving and balancing!). As you stand up on your pedals, make sure you start with a straight back, engage your rib anchor, and then slowly deepen your hiphinge as you move your hips back and up onto the seat, keeping your sitz bones out behind you.


Start hiphinging as you stand up on your pedals, before moving your bottom onto your seat.

The motion is similar to hiphinging before lowering down onto a chair for stacksitting:


As your lift yourself into your bike seat, you will need to hiphinge to some degree, more or less depending on the style of your bike and how upright it allows you to be.

If you need to adjust while you are on the move, you can make sure you are properly anteverted by lifting your bottom up a little and repositioning your sitz bones even farther behind you.

As you ride, you can lessen the work of your back, shoulder, forearm, and wrist muscles by keeping as much weight in your seat as possible, rather than supporting yourself on your handlebars. If you have experienced wrist or arm pain, you should consider a frame and seat that allows you to stacksit, since being fully upright will save your wrists from unnecessary stress.

Engaging your inner corset as you ride will also protect you from bumps and jostling. Because you will be in motion, manually checking your position or looking in a mirror is likely impossible, so you will have to rely on your proprioception and your body’s comfort levels to judge how well you are maintaining your posture. But like with everything else, practice makes perfect; with some repetition and regular breaks, you can soon master the Gokhale Method on two wheels!

Do you have any experiences to share about bike seats?


How to Ride a Bike with Good Posture (Part 1)

How to Ride a Bike with Good Posture (Part 1)

Esther Gokhale
Date

Most people, when they ride a bike, tuck their pelvis so the rear portion of their sitz bones rests on the seat. Then they lean over to reach the handlebars causing a lot of spine curvature. With the additional tension created from pushing the pedals and holding the handlebars, and the bouncing and jostling from the road, riding a bike this way can be a painful and harmful activity.


Many modern bike riders look like Mr. Bean when they ride a bike, sitting with an unnaturally curved spine.


Each of these modern-day bikers has a rounded spine and craned neck. Image courtesy John Matrix at bikelist.org.

With a few adjustments, riding a bike can be a harmonious and healthful activity. By using hiphinging and stacksitting, and by making sure you have the right bike and the right settings, you can enjoy this way of exercising and getting around. Here are the key things to look for in a bike frame:

Bike style: In some areas, road bikes and touring bikes—styles that require a deep bend to reach the handlebars—are very common. In other places, cruisers, hybrids, and flat-foot ‘comfort bikes’ are the norm. Pick a style that works best for you, but if you experience back pain, an upright model will likely more comfortable and conducive to good posture.

An additional advantage of an upright bike is that you won’t need much hamstring flexibility and back strength to maintain a J-spine. An upright bike allows you to stacksit on your seat with an easily maintained healthy neck position.


This comfort cruiser is ideal for maintaining a relaxed upright posture. It also has a low bar in the front that makes getting on and off the bike easy.


Shailene Woodley rides a bike with close-swooping handle bars, which make it easy to ride upright with the shoulders back.


This woman from yesteryear demonstrates an excellent J-spine on a ‘comfort’ frame that allows her to stacksit and easily keep her shoulders back. 


Here Kim Kardashian rides an upright with cruiser handlebars. With a slight hiphinge, she is able to maintain healthy spine and neck alignment. This position doesn’t require great hamstring flexibility; it does requires slightly more work than stacksitting.

For those who prefer a more aerodynamic racing style, you will need to do a deep hiphinge. It can be challenging to find a seat that allows for appropriate and comfortable pelvic anteversion. I will write more about bike seats in an upcoming sequel post.


To get closer to a racing position with your torso more horizontal, you will need a pronounced hiphinge to maintain a straight spine. This woman hiphinges quite a bit, but stops short of ideal and therefore has a slightly rounded lumbar spine. Ideally, you pivot your head upwards on the neck rather than crane the neck to look ahead (more on this in a future post). 

Frame size: For good bicycling posture, you will need an appropriately sized bike frame that allows you to maintain a relaxed shoulder and neck position, and allows you to touch your feet to the ground from your seat. The handlebars need to be within reach without your shoulders pulling forward. 


With a little effort, you can find just the right size and style frame to keep you straight and pain-free!

With With good posture and a good bike fit, biking is a pleasure to observe and experience.

The more upright you can be on your bike, the less work you will have to do to maintain your J-spine.

Children often maintain a J-spine on bikes without too much trouble. Children’s bikes are rarely designed for aerodynamic racing, but rather for ease of learning on.

A frame that is too small can cause you to scrunch up, tuck your pelvis, and round your spine. A frame that is too large can pull your shoulders too far forward to reach the handlebars. When your handlebars are in the wrong place and you rest a lot of weight on them, you may create shoulder and neck tension from bracing yourself continuously.


This rider’s bike is too small for him, resulting in a tucked pelvis and rounded spine.

If you are exceptionally tall, you may find it difficult to find a frame that is tall enough to fit you. If you need to lift your seat to its max to create enough legroom for yourself, consider also lifting your handlebars. There are extensions that can be attached to the stem of the handlebars, to bring them closer or farther away, as well as to add height. Your frame needs to be long enough to comfortably reach between seat and handlebars without hitting your knees or scrunching your torso.


This tall rider is having trouble fitting onto a too-small frame—the distance between the handlebars and seat is too short for his torso to fit without buckling at the spine.

For smaller-than-average adults, it is sometimes difficult to find a petite frame that allows you to lower the seat enough to reach the ground, without this causing the handlebars to be uncomfortably out of reach. Again, there are adjustable stems available for handlebars that are shorter than average, or can tilt the handlebars closer to you. With many bike seats, you can also adjust the seat position horizontally, and it may be easier to slide the seat closer to the handlebars than to bring the handlebars closer to the seat. Just make sure that your seat isn’t so far forward that pedaling becomes awkward or uncomfortable.

How well does your bike fit you? What has your experience been riding different kinds of bicycles? How good is your posture when you ride? Please do share!


Join us in an upcoming Free Workshop (online or in person).  

Find a Foundations Course in your area to get the full training on the Gokhale Method!  

We also offer in person or online Initial Consultations with any of our qualified Gokhale Method teachers.

Sitting: Is It Hurting You?

Sitting: Is It Hurting You?

Esther Gokhale
Date

Sitting has been much maligned in the last decade. News sources love to dramatize the issue, and you can find many alarming headlines—such as, “Sitting will kill you, even if you exercise” from CNN in 2015. The debate about the various risks of sitting and possible ways to mitigate them is raging, and articles and research range from “sitting is the new smoking” to “sitting isn’t actually bad for you.”

 
Sitting: is it bad for you?

In the last few years, some research has seemed to backtrack or qualify the fears of the past, making a distinction between sitting for work versus sitting in front of the TV; news articles have begun to note the higher risks of sitting for those who are obese or inactive, and the potentially minimal risks of sitting for otherwise healthy adults. Just two years after telling us that sitting will kill us, CNN now claims, “Sitting might not be so bad for you after all.” There are also studies now suggesting that standing presents its own risks and problems including hospitalization due to varicose veins and inreased risk of atherosclerosis. In any case, studies show that after one month, users of standing desks return to sitting. 


People have been spending long hours each day sitting before the rise of ailments like heart disease and diabetes—is sitting really so bad for us? 

So what are we to believe? Do we sit, or stand—or are both harmful? You have to earn your living some way, and if it’s not going to be sitting, it’s going to be standing. All the back-and-forth in the media might have you believe the trendy guideline “the best position is the next position.” To me, this is a rather defeatist take on the human body. I believe all positions are good for you—if done with good posture, and in moderation.


Many famous thinkers can be quoted on the benefits of sitting calmly.

What is overlooked in all the studies and articles on the subject, is our sitting form and our furniture. Beyond one article that explored the benefits of sitting reclined, which is a relaxing but not a very practical posture, the medical literature seldom touches on how people sit, what they sit on, and what difference these can make to health and back pain. 


Bad furniture can contribute to harmful sitting, but even the best-shaped furniture can’t force you into a good posture. Compare the woman on the left, sitting with a tucked pelvis and rounded spine, to the woman on the right who uses the seat shape to her advantage, stacking her spine effortlessly on top of an anteverted pelvis.

In my experience, a person’s posture, what the person is doing while sitting, and what they are sitting on makes a huge health difference, both through correlated factors and through causation. Sitting with poor posture, whether from habit or from bad furniture, has many negative side effects, from causing joint and muscle pain in the back (and as we know, chronic back pain can bring down your mood and keep you from being active), to limiting lung capacity and circulation, which hinders the body’s ability to heal, remove toxins, and circulate oxygen. Even just being able to breath more deeply can have wonderful effects on physical and mental health, boosting energy, digestion, and mood. All these processes are linked, and when one suffers, it is no surprise that other weak spots in a person’s system can take a big hit, even to the extent of increasing the risk of health issues like heart disease or diabetes.


Sitting slouched all day will leave this surgeon tired and in pain, and less able to effectively help others. 

Apart from these direct effects, someone who sits with good form may be more likely to practice other beneficial health habits, like daily exercise and eating a healthy diet; while someone in the habit of sitting in front of the TV, unmoving for hours at a time is likely to harbor other unhealthy habits.


Sitting with good form can allow you to enjoy other activities that enrich your life and help you maintain mental and physical health.


These women in Burkina Faso are both working and relaxed as they sit for several hours spinning cotton. 


This baby naturally sits with good posture, and surely does not find it tiring or uncomfortable in the least. 

So wave goodbye to your anxiety about whether your desk job or your 3-hour seminar are going to give you health woes. Work on your form, maintain healthy habits like daily exercise and limited TV-watching (or other forms of lazy sitting), and take frequent breaks to move around and get your heart rate up a little. Sitting is a natural human activity, and your body is strong enough to handle moderate amounts of any position, when it’s done well.

 
Sometimes, simply by sitting, the soul collects wisdom.
- Zen proverb


Join us in an upcoming Free Workshop (online or in person).  

Find a Foundations Course in your area to get the full training on the Gokhale Method!  

We also offer in person or online Initial Consultations with any of our qualified Gokhale Method teachers.

Subscribe to tucked pelvis