L5-S1

How to Swim with Healthy Posture: Breaststroke

How to Swim with Healthy Posture: Breaststroke

Esther Gokhale
Date

Vacation time is in full swing in the northern hemisphere. For many of us, being beachside or poolside gets us yearning for a dip, a splash, and a swim. And I’m guessing that many of us have been mesmerized and inspired by watching the Olympic pool athletes in action. 

Young girl splashing/jumping in swimming pool.
Swimming can be fun for all ages and abilities—and healthy posture keeps it back pain free. Image from Unsplash

In this blog post we’ll discuss breaststroke, which happens to be my favorite way of swimming, and how healthy posture enables you to swim breaststroke better, and avoid the neck and back aches that some people experience after. 

Swimming starts with the inner corset

Have you ever wondered why some swimmers manage to move so well through the water? Here are some things they are likely doing: 

  • They are activating their inner corset strongly. This enables the trunk and spine to maintain its alignment in an aquadynamic position, reducing drag.
  • Their limb movements originate from the large trunk muscles of the back, chest, psoas, and gluteal muscles, which produce the most power. 
  • These two things enable an efficient, coordinated, smooth technique that avoids “flailing” in various directions and dissipating energy. 

There are many preferred variations with arm and leg angles, hand and finger positions, cadence, and so on. But these are details compared with the all-important strong inner corset. Once your torso has lost its structural integrity, any movement you generate will work partially against you, rather than contribute to propulsion.

Gokhale Method teacher Clare Chapman using her inner corset walking in a pool. 
We need our inner corset in many activities to prevent distortions of the spine. Maintaining a straight course walking in the pool takes a strongly activated inner corset and is excellent prep for swimming.

The clue’s in the name

The name “breaststroke” is a good descriptor for the chest-opening benefits of this stroke. Done well, breaststroke can be a great antidote to many aspects of modern life that encourage us into stooped posture, rounding our shoulders, collapsing our chest, and breathing into our belly. As the hands and arms pull back, most of the muscle power behind that action comes from the upper back and rhomboids contracting to draw the shoulders back. We simultaneously open the ribcage and chest to fill the lungs.

How to breathe in but not sway your back

Breaststroke has an advantage over crawl in that breathing in is relatively easy while your head is well above the waterline. If, however, the lifting of the upper body happens in the upper lumbar spine rather than at L5-S1, the result is likely to be an achy neck and/or low back. 

Professional or elite breaststroke swimmers have the strength and thrust to heave a large part of their upper body up out of the water, bending back exclusively at L5-S1; the upper lumbar spine and neck then have minimal need to extend back, if at all.

Olympic Gold Medalist Adam Peaty pulls up with straight spine in breaststroke.
Olympic Gold Medalist Adam Peaty maintains a largely straight spine throughout most of his stroke. Image from Wikimedia

Cecily Frederick in a back dive with a healthy L5-S1 backbend.
Cecily Frederick, a teacher of the Gokhale Method for many years, does a back dive with a healthy L5-S1 backbend—her upper lumbar area through to her head remains aligned straight. 

Whatever your level of swimming, it is important when swimming breaststroke to counter any habit of lifting and swaying from the upper lumbar spine. The solution to this habit is to learn to engage the rib anchor muscles very strongly; with your rib anchor in place, you can learn to cultivate a healthy J-shaped spine rather than an S-shaped spine. You can learn more about spine shape here.

The posture benefits of the exhale phase

During the exhale phase the body settles horizontally into the water. This brings the great advantage of being able to rest, recover, and prepare the limbs for the next stroke. Part of this will include gliding through the water, which is conducive to recruiting the inner corset to steady and slenderize you. It offers a solid platform from which to launch the next stroke.

Male swimmer gliding face down horizontally, arms out ahead.
Practice floating or gliding through the water in a face-down, horizontal position. Then apply this to your stroke. Image from Pexels

If you don’t have the confidence to swim with your head in the water, consider gradually building familiarity with this skill with a friend or sympathetic swimming coach. Most people find it well worth mastering and, approached in the right way, much more enjoyable and comfortable. Wear goggles so that you can still see. Snorkels and full-face snorkels can be a useful measure for getting used to being face down in the water and experiencing the advantages of swimming in a horizontal position. 

Man and young girl snorkeling, from above.
Snorkeling is a great way to get used to swimming in a face-down position with a long, more relaxed neck. Image from Unsplash

Hips and kicks

If your hips are very stiff, then you will benefit from breaststroke’s built-in opportunity to gradually increase your range of motion and muscular strength without loading the hip joint. 

While it’s impressive to watch someone kicking wide with strong, flexible hips, it is not necessary, or even optimal, to go very wide with the legs. Watching a bird’s eye view of modern Olympic breaststrokers, you may be surprised by the narrowness of their kick. A narrower kick turns out to be more explosive and minimizes drag. Adam Peaty, the fastest breaststroker on the planet, estimates that up to 70% of his speed is generated by this narrow kick.  

A narrow kick also makes breaststroke more accessible, especially for people with a limited range of motion in one or both hips. To narrow your kick, hold a pull buoy or two between the thighs as you swim. This leg arrangement also helps you to pattern healthy external rotation in your hips, legs, and feet, so you have a carry-over benefit for your land-based posture too!

A narrowed breaststroke kick has the advantages of speed, power, and developing external rotation in the legs. These young swimmers are training with a pull buoy.

If you have a pelvic rotation and/or SI joint instability, you may be prone to difficulties when attempting a wider kick; you are more likely to kick asymmetrically (called a screw kick), which is inefficient, and possibly risks injury. A narrow kick reduces these complications.

Legs externally rotated, a J-shaped spine, shoulders posterior, and an anchored rib cage, are not just tips for swimmers. These healthy posture principles are taught in our in-person Foundations course, one-day Pop-up course, our online Elements course, and our Gokhale Exercise program. Our students often report how much their swimming improves simply by applying these techniques.

Best next action steps for newcomers

If you would like insight on your posture, in and out of the pool, consider scheduling an Initial Consultation, online, or in person.

You can sign up below to join one of our upcoming FREE Online Workshops. . .

Clare’s Gokhale Method® Success Story

Clare’s Gokhale Method® Success Story

Excerpts from an interview with Clare Rosenfield
Date

In January and February this year I took the Gokhale Method Elements course, which consists of 18 brief (13 minute) but potent lessons. I would like to share my experience of the Gokhale Method with you in this blog post.

My goals were to find out how to sit, stand, and walk well, so that I don’t overstress the scoliotic parts of my back. I was also in search of more comfortable and beneficial sleeping positions. I felt I needed guidance to help me develop a better sense of my body posture and alignment. To be able to do a one-on-one course online made this possible for me. 

It was only when I saw the difference between my “Before” and “After” pictures that I realized just how much change it was possible to make to my posture in such a relatively short period. 

Clare Rosenfield standing side on for Before and After photos.
Learning to stand well has been transformational for me. You can see that I used to park my hips forward and sway back, pressuring on my lower spine and sending my neck forward—little wonder I was in so much pain. Though still a work in progress, I know how to align my weight better throughout my whole body.

I have always enjoyed exercise, movement, and body work, including hiking, Qigong, and yoga. I now have a healthy standing point from which to do all these activities.

When walking, for the first few steps I might omit to squeeze my glutes and check through the other things I know to do…but it is becoming more habitual so my muscle memory soon kicks in. Or I recall my favorite prompt of Esther’s, “if your glutes snooze, you lose.” 

The J-spine concept was entirely new to me. I had tucked my pelvis under (as you saw in the above “Before” photo) all my life as far as I can recall. Consequently, I believe, the place that hurts for me is around L5-S1 at the very bottom of my spine, so I have to be accurate to squeeze my glutes from a relaxed pelvic position and not to sway and compress my lower back trying to make it happen with the wrong muscles. A single follow-up lesson on this was really useful to help me relax my pelvis back even more.

Diagrams showing the lower lumbar vertebrae and sacrum, (a.) anteverted at L5-S1, (b.) retroverted (tucked) at L5-S1.
A healthy L5-S1 angle (J-spine) permits the wedge-space disc there the space that it needs (a.). Learning the Gokhale Method finally enabled me to stop tucking my pelvis and sacrum, and damaging my L5-S1 disc (b.).

Due to my scoliosis I have to be extra careful about how I do things, and with poor bending form, I would always ache—or have a more acute disaster. Now I understand why. I use the hip-hinging technique as I’ve been taught (plus putting my hands on my hips) and I can bend comfortably—it amazes me! I don’t straighten my legs like some of the pictures we see, as I don’t have the hamstring length, but I can follow the principles involved. 

Clare Rosenfield standing side on and hip-hinging for Before and After photos.
Since learning to hip-hinge I can bend without distorting my back and without pain. There are many principles to learn that contribute to healthy bending, which comes later in the course, but it has been well worth it.

Since 2005 I have been playing the harp, for which being in the right position is important. I pull the harp towards me more now, and when I bend, I bend at the hips, not rounding my back. When sitting with a backrest I have found using the Stretchsit® Cushion makes a good deal of difference to my comfort—I have one in the car, and in fact I’m sitting with one in this interview right now to reduce the pressure on my lower back.

The Gokhale Method Stretchsit® Cushion

The gentle traction you can get in your lumbar area by using a Stretchsit® Cushion reduces compression and asymmetry in your spine.  

Since a hysterectomy in 1995, I have lost bone density and three inches in height. I am working nightly with stretchlying to lengthen my spine and reduce my scoliosis. I am confident that stretchlying at night and using my inner corset to support my spine during the day will prevent any further height loss and increase in my scoliosis, as I have already seen such improvement in my posture. These two measures may well enable me to regain some of the height in my spine that I have lost.

In October I had an eye surgery, a partial cornea transplant, and to make sure that it stayed in place, for three days following the operation I had to keep my head still and remain on my back. I practiced stretchlying carefully leading up to the operation and found I could lie there all night comfortably; stretchlying is the best!

Come morning I have the option of switching to stretchlying on my side, which I also learned in the course. Again, I found a follow-up lesson on stretchlying on the side helpful as it involves a little more technical precision, especially with anteverting the pelvis, to work its magic.

For me the biggest help for my upper body was learning the shoulder roll…and I feel like my neck automatically gets into the right place after I’ve positioned my shoulders well. It also positions me better in sitting and standing, and helps me do more of the things I care deeply about.

One of those things is artwork, and I am now much more aware of my body while I’m doing it. For example, I’m standing straighter, and if I start to slouch—oops—I can feel it. 

Colorful drawing with words by Clare Rosenfield
I love the poetry of combining imagery and words in my artwork.

I’m also at the computer writing books, including a biography, children’s books, and poetry. As I spend a good deal of time sitting, it’s important to do it well. 

Books variously written, illustrated, and recorded by Clare Rosenfield Books variously written, illustrated, and recorded by Clare Rosenfield
These are four of the numerous books I've published. I have illustrated the three books shown along the top here. Seven Meditations for Children I have recorded as an audiobook—see how the child is sitting with a nice straight back!

My husband had an eminent career in public health which took us all over the world. Rather than take a lucrative post as an Obstetrics and Gynecology trained MD, he chose instead to work for the poor and underserved of the world, becoming Founder-Director of the Center for Population and Family Health, 1975–86. He was then Dean of the Mailman School of Public Health at Columbia University, 1986–2008, and honored while alive with the naming of the Allan Rosenfield Building and after his passing by the Tribute Wall I fundraised for. The first year of our marriage was spent in Nigeria, and we were in Thailand for six years. I must have seen a lot of examples of elegant posture in the rural areas of those countries, but back then I didn’t recognize how important it was.

Photo of the Tribute Wall to Clare Rosenfield’s husband, Allan Rosenfield MD
Here is a photo of the Tribute Wall to my husband—there we are together, bottom left. My husband served in Korea as an Air Force doctor. You can see people headloading in Nigeria (left hand panel, photo top right).

I have six grandchildren, three boys and three girls, aged 12–23. When I’m with them I try to help them with their posture—they spend so much time hunched over. I guess it’s hard for children to envisage they are statistically likely to have back pain down the line, but at least I can sow the seeds for them to think about posture, and set as healthy an example as I can. I’m so glad that the Gokhale Method is there to help all generations—and especially the young—to rediscover their healthy posture heritage.

I’m known to my grandchildren as “the Nana who raps instead of naps!” Here is a rap I would like to share with you:

IT'S TIME WE VOW TO SPEAK RIGHT NOW
 

It's time we vow to speak right now

our vow to share a peace we dare

to live and keep and not let sleep

In mere intentions while old conventions

Toot horns of war. No more, no more,

We shout out loud, no more to shroud

Our depths of heart. It's time to start,

Yes, twenty-four seven, on Earth bring Heaven,

So one, two, three, it's you and me

To take a dive in what's alive,

Our YES to fate before too late

To emanate our LOVE not wait,

to one and all, the world enthrall

So they will see that all we be

One family! Yes all we be

One FAMILY!

Best next action steps for newcomers

If you would like insight on your posture, consider scheduling an Initial Consultation, online, or in person.

You can sign up below to join one of our upcoming FREE Online Workshops. . .

Running: Part 6: Upper Body

Running: Part 6: Upper Body

Michelle Ball, Gokhale Method teacher
Date

Welcome to the sixth blog post in our series on running. My name is Michelle Ball, and I am a Gokhale Method® teacher living in Tasmania. I am also a lifelong runner and am passionate about sharing the benefits of healthy posture with the running community, be that beginners, seasoned runners, or anyone in between. Even if you walk rather than run, the posture principles outlined in this post can still help you to enjoy an active and pain-free body well into old age.

Running with a well-positioned upper body

In this post we will consider the upper body. Runners are inclined to pay far less attention to the upper half of the body than the lower half, as they focus on gait pattern, cadence, footwork, and propulsion. This is hardly surprising, but the lower body, while super-busy, really is just half the story. 

Healthy posture in the upper body brings the following benefits:

  • Protected spinal structures
  • Improved biomechanics
  • Unimpeded flow and momentum
  • Support that makes the body feel lighter
  • Athletic appearance

4 elite female runners in profile showing healthy form.
Healthy posture principles are important for the upper body as well as the lower. Implementing them can both protect your spine, and bring mechanical advantage to your running. Unsplash

I have found the upper body principles that we teach in the Gokhale Method® in-person Foundations and Pop-up courses, and our online Elements course, made a world of difference to my running. Let me share some key points with you. . .

Anchoring your ribs

As explained in my previous post, Running: Part 5: Anteverted Pelvis, a forward leaning position when running helps to avoid compression in the lower back. In our culture it is common that people have tight lower back muscles (erector spinae), and weak opposing muscles of the torso (internal obliques). This creates a sway back, which pulls the torso into a backward leaning position. A deliberate forward lean will help counter this. 

Gokhale Method teacher Michelle Ball running angled forward, side view.
Here you can see me keeping a consistent forward angle throughout my torso, neck, and head.

Most people will benefit from some degree of forward rotation of the thorax to fully correct a sway and bring their torso into a straight and healthy alignment. This adjustment can be made and maintained by engagement of the internal oblique muscles, or rib anchor, as we Gokhale Method teachers call it. The rib anchor can be learned with a simple but precise maneuver which you can learn here

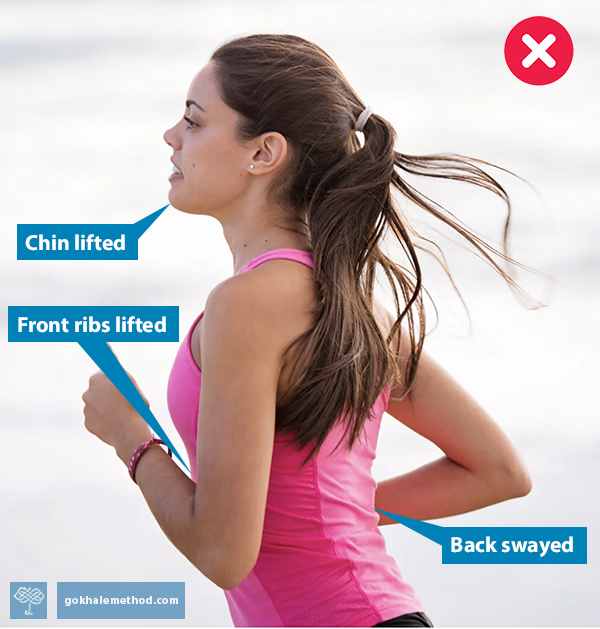
Female runner (upper body) in profile showing swayback and lifted chin.
Overly contracted back and neck muscles can give a misleading feeling and appearance of being upright. In reality, overly muscles are pulling the lumbar and cervical spine into compression, threatening discs and nerves. Pexels

Deeper support and protection for your spine

Running is classed as a “high impact” activity. This is one reason to run with the best posture and technique you can. Even if you are running smoothly with impeccable form, running will generate additional forces that impact the spine on landing. Perhaps that is how “jogging” got its name! 

Using your inner corset while running lends natural protection to the joints, discs, and nerves of the spine in two important ways. Firstly, it creates and maintains length, and secondly, it confers stability, preventing untoward twisting, forward, back, and sideways movement. The trunk and pelvis remain a single unit, with no jiggling from micro-flexing and extension, or bobbing up and down—and the head travels at a continuous level, sparing the neck. In these respects good running form is the same as good walking form. The spine and its tissues are saved from both acute injury and long-term wear and tear. How to find and deploy your inner corset is explained in detail in Esther’s bestselling book, 8 Steps to a Pain-Free Back.

An S-shaped spine medical illustration from 1990, and a J-shape spine from 1911.
These two medical illustrations from 8 Steps to a Pain-Free Back show how, in modern times (e.g., 1990), deeper spinal curves have come to be regarded as normal and desirable. The Gokhale Method advocates a return to a straighter, longer spinal shape (e.g., 1911). 

Avoiding neck pain while running

Deep engagement of the inner corset will preserve length in the lumbar spine, and this supportive structure also encourages length in the cervical spine, or neck. In addition, locally, the longus colli muscle, which attaches to the front and side of the neck and upper thoracic vertebrae, needs to be engaged to draw the neck back into a tall, lengthened position in line with your body. 

 Anatomical drawing of the longus colli muscle.

The longus colli muscle (seen here in red) draws the vertebrae of the neck back into a healthy, tall, and spacious alignment. Wikimedia

Gliding your head up and back, while allowing your chin to rest down, will provide stable and relaxed carriage for your head, and a happier neck. You can learn how to glide your head back here.

Woman running with head and neck back in line with body, side view
Your head and neck want to remain back in line with your body, even as you lean forward. 

Man running with tucked pelvis, internal rotation of feet and legs, rounded torso, and forward head carriage
You don’t want to jut your chin forward and let your head literally run ahead of you. Pexels

Trunk stability

The trunk stability that protects the spine also enables efficiency when running, as energy is not dissipated into incidental movements that detract from forward motion. It enables all propulsion to be well channeled, rather than just pulling the spine around. As running expert Marc Cucazella reminds us, ‌“You‌ ‌can’t‌ ‌fire‌ ‌a‌ ‌cannon‌ ‌from‌ ‌a‌ ‌canoe.”‌ In the upper body this propulsion comes from the arms.

Arm movements in running

Whereas in glidewalking the arms largely rest, in running the arms actively contribute to propulsion and alternate with the leg action. In sprinting the arms are especially important, moving straight forward and back like pistons on either side of the body. The arms‌ ‌are bent at‌ ‌45 degrees ‌or‌ ‌slightly‌ ‌more,‌ with the hands‌ ‌moved ‌in‌ ‌a‌ ‌circular‌, ‌‌rearward‌ ‌pull motion,‌ ‌‌as‌ ‌if‌ ‌you‌ ‌were‌ ‌chopping‌ ‌wood.‌ The arms‌ ‌then‌ ‌recoil‌ ‌forward,‌ ‌very slightly rotating‌ the shoulders‌.‌ What you don’t want is the arms to be crossing the midline of your body and pulling you off balance. Arm action can be much more relaxed at an easy jogging pace or in distance running. 

4 elite female sprinters in profile showing strong arm action.
The vigorous piston action of the arms in sprinting requires a well-configured shoulder joint. Unsplash

Whatever your running speed, it is extremely important that the shoulders be well positioned, so that the joint—where the bone of the upper arm, shoulder blade, and collarbone meet—can connect well, and the soft tissues, nerves, and circulation can function optimally. You want your shoulders to be happily at home in their natural, posterior position. You can learn how to roll your shoulders back here.

Open, posterior shoulders will also help you to access breathing in your upper chest. If you tend to hunch forward, draw your elbows more together behind you to assist the external rotation of your shoulders.

Relaxed and bouncy shoulders

In gentler jogging and long distance running, the shoulder area can be more relaxed. Healthy alignment within the shoulder joint is still important for the hundreds of to-and-fro arm reps, and to cushion the impacts traveling through the joint with every stride. A healthy postural relationship between the upper back, the shoulder girdle, and the neck will help the shoulders to be responsive rather than held tight, and to bounce a little as you run. 

Anatomical drawing of the trapezius muscle.
The trapezius muscle is at the center of healthy upper back, neck, and shoulder posture. It helps the shoulder to lift, lower, and gently bounce through impactful movement. Wikimedia

Stick or twist?

The synchronized alternation of arm and leg movement is vital for momentum and balance during running. This will be integrated by the torso twisting somewhat. There is a counter movement of pelvic rotation backward as the chest moves forward on the opposite side. The key is neither to over stiffen, nor over twist the torso. A stiff body keeps the hips from extending fully, can shorten your stride, and puts more pressure on the knees and leg joints. Over twisting can cause a “sloppy” run and impinge on the spinal joints. This is where staying tall with a strong inner corset is invaluable, as the inner corset allows healthy rotation both through and beyond it.  

In particular, avoid an upper/lower torso separation with twisting happening almost entirely at the T12/L1 junction, where the ribs meet the lumbar area. Twisting here is sometimes misguidedly encouraged to help power the arms, especially in fitness walking classes. However, there is no ball and socket joint at T12/L1 that makes swiveling here a good idea for the spine! 

South African sprinter Wayde van Niekerk running, side view
This runner’s torso shows considerable rotation, but it is distributed along the spine—it does not twist at just one point. South African sprinter Wayde van Niekerk sets a world record at the 2016 Olympics. Alessandro Bianchi / Reuters

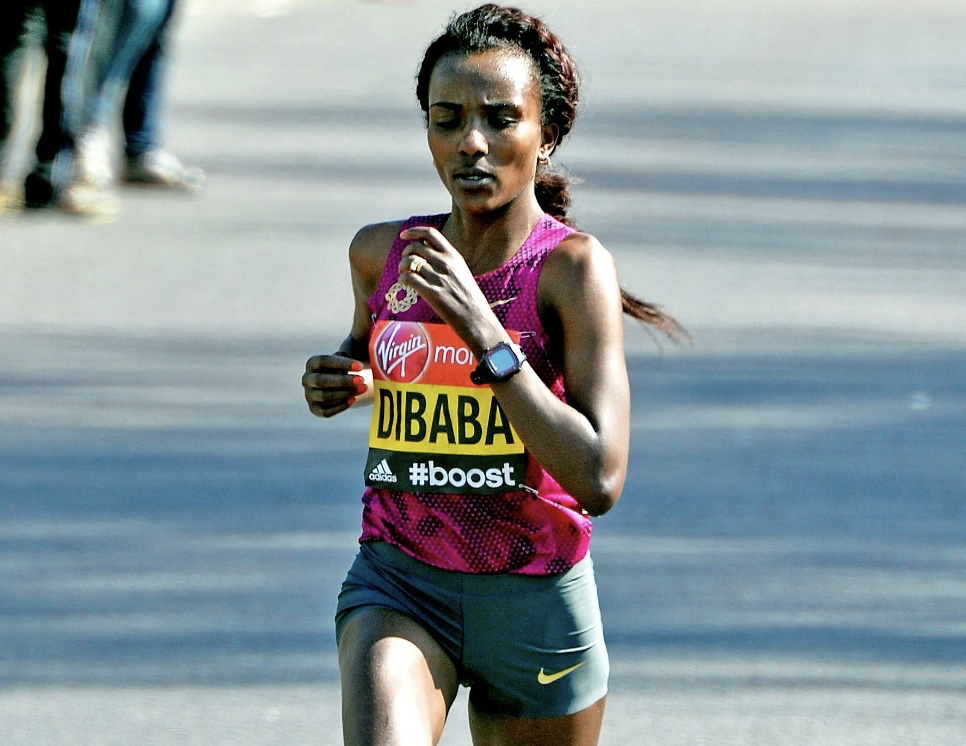
Olympic gold medalist Tirunesh Dibaba running, front view
Olympic gold medalist Tirunesh Dibaba also shows even rotation of her torso from hip to opposite shoulder. I’ve also noticed that most East African runners have a significantly higher arm carriage, and are among the best runners in the world. Bretta Riches – Run Forefoot

If you would like guidance on any aspect of your posture and/or running, including your head, neck or shoulder position, consider scheduling an Initial Consultation, online or in person, with a Gokhale Method teacher.

Here are previous running posts you might like:

Running P1: Introduction, Esther Gokhale

Running P2: Meet Your Feet, Michelle Ball 

Running P3: How to choose running shoes, Michelle Ball 

Running P4: Taking care of your knees, Michelle Ball

Running P5: Anteverted Pelvis

If you would like to find out more about how the Gokhale Method can help support you, sign up to join one of our upcoming FREE Online Workshops.

Outer Corsets and Inner Corsets

Outer Corsets and Inner Corsets

Esther Gokhale
Date

I have often written about the elegance of people in bygone years. The women, sometimes corseted, show striking deportment.

19thC African American woman standing with elegant, healthy posture.
This young woman shows wonderful alignment and poise in an age when corsets were commonly worn. Corsets encouraged abdominal support, a tall straight spine, and the behind behind. Pinterest

The excesses of nineteenth-century fashion understandably gave corsets a bad name. Extreme tight lacing had some terrible effects, imposing some drastic anatomical remodeling:

The stomach and liver are crammed down, with the ribs compressing into drooping S-loops. The neural spines of each vertebra, the little projections that stick up from the central body of each bone, are also pushed out of place. Normally they stack nicely one atop the other in a neat midline ridge, but in long-term corset wearers these spindles of bone jut to this side or that.

Science writer Brian Switek in Skeleton Keys: The Secret Life of Bone.

2 Drawings of Venus statue showing internal deformities due to 19thC tight corset.
The extremes of nineteenth century corsetry had unhealthy effects, including restricting breathing and digestion (left). Wikimedia

The majority of people nowadays enjoy the freedom of not wearing a corset, and are understandably determined never to return there. However, some kinds of external corset, well chosen and used judiciously, can have protective benefits for the lower back area. They can also serve as a training tool for developing a stronger, healthier, inner corset. Let’s consider this in more detail.

External corsets can offer protection in some contexts

Belts and corsets are often worn by manual workers—for lifting heavy goods at Home Depot, for example. The extra stability they give the trunk can be protective in awkward maneuvers, when workers are tired, if they have previous injuries, or are vulnerable due to a weak “inner corset.” 

Man wearing lumbar corset and lifting heavy box.
A corset provides extra protection for the lumbar spine, which, unlike the thoracic spine, is not protected by the architecture of the ribcage. Ninelife.uk

Another common use for external corsets is in weight lifting. In this case, should the natural inner corset fail and the considerable weight over challenge the lifter, a resultant twist or buckle of the spine could cause serious injury. The corset will guard against this and also help the lifter to maintain length and space in the lumbar area despite the compressive force from the weights. 

Man wearing protective lumbar belt and lifting weights above head.    
A weightlifter protects his lower back with a belt. Unsplash

External corsets can be useful training aids

A corset or belt can give a feeling of strength and stability that you want your own muscles to provide. A corset or belt can be used as a reminder and a training tool. External corsets can be used as supplements to your own inner corset musculature, not instead of it, when bending, lifting and carrying.

Healthy posture trains your  inner corset

Healthy posture naturally strengthens your inner corset. Poor posture will lead you to slump and collapse your inner corset, or sway and make your back muscles overwork and tighten. Either way, your inner corset is sidelined, making you more vulnerable to injury and degenerative spinal conditions.

Some traditional cultures wear external corsets

Some societies have integrated corsets into their traditional dress. Members of the Dinka tribe from Southern Sudan, Africa, wear surprisingly rigid corsets with metal ribbing and beading to show their status. These are worn day and night for years. The corsets allow no appreciable flexion, extension, side-bending, or twisting, yet the excellent physique of the young men and women who wear them is testimony to how little spinal movement may be necessary to preserve good health.

A member of the Sudanese Dinka tribe wearing a corset.
A member of the Dinka tribe wearing a corset. Note that the L5-S1 area is allowed to assume its normal curvature.

Another corset-like garment, this time from East Asia, is the Japanese obi, or sash, worn in various styles with different types of kimonos. Nowadays they are mainly reserved for bridal wear. Over the centuries, owing to their increasing ornamental width and stiffness, other more functional belts would be tied underneath to close the kimono.

A Japanese woman tying the obi (sash) of a geisha in the 1890s. 
A woman tying the obi of a geisha in the 1890s. Wikimedia

Gokhale Method students can make use of corsets

Some of our students have explored wearing corsets. Alumna Fatimah has experimented with very different types of corsets. She tells us that in the old days in Java the kemben, an item of traditional clothing she knows from her Indonesian heritage, was similar in function to the modern bustier, and was worn with a sarong (wrap around skirt). However, nowadays most people would wear a sarong with a corset over it, and a kebaya (longer blouse/jacket, sheer and often lacy) on top. Fatimah remembers her grandmother wrapping herself in a sash that acted as a corset over her sarong, with a long straight kebaya on top.

An Indonesian woman wearing the traditional kemben wrap-around costume, c. 1900. 
A woman wearing a kemben, the traditional Indonesian female torso wrap, circa 1900.
The traditional kemben is worn by wrapping a piece of cloth around the torso, folding and securing the edge, tying it with binding, and then covering it with a sash or angkin around the abdomen. Today, there are also tight-fitting and tailored
kemben secured using buttons, straps, or zippers similar to the Western corset. Wikimedia

Modern shapewear as a corset

Modern shapewear is, as the name suggests, usually worn to achieve a smooth and shapely body contour—in the case of the corset, while reducing the waist. The sensation of wearing it can provide a reminder to engage the deep abdominal muscles. Fatimah discovered a shapewear corset via her hairdresser, who uses it while working to prevent back pain. Fatimah comments:

If I wear it high, covering my lower ribs, it reminds me to engage my rib anchor, keeping my front ribs down and flush with my torso and avoiding swaying my back. I actually don’t find it comfortable to wear for long periods, so I’m getting good at remembering to use my rib anchor without it!

A black SKIMS “waist trimmer” shapewear corset
 A SKIMS corset, a modern piece of shapewear in a style made popular by Kim Kardashian. Pinterest

Ideally, we all have a strong, natural inner corset

Since our first human ancestors stood upright some 5–7 million years ago, we have acquired not only a J-spine but also a strong matrix of tissues designed to support and protect it. (You can read more about spine shape here.) We evolved perfectly to do this. Unfortunately, about one hundred years ago, our industrialized culture took a wrong turn in notions about healthy posture. Going forward into modern times, we have exported a distorted view of human posture to much of the world through our design, fashion, and manufacturing. This unraveling of global postural health and traditions is explained in more detail in my book, 8 Steps to a Pain-Free Back.

Fortunately, there remain traditional societies where healthy, pain-free posture is still intact, and they provide precious role models for us to learn from. The Gokhale Method® in-person Foundations and Pop-up courses, and our online Elements course, teaches how to stand, bend, walk, and even sit as these people do. The inner corset is also explained in detail in my book 8 Steps to a Pain-Free Back.

Drawing of the muscles of the inner corset on a standing female figure. 
The muscles of the inner corset include the deep intrinsic back muscles, the abdominis transversus, and the obliques. 

Photo of a young mother in Burkina Faso, headloading with baby on her back.
This young mother in Burkina Faso is using her inner corset to remain tall, stable, and relaxed while carrying on her head with her baby on her back. Headloading, done well, can encourage the inner corset to engage and the spine to align. Traditional posture principles really work!  

Strengthening your inner corset

There are few of us who can’t do without some attention to our inner corset. What you don’t want to do is common ab exercises such as the aptly named crunches, which squish your discs and crunch your spine, or, worse, sit-ups. You can read more about ab exercises here.

We recommend you start by learning to use your rib anchor, an ingredient of your inner corset, which will prevent you from swaying and compressing your lumbar area. You can watch our free rib anchor video here
If you would like guidance on any aspect of your posture, including ways to cultivate your inner corset and protect your back, consider scheduling an Initial Consultation, online or in person, with a Gokhale Method teacher.

Running: Part 5: Anteverted Pelvis

Running: Part 5: Anteverted Pelvis

Michelle Ball, Gokhale Method teacher
Date

Welcome to the fifth blog post in our series on running. My name is Michelle Ball, and I am a Gokhale Method® teacher living in Tasmania. I am also a lifelong runner and am passionate about sharing the benefits of healthy posture with the running community, be that beginners, seasoned runners, or anyone in between. Even if you don’t run, but do want an active and pain-free body well into old age, this blog post is for you!

What is an anteverted pelvis? 

Pelvis refers to the bony pelvis, and means basin, or bowl, in Latin. Anteverted means tipped, turned, or inclined forward, from the Latin ante to go before or in front, and vertere to turn. So we are referring to a pelvis that tips forward. 


The angled belt line of the Ubong tribesman on the left shows that his pelvis is anteverted—mildly tipped forward. Contrary to popular belief, an anteverted pelvis does not cause excessive lumbar lordosis (sway back) when there is a healthy angle at the L5-S1 junction. His back remains surprisingly straight by conventional standards. 

Three standing figures in profile showing anteverted, “neutral”, and tucked pelvis
(a.) An anteverted pelvis facilitates heath posture. The commonly advocated “neutral pelvis.” (b.) is actually mildly tucked and does not allow the correct lumbo-sacral angle and stacking of the spine. (c.) A markedly tucked (retroverted) pelvis leads to a tense, compressed lumbar area, or to slumping., 

How an anteverted pelvis benefits the spine:

As you see in the image above, an anteverted pelvis (see example (a.)), is the foundation for a healthy, straighter, more vertical spine, which does not sway or round. It provides the correct orientation for the sacrum to support the L5-S1 disc, which is wedge-shaped, and then for the L5 vertebra and those above to stack well. A tucked pelvis, over time, will likely cause the L5-S1 disc to suffer wear and tear, bulging, or worse, and put pressure on the sciatic nerve roots.


(a.) An anteverted pelvis preserves the wedge-shaped L5-S1 disc. (b.) A tucked pelvis cannot accommodate this and the lower discs will suffer undue pressure and bulging toward the nerve roots.


Like the Ubong tribesmen and people throughout the nonindustrialized world, these elite runners show both an anteverted pelvis and an upright torso. Unsplash

Running leaning forward

Some running coaches teach a forward lean of the torso, which I agree reproduces some of the benefits of a healthy L5-S1 angle for runners who are currently stiff at that joint and therefore slightly tucked if they remain upright. Leaning forward helps compensate for any lack of L5-S1 angle, and harnesses power from the energy of impact when the back leg pushes off. 

Leaning forward is strongly advocated in the ChiRunning technique, which was developed by Danny Dreyer. You can watch Esther in conversation with Danny here, where he explains his approach.

Graphic over photo of runner in profile showing benefits of leaning forward 
Danny Dreyer advocates a forward lean when running, with shoulders, hips and ankles aligned. This is a useful technique to help orient the pelvis, especially if the L5-S1 angle does not allow for the torso to be upright. It also provides additional momentum.


World-renowned Kenyan runners often run with a good L5-S1 angle that anteverts the pelvis, combined with only a slight forward lean. Flikr

Powerful glutes 

An anteverted pelvis also confers mechanical advantage to the buttock muscles. With the behind behind, they can contract powerfully to pull the legs back and aid propulsion. Under-developed glutes are a common casualty when the pelvis is tucked. 


You can see here that I am running with my pelvis anteverted, and a slight lean forward, both of which put my glutes behind to help power my stride.

It is important that, in an effort to get your behind behind, the anteverted pelvis is not mimicked by simply sticking your bottom back with tension (sway) in the lower back. The pelvis needs to settle into anteversion naturally, with healthy articulation at the L5-S1 joint, relaxed back muscles and hip joints, and healthy alignment throughout the body. Gokhale Method teachers have the techniques and expertise to help you get there without inadvertently creating more postural problems. 

Young woman running with behind behind but swayed back
This runner has her behind behind her—but, as the creases in her top confirm, she is tensing her back into a sway and lifting her front ribcage to get there. Pexels


This footballer has his behind behind with an anteverted pelvis that articulates at L5-S1. His torso remains largely straight, which enables him to twist with good length in his spine, rather than compounding compressed discs and nerves. Pixabay

I find it interesting that a forward-leaning stance which aligns the torso with the extended back leg and supports pelvic anteversion is also a key ingredient in learning to glidewalk. Glidewalking is taught in detail in our Gokhale Method® in-person Foundations and Pop-up courses, and our online Elements course. Glidewalking produces a natural, smooth and powerful gait, which in particular strengthens the glutes and the feet. Students who have learned glidewalking find their running improved by the Downtime Training™of simply walking—but walking well. 

Good hip health

The anteverted pelvis is part of nature’s blueprint for healthy human posture and sound biomechanics. It is no surprise therefore that it confers many benefits throughout the body. An anteverted pelvis gives the best fit and function for the hip joints, avoiding the misalignments that occur with tucking. Poorly aligned hips can cause bursitis, labral tears, and osteoarthritis within the joints, and soft tissue issues such as muscle strains, tendonitis, and ITB (iliotibial band) problems further down. 


Jogging or walking with a tucked pelvis encourages tight hip joints, internal rotation of the feet, legs, and hips, rounding of the torso, and forward head carriage. Pexels

Pain in the knees, lower legs, and feet 

When runners get pain in their knees, lower legs, or feet, one of the last places they are likely to look for a remedy is their pelvic position. They are far more likely to blame their shoes! While the right shoes are important, (see Running P3: How to choose running shoes), it is often a revelation for runners to realize how the angle of the pelvis affects their gait. 

One serious problem with tucking the pelvis that hits runners particularly hard is excessive heel strike. While this may also occur in walking with a tucked pelvis, running or even slow jogging will mean that an unduly forward thrusting front leg will suffer more impact. This may result in not only wear and tear, but immediate and painful damage, as the femoral head (top of the thigh bone) is jammed back into the hip socket, and the knee joint of a more forward and likely more straightened leg is jarred.  Sticking the heel forward is like ramming the brakes on while still stepping on the gas! The answer to a thudding heel strike is not to buy excessively padded shoes, but to antevert the pelvis.


A tucked pelvis points the thighs forward, resulting in an excessive heel strike and jarring through the front leg knee and hip. sportssurgeryclinic.com


This runner has her behind behind, but the orientation of her pelvis comes from a
swayed lumbar area, not from L5-S1. The front of her rib cage and chin are pulled up.
She is about to heel strike—bad news for her straightened front leg and hip joint.
Unsplash

Doing a much better job, an anteverted pelvis:

  • Puts the muscles and soft tissues, especially the glutes, in a position of mechanical advantage, without threatening the lumbar spine
  • Enables better weight distribution and therefore bone health 
  • Places the thigh in a healthier position to absorb forces in the hip socket 
  • Allows landing with a bent front knee, with better shock absorption 
  • Facilitates a light heel/midfoot landing, avoids excessive heel strike, is more energy-efficient

Female runner in back/profile view showing good form and anteverted pelvis 
This runner has good form. Her behind is behind because of a pronounced angle at L5-S1 (anteverted pelvis). Her back remains largely straight, her shoulders back, her neck tall. She will land without unduly jarring her joints. Unsplash

Support for the pelvic organs 

An important benefit of an anteverted pelvis is that the bones of the pubis are able to play their part in supporting the pelvic organs. Organ prolapse and incontinence can affect everyone, especially as we age, and is also a common problem in our culture for women during or after pregnancy. When the pelvis is tucked the organ support is overly reliant on the soft tissues of the pelvic floor, such as the Kegel muscle.

 Two diagrams in profile showing anteverted and tucked pelvis effect on pelvic organs.
(a.) With an anteverted pelvis, the pubic bone is positioned to support the pelvic organs. (b.) With a tucked pelvis, the Kegel muscle is obliged to assume this role.

There is nothing worse than getting a run in and having to use the bathroom, especially if there is not one available! Heather A. Dunfee is a physical therapist in the Mayo Clinic Healthy Living Program, and a certified Pregnancy and Postpartum Corrective Exercise Specialist. She does not refer specifically to the anteverted pelvis, but she is clear that tucking the pelvis is bad news:

For runners, good alignment can help your core to better absorb impact, preventing leaks. For example, a slight forward lean helps to put your deep core "canister" in the best alignment to do its job. Think about stacking your rib cage over your pelvis, something that comes naturally when running uphill. . . Hills are great because they force the body into a position of rib cage over pelvis and untuck the bum.

If you would like guidance on any aspect of your posture and/or running, including pelvic position, consider scheduling an Initial Consultation, online or in person, with a Gokhale Method teacher.

Here are previous running posts you might like:

Running P1: Introduction, Esther Gokhale

Running P2: Meet Your Feet, Michelle Ball 

Running P3: How to choose running shoes, Michelle Ball 

Running P4: Taking care of your knees, Michelle Ball

If you would like to find out more about how the Gokhale Method can help support you, sign up to join one of our upcoming FREE Online Workshops.

How Not To Do Yoga

How Not To Do Yoga

Esther Gokhale
Date

This blog post explains how some common yoga injuries occur and how applying the principles of healthy posture to yoga postures replaces this scenario with movements that are good for your body.

Yoga postures and back pain

Growing up in Mumbai, India, my Dutch mother was a student of BKS Iyengar and the Satyananda yogis, and keen for me also to learn yoga asanas, or postures. I practiced, and, being reasonably athletic as a child and already trained in Indian classical dance (Bharata Natyam), did not find it particularly difficult to choreograph the back bends, forward bends, and twists that were asked of me. I became a yoga model, demonstrating postures alongside visiting swamis’ presentations to induce the audience to sign up for upcoming yoga courses.

Esther Gokhale with yoga student in shoulder stand.
This photograph shows me teaching yoga as best as I knew how in 1979, standing with a sway in my back (and putting excess flexion into my student's neck).

Aged 15, I came to the United States as an exchange student and proceeded to go to college here. It was while doing a yoga pose in college that I first experienced a significant back episode with severe spasms. A few years later I injured my back while windsurfing; this time it took five days of bed rest to recover. I did weight training to strengthen my back, and returned to normal activity. 

When nine months pregnant with my first child, my back problem resurfaced with an onset of sciatica. After my baby’s birth, it grew worse, leading to surgery for a large disc herniation at L5-S1 a year later. Within another year the pain had returned. I declined a second surgery, and instead deepened my quest to understand the causes of back pain and how best to resolve it. 

Esther Gokhale’s MRI 1987 showing herniation L5-S1.
An MRI scan done in 1987 revealed the cause of my sciatica and severe back pain—a large herniation at L5-S1.

Yoga postures require healthy posture

I learned from my life experience, as well as that of key teachers such as Noelle Perez, that in the industrialized world we do not use our bodies well. As our posture has deteriorated, traditional ways of performing everyday tasks in sitting, standing, and bending positions have become distorted. These damaging postural patterns are now deeply embedded in our culture and have even been unwittingly carried through into therapeutic activities such as yoga. 

How is it that yoga asanas, developed to bring strength, flexibility, and relaxation to the body, are now causing frequent injury? This question has been the subject of much media coverage in recent decades, including the provocative New York Times article in 2012, How Yoga Can Wreck Your Body¹. From a Gokhale Method® perspective, the primary problem is that poor posture in the population at large, including yoga students, combined with misguided conventional wisdom shared by yoga teachers about what constitutes good posture, has created a perfect storm. 

I came to realize that much of the flexibility I had as a young yoga model came from the wrong places—it was achieved at the expense of my lumbar discs and nerves as I compressed them to sway back, round forward, and twist. Let’s take a look at how yogis are likely to be causing themselves injuries and how using the Gokhale Method to apply the principles of healthy posture will avoid them:

Back bends

A large group of yoga postures are backbends. Bending backwards is something that is generally done extremely poorly in our culture, with most of the bend occuring around waist level. This puts a great deal of pressure on discs, nerves, and soft tissue in an area of the lumbar spine already compressed by tight erector spinae (long back muscles). This shortened baseline length is due to poor posture and furniture, part of our culture’s paradigm shift away from a healthy spine shape. You can read more about spine shape in my blog post What Shape is Your Spine? 

Yoga model in Warrior pose, side view, extreme bend back.
Many versions of Warrior pose, or Virabhadrasana in Sanskrit, are taught with a significant bend in the upper lumbar spine or thoraco-lumbar junction. This is especially a problem when one or both arms are lifted, encouraging the ribs to pop up. Pixabay

Yoga model in Warrior pose, side view, mild sway.
Even mild sways perpetuate tight muscles in the lumbar area and correspond with a lack of healthy articulation at L5-S1, the lumbosacral junction. Pexels

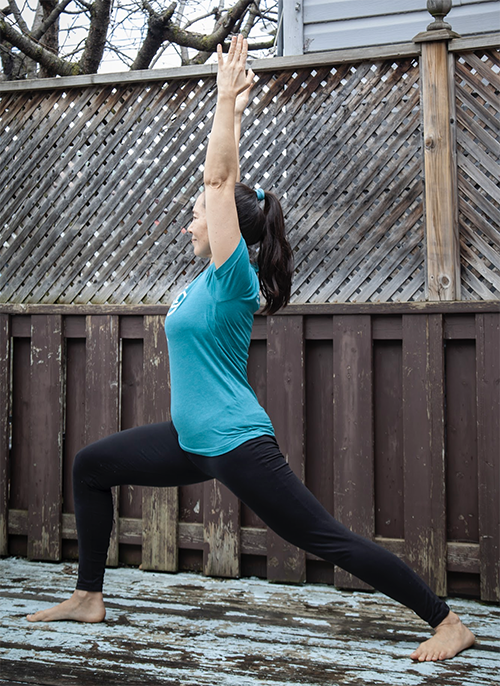
Gokhale Method teacher Lang Lui in Warrior pose, arms raised, side view.
Gokhale Method teacher Lang Liu shows how anchoring your rib cage prevents swaying and encourages healthy articulation at L5-S1. You can read more about our approach to this pose in my blog post Why Keep the Body forward in Warrior I 

Forward bends

Many yoga postures contain some form of forward bend. This can be standing, sitting, symmetrical or asymmetrical, with the legs together or wide apart. Regardless of these permutations, from a Gokhale Method perspective, the key point is to make bending healthy and avoid the damage that comes with rounding the back, distending the spinal ligaments, and pinching the front of the discs.

Yoga model in standing forward bend, side view, straight legs, rounded back.
Standing forward bends (Uttanasana) are often taught with legs straight. This leaves most students in our culture, who have tight hamstrings, straining towards the ground with their shoulders pulled forward. It also rounds the back, distending the spinal ligaments and pinching the front of the discs. Hanging off the lower back is also aggravating for the sacro-iliac joints and soft tissue in the area.
Pexels

Yoga model in standing forward bend, side view, knees bent, hands on floor, rounded back.
Bending the knees softens tight hamstrings allowing a lower bend to the floor—but this student is still rounding her torso to reach over her pelvis and legs to reach the floor. Pexels

Yoga model in standing forward bend, side view, touching blocks, rounded back.
This man is using blocks to reach the floor. He is still rounding his back, and severely compressing his neck to try and look ahead. Pexels

Mother and daughter in standing forward bend, side view, straight legs, rounded back.
Unfortunately this well-meaning mother is teaching her daughter poor bending form. This is especially regrettable as young children naturally tend to bend healthily by hip-hinging. Pexels

Yoga model in seated forward bend, side view, rounded back, compressed neck.
In seated forward bends yoga students often hunch forward. This compounds any rounding already established in the upper back, and forward rounding of the shoulders. Her head also strains forward, chin up, compressing the back of the neck. Pexels

Gokhale Method teacher Cecily Frederick in standing forward bend, side view. 
Gokhale Method teacher Cecily Frederick hip-hinges in a standing forward bend. Her pelvis rotates forward around the femoral heads (tops of the thigh bones that form part of the hip joints). Her spine remains long, rather than rounding. 

Twists

In twisting postures (Parivrtti), it is especially important that your movement is not concentrated at a particular level of the spine, but is well distributed. Levering into a twist by pushing or pulling with the arms or legs can cause a twist to concentrate at any vulnerable point. Typically people will twist most in the mid-spine at T12-L1. Here the more axially mobile thoracic spine meets the lumbar area, where the orientation of the facet joints limit rotation. This is likely to result in disc bulging or even herniation at this junction, pinching of the nerves, and undue stress on the bony spine.

Yoga model in crossed leg twist, front view, twist at waist.
This woman is twisting mostly at the waist. Pexels

Yoga model in seated twist, side view, levered twist, tucked pelvis.
This seated twist shows tucking of the pelvis. There is considerable rotation at the base of the shoulder blades as the yogini levers with her arms against a fixed pelvis and legs. Wikimedia

Yoga model in lying twist, back view, bent legs, tucked pelvis.
A lying twist with one knee reaching the floor and the opposite shoulder remaining there is an extreme rotation for most people. It will often compromise healthy posture. In this case the woman is using her forearm and tucking her pelvis slightly to get her knees down. It is better to prioritize  healthy movement over achieving the “correct” shape. Pexels

Gokhale Method teacher Clare Chapman in lying twist, head on.
Gokhale Method teacher Clare Chapman in a lying twist. Allowing the pelvis to rest back and the thighs to separate avoids tucking and encourages more rotation in the hips. 

We recommend that you initiate twists using the muscles of the torso’s inner corset, especially the obliques. The inner corset is explained in detail in Lesson 5 of my book 8 Steps to a Pain-Free Back. Using these muscles means that the lumbar spine is protected while the muscles originating in the thoracic area and connecting to the pelvis power the rotation. Engaging the inner corset also lengthens the spine avoiding the common pitfall of imposing rotation on top of flexion (rounding) or extension (swaying) or any other kind of compression. 

Twists should mainly occur and be appropriately distributed in the joints best designed for them—the ankles (standing twists), hips, the thoracic spine, and the neck. Small amounts of rotation can contribute from elsewhere, but pushing beyond natural limits anywhere by applying force is a recipe for injury and pain.

Before executing yoga bends or twists, we recommend that you first learn the basics of the Gokhale Method® in our in-person Foundations Course, Pop-Up courses, or online Elements. These courses teach you how to bend back without swaying, and how to bend forward in a way that profoundly benefits rather than damages your body. The Gokhale Method Online University has many offerings for Alumni which explore additional movements such as shearing and twisting in ways that are healthy.

If you are a yoga practitioner who suffers from recurrent bouts of back pain or strain, have stopped practicing due to injury, or have been put off even trying yoga, then a solution is at hand! 

It has long been my ambition to offer yoga classes with healthy posture. I am delighted that one of our most experienced and accomplished teachers, Lang Liu, will offer regular Tuesday and Thursday Gokhale Yoga classes, ​​7:00 am (Pacific Time), starting April 21, as part of our Alumni Gokhale Exercise program. 

We look forward to seeing you there.

Gokhale Method teacher Lang Lui in Namaste.
Gokhale Method teacher Lang Liu looks forward to seeing you in the Gokhale Yoga class.

References:

¹ William Broad, “How Yoga Can Wreck Your Body”, New York Times Magazine, Jan. 5, 2012,
https://www.nytimes.com/2012/01/08/magazine/how-yoga-can-wreck-your-body.html 

If you would like to find out more about how the Gokhale Method can help support you, sign up to join one of our upcoming FREE Online Workshops…

Why Keep the Body forward in Warrior I Pose?

Why Keep the Body forward in Warrior I Pose?

Esther Gokhale
Date


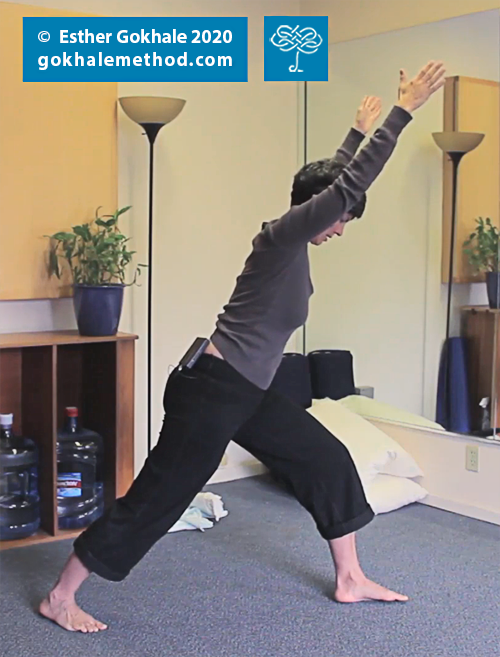
When doing yoga with a Gokhale Method filter, we use specific adjustments to maintain healthy posture and avoid unnecessary injury. Note the distinct lack of curvature in my lumbar spine.

A general tenet of the Gokhale Method approach is that micro-level adjustments can lead to macro-level results. Like the world we live in, the human body is a complex, interconnected system. So it is not surprising that attainable tweaks in how we use our bodies can have beneficial effects on our function and well-being.

Yoga is no different. If you have an established yoga practice, you’ve probably discovered for yourself that small adjustments are not so small in the aggregate!


Even when practicing yoga, we would do well to refrain from swaying our lower backs. Image courtesy Elly Fairytale on Pexels.

Warrior I and healthy posture
Take Warrior I Pose (Virabhadrasana I), for example. This pose is one in which yoga models (a group that used to count me among its numbers, decades ago in India) often demonstrate a vertical upper body above their hips.


By keeping her upper body vertical above her hips, this yogini is predisposing herself to lumbar curvature. Image courtesy Sigurdas on Wikimedia Commons under CC BY-SA 3.0.


If you look carefully at her silhouette, you’ll see that this yogini’s lumbar sway is quite visible, putting undue pressure on her delicate spinal discs and nerves. Image courtesy Mor Shani on Unsplash.

However, when I practice Warrior I today, I make sure to keep the upper body leaned forward rather than vertical. Why is this?

The story connects with L5-S1 mobility. This special “saddle joint” is a cylindrical disk in quadrupeds. In bipeds (that would be us, humans!), it’s wedge-shaped. In spite of this baseline shape, the joint is actually capable of quite a lot of healthy variation in shape.


The L5 vertebra, one of the two elements of the L5-S1 (lumbosacral) joint, as depicted in Gray’s Anatomy. Public domain image.

B.K.S. Iyengar famously demonstrated extreme L5-S1 mobility, surely the result of his practicing yoga intensively for 8-ish hours a day over decades of his life. His remarkable L5-S1 mobility facilitated extreme (and still healthy) backbends as well as verticality in poses like Warrior I.


Of course, we’re not all built like B.K.S. Iyengar! Most of us have limited L5-S1 mobility. One can cultivate additional mobility in this saddle joint, but it takes time, dedication, and expertise to do it safely.


A forward-projecting upper body in Warrior I protects the lumbar spine from swaying.

In one of our upcoming Gokhale Premium workshops this month, I’ll apply the Gokhale Method filter to all the poses of the original Sun Salutation sequence. You are invited to join me! I’ll also be offering new Free Online Workshops on topics including:

What are some tiny posture adjustments you’ve made that have made a big difference in your life?

In Yoga: Bend Back, Don’t Swayback!

In Yoga: Bend Back, Don’t Swayback!

Esther Gokhale
Date

Not all backbends are created equal. Healthy backbends happens at the lowest lumbar level (L5-S1); unhealthy backbends happen higher up in the lumbar spine.



Cecily Frederick (Gokhale Method teacher, Madison, Wisconsin), doing a back dive with a healthy L5-S1 backbend.  


This yogini is backbending (unhealthily) almost entirely in the upper lumbar spine. 


The L5-S1 joint is unique in having saddle-like properties and is capable of quite extreme extension (backbending) without injury.


B.K.S. Iyengar demonstrates a healthy 90 degree backbend that happens exclusively at the L5-S1 joint. Iyengar was one of the world's foremost yoga teachers until his death at age 95.


Peking Acrobats are trained to perform extreme backbends. The backbends happen exclusively at L5-S1, which makes them sustainable.


Higher up in the lumbar spine, repeated, sustained, or extreme extension results in wear and tear and injury in the related discs and vertebrae.


This young gymnast exhibits a classic gymnastics pose, with a significant (unhealthy) sway in her upper lumbar spine.  Gymnasts are notoriously prone to back pain and injury.


The majority of this dancer’s backbend happens at a single level in her upper lumbar spine that is not adapted for extreme backbending (ouch!).


The distinction between upper and lower lumbar curvature is rarely made, neither for baseline positions like standing and sitting, nor for acrobatic and yoga positions like backbends. This lack of distinction is true in modern lay culture (see post on Forward Pelvis) as well as in the medical literature (see this cross sectional study on the Correlation between Radiologic Sign of Lumbar Lordosis and Functional Status in Patients with Chronic Mechanical Low Back Pain). Not surprisingly, findings involving a crude compound of all lumbar curvature are confused and contradictory. I have found only one scientific study on lower back pain that makes a distinction between upper and lower lumbar curvature - the findings are consistent with the Gokhale Method's claims about a "J-spine" being healthier than an "S-spine."

I consider that the significant back problems I suffered in my mid-20’s resulted in part from poorly executed yoga and gymnastic backbends in my childhood, as well as a chronic baseline extension (sway) of my upper lumbar spine. I was rewarded for my “flexibility” both in gymnastic competitions and as a yoga presenter and teacher—I received applause, awards, and signups for classes. Almost no one saw that I was systematically bending backwards in a problematic place.


Me in the INDUS fashion show (Mumbai, 1973) sporting a hand-me-down dress - and a significant sway.


I do recall my Bharatanatyam dance teacher Kutti Krishnan being vaguely disturbed by my baseline stance. He wasn’t able to articulate what exactly the problem was, or how to correct it, but I remember him trying to imitate my stance to help me out. It didn’t work, he stopped trying to correct me, and my sway persisted unchecked into adulthood, when it manifest as a problematic and then surgical back in my mid-20’s.


An old image of me teaching yoga as best as I knew how in 1979, standing with a sway in my back (and putting extreme flexion into my student's neck.)


To learn a healthy backbend, start with an “infant cobra,” in which you plan on lifting no more than two inches off the ground. Begin by lying face down with your hands placed near your armpits. Before lifting, engage an extremely strong rib anchor. Augmenting the rib anchor hard against the tendency to sway, press up an inch or two from the ground. Keep the neck aligned with the spine.


Notice how in this healthy baby cobra, the backbend takes place only at L5-S1 at the base of the lumbar spine, right above the butt.


Don’t expect to be entirely successful at the start. It’s challenging to eliminate a habitual sway entirely so tolerate a small amount of arching in your back unless that hurts. As you practice, slip a hand back to your midline groove and make sure the arch is not too accentuated.

If you backbend at L5-S1 and strongly engage your rib anchor muscles, the front lower border of your ribcage will not protrude, but rather remain flush with your torso. A bend higher in the lumbar spine will result in the ribs protruding visibly from the contour of the abdomen.


The extent of protrusion of the ribcage is a fairly reliable index of sway in the low back. This bridge position shows healthy spinal curvature, where the backbend happens almost exclusively at the L5-S1 joint. There is no protrusion of the ribcage from the smooth contour of the abdomen.


This yoga student’s backbend happens at L5-S1 (which is good) as well as the upper lumbar spine (not so good)-  her rib cage protrudes slightly from the contour of her abdomen.


This student backbends entirely in her upper lumbar spine (ouch) and we see her ribs lift away from her abdomen a great deal. 


As you get used to the practice of intensifying the rib anchor corresponding to the challenge that you’re imposing on it, you can increase the extent of your cobra by degrees and perform other types of backbends.

For extreme backbends, we recommend you leave them to the professionals. B.K.S. Iyengar was known to practice yoga eight hours a day. The Peking Acrobats are also singularly dedicated to their craft.  For some of us, bending back in the shower to avoid shampoo coming into our eyes is the most practice we'll have in backbending. It's enough to keep us flexible and healthy as we enjoy watching what others are able to do.


B.K.S. Iyengar doing an inversion combined with a healthy backbend.

Subscribe to L5-S1