C-spine

Posture Tips for Meditators

Posture Tips for Meditators

Esther Gokhale
Date

It has been over 60 years since Eastern schools of meditation became widely known in the U.S. and Europe, and meditation became widely practiced, with over 14% of Americans having meditated at least once. If we include those practicing mindfulness techniques, using meditation apps, and attending yoga classes with a meditation component, this figure goes far higher.

The effects of sitting in meditation

The potential benefits of meditation are well known, and include a calmer, clearer mind, lower levels of stress, better sleep, improved relationships with others, and better mental health. 

From a posture perspective, whether you sit in meditation regularly or are just getting started, you want the experience to be as healthy for your body as it is for your mind. 

Tradition and seated meditation

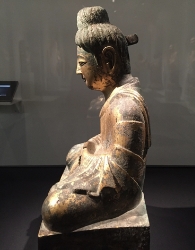
North Indian Buddha figure with healthy form, 7th–8th century C.E..
This North Indian Buddha figure shows healthy form. He has a well-stacked spine, open shoulders, and an elongated neck. (Post Gupta period, 7th8th century C.E..)

Westerners often try to be “authentic” in their meditation by sitting cross-legged on the floor, as is portrayed in most traditions. This is particularly difficult for people who have not grown up regularly sitting this way. It may be that practitioners manage to cross their legs, but then their pelvis is not able to tip forward. Their hip joints will not have developed in childhood and ossified in their teens for unaided cross-legged sitting to be a truly comfortable and biomechanically available option. 

Common problems in upright seated meditation

With the pelvis tucked, meditators have two options, both of them unhealthy:

  1. Sitting on their tail bones in a relaxed but slumped position, which will put their spines into a C-shape that overstretches the ligaments of the SI joints and spine, and compresses the spinal discs and nerves. Such collapsed posture restricts the lungs, stomach, and other organs. It also deconditions the deep inner corset muscles that are there to regulate spinal alignment “in the background” during healthy sitting. 
  2. Sitting tucked but holding themselves upright by tensing the back muscles. Many meditators and yoga practitioners are so familiar with this effortful solution to being upright that they don’t realize that they are doing it, or recognize it as poor posture. 

It takes freedom in the hip socket to allow the pelvis a good range of motion, rotating forward (anteverting) around the head of the femurs—then the spine can articulate at L5-S1 to stack upright and the back muscles can relax. You can read more about healthy pelvic anteversion here

Man and woman on beach meditating. Crossed legged and slumped.
The man’s notably tucked pelvis is sending his spine into a C-shape. Their upper backs are rounded, compressing the base of the neck and lifting the chin to face forward. Pexels

Man on mountain top meditating. Crossed legged and arched.
This man is holding himself up with tension in his back muscles. He can learn to antevert his pelvis to find its natural L5-S1 angle, allowing his back to be upright and relaxed. To get there we recommend a suitable wedge along with some posture know-how. Pexels

Woman on beach near sea, meditating. Crossed legged and arched.
This woman is getting some anteverting benefit from the slope of the beach, but is used to swaying her lumbar area rather than having a healthy angle lower down at L5-S1. Unsplash

Chinese Buddha figure with slumped posture, 338 C.E..
This Chinese Buddha figure shows surprisingly slumped posture. Note the forward head, absence of a stacked spine, and tucked pelvis. With a tucked pelvis slumping is the only relaxed option for sitting.

The hunched figure above is the oldest Chinese Buddha figure that has survived into modern times. The inscription on its base dates it to 338 C.E., 500 years after Buddhism came to China from India. Why does the hunched posture of the Chinese figure compare so poorly with the Indian figure (top)? It is reasonable to suppose that while crossed legged sitting was the norm in India, a warm country where much of the population sits on the floor to gather, eat, socialize, and more, in China, with its generally cooler climate, sitting crossed legged was consciously adopted for meditation but was not a widely used sitting position.   

Esther Gokhale stacksitting on a Gokhale Pain-Free Chair.
Here I am stacksitting on the Gokhale™ Pain-Free Chair—my pelvis is anteverted so my spine stacks upright and relaxed, with a healthy angle at L5-S1. This way of sitting enables you to sit in meditation comfortably for prolonged periods if required, and to breathe well. Like all students on the path of postural improvement, I am a work in progress. . .

Appropriate furniture, props, and seating solutions

Most Zen and yoga centers in the West have become more enlightened about the difficulty many people have in sitting on the floor, providing chairs, meditation stools, and cushions for meditators’ comfort. Some more recently established schools, such as Transcendental Meditation, have always encouraged practitioners to use chairs and sofas rather than wrangle with the difficulties of sitting on the floor and working through the resultant aches and pains. 

That said, seeking comfort and back support from soft and poorly contoured modern furniture can also promote slumping, or lead to problematic remedies such as using lumbar cushions which sway the back. You can read more on finding a healthy back rest here, as well as about gentle traction from our Stretchsit® Cushion.

Traditional and potentially effective solutions to help meditators sit without a backrest include the Japanese Zafu cushion, a high, round cushion that can help the thighs and pelvis to angle down, and a low wooden meditation stool used in a kneeling position. The Gokhale™ Wedge is a modern solution to support stacksitting. In all cases, it is important that the practitioner knows how to anchor their rib cage to resist any tendency to sway, and how to find articulation at the lower L5-S1 junction. 

Four props for healthy sitting: Zafu cushion, Gokhale™ Wedge, meditation stool, Stretchsit® Cushion
Four props for healthy sitting (top left to bottom right): a Japanese Zafu cushion, the Gokhale™ Wedge, a kneeling meditation stool, and the Gokhale Stretchsit® Cushion

Healthy sitting makes for healthy breathing

Given that controlled or mindful breathing is part of many meditation practices, it’s surprising how little attention is given to the link between breathing well and sitting well.

Some meditation traditions have mimicked teachers and icons with slumped posture, and teach that the associated abdominal breathing is part and parcel of spiritual practice. This type of breathing, however, results in a soft, expanded belly with low muscle tone, an underdeveloped chest, and inadequate use of the diaphragm and lungs.

Equally problematic is tensing the back to remain upright, which tightens the erector spinae muscles and restricts the diaphragm and ribs at the back. It takes stacksitting with a J-spine to let the breath work its magic—bringing a natural massage to your spine, better circulation, and length, strength, and flexibility to the musculoskeletal parts of the torso.

Chop wood, carry water, preserve your posture

There is a traditional Zen Buddhist koan (puzzle/story): 

The novice says to the master, "What does one do before enlightenment?"

"Chop wood. Carry water," replies the master.

The novice asks, "What, then, does one do after enlightenment?"

"Chop wood. Carry water."

Women in Burkina Faso carrying large loads on their heads.
Chopping wood and carrying is part of everyday life for millions of people in traditional communities—and it is done with healthy posture.

Of course there are various interpretations of this koan, including that the most pedestrian of activities are also the most sacred. From a posture teacher perspective, the koan reminds us that in the pursuit of spiritual (or mental) development, we should continue to engage with the physical foundations of life. Not only are the body, mind and spirit intertwined, but a healthy body can also help support our other endeavors.

Breaking free from old habits

Meditators often come to work with us because they are frustrated by their pain and struggle to be comfortable. In our experience, though meditators are extensively trained in matters of the mind, the training of the body lags behind. Our teachers have expertise in identifying and solving systemic postural errors in meditation and other activities, and are ready to support you on your meditation and life journey.  

Best next action steps for newcomers

If you would like insight on your posture, consider scheduling an Initial Consultation, online, or in person.

You can sign up below to join one of our upcoming FREE Online Workshops.

Five Posture Tips to Power Your Cycling

Five Posture Tips to Power Your Cycling

Tiffany Mann, Gokhale Method Teacher
Date

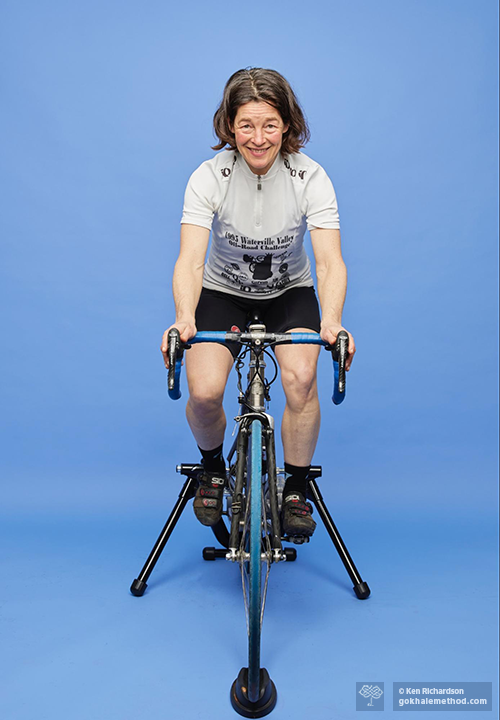
This is Part 3 of a three-post series on cycling with healthy posture by Gokhale Method teacher and longtime cyclist Tiffany Mann. Read Part 1 and Part 2 here.


Gokhale Method teacher Tiffany Mann is passionate about 
combining her cycling and posture expertise.

Spring has arrived, and perhaps like many people, you want to spend more time on your bike! Maybe you’re already an avid cyclist looking for some tips to make cycling more comfortable and sustainable for years to come; or you’ve taken a break and are ready to step back on the pedals. Perhaps you just want to get up those hills! 

Even if you are a beginner, it is so satisfying and pleasurable to use your own muscle power to propel yourself on this simple machine; but it is still well worth looking at how to use your energy as economically as possible. Cycling doesn’t have to be superhard work, and you can benefit your posture at the same time.

My last blog post focused on keeping your arms, neck, and shoulders comfortable when cycling. In this post I want to pass on some simple tips on how best to pedal and use your legs efficiently. 

As in any physical activity, good form is essential for the best transfer of effort, minimizing fatigue, and reducing wear and tear on the body by using relevant muscles and sparing others. You can still get an excellent whole-body workout if you want to pedal hard, but your chance of injury will be far lower. 

Tip 1. Get your saddle height right 

Having your saddle either too high or too low can make pedaling miserable. The saddle wants to be at an optimal height for the foot, ankle, and lower leg to power the pedal rotation. Too low a saddle, as is unavoidable on too small a bike, and none of your joints can open up enough to transfer optimal power from the muscles. You want an almost full-length pedal stroke that gives a good transfer of power, starting from the glutes and hips, through the quads and to the feet. 


This saddle is too low for comfort and results in inefficient pedaling. 

Have the saddle too high, and the pelvis rocks up and down as each leg in turn overextends to reach the bottom of the pedal stroke. This is not only inefficient in terms of energy transfer but puts a lot of strain on the lower back and sacroiliac joints. If your hamstrings are a reasonable length, they can accommodate a good saddle height without any ill effect or abuse to the hips and low back. Some serious cyclists raise their saddle after they’ve reached a threshold number of miles or time on their bike, as their hamstrings have adapted and lengthened during the ride.  


We have all pedaled since we were toddlers on tricycles. Now that our coordination is more developed
and our
cycles better engineered, pedaling can become a more refined action!
Unsplash

Tip 2. Improve your pedaling power

In cycling, propulsion is from the glutes, thigh, and calf muscles, pushing down and pulling up on the pedals. Instead of just pushing downward on the pedals in a fixed-ankle, one-side-at-a-time action, you want to think of your pedaling motion as continual, circular and smooth, with the whole ankle involved. This takes strength and flexibility in the calf, which needs to alternately contract strongly and elongate. The Achilles tendon that attaches the calf muscles to the heel also gets a healthy workout as the foot moves through its circular motion. When done with good form, cycling not only strengthens our tissues, but can also lengthen them. Gokhale Method students who have learned to propel themselves in walking will already have a good deal of relevant muscle memory and power in their legs and feet and will likely be pleasantly surprised when returning to cycling.


A good pedaling action bestows both efficiency and healthy exercise
 for the foot, ankle, and lower leg.
Wikimedia

Tip 3. Use your feet

You don’t want to be sending your weight, as well as transferring the force of your pedal stroke, onto just the delicate toe bones. Instead, placing the more robust ball of your foot on the pedal will elicit the most power transfer. 

At the bottom of the pedal stroke (the 6 o’clock position) you want to pull the pedal back with your feet. The “pulling up” phase of the pedaling action is most effective when you are clipped into the pedals with cycling shoes, or toe straps, but you can still imagine you are “grabbing” up with your plantar foot muscles inside a regular shoe. Gokhale Method students will already have learned to use their feet strongly when walking by grabbing and then pushing the ground away and behind them, which translates well into cycling. You can learn this grabbing action from our Gokhale Moment Inchworm video here.

The feet are actively engaged. They grab and help push the pedal down, and at the downward-most position, they
start to pull back and then up.

When you are feeling more confident in your cycling and want the extra power that comes from being “attached” to your bicycle, cycling shoes and clipless pedals are a terrific investment that can really up your game. The more you use your feet and ankles the stronger they will become, serving you better in cycling, walking, running, dancing, and more. . .


Have your knees not too bent but not fully extended either. You want a small bend just like an athletic “ready position.” Slight external rotation of the legs and feet allows the knees to track well.

Tip 4. Keep your knees happy

Cycling should actually be good exercise for the knees as it uses the quadricep muscles on the front of the thigh that help stabilize the knee. However, a common threat to the knees is riding with the seat too low, (see Tip 1), which stresses the knee joint and causes inefficient pedaling form and fatigue. 

Your feet also want to be pointing outward just a little. Not quite as much as in healthy standing, which is 10°–15°, but enough to afford a degree of external rotation for your legs. Your knees will be happy tracking at this angle, the same as your feet. This helps avoid pronation in the feet and ankles, and pressure on the inside of your knees. 


These two look set for fun on their customized bike! The boy on the left sits well, while his friend could do with untucking his pelvis. You want your behind behind you and your back straight.

Tip 5. Antevert your pelvis 

A common threat to happy knees is riding with a tucked pelvis. Tucking the pelvis pushes the thighs into a more forward position than they would be in if the pelvis were anteverted. As a result, the far end of the thigh bones, where they form the upper half of the knee joints, are also more forward. These “overshot” knees then have a poor alignment for distributing downward force through the joint and into the lower legs and feet and are much more likely to suffer painful wear and tear. 

An anteverted pelvis serves both seated and standing pedaling positions well.

Good posture is a bit like a jigsaw puzzle—get a prize piece like the pelvis in the right position and many things fall into place. An anteverted rather than a tucked pelvis is often the missing piece for beneficial cycling posture. Having already set up some external rotation of your thigh bones, you will have created the space needed for your pelvis to tip and settle forward into anteversion. This puts your behind behind you, and from here, whether sitting or standing, your buttocks are in a position of mechanical advantage to drive your ride. Happy pedaling!


Riding with a tucked pelvis disadvantages the glutes and encourages a C-shaped spine.
It is very common in both amateur and professional cyclists. Unsplash


An anteverted pelvis brings your behind out behind you, giving more power to your pedaling, whether you are sitting or standing, and enabling a straight axis for your spine. 

If you are concerned about storing your bike securely with easy access, we recommend this article, which gives helpful advice on finding the best option to store your bike safely in a bike shed or a garden shed. Click here. 

If back pain or other musculoskeletal problems have been holding you back from cycling, or you would like to improve your fitness and posture when cycling, consider joining our Gokhale Exercise program. It will inspire and teach you how to apply Gokhale Method principles while on your bike, and in everything you do. Sign up for your 7-day free trial here.

If you are interested in learning the Gokhale Method principles referred to in this blog, in depth and customized to your needs, we recommend our Elements course (one-on-one coaching online), our Foundations Course (one-on-one or small groups in-person), or Pop-up Course (not available during COVID). 

Getting on a bike is a fabulous way to bring healthy activity, energy, and better posture into your life. We hope you feel inspired and empowered to do just that!

Please share your posture and cycling experiences here:

Which Shape is Your Spine?

Which Shape is Your Spine?

Esther Gokhale
Date

SCIJ isn’t a very memorable acronym, but the shapes of the letters do accurately represent the four most common spinal shapes. In this blog post you will discover which SCIJ category you belong in, what changes you might want to make, and the first baby steps to improve your spinal shape.


The letter “S” is widely used to describe the conventional paradigm for an ideal shape of the spine. The Gokhale Method perspective is that we need a paradigm shift.


Loren had developed a pronounced S-shaped spine before she took the Gokhale Elements online course. Tightened lower back muscles formed a pronounced lumbar curve, and her upper back had to round over to return her to upright. 

S. This is the spinal shape considered to be normal (as well as ideal) in today’s conventional wisdom. You will find the S template for spinal shape in lay circles, alternative health circles, as well as medical circles. Massage therapists, yoga teachers, physical therapists, and medics, are all taught the S-shape paradigm, which may include arguments about the strength of arches and “opposing curves'' and their ability to absorb vertical load like a spring.

The S-spine consists of a significant concave curve in the lower back meeting a significant convex curve in the upper back. From the Gokhale Method perspective, both curves are exaggerated and can lead to pain and dysfunction. This posture loads the spinal joints and takes a lot of muscular tension to maintain. It is the reason, we posit, that maintaining “good posture” has a reputation for being hard work. If this shape fits your spinal contour, it is unlikely to have been called out by either conventional or alternative practitioners. After all, it is the described ideal. If you have faced the frustration of having your back “go out” soon after an intervention, or your symptoms return again and again, a possible reason is that your S-shaped spine has never been recognized as the root of your problem, let alone be treated. 


This medical illustration (1990) displays the excessive curvature that can result in pinched nerves and compressed intervertebral discs. 

As both the vertebrae and the intervertebral discs have virtually parallel upper and lower surfaces, like a cylinder, the exaggerated curves of the S-spine create pinch points that can impinge on nerves, and cause wear and tear on the discs and degenerative change in the bones. Any of the tissues of the back, shoulder area, and neck might well “complain” about being obliged to maintain these contours.

An ideal first step to improving the shape of your S-spine would be stretchsitting. You can begin to learn stretchsitting here.


The letter “C” describes the most common modern posture of all—slumped.


The C-shaped spine will curve more at the top if we hunch more…


or curve more at the bottom if we tuck more…


either way, a C-shaped spine is bad news for our discs.

The C-spine is the product of slumped posture, with the tail tucked between the legs, shoulders rounded, and head forward. This compresses the front of the spinal discs, squeezing the interior contents (the nucleus pulposus) backward. This is the most dangerous direction to load the spinal discs since the nerve roots exit the spine right behind the discs. Slumping with a C-spine also overstretches and weakens the ligaments around the spine, undermining their ability to maintain the integrity of our all-important spinal column. Many people alternate between forcing an S-shape in their spine in the name of “good posture” (wrong!) and collapsing into a C-shape when they are fatigued from their efforts. Both these shapes in fact cause damage—in different ways—and need to be replaced with a J-shape (keep reading!). 

An ideal first step to improving the shape of your C-spine would be learning to use your inner corset, the deep muscles of the abdomen and back which support and protect the spine. This is explained in detail in my book, 8 Steps to a Pain-Free Back.

Free Chapter of 8 Steps to a Pain-Free Back

As a special gift to newsletter subscribers who have confirmed their subscription, we would like to send you the Inner Corset chapter from Esther's book, 8 Steps to a Pain-Free Back.

Please enter your email address in the field below and you will be sent an email with your Inner Corset chapter. You may receive a confirmation email to sign up to the Positive Stance newsletter first.

Free Chapter of 8 Steps to a Pain-Free Back


The I-spine shape results from a “sinking into oneself” without a significant increase in spinal curvature. 
Older people may develop an I-spine as they lose height due to spinal degeneration. Unsplash

The I-spine is common in older folk living in modern industrialized societies. There are no particularly pronounced contours in the spine, but rather a general “melting into itself” with the disappearance of 1 or more inches in height accompanying the aging process. The shrinkage is often the result of degeneration in the discs or mini-fractures in the vertebrae. Some diagnoses that might accompany this spinal shape include osteoporosis and stenosis. The pelvis is tucked, there is no angle between the buttocks and the back, and the buttocks are underdeveloped. Though the I-shape is most common in older people, it can begin at a young age with tucking the pelvis.


This photo of Taylor Swift shows how a tucked pelvis flattens the lumbosacral angle, and disadvantages the gluteal muscles, combining to produce a flat “behind." 

An ideal first step to improving your I-spine would be to learn stretchlying on your back.

The letter J represents the healthiest spinal shape. 


The shape of this Ubong tribesman’s back is best described as a J-spine.

Though rarely preserved in adults in modern industrialized societies, the J-spine is the shape we all enjoyed as toddlers and is still prevalent in many nonindustrialized areas of the world. This “J” is a modern, stylized “J,” reflecting the relatively straight alignment of the vertebral column and the pronounced angle at the lumbosacral junction. There is no exaggerated lumbar sway or thoracic curvature. You can see this shape embodied in the Ubong hunter’s torso. 


This medical illustration from 1911 more closely depicts the J-shape spine rather than the S-shape of modern conventional wisdom. The only pronounced curve is at the L5/S1 junction at the base of the spinal column.


Since taking the Gokhale Elements online course, Loren has made good progress in losing unwanted curvature in her back. Her upper lumbar spine has straightened out considerably. Over time, given her dedication, we expect to see her most pronounced curve move lower as she continues to cultivate her J-spine. 

If you are interested in restoring your J-spine, we recommend taking our Elements course (one-on-one coaching online), or our Foundations Course (one-on-one or small groups in-person) or Pop-up Course (not available during COVID). These courses teach you to systematically lengthen, strengthen, and remodel your spine to a healthier J-shape in a safe and effective way. 

To gradually and safely improve their spinal shape students learn well-honed techniques using their fingertips to monitor their spinal groove, kinesthetic and visual cues, customized exercises, and visualizations. Because it is still challenging to rely heavily on your proprioceptive sense, we have also developed the PostureTracker™, a tool that tells students exactly where they are positioned using Bluetooth sensor technology. PostureTracker tracks the shape of your spine in real time—it gives immediate and intuitive feedback, is easy to use, and reveals information about your spine that a plain mirror cannot show you. Though PostureTracker is not yet available for sale, it is available as a loner (while supplies last) to students who sign up for the online one-on-one Gokhale Elements course.


If you sway in your lumbar area, PostureTracker will show what is going on with your spine.

To get an idea of the current shape of your spine, view yourself side-on. You can use a mirror, but it is best to photograph or video yourself, or use several mirrors, so that you can observe your shape without turning your head. Take a while to study yourself both sitting and standing. Notice that your spine changes if you alternate between swaying and slumping. You may discover that your habitual posture combines elements from two or more of the categories we have described—for example, you may most closely resemble the I-spine, except that your head and neck jut forward.


The curves in our spines precisely reflect our everyday posture habits.

If you would like a trained eye to help you understand your spinal shape and how to improve it we recommend an online Initial Consultation with a Gokhale Method teacher. In-person Initial Consultations may also be available depending on the COVID status of your area.

How Bad Posture Can Crack Your Teeth — and How to Avoid It

How Bad Posture Can Crack Your Teeth — and How to Avoid It

Esther Gokhale
Date


According to Dr. Tammy Chen’s NY Times column, dental patients are suffering from an “epidemic of cracked teeth” due in part to posture. How can we avoid a similar fate? Image courtesy Engin Akyurt on Unsplash.

I recently came across a New York Times column by Tammy Chen, DDS, a prosthodontist with a practice in Manhattan, describing the “epidemic of cracked teeth” she’s seen in her patients during the COVID pandemic. Dr. Chen names two suspected culprits: the slumped posture many people adopt while working from home with improvised furniture, and excessive anxiety and stress. Both of these culprits lead to jaw clenching and tooth grinding.


This man’s C-spine — an intensely rounded upper back and tucked pelvis — are all too common in people working from home and on laptops. As Dr. Chen pointed out, such postural habits can have deleterious effects on the jaw.

The dangers of a C-spine
While working remotely, people are slumping and hunching at their computers more than ever before. For many unaware of how to sit healthfully, lack of access to office workspaces (and in some cases, ergonomic furniture) has been difficult to adjust to. Anyone plagued by a C-spine — with an intensely tucked pelvis below rounded, hunched shoulders — is doing themself some real damage if they don’t learn new ways of using their body. I’m always calling out the unhealthy stresses this puts on discs, nerves, bones, and ligaments in the back and neck, but the consequences of poor posture don't stop there.


Gaming posture also often tends toward a C-spine, to the detriment of gamers’ long-term spinal health, as well as jaw health.

As Dr. Chen points out, nerves passing through the neck and shoulder lead directly to the temporomandibular joint (TMJ). TMJ dysfunction is a widespread problem in our culture and can lead to pain, clicking, and popping in the jaw. So it stands to reason (and I’ve seen in my decades teaching) that hunched, slumped posture in the upper body, including the neck and shoulders through which nerves pass, has detrimental effects on the jaw.


The temporomandibular joint (TMJ) connects the jaw to the skull. Original image courtesy Wikipedia user Jmarchn under CC BY-SA 3.0.

Healthier posture = healthier teeth
Thankfully, learning new and healthful ways of using the upper body while sitting and sleeping is within all of our reach. When sitting, the alternative to collapsing into a C-spine is to first fix the foundation of the spine, which is the pelvis. When the pelvis is tucked under, it provides a wonky base for the spine to rest on. Like a building with poor foundations, the spine is then distorted as a consequence, rounding out the back to then cantilever forward with the upper body. This obliges the muscles in the neck and shoulders to do overtime supporting the substantial weight of the head, creating tension and compression all the way through to the jaw.

The remedy is to learn to position the pelvis well by stretchsitting or stacksitting — so named because they either allow the spine to stretch out straight (stretchsitting), or for the bones of the spine to stack upright and relaxed (stacksitting). Both enable sustainable shoulder placement, and a well positioned neck and head. Bingo! Their harmonious arrangement of bones and soft tissues gives our nerves the space and pathways they need to function happily.


Our jaws and teeth are among the body parts where anxiety and stress most noticeably take their toll. Image courtesy Nhia Moua on Unsplash.

Anxiety and stress affect the jaw
Jaw clenching and tooth grinding at night while sleeping are typically the result of anxiety and stress, both of which are increasingly common in 2020. This added pressure and friction on the dental surfaces are another factor Dr. Chen suspects in the high number of cracked teeth she’s seen in her practice since June. How can posture help here?


Learning stretchlying brings our students a level of comfort and rest many have never experienced before. Image courtesy Minnie Zhou on Unsplash.

The luxuriously comfortable and relaxed postures we teach for sleep help relieve tension all throughout the body and improve sleep quality. Better, deeper sleep gives us a more stable footing on which to meet the day, even in stressful settings, and can help our mental health considerably. Why not take steps to improve our sleep quality if it can help our health, both mental and dental?

We recommend stretchlying on the back because it supports and gently tractions the body in ways that allow muscles that have been overworking to finally relax, releasing their grip on the back, the neck and, yes, the jaw. It may seem surprising to link healthy posture and dental health, but it actually makes perfect sense that jaw tension and teeth grinding can have positional causes.

If you’d like to revamp your understanding of comfort and perhaps invest in something other than your dentist’s next vacation, try an Online Initial Consultation with one of our online teachers. We also have a new Free Online Workshop all about how you can use posture to relieve stress! We look forward to supporting you (and your pearly whites) in these challenging times.

Subscribe to C-spine