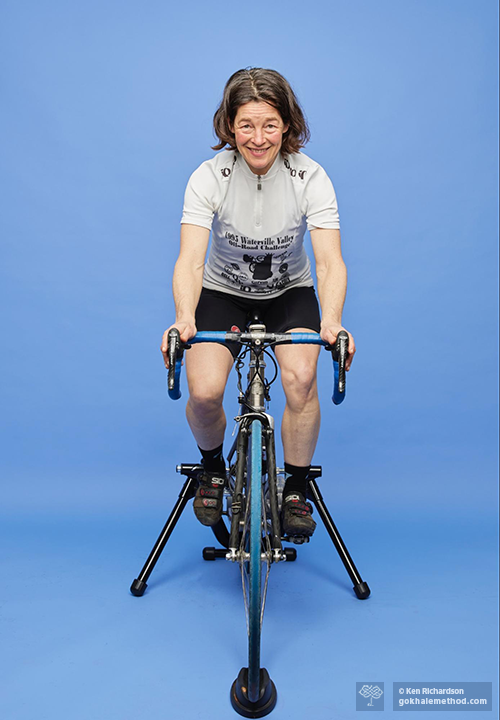
Knees

Kathy Nauman Success Story

Kathy Nauman Success Story

Kathy Nauman
Date

In 2014, at age sixty-four, I began to experience pain in my left hip that eventually became quite debilitating. For the first time in my life, I went to a chiropractor, which resulted in relief that lasted a couple of years. By 2015 I had consulted first one, then a second orthopedic surgeon, who recommended a hip replacement due to osteoarthritis. 

The first clinic I went to, I felt like I was visiting a bone and joint factory…I decided to wait. The second place, they were reading another patient’s notes! That doesn’t give you a lot of confidence!! Not feeling completely comfortable with either of the surgeons, I began doing my own research. 

Gokhale Method Alumna Kathy Nauman out hiking.
I longed to get back to hiking and walking pain-free.

I’m not one of those people who jump into things, especially surgery. So I went to a clinic where they did a lot of rehabilitative physical therapy and I asked one of the PT’s: of the people you work with who have success with their surgery, which surgeons do they use? And that’s how I found my hip surgeon. After a successful surgery in January 2016, as well as physical therapy sessions with the excellent physical therapist who recommended the surgeon to me, I recovered quickly and was thrilled to resume walking without pain.  

During the summer of 2018, while out shopping, I experienced both of my knees feeling as if they were on fire. My knees continued to bother me, but, afraid an orthopedic surgeon would tell me I needed surgery, I consulted a sports medicine doctor. He performed X-rays and confirmed that I had osteoarthritis in both knees. He suggested physical therapy and braces, as well as steroid shots (which I declined). Physical therapy helped to provide some relief as the muscles around my knees strengthened.

The following year, I read an article by Christiane Northrup, M.D., in which she shared information about the Gokhale Method®. I researched the method and learned that a one-day Pop Up course, one of the in-person ways to learn the Gokhale Method, would soon be offered in a nearby town, Boulder, Colorado. After the course, I did my best to focus on glidewalking, which did reduce the bone-on-bone knee pain.               

Gokhale Method Alumna Kathy Nauman bending, “Before” and “After”.     
Everyday activities, such as bending, are taught in Gokhale Method group courses. Bending can be done in ways that align the bones well, use muscles appropriately, and spare the joints. Learning to hip-hinge benefits the knees, hips, shoulders and neck, and more besides.

I made it until June 2021, when I had successful bilateral knee replacements with the same surgeon.  I opted to do them both at the same time to get it over with, but recovery was challenging. After weeks of physical therapy, I was told to just do normal everyday activities. However, I did not feel I was making the progress I wanted.

Gokhale Method Alumna Kathy Nauman’s post knee replacement X-rays.
My husband took these photos of my knee replacement X-rays at my 6-week post-operative follow-up appointment. Our joints are precious things to take care of!

Because COVID was still raging, I joined the new Gokhale daily online program. This enabled me to extend my recovery in a more enjoyable and focused way, and my knees became ever stronger. Even now, if I am unable to participate in the day’s live session, just receiving the email about the topic of the day is a great reminder and encourages me to focus on practice. And I regularly watch the replays if I miss a session.

Gokhale Exercise daily email image, mural of First Nation People, Sydney, Australia.
Gokhale Exercise members receive a daily email outlining the day’s program, complete with an inspirational posture reminder image. This was May 7, 2024.

In February 2023 I began experiencing pain in my hands and my left shoulder. I was diagnosed with Carpal Tunnel Syndrome (CTS) and given exercises and braces for my wrists/hands to wear at night. While the shoulder responded and had some improvement, my hands were still an issue.

At a follow-up appointment six weeks later, it was suggested I could have “a little surgery” on both hands to fix the issue. I looked up information about CTS and the surgery, and learned the pros and cons of having that done. I lived with the pain off and on until this year, when in early 2024 a diagnostic nerve test was performed by a neurologist to check the severity and cause of my particular CTS. Even though C7 (the seventh neck vertebra where nerves to the back of the arm, wrist, hand, and middle finger exit the spinal cord) was mentioned to me during the nerve assessment, the hand specialist who ordered the test did not mention it at a follow-up visit. He suggested surgery on both hands. A day after this appointment, I called the doctor’s office to find out more about possible C7 involvement and to ask if that might be the cause of my CTS. If so, how would surgery to snip the ligaments in my hands fix the problem? Since I never received a response, I did not schedule surgery.  

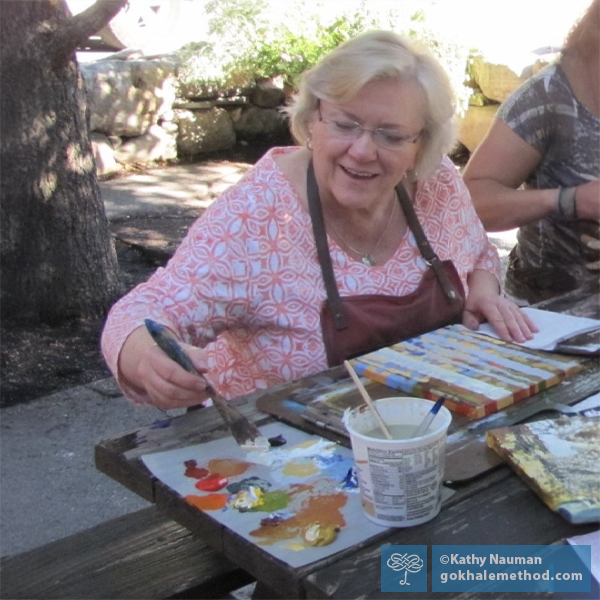
Gokhale Method Alumna Kathy Nauman sitting painting at art class.
Pain-free wrists and a mobile neck are important to enjoy my hobbies. Here I am on a painting course that my daughter and I took together.

An X-ray of my cervical spine in March did indicate osteoarthritis in my neck, which in our society would be regarded as “normal” for my age. I discussed this finding with my chiropractor, who uses the Gonstead Technique. She felt confident that regular, gentle adjustments of affected areas, found by palpation and the use of a heat sensor that indicates inflammation, could be successful in eliminating the CTS symptoms. She checked my grip strength and adjusted my hands and wrists. Because I had difficulty using my hands for so long due to pain and numbness, they had become stiff and weak. I was also given suggestions about what I might do to help with my neck after my appointment. This made me once again think about what more I could do to contribute to my own healing.

 2 of Gokhale Method Alumna Kathy Nauman’s neck X-rays.
My neck X-rays showed several areas of degeneration and misalignment that would potentially cause radicular pain. 

It had been almost five years since I first attended the one-day Pop Up course. I would say that up until recently, I had been somewhat “dabbling” in the Gokhale Method, without a full understanding or commitment to change my posture. Although chiropractic treatments helped to relieve my symptoms, I recognized that a healthy baseline posture was lacking, resulting in repeated misalignments. Understanding that an issue with my cervical spine might actually be the cause of my CTS, I finally came to the realization that I had been overly relying on others to fix me, and that I also needed to do everything I could to help myself. Just the thought of yet another surgery became extremely motivating!

That’s when I decided to circle back to the Gokhale Method. During an Online Follow-up with Esther in January this year, I explained that I wanted more confidence about what I should be doing for my posture and wanted coaching. Shortly after, I began the one-on-one online Elements course with Esther, which ended in April. In the early sessions, it was difficult for me to even get into positions that required me to use my hands and shoulders. By about halfway through the course, my pain from CTS had subsided, as well as the stiffness and pain in my shoulders which had not been in the healthy place they should be. I used to change up my mattresses and pillows a lot, but now I realize it’s not all about these external things—good mattresses and pillows can help, but how you position your body makes a big difference. 

Gokhale Method Alumna Kathy Nauman standing, front on, “Before” and “After”.
On a regular basis, non-genetic scolioses/asymmetries tend to diminish with standard Gokhale Method training—that is, without any special focus. In my case, it reduced the strain on my neck. This surprised and delighted me.

Now for the really great news! I have not experienced CTS at all since completing the Elements course. While I practice healthy posture with my whole body, as everything interrelates, my main focus has been on my neck, head, and shoulder placement. Chiropractic appointments have gone from bi-weekly, to weekly, and now, only occasionally. For weeks now, C7 has not needed an adjustment and it makes my heart so happy when my chiro tells me the instrument that measures heat and inflammation in that area is clear! She has seen how my improved posture is making a difference and has been extremely supportive of the Gokhale Method.  

My exercise and walking had greatly diminished over the years after the onset of osteoarthritis, pain, and then surgeries. My upper body has been my main concern recently, but other techniques, such as glidewalking, have greatly improved my mobility and stamina. I would like to take the Advanced Glidewalking course in the future. I am working my way back to a healthy weight and an active life—thanks to the Gokhale Method.    

In this video I share how glidewalking has enabled me to travel and walk longer distances in comfort.

Best next action steps 

If you would like to improve your joint health, get started by booking a consultation, online or in person, with one of our teachers. 

You can sign up below to join any one of our upcoming FREE Online Workshops

Give Your Walk the Green Light!

Give Your Walk the Green Light!

Esther Gokhale
Date

The best art often communicates on many levels. The Walking Men 99™ exhibit is a great example. It consisted of a frieze of pedestrian crossing icons, photographed and assembled from around the world. At human scale, they mingled with passersby on the sidewalk. 

Walking Men 99™ exhibition, Manhattan, NYC, 2010
Walking Men Worldwide™ is a series of public art installations by artist Maya Barkai, which was launched in Lower Manhattan in 2010-2013 (Walking Men 99™), and was followed by a series of installations around the globe. www.walking-men.com

From a posture perspective, signage featuring pedestrians offers us an overview of how modern urban people perceive, represent, and execute walking. Some lean back in line with the front leg, others lean forward in line with the back leg; some land with a bent front knee, others land with a straight knee; some have a straight back leg as the front leg lands, others do not. No other mammal on earth shows such variation in its locomotion!

Does variation in gait matter?

In traditional rural villages across Africa, India, and South America, when I study walking, I see a more uniform walking pattern. This holds true across different cultures, ages, and occupations. Intriguingly, this gait is also shared by our young children, and can be seen in antique photographs, paintings, and sculptures of our ancestors. It results in a uniquely smooth, elegant, powerful walk that is rare enough, it merits a special name, glidewalking

Four images of people of varying ages and cultures glidewalking.
Glidewalking describes the healthy and efficient human gait pattern shared across different generations and cultures.

Glidewalking is very different from the various stomps, shuffles, totters, bounces, and other strategies that people in modern urban societies bring to their walking. Any type of walk can get us from A to B, but anything short of what our bodies are designed for is likely to be inefficient and, over time, destructive. Twisting, swaying, slumping, or jerking the spine with every step causes compression, inflammation, damage, and degenerative processes. Suboptimal gait biomechanics are also largely responsible for our epidemic of knee, hip, and foot problems, which include cartilage wear and tear, joint arthritis, and plantar fasciitis.

Take a closer look at walking

In the Glidewalking chapter of my book, 8 Steps to a Pain-Free Back, I included a variety of pedestrian traffic signs to show how they can reflect and promote different gait patterns:

Detail of pedestrian crossing signs, Pg 170, 8 Steps to a Pain-Free Back, E. Gokhale
Taking a fresh look at pedestrian crossing signs—from a posture perspective. (Page 170, 8 Steps to a Pain-Free Back)

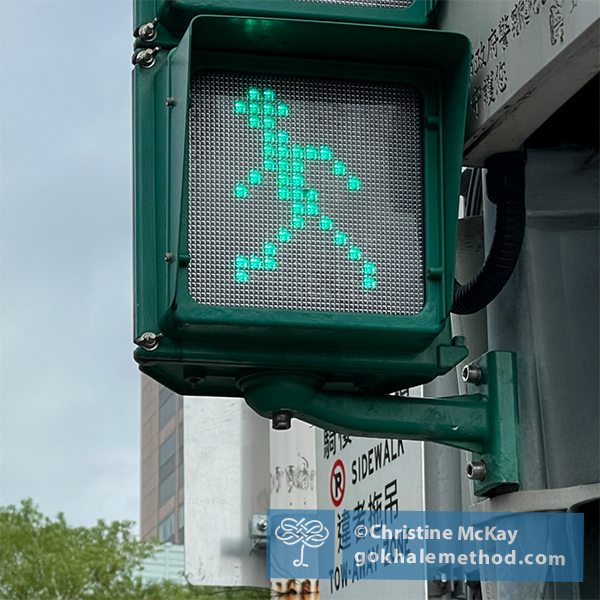
Most public signage reflects our confusion about walking. Signs often depict walking with either both legs bent, or both legs straight at the same time, or some other compromised configuration.

Three airport signs showing walking figure, weight aligned on the front leg.
These airport signs show weight aligned on the front leg and little effective propulsion from behind.

Straighten out your walking

A good first step (literally!) is to learn to straighten your back leg fully. This has numerous benefits: 

  • pushes the ground back strongly to propel you forward
  • encourages you to lean a little forward rather than backward 
  • encourages glute contraction 
  • encourages healthy pelvic anteversion
  • encourages your back heel to stay down and your foot to be active for longer
  • stretches your calves
  • is nature’s stretch for the psoas

We recommend you start practicing by walking uphill, or pushing a rolling chair or shopping cart, which makes all of the above benefits easier to find in your body. 

Stop sign showing walking figure, weight aligned with straight back leg.
This sign in the Philippines shows healthy walking form, with the torso angled slightly forward and the leg behind straight. Image from Bonifacio Global City

No entry sign showing walking figure, with both legs bent.
Unfortunately, this guy is not doing such a good job… Image from Angela Bayona(Toggear.com

Notice how these animated walking figures differ…but both have a straight back leg.


Take a step in the right direction 

Over the decades we have worked out how best to guide students through the process of improving their gait. Deeply ingrained poor walking habits can be replaced using tried and tested techniques in a step-by-step process.  This is covered in all of our beginning courses: our in-person Foundations course, one-day Pop-up course, and our online Elements course. 

Alumni can sign up here for our next Advanced Glidewalking Course, starting Monday, June 03, 12:00 p.m. PST and give your walk the green light!

Best next action steps 

If you would like to improve your walking, get started by booking a consultation, online or in person, with one of our teachers. 

You can sign up below to join any one of our upcoming FREE Online Workshops

How To Go Down Stairs (Part 2)

How To Go Down Stairs (Part 2)

Esther Gokhale
Date

Are you beginning to wonder if you will need to set up your bed in the living room? Do you think twice about visiting places with stairs? Do you have a friend or older relative facing this kind of challenge? 

Welcome to our second post on navigating steps and stairs. Our first post looked at how to power yourself up stairs—this one talks about how to come down stairs. This kind of “life exercise,” done skillfully, can be transformative and gives many benefits beyond getting you to where you want to go.

Two women descending steps.
Going down stairs is a functional exercise that doesn’t need a gym. Freepik

Walking downstairs gets you fitter than walking upstairs! 

Dr Michael Mosley, a well-known BBC health journalist, has a favorite study that had people walk either up or down the stairs of a 10-story building twice a week, using the elevator in the other direction. Both groups saw improvements in many health outcomes—but those walking down the stairs—perhaps surprisingly—did better. They were fitter, had a lower resting heart rate despite doing less cardiovascular exercise, lower insulin sensitivity, lower blood fat levels, better bone density, superior balance, and twice the improvement in muscle strength. You can read more about the benefits of eccentric rather than concentric muscle action here.

Safety first

Whatever your fitness and mobility level, follow these measures to use steps and stairs safely:

  • Use a handrail if appropriate
  • Watch out for slippery or unsound surfaces and trip hazards 
  • Wear well-fitting, non-slip shoes

Start with your stance

When descending stairs, it’s especially important to maintain a well-balanced stance from start to finish. You want to position your body in a shallow zigzag squat, or “ready position.” We teach this stance in detail in our in-person Foundations and Pop-up courses, and our online Elements course. As the name suggests, this stance makes us available for action and quick reaction.

Martina Navratilova ready for the ball, Prague Open, 2006.
A zigzag stance or “ready position” readies us for dance, sport, or stairs. Martina Navratilova ready for the ball, ECM Prague Open, 2006. Wikimedia

The benefits of a zigzag stance for walking down stairs

Having your behind behind with your torso angled forward from the hip joint while descending stairs has several benefits:

  • It keeps your center of gravity further back so you are less likely to fall. By contrast, if you tuck your pelvis, your center of gravity goes further forward, making it more likely you will slip. This is familiar to anyone who has been on a ski slope.
  • Your head aligns over your feet, allowing you to see where you are placing your feet more clearly. 
  • It makes it easier to antevert your pelvis and direct body weight through your knees in a healthy way. 
  • It is good practice for other activities like bending, sitting, squatting, and more. 

Man walking down steps with a healthy zigzag stance.
Gokhale Method teacher Eric Fernandez descends steps maintaining a zigzag stance.

Your glutes help you keep your balance

In coming down steps and stairs your glutes contribute to the important job of stabilizing your hips, pelvis, and sacroiliac joints. Together with other muscles they play a key role in keeping you balanced over your standing leg as the other one is smoothly lowered to the next step. The importance of our glutes for achieving stability through the hips and pelvis is one of the areas of convergence between conventional advice and the Gokhale Method®. Having your behind behind you in a zigzag stance enables the glutes to work optimally.

Try hovering in your zigzag stance for a while on one leg—you will soon feel your glutes working. Be sure not to tuck your pelvis, as this interferes with the glutes’ stabilizing ability.

Anatomy drawings showing gluteus maximus (left) and, underneath, gluteus medius (right). 
Knowing where your buttock muscles are situated can help you visualize them working: gluteus maximus (left) and, underneath it, gluteus medius (right). 

The quadriceps lower you down—as well as take you up

When descending stairs, the back leg quadriceps work eccentrically to lower you with control as your front foot approaches the step below.

Anatomy drawing showing the quads
The “quads” are four muscles on the front of the thigh that insert at the knee. Wikipedia


Notice the quads of the supporting back leg working to lower the body’s weight.

Externally rotated feet v. internally rotated feet

Another important ingredient in coming down stairs is external rotation of the feet and legs. This is the natural angle for the feet, and encourages optimal alignment of the knees, hips, and pelvis. 

Woman in Odisha, bare feet pointed outward, close-up from behind 
The feet of this woman in Odisha, India, have retained a healthy angle outward.

Externally rotated feet are also preferable to feet straight ahead as this enables more of your standing foot to contact the step securely while you lower your other leg. 

Feet descending steps, externally rotated, front view.
Externally rotated feet encourage healthy alignment of both the foot and leg.

Internally rotating your feet will, over time, collapse your arches, and create bunions and knee problems. You will also be more likely to trip over your toes. If you currently have this habit, adopt a mild turnout of about 5° to give your muscles and joints time to adapt to change. You can read more about foot angle here

Feet descending steps, internally rotated, front view.
Internally rotated feet are problematic for your structure, and your safety.

Best next action steps for newcomers

If you would like insight on your posture, consider scheduling an Initial Consultation, online, or in person.

You can sign up below to join one of our upcoming FREE Online Workshops. . .

The New Year 3 x 3 Fitness Challenge: Strength without Strain

The New Year 3 x 3 Fitness Challenge: Strength without Strain

Esther Gokhale
Date

We’re here to help with your New Year’s fitness resolution. Join us for a FREE 10-day New Year 3 x 3 Fitness Challenge, which is offered as part of the Gokhale Exercise program. It will be fun, safe, and effective, enabling you to build your strength without strain and injury, because, all the while, you are also training for healthy posture! 

The Gokhale Exercise banner showcasing six different program teachers.

Your 10-day challenge consists of three sets of three (3 x 3) popular exercises. Our approach to these well-known exercises is unlikely to be found in any standard gym or fitness program where, unfortunately, poor postural habits go undetected or are even unknowingly promoted. Here the exercises will be taught with our “Gokhale filter” to respect what is natural and healthy for your body.

The New Year 3 x 3 Challenge Exercises:

Exercise #1: Push-ups

Push-ups are a highly functional exercise that will assist you with many daily tasks and a range of activities—getting up from the floor, yoga, weight training, gardening, pushing heavy doors or strollers, etc.

A lot of people, especially women, have difficulty supporting their weight with their arms; their upper body muscles are much weaker than lower body muscles. That was certainly my story.

To this day I haven’t yet done a full push-up though I am getting tantalizingly close thanks to our Gokhale Fitness and Yoga programs. I can now lower myself to the ground with full control, (an excellent eccentric exercise, which you can read more about here), and can push up from part way up. I am hopeful that the 10-day New Year 3 x 3 Challenge will take me all the way! 

Gokhale Method teacher Eric Fernandez demonstrates a push-up with poor form.
This push-up is done at a bench rather than on the floor to be easier. However, common problematic habits can still creep in, as Gokhale Fitness teacher Eric Fernandez demonstrates.

Gokhale Method teacher Eric Fernandez demonstrates a push-up with healthy form.
This push-up shows healthy form.

Exercise #2: Squats

Growing up in India, I was surrounded by people sitting on the floor and squatting frequently throughout the day. These habits contribute to greater mobility in the formation of the hip joint, and flexibility in the tissues surrounding the hip joint. 

People in our culture rarely have this degree of mobility and flexibility in the hips and ankles, and so squat poorly in a way that does damage—rounding the back and pronating the feet. This is more of a collapse downward than a well-supported, well-aligned squatting movement. 

In the 3 x 3 Fitness Challenge, Eric will show you how to do squats in a safe way, to boost the strength of your knees, quads, glutes, thighs, and whole lower body. Done well, deep squats are not only safe—research shows that they can improve the health of knee menisci and cartilage, ligaments, and bones.

Gokhale Method teacher Eric Fernandez demonstrates a squat with poor form.
This squat demonstrates poor form, such as internal rotation of the legs. 

Gokhale Method teacher Eric Fernandez demonstrates a squat with healthy form.
This squat demonstrates healthy form.

Exercise #3: Deadlifts

Often known as a Romanian deadlift due to its popularity among weightlifters in Eastern Europe, a deadlift strengthens almost everything on the back of your upper and lower body. It is also a good exercise to test and develop hip mobility, and to develop bone density. 

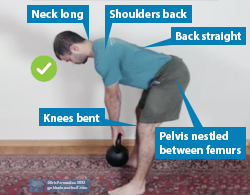
The deadlift utilizes our primal way of bending, which we call hip-hinging. Hip-hinging is instinctively used by our infants, and widely by adults in many parts of the world where traditional patterns of movement have been maintained. Hip-hinging is taught in our Gokhale Method® in-person Foundations and Pop-up courses, and our online Elements course.

Gokhale Method teacher Eric Fernandez demonstrates a deadlift with a kettlebell and poor form.
This deadlift demonstrates common mistakes such as rounding the back.


This deadlift demonstrates healthy form.

Here’s your Challenge:

Day 1: You’ll test how many reps of each exercise you can do in a minute. You’ll take a minute’s rest between each of the three sets, and between each exercise. 

Days 2–4: You will do other exercises that compliment and build up your strength for the 3 x 3 Fitness Challenge.

Day 5: Check-in on your goals.

Days 6–9: Continue with strength training.

Day 10: You’ll go through the challenge again and see in what ways you have improved. Expect an improvement in your strength, in the number of reps you can do, and in your range of motion!

Is this fitness challenge suitable for everyone?

The 3 x 3 Fitness Challenge is designed for practically everyone, with easier options given for those taking steps towards the full exercise, and additional challenges for those who find them relatively easy. 

People are often surprised at how working with healthy posture changes their experience of an exercise—depending on the situation, you may feel stronger and lighter, for example. Or you may discover that you were unknowingly “cheating” and can benefit your body by making different, healthier efforts.

If you have had an injury or surgery recently, or have a particular health issue, we recommend that you seek the advice of your preferred physician or health professional before starting the Challenge. We encourage everybody to work within their capabilities—this is not a no-pain, no-gain program!

I look forward to meeting you as we challenge ourselves to greater fitness, and healthier posture.

If you would like to find out more about how the Gokhale Method can help support you, sign up to join one of our upcoming FREE Online Workshops. . .

Running: Part 6: Upper Body

Running: Part 6: Upper Body

Michelle Ball, Gokhale Method teacher
Date

Welcome to the sixth blog post in our series on running. My name is Michelle Ball, and I am a Gokhale Method® teacher living in Tasmania. I am also a lifelong runner and am passionate about sharing the benefits of healthy posture with the running community, be that beginners, seasoned runners, or anyone in between. Even if you walk rather than run, the posture principles outlined in this post can still help you to enjoy an active and pain-free body well into old age.

Running with a well-positioned upper body

In this post we will consider the upper body. Runners are inclined to pay far less attention to the upper half of the body than the lower half, as they focus on gait pattern, cadence, footwork, and propulsion. This is hardly surprising, but the lower body, while super-busy, really is just half the story. 

Healthy posture in the upper body brings the following benefits:

  • Protected spinal structures
  • Improved biomechanics
  • Unimpeded flow and momentum
  • Support that makes the body feel lighter
  • Athletic appearance

4 elite female runners in profile showing healthy form.
Healthy posture principles are important for the upper body as well as the lower. Implementing them can both protect your spine, and bring mechanical advantage to your running. Unsplash

I have found the upper body principles that we teach in the Gokhale Method® in-person Foundations and Pop-up courses, and our online Elements course, made a world of difference to my running. Let me share some key points with you. . .

Anchoring your ribs

As explained in my previous post, Running: Part 5: Anteverted Pelvis, a forward leaning position when running helps to avoid compression in the lower back. In our culture it is common that people have tight lower back muscles (erector spinae), and weak opposing muscles of the torso (internal obliques). This creates a sway back, which pulls the torso into a backward leaning position. A deliberate forward lean will help counter this. 

Gokhale Method teacher Michelle Ball running angled forward, side view.
Here you can see me keeping a consistent forward angle throughout my torso, neck, and head.

Most people will benefit from some degree of forward rotation of the thorax to fully correct a sway and bring their torso into a straight and healthy alignment. This adjustment can be made and maintained by engagement of the internal oblique muscles, or rib anchor, as we Gokhale Method teachers call it. The rib anchor can be learned with a simple but precise maneuver which you can learn here

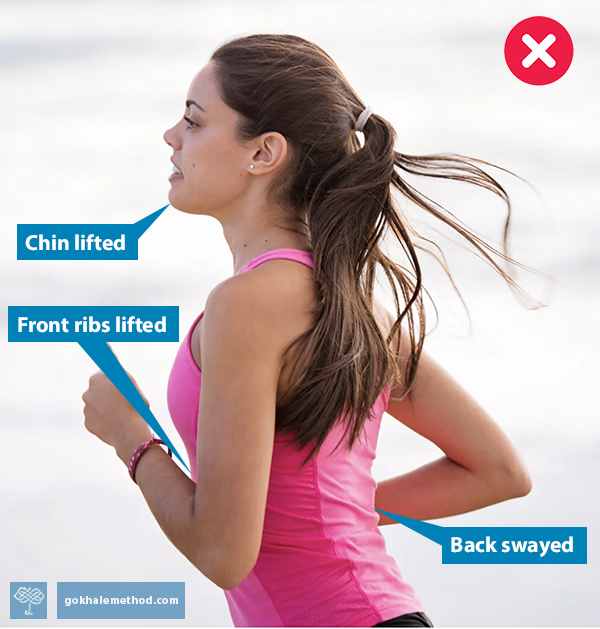
Female runner (upper body) in profile showing swayback and lifted chin.
Overly contracted back and neck muscles can give a misleading feeling and appearance of being upright. In reality, overly muscles are pulling the lumbar and cervical spine into compression, threatening discs and nerves. Pexels

Deeper support and protection for your spine

Running is classed as a “high impact” activity. This is one reason to run with the best posture and technique you can. Even if you are running smoothly with impeccable form, running will generate additional forces that impact the spine on landing. Perhaps that is how “jogging” got its name! 

Using your inner corset while running lends natural protection to the joints, discs, and nerves of the spine in two important ways. Firstly, it creates and maintains length, and secondly, it confers stability, preventing untoward twisting, forward, back, and sideways movement. The trunk and pelvis remain a single unit, with no jiggling from micro-flexing and extension, or bobbing up and down—and the head travels at a continuous level, sparing the neck. In these respects good running form is the same as good walking form. The spine and its tissues are saved from both acute injury and long-term wear and tear. How to find and deploy your inner corset is explained in detail in Esther’s bestselling book, 8 Steps to a Pain-Free Back.

An S-shaped spine medical illustration from 1990, and a J-shape spine from 1911.
These two medical illustrations from 8 Steps to a Pain-Free Back show how, in modern times (e.g., 1990), deeper spinal curves have come to be regarded as normal and desirable. The Gokhale Method advocates a return to a straighter, longer spinal shape (e.g., 1911). 

Avoiding neck pain while running

Deep engagement of the inner corset will preserve length in the lumbar spine, and this supportive structure also encourages length in the cervical spine, or neck. In addition, locally, the longus colli muscle, which attaches to the front and side of the neck and upper thoracic vertebrae, needs to be engaged to draw the neck back into a tall, lengthened position in line with your body. 

 Anatomical drawing of the longus colli muscle.

The longus colli muscle (seen here in red) draws the vertebrae of the neck back into a healthy, tall, and spacious alignment. Wikimedia

Gliding your head up and back, while allowing your chin to rest down, will provide stable and relaxed carriage for your head, and a happier neck. You can learn how to glide your head back here.

Woman running with head and neck back in line with body, side view
Your head and neck want to remain back in line with your body, even as you lean forward. 

Man running with tucked pelvis, internal rotation of feet and legs, rounded torso, and forward head carriage
You don’t want to jut your chin forward and let your head literally run ahead of you. Pexels

Trunk stability

The trunk stability that protects the spine also enables efficiency when running, as energy is not dissipated into incidental movements that detract from forward motion. It enables all propulsion to be well channeled, rather than just pulling the spine around. As running expert Marc Cucazella reminds us, ‌“You‌ ‌can’t‌ ‌fire‌ ‌a‌ ‌cannon‌ ‌from‌ ‌a‌ ‌canoe.”‌ In the upper body this propulsion comes from the arms.

Arm movements in running

Whereas in glidewalking the arms largely rest, in running the arms actively contribute to propulsion and alternate with the leg action. In sprinting the arms are especially important, moving straight forward and back like pistons on either side of the body. The arms‌ ‌are bent at‌ ‌45 degrees ‌or‌ ‌slightly‌ ‌more,‌ with the hands‌ ‌moved ‌in‌ ‌a‌ ‌circular‌, ‌‌rearward‌ ‌pull motion,‌ ‌‌as‌ ‌if‌ ‌you‌ ‌were‌ ‌chopping‌ ‌wood.‌ The arms‌ ‌then‌ ‌recoil‌ ‌forward,‌ ‌very slightly rotating‌ the shoulders‌.‌ What you don’t want is the arms to be crossing the midline of your body and pulling you off balance. Arm action can be much more relaxed at an easy jogging pace or in distance running. 

4 elite female sprinters in profile showing strong arm action.
The vigorous piston action of the arms in sprinting requires a well-configured shoulder joint. Unsplash

Whatever your running speed, it is extremely important that the shoulders be well positioned, so that the joint—where the bone of the upper arm, shoulder blade, and collarbone meet—can connect well, and the soft tissues, nerves, and circulation can function optimally. You want your shoulders to be happily at home in their natural, posterior position. You can learn how to roll your shoulders back here.

Open, posterior shoulders will also help you to access breathing in your upper chest. If you tend to hunch forward, draw your elbows more together behind you to assist the external rotation of your shoulders.

Relaxed and bouncy shoulders

In gentler jogging and long distance running, the shoulder area can be more relaxed. Healthy alignment within the shoulder joint is still important for the hundreds of to-and-fro arm reps, and to cushion the impacts traveling through the joint with every stride. A healthy postural relationship between the upper back, the shoulder girdle, and the neck will help the shoulders to be responsive rather than held tight, and to bounce a little as you run. 

Anatomical drawing of the trapezius muscle.
The trapezius muscle is at the center of healthy upper back, neck, and shoulder posture. It helps the shoulder to lift, lower, and gently bounce through impactful movement. Wikimedia

Stick or twist?

The synchronized alternation of arm and leg movement is vital for momentum and balance during running. This will be integrated by the torso twisting somewhat. There is a counter movement of pelvic rotation backward as the chest moves forward on the opposite side. The key is neither to over stiffen, nor over twist the torso. A stiff body keeps the hips from extending fully, can shorten your stride, and puts more pressure on the knees and leg joints. Over twisting can cause a “sloppy” run and impinge on the spinal joints. This is where staying tall with a strong inner corset is invaluable, as the inner corset allows healthy rotation both through and beyond it.  

In particular, avoid an upper/lower torso separation with twisting happening almost entirely at the T12/L1 junction, where the ribs meet the lumbar area. Twisting here is sometimes misguidedly encouraged to help power the arms, especially in fitness walking classes. However, there is no ball and socket joint at T12/L1 that makes swiveling here a good idea for the spine! 

South African sprinter Wayde van Niekerk running, side view
This runner’s torso shows considerable rotation, but it is distributed along the spine—it does not twist at just one point. South African sprinter Wayde van Niekerk sets a world record at the 2016 Olympics. Alessandro Bianchi / Reuters

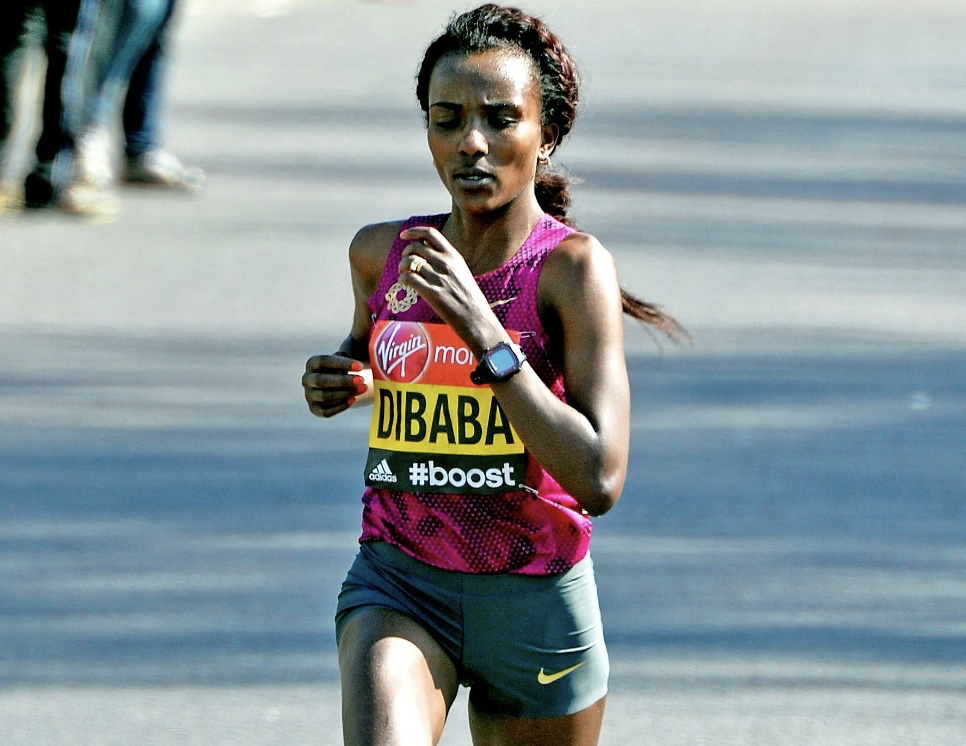
Olympic gold medalist Tirunesh Dibaba running, front view
Olympic gold medalist Tirunesh Dibaba also shows even rotation of her torso from hip to opposite shoulder. I’ve also noticed that most East African runners have a significantly higher arm carriage, and are among the best runners in the world. Bretta Riches – Run Forefoot

If you would like guidance on any aspect of your posture and/or running, including your head, neck or shoulder position, consider scheduling an Initial Consultation, online or in person, with a Gokhale Method teacher.

Here are previous running posts you might like:

Running P1: Introduction, Esther Gokhale

Running P2: Meet Your Feet, Michelle Ball 

Running P3: How to choose running shoes, Michelle Ball 

Running P4: Taking care of your knees, Michelle Ball

Running P5: Anteverted Pelvis

If you would like to find out more about how the Gokhale Method can help support you, sign up to join one of our upcoming FREE Online Workshops.

Running: Part 5: Anteverted Pelvis

Running: Part 5: Anteverted Pelvis

Michelle Ball, Gokhale Method teacher
Date

Welcome to the fifth blog post in our series on running. My name is Michelle Ball, and I am a Gokhale Method® teacher living in Tasmania. I am also a lifelong runner and am passionate about sharing the benefits of healthy posture with the running community, be that beginners, seasoned runners, or anyone in between. Even if you don’t run, but do want an active and pain-free body well into old age, this blog post is for you!

What is an anteverted pelvis? 

Pelvis refers to the bony pelvis, and means basin, or bowl, in Latin. Anteverted means tipped, turned, or inclined forward, from the Latin ante to go before or in front, and vertere to turn. So we are referring to a pelvis that tips forward. 


The angled belt line of the Ubong tribesman on the left shows that his pelvis is anteverted—mildly tipped forward. Contrary to popular belief, an anteverted pelvis does not cause excessive lumbar lordosis (sway back) when there is a healthy angle at the L5-S1 junction. His back remains surprisingly straight by conventional standards. 

Three standing figures in profile showing anteverted, “neutral”, and tucked pelvis
(a.) An anteverted pelvis facilitates heath posture. The commonly advocated “neutral pelvis.” (b.) is actually mildly tucked and does not allow the correct lumbo-sacral angle and stacking of the spine. (c.) A markedly tucked (retroverted) pelvis leads to a tense, compressed lumbar area, or to slumping., 

How an anteverted pelvis benefits the spine:

As you see in the image above, an anteverted pelvis (see example (a.)), is the foundation for a healthy, straighter, more vertical spine, which does not sway or round. It provides the correct orientation for the sacrum to support the L5-S1 disc, which is wedge-shaped, and then for the L5 vertebra and those above to stack well. A tucked pelvis, over time, will likely cause the L5-S1 disc to suffer wear and tear, bulging, or worse, and put pressure on the sciatic nerve roots.


(a.) An anteverted pelvis preserves the wedge-shaped L5-S1 disc. (b.) A tucked pelvis cannot accommodate this and the lower discs will suffer undue pressure and bulging toward the nerve roots.


Like the Ubong tribesmen and people throughout the nonindustrialized world, these elite runners show both an anteverted pelvis and an upright torso. Unsplash

Running leaning forward

Some running coaches teach a forward lean of the torso, which I agree reproduces some of the benefits of a healthy L5-S1 angle for runners who are currently stiff at that joint and therefore slightly tucked if they remain upright. Leaning forward helps compensate for any lack of L5-S1 angle, and harnesses power from the energy of impact when the back leg pushes off. 

Leaning forward is strongly advocated in the ChiRunning technique, which was developed by Danny Dreyer. You can watch Esther in conversation with Danny here, where he explains his approach.

Graphic over photo of runner in profile showing benefits of leaning forward 
Danny Dreyer advocates a forward lean when running, with shoulders, hips and ankles aligned. This is a useful technique to help orient the pelvis, especially if the L5-S1 angle does not allow for the torso to be upright. It also provides additional momentum.


World-renowned Kenyan runners often run with a good L5-S1 angle that anteverts the pelvis, combined with only a slight forward lean. Flikr

Powerful glutes 

An anteverted pelvis also confers mechanical advantage to the buttock muscles. With the behind behind, they can contract powerfully to pull the legs back and aid propulsion. Under-developed glutes are a common casualty when the pelvis is tucked. 


You can see here that I am running with my pelvis anteverted, and a slight lean forward, both of which put my glutes behind to help power my stride.

It is important that, in an effort to get your behind behind, the anteverted pelvis is not mimicked by simply sticking your bottom back with tension (sway) in the lower back. The pelvis needs to settle into anteversion naturally, with healthy articulation at the L5-S1 joint, relaxed back muscles and hip joints, and healthy alignment throughout the body. Gokhale Method teachers have the techniques and expertise to help you get there without inadvertently creating more postural problems. 

Young woman running with behind behind but swayed back
This runner has her behind behind her—but, as the creases in her top confirm, she is tensing her back into a sway and lifting her front ribcage to get there. Pexels


This footballer has his behind behind with an anteverted pelvis that articulates at L5-S1. His torso remains largely straight, which enables him to twist with good length in his spine, rather than compounding compressed discs and nerves. Pixabay

I find it interesting that a forward-leaning stance which aligns the torso with the extended back leg and supports pelvic anteversion is also a key ingredient in learning to glidewalk. Glidewalking is taught in detail in our Gokhale Method® in-person Foundations and Pop-up courses, and our online Elements course. Glidewalking produces a natural, smooth and powerful gait, which in particular strengthens the glutes and the feet. Students who have learned glidewalking find their running improved by the Downtime Training™of simply walking—but walking well. 

Good hip health

The anteverted pelvis is part of nature’s blueprint for healthy human posture and sound biomechanics. It is no surprise therefore that it confers many benefits throughout the body. An anteverted pelvis gives the best fit and function for the hip joints, avoiding the misalignments that occur with tucking. Poorly aligned hips can cause bursitis, labral tears, and osteoarthritis within the joints, and soft tissue issues such as muscle strains, tendonitis, and ITB (iliotibial band) problems further down. 


Jogging or walking with a tucked pelvis encourages tight hip joints, internal rotation of the feet, legs, and hips, rounding of the torso, and forward head carriage. Pexels

Pain in the knees, lower legs, and feet 

When runners get pain in their knees, lower legs, or feet, one of the last places they are likely to look for a remedy is their pelvic position. They are far more likely to blame their shoes! While the right shoes are important, (see Running P3: How to choose running shoes), it is often a revelation for runners to realize how the angle of the pelvis affects their gait. 

One serious problem with tucking the pelvis that hits runners particularly hard is excessive heel strike. While this may also occur in walking with a tucked pelvis, running or even slow jogging will mean that an unduly forward thrusting front leg will suffer more impact. This may result in not only wear and tear, but immediate and painful damage, as the femoral head (top of the thigh bone) is jammed back into the hip socket, and the knee joint of a more forward and likely more straightened leg is jarred.  Sticking the heel forward is like ramming the brakes on while still stepping on the gas! The answer to a thudding heel strike is not to buy excessively padded shoes, but to antevert the pelvis.


A tucked pelvis points the thighs forward, resulting in an excessive heel strike and jarring through the front leg knee and hip. sportssurgeryclinic.com


This runner has her behind behind, but the orientation of her pelvis comes from a
swayed lumbar area, not from L5-S1. The front of her rib cage and chin are pulled up.
She is about to heel strike—bad news for her straightened front leg and hip joint.
Unsplash

Doing a much better job, an anteverted pelvis:

  • Puts the muscles and soft tissues, especially the glutes, in a position of mechanical advantage, without threatening the lumbar spine
  • Enables better weight distribution and therefore bone health 
  • Places the thigh in a healthier position to absorb forces in the hip socket 
  • Allows landing with a bent front knee, with better shock absorption 
  • Facilitates a light heel/midfoot landing, avoids excessive heel strike, is more energy-efficient

Female runner in back/profile view showing good form and anteverted pelvis 
This runner has good form. Her behind is behind because of a pronounced angle at L5-S1 (anteverted pelvis). Her back remains largely straight, her shoulders back, her neck tall. She will land without unduly jarring her joints. Unsplash

Support for the pelvic organs 

An important benefit of an anteverted pelvis is that the bones of the pubis are able to play their part in supporting the pelvic organs. Organ prolapse and incontinence can affect everyone, especially as we age, and is also a common problem in our culture for women during or after pregnancy. When the pelvis is tucked the organ support is overly reliant on the soft tissues of the pelvic floor, such as the Kegel muscle.

 Two diagrams in profile showing anteverted and tucked pelvis effect on pelvic organs.
(a.) With an anteverted pelvis, the pubic bone is positioned to support the pelvic organs. (b.) With a tucked pelvis, the Kegel muscle is obliged to assume this role.

There is nothing worse than getting a run in and having to use the bathroom, especially if there is not one available! Heather A. Dunfee is a physical therapist in the Mayo Clinic Healthy Living Program, and a certified Pregnancy and Postpartum Corrective Exercise Specialist. She does not refer specifically to the anteverted pelvis, but she is clear that tucking the pelvis is bad news:

For runners, good alignment can help your core to better absorb impact, preventing leaks. For example, a slight forward lean helps to put your deep core "canister" in the best alignment to do its job. Think about stacking your rib cage over your pelvis, something that comes naturally when running uphill. . . Hills are great because they force the body into a position of rib cage over pelvis and untuck the bum.

If you would like guidance on any aspect of your posture and/or running, including pelvic position, consider scheduling an Initial Consultation, online or in person, with a Gokhale Method teacher.

Here are previous running posts you might like:

Running P1: Introduction, Esther Gokhale

Running P2: Meet Your Feet, Michelle Ball 

Running P3: How to choose running shoes, Michelle Ball 

Running P4: Taking care of your knees, Michelle Ball

If you would like to find out more about how the Gokhale Method can help support you, sign up to join one of our upcoming FREE Online Workshops.

Hypermobility

Hypermobility

Esther Gokhale
Date

Flexibility in the body is generally regarded as a plus, and most people want more of it. Flexibility is seen to enable a wide range of motion, avoid muscle pulls, and spare wear and tear in overly tight joints. But like most things in life, you can have too much of a good thing. In this blog post we are going to look at why excessive mobility has a downside and how healthy posture can mitigate that.

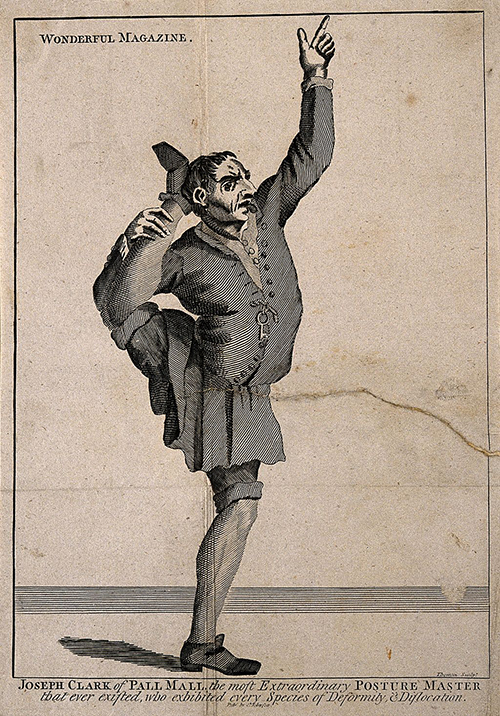
An exceptional range of motion makes for a very “bendy” looking body. Enter the age-old art of the contortionist, a mainstay of acrobatic troupes, circuses, and fairs, which for centuries have enthralled and appalled audiences in equal measure. 


“The most Extraordinary Posture Master.” Wikimedia
Engraving of Joseph Clark of Pall Mall, London, England, by Thornton, c. 1690

What is hypermobility?

An unusual degree of flexibility is still sometimes referred to as being “double-jointed,” but this is poetic license and inaccurate—hypermobility is a better term. Hypermobility is usually due to laxity in the ligaments that holds one bone to another, forming the joint. Hypermobility enables more rotational movement in ball and socket joints such as the hip, more “bend” at hinge joints like the knee and elbow, and also larger angles of bend between the vertebrae of the spine. Hypermobility can be genetic, acquired by persistent over-stretching, or a combination of both. 

The Beighton score, along with other criteria, is used to assess hypermobility. It gives 1 point for each elbow and knee that hyperextends by 10 degrees or more (4 points), 1 for each little finger that bends back by 90 degrees (2 points), 1 for each thumb which can be touched to the forearm (2 points), and 1 for touching the floor with the palms. Wikimedia

Hypermobility can do damage

Unfortunately, there is a high incidence of injury associated with over-stretching ligaments, which lack abundant blood supply to repair themselves and the elasticity to return to their baseline length. Most professional dancers, gymnasts, or acrobats are trained from an early age to further enhance their natural flexibility with stretching regimens. But this can be taken too far. 


Israeli rhythmic gymnasts at the 2012 London Olympics. Note the hyperextension of the center gymnast’s standing leg,
 which bows backward.
Wikimedia

A memorable example of taking flexibility and stretching to the point of damage was the career of gymnastics champion Olga Korbut. Having won gold at the 1972 Olympics she toured West Germany. In her autobiography she wrote, “During that tour of Germany, the lumbago in my back began to hurt more and more. The Novocaine injections took away the pain for a while, but I needed time to rest and heal. By the end of the tour, I walked as though I had a stake in my spine.” 


Olga Korbut demonstrating her prowess on the beam. Her upper lumbar spine is being pushed into significant curves. Alchetron

Protecting the spine

It is common to find vertebrae that have become hypermobile where the adjacent section of spine has become stiff and lacks movement. This can be a particular issue in movements such as a golf swing, where it is important that the rotation be distributed appropriately through the whole body rather than achieved by an extreme twist between a few vertebrae.


Tiger Woods follows through with rotation throughout his body, not just twisting at the waist. Flickr

Hypermobility in the spine can result in damage to all its structures. The vertebrae may lay down problematic extra bone in an effort to protect the area. The discs are also at risk of wear and tear and herniation, and the nerves risk compression. Muscles may become hypertonic (held tight) or spasm in an effort to stabilize the area and protect the delicate structures of the spine.

If you do have a genetic disposition to hypermobility, then it’s important to have adequate strength in the muscles surrounding the affected joints to maintain good alignment. Equally important knowledge of healthy posture will ensure you know how to find and keep ideal alignment. 

Protecting elbows and knees 

If you have hypermobile elbows and are on all fours, don’t “park” into those joints. You want to retain a little “give” at the elbow creases. This works the muscles around the elbow joints, affording them protection and encouraging the hands to also be responsive rather than compressing the wrist joints as they take all the weight. 


Avoid locking out your elbows, which pushes into the joints and further distends their ligaments. In the example above, the hands are inactive and all the weight is pressed into the wrist joints. Freepik

Similarly, if you have hypermobile knees, you don’t want your knees to go past straight to bow backward when standing. If this is a habit for you, join me on the 1-2-3 Move program on Monday, September 6 and I will show you a couple of dance techniques to displace this habit. You can also join Eric for Gokhale Fitness on Tuesday, September 7 when he will share an exercise approach to maintaining healthy knee joints.

If you would like to join either or both of these classes but have not yet subscribed to the 1-2-3 program, sign up now for your 7-day Gokhale Exercise Free Trial.


1-2-3 Move happens daily with Esther or guest teachers at 9:45 a.m. (Pacific Time)
Gokhale Fitness with Eric runs Mondays, Wednesdays, Fridays from 7–7:25 a.m.
(Pacific Time), and Tuesdays, Thursdays, Saturdays from 3–3:25 p.m. (Pacific Time)
Gokhale Moving Meditation with Roberta is Mondays at 2 p.m. and with Kathleen is Wednesdays at 12 p.m. (Pacific Time)

Flexibility in your body is a wonderful thing. It looks good, and feels good, but requires some wisdom in its usage. The Gokhale Method® approach to movement and exercise is always holistic, supports good posture habits, and develops the necessary strength to protect the joints from injury. 

If you would like an expert one-on-one assessment of your posture and flexibility you can arrange an Online Initial Consultation or take an in-person Initial Consultation if you have a Gokhale Method Teacher near you.

Five Posture Tips to Power Your Cycling

Five Posture Tips to Power Your Cycling

Tiffany Mann, Gokhale Method Teacher
Date

This is Part 3 of a three-post series on cycling with healthy posture by Gokhale Method teacher and longtime cyclist Tiffany Mann. Read Part 1 and Part 2 here.


Gokhale Method teacher Tiffany Mann is passionate about 
combining her cycling and posture expertise.

Spring has arrived, and perhaps like many people, you want to spend more time on your bike! Maybe you’re already an avid cyclist looking for some tips to make cycling more comfortable and sustainable for years to come; or you’ve taken a break and are ready to step back on the pedals. Perhaps you just want to get up those hills! 

Even if you are a beginner, it is so satisfying and pleasurable to use your own muscle power to propel yourself on this simple machine; but it is still well worth looking at how to use your energy as economically as possible. Cycling doesn’t have to be superhard work, and you can benefit your posture at the same time.

My last blog post focused on keeping your arms, neck, and shoulders comfortable when cycling. In this post I want to pass on some simple tips on how best to pedal and use your legs efficiently. 

As in any physical activity, good form is essential for the best transfer of effort, minimizing fatigue, and reducing wear and tear on the body by using relevant muscles and sparing others. You can still get an excellent whole-body workout if you want to pedal hard, but your chance of injury will be far lower. 

Tip 1. Get your saddle height right 

Having your saddle either too high or too low can make pedaling miserable. The saddle wants to be at an optimal height for the foot, ankle, and lower leg to power the pedal rotation. Too low a saddle, as is unavoidable on too small a bike, and none of your joints can open up enough to transfer optimal power from the muscles. You want an almost full-length pedal stroke that gives a good transfer of power, starting from the glutes and hips, through the quads and to the feet. 


This saddle is too low for comfort and results in inefficient pedaling. 

Have the saddle too high, and the pelvis rocks up and down as each leg in turn overextends to reach the bottom of the pedal stroke. This is not only inefficient in terms of energy transfer but puts a lot of strain on the lower back and sacroiliac joints. If your hamstrings are a reasonable length, they can accommodate a good saddle height without any ill effect or abuse to the hips and low back. Some serious cyclists raise their saddle after they’ve reached a threshold number of miles or time on their bike, as their hamstrings have adapted and lengthened during the ride.  


We have all pedaled since we were toddlers on tricycles. Now that our coordination is more developed
and our
cycles better engineered, pedaling can become a more refined action!
Unsplash

Tip 2. Improve your pedaling power

In cycling, propulsion is from the glutes, thigh, and calf muscles, pushing down and pulling up on the pedals. Instead of just pushing downward on the pedals in a fixed-ankle, one-side-at-a-time action, you want to think of your pedaling motion as continual, circular and smooth, with the whole ankle involved. This takes strength and flexibility in the calf, which needs to alternately contract strongly and elongate. The Achilles tendon that attaches the calf muscles to the heel also gets a healthy workout as the foot moves through its circular motion. When done with good form, cycling not only strengthens our tissues, but can also lengthen them. Gokhale Method students who have learned to propel themselves in walking will already have a good deal of relevant muscle memory and power in their legs and feet and will likely be pleasantly surprised when returning to cycling.


A good pedaling action bestows both efficiency and healthy exercise
 for the foot, ankle, and lower leg.
Wikimedia

Tip 3. Use your feet

You don’t want to be sending your weight, as well as transferring the force of your pedal stroke, onto just the delicate toe bones. Instead, placing the more robust ball of your foot on the pedal will elicit the most power transfer. 

At the bottom of the pedal stroke (the 6 o’clock position) you want to pull the pedal back with your feet. The “pulling up” phase of the pedaling action is most effective when you are clipped into the pedals with cycling shoes, or toe straps, but you can still imagine you are “grabbing” up with your plantar foot muscles inside a regular shoe. Gokhale Method students will already have learned to use their feet strongly when walking by grabbing and then pushing the ground away and behind them, which translates well into cycling. You can learn this grabbing action from our Gokhale Moment Inchworm video here.

The feet are actively engaged. They grab and help push the pedal down, and at the downward-most position, they
start to pull back and then up.

When you are feeling more confident in your cycling and want the extra power that comes from being “attached” to your bicycle, cycling shoes and clipless pedals are a terrific investment that can really up your game. The more you use your feet and ankles the stronger they will become, serving you better in cycling, walking, running, dancing, and more. . .


Have your knees not too bent but not fully extended either. You want a small bend just like an athletic “ready position.” Slight external rotation of the legs and feet allows the knees to track well.

Tip 4. Keep your knees happy

Cycling should actually be good exercise for the knees as it uses the quadricep muscles on the front of the thigh that help stabilize the knee. However, a common threat to the knees is riding with the seat too low, (see Tip 1), which stresses the knee joint and causes inefficient pedaling form and fatigue. 

Your feet also want to be pointing outward just a little. Not quite as much as in healthy standing, which is 10°–15°, but enough to afford a degree of external rotation for your legs. Your knees will be happy tracking at this angle, the same as your feet. This helps avoid pronation in the feet and ankles, and pressure on the inside of your knees. 


These two look set for fun on their customized bike! The boy on the left sits well, while his friend could do with untucking his pelvis. You want your behind behind you and your back straight.

Tip 5. Antevert your pelvis 

A common threat to happy knees is riding with a tucked pelvis. Tucking the pelvis pushes the thighs into a more forward position than they would be in if the pelvis were anteverted. As a result, the far end of the thigh bones, where they form the upper half of the knee joints, are also more forward. These “overshot” knees then have a poor alignment for distributing downward force through the joint and into the lower legs and feet and are much more likely to suffer painful wear and tear. 

An anteverted pelvis serves both seated and standing pedaling positions well.

Good posture is a bit like a jigsaw puzzle—get a prize piece like the pelvis in the right position and many things fall into place. An anteverted rather than a tucked pelvis is often the missing piece for beneficial cycling posture. Having already set up some external rotation of your thigh bones, you will have created the space needed for your pelvis to tip and settle forward into anteversion. This puts your behind behind you, and from here, whether sitting or standing, your buttocks are in a position of mechanical advantage to drive your ride. Happy pedaling!


Riding with a tucked pelvis disadvantages the glutes and encourages a C-shaped spine.
It is very common in both amateur and professional cyclists. Unsplash


An anteverted pelvis brings your behind out behind you, giving more power to your pedaling, whether you are sitting or standing, and enabling a straight axis for your spine. 

If you are concerned about storing your bike securely with easy access, we recommend this article, which gives helpful advice on finding the best option to store your bike safely in a bike shed or a garden shed. Click here. 

If back pain or other musculoskeletal problems have been holding you back from cycling, or you would like to improve your fitness and posture when cycling, consider joining our Gokhale Exercise program. It will inspire and teach you how to apply Gokhale Method principles while on your bike, and in everything you do. Sign up for your 7-day free trial here.

If you are interested in learning the Gokhale Method principles referred to in this blog, in depth and customized to your needs, we recommend our Elements course (one-on-one coaching online), our Foundations Course (one-on-one or small groups in-person), or Pop-up Course (not available during COVID). 

Getting on a bike is a fabulous way to bring healthy activity, energy, and better posture into your life. We hope you feel inspired and empowered to do just that!

Please share your posture and cycling experiences here:

Knee bone connected to the…?

Knee bone connected to the…?

Esther Gokhale
Date

Josephine Baker dances the Charleston

The "knee bone" IS connected to the "thigh bone," but the knee and gluteus medias ALSO connect
The knee bone is "connected"
to the gluteus medius

 Can you sing "Dem Dry Bones"? If you don't know the spiritual by name, I bet you can intone at least some of the lyrics:

…the foot bone's connected to the leg bone, the leg bone's connected to the knee bone, the knee bone's connected to the thigh bone...

Beyond the direct structural connection between the "knee bone," or patella, and the "thigh bone," or femur, is another connection that will be of particular interest to athletes and other individuals afflicted with or susceptible to patellar femoral pain syndrome (PFPS), a disorder often referred to as "runner's knee." And this is the connection between the knee and the gluteus medius, the muscles situated above and toward the outer sides of the much larger gluteus maximus muscles. 

How to locate the gluteus medias
How to locate the gluteus medius


If you read my Samba Your Way to Beautiful Glutes post or joined my Samba webinar in November, you'll know how to locate these paired muscles, and you'll appreciate at least some of what they do. (If you'd benefit from a refresher, click and scroll through the Samba post, where you'll find a 6-point list.) 

 Gluteus medius muscles, pelvic anteversion, and knee health

Baby sitting on legs
This Burkina baby was patterned to
externally rotate his legs as he was
carried on his mother's back

According to modern conventional wisdom, it's considered normal for young children to have inward-turning knees, which are expected to straighten out by about age 7. What I've observed in village Africa and other nonindustrial cultures is that because children are carried on their caregivers' hips and backs, children's legs are externally rotated from the very youngest ages.

In contrast, in the US and other modern industrial cultures, the  internal rotation of the legs is often maintained into adulthood. 

Weak gluteus medias muscles can cause knees to turn inInternally rotated legs
are common in modern
industrial cultures, even
in adulthood

Because the gluteus medius muscles are external leg rotators, strengthening these muscles can counter internal leg rotation, helping  the kneecaps to align and track better. (To check the tracking of your patella, sit down, place your palm over one of your knees, and then flex your leg to feel and follow the triangular kneecap glide up and down along the end of your femur.) Strong gluteus medius muscles are important because people whose "glute mēds" are underdeveloped are at increased risk of knee and other lower-limb injuries, including patellafemoral pain syndrome. Preventing PFPS, or managing its painful symptoms if the problem has already occurred, are just a couple of reasons why--when you stand, walk, and run--you want to use your glute meds and externally rotate your legs.

There are more connections than meet the eye
In addition to promoting knee health, external leg rotation 
also facilitates an anteverted pelvic position and a
well-stacked spine

Gluteal muscle activity and patellofemoral pain syndrome (PFPS)

Votive relief for the cure of an injured knee, 100-200 AD, Melos
Knee pain is nothing new; this Greek votive
relief for the cure of an injured knee
dates back to 100-200 AD

If you've ever felt a dull, aching pain under or around your kneecap where it connects with the lower end of your femur, you may have experienced patellar femoral pain, especially if the pain occurred when you were sitting for a long stretch of time with your knees bent, or you were kneeling, squatting, or walking up or down stairs.

And, if you have been diagnosed with PFPS, you're not alone. Gluteal Muscle Activity and Patellofemoral Pain Syndrome--A Systematic Review, which was published earlier this year in the British Journal of Sports Medicine, confirms the connection between the knee and the gluteus medius. By synthesizing electromyography (EMG) measurements of the gluteus medius muscles during a range of functional tasks as reported in 10 case-controlled studies, all of which evaluated EMG activity of the gluteus medius, the authors strove to elucidate the relationship between gluteal muscle activity and PFPS. Among their observations and conclusions:

In a nutshell, if we have good strength in our gluteus medias muscles, our knees will be in better shape
In a nutshell, if you have good strength in your gluteus medius
muscles, your knees will be in better shape.

  • Patellofemoral pain syndrome is one of the most common presentations to sports medicine practitioners; of 2500 presentations to sports medicine clinics 25% of all injuries were PFPS
  • Individuals with PFPS exhibit reduced gluteus medius and gluteus maximus muscle strength
  • Growing evidence supports the efficacy of gluteal muscle strengthening for PFPS and gluteal-muscle strengthening programs have been associated with positive clinical outcomes

Walking is connected to healthy knees

Walking is something most of us do a lot, although according to the 2010 study Pedometer-Measured Physical Activity and Health Behaviors in US Adultsthe 5,117 steps Americans typically take each day are not enough--and in fact represent thousands fewer steps than those taken by our counterparts in Australia (9,695 steps), Switzerland (9,650 steps), and Japan (7,168 steps). But even if  we step just 5,000 times a day, if we engage our gluteus medius muscles with each step, that's still a lot of repetitions to help "re-architecture" our legs and minimize the risk of PFPS. 

Ancient Greek coin features Apollo (with anteverted pelvis!) and stag           
Ancient Greek coin features Apollo (with anteverted pelvis!                      

The pelvis serves as our postural foundation, and one of the keystones for healthy postures is to allow the pelvis to be anteverted. When your pelvis is anteverted and your "behind is out behind you," then the whole pack of muscles that includes the hamstrings, the gluteus maximus, and the gluteus medias can work to advantage, strengthening themselves, inducing circulation in the appropriate places, and bearing stress.


Eadward Muybridge human male walking
Eadweard Muybridge's 'human male walking'
demonstrates
strong gluteal action
in the rear leg


In Muybridge's model we see the interconnectedness between external leg rotation, pelvic anteversion, and strong gluteus medius action
This rear view of the
subject above shows his
healthy external leg
rotation


Beyond this, the relationship between external leg rotation, pelvic anteversion, and the action of the gluteus medius is cyclic. In order for the gluteus medius to be in a position of mechanical advantage, some degree of pelvic anteversion is required. And, if we are to believe the observations summarized in the British Journal of Sports Medicine review, strong gluteus medius action relates to a diminished risk of PFPS.

The interconnectedness between external leg rotation, pelvic anteversion, and strong gluteus medius action is beautifully illustrated in the detail of Muybridge's "animal locomotion" photo and "film" to the right. 

"Dem Dry Bones"

Bottom line, the knee bone is connected to the thigh bone, but it's also connected to the gluteus medius, and this is a fairly direct connection because these paired muscles externally rotate the legs. Finally--not just because the lyrics are right on point with this lesson, but because he plays and sings so artfully and with such a great sense of fun--I hope you'll listen to Fats Waller's wonderful take on "Dem Dry Bones." 


Join us in an upcoming Free Workshop (online or in person).  

Find a Foundations Course in your area to get the full training on the Gokhale Method!  

We also offer in person or online Initial Consultations with any of our qualified Gokhale Method teachers.


Image Credits: Josephine Baker Dances the Charleston, Wikimedia Commons; The Bath, Charles Degas, Wikimedia Commons, Public Domain; How to Locate the Gluteus Medius, Esther Gokhale; X-ray of "Knock Knee," Biomed Central, Wikipedia; The Spinal Cord, Bruce Blaus, Wikimedia Commons; Greek Votive Relief Knee Injury, Marie-Lan Nguyen, Blacas Collection, Wikimedia Commons; Female Jogger, Mike Baird, Creative Commons; Human Male Walking (animation), Eadweard Muybridge, Wikimedia Commons; Animal Locomotion, Eadward Muybridge, Wikimedia Commons;  AncientGreek Coin: Classical Numismatic Group, Inc, Wikimedia Commons

Subscribe to Knees