bike riding

How to Beat Neck and Shoulder Pain While Cycling (Cycling for Everyone, Part 2)

How to Beat Neck and Shoulder Pain While Cycling (Cycling for Everyone, Part 2)

Tiffany Mann
Date

This is Part 2 of a 3-post series on cycling with healthy posture by Gokhale Method teacher and longtime cyclist Tiffany Mann. Read Part 1 here!


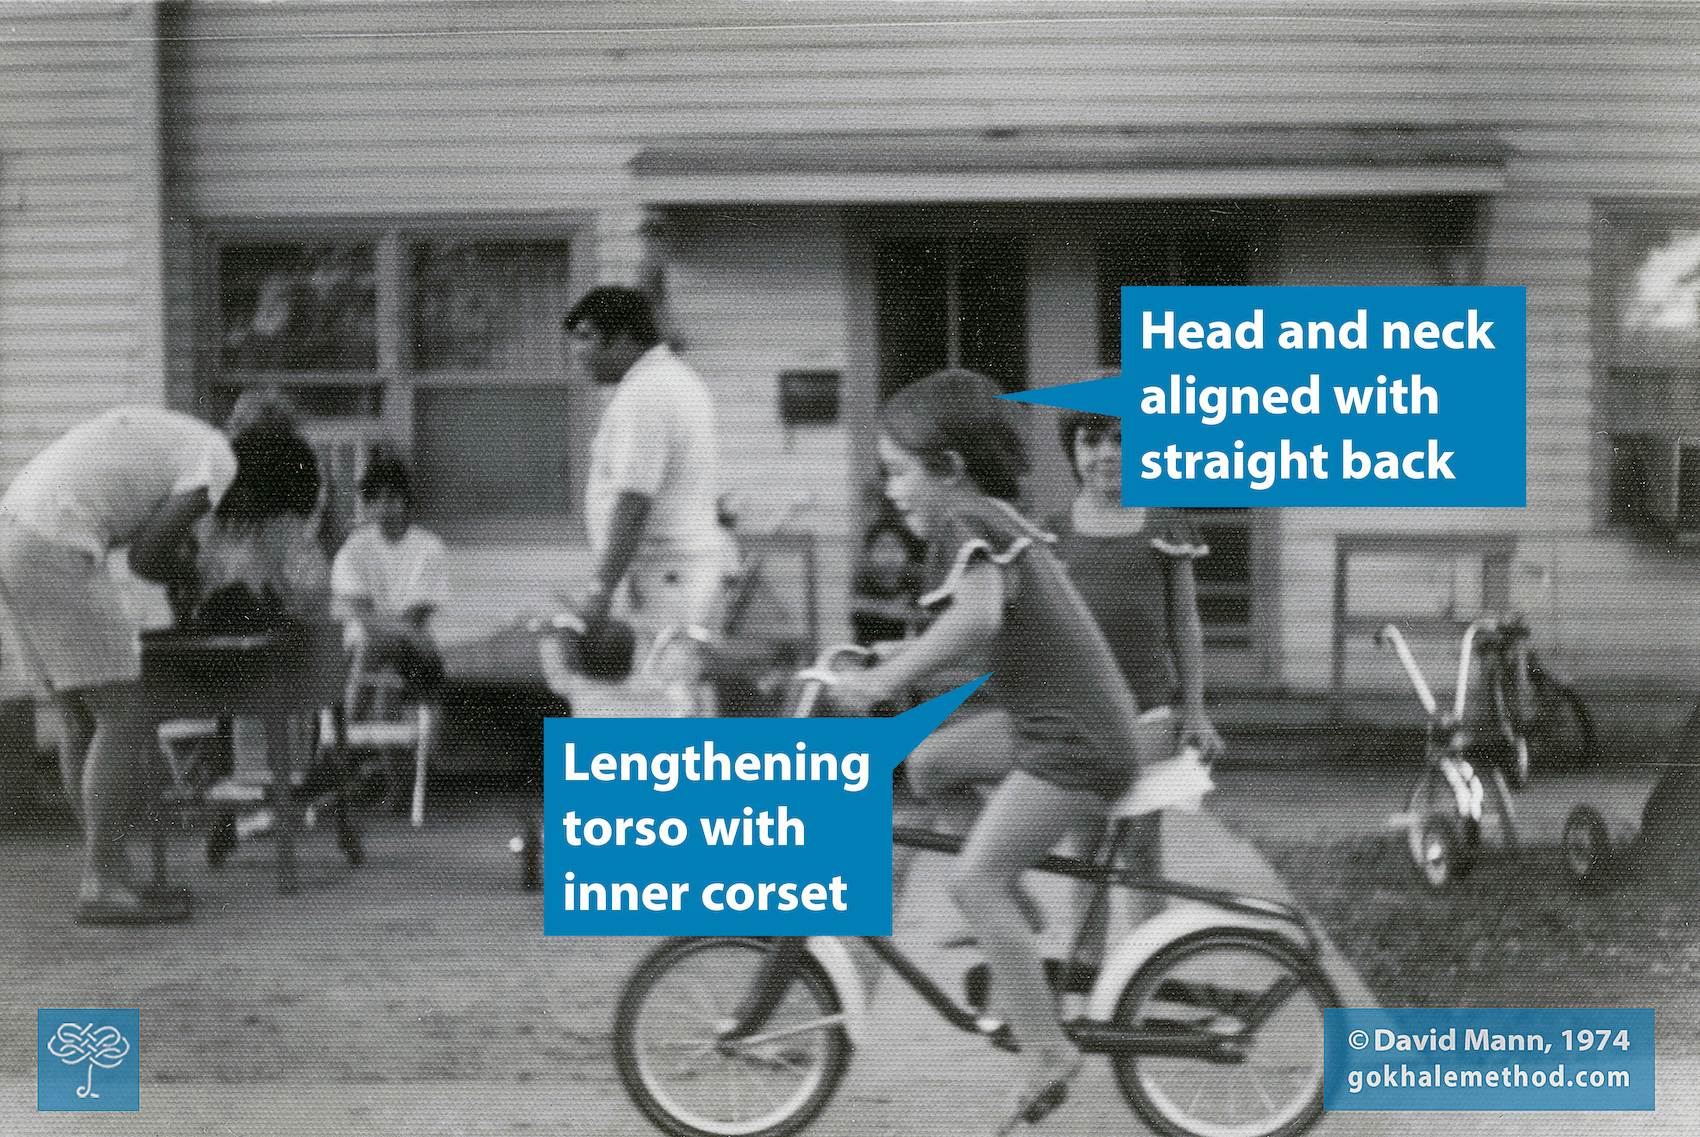
Little Tiffany (circa 5 yrs old), a new bike rider, having such fun!

Neck and/or shoulder pain is a common ailment even experienced cyclists regularly encounter. It takes awareness and muscular engagement while cycling to not allow gravity to further pull the head forward and down and round or hunch the shoulders, a posture problem that is already prevalent in our modern culture.


This cyclist in Berlin is on a bike that is too small for him, leading to the pronounced rounding visible in his upper spine. A supportive fit helps prevent rounding. Original image courtesy Raquel García on Unsplash.

While it does take some effort, via muscular engagement and kinesthetic awareness, to maintain a healthy shoulder and head placement while bicycling, the payoff is worth it. You will be able to ride pain-free for longer, and you will also be patterning a healthy upper body position regardless of your activities and movements. You will also strengthen and develop baseline tone in stabilizing muscles, and they will become more accustomed to doing the job of maintaining shoulders back, back of the neck tall and straight, and head lined up over the body, as we teach for all posture stances — sitting, standing, hip-hinging (all of which cycling incorporates!).

Opening the shoulders and chest
Rolling open the shoulders and drawing the scapulae down and back onto your back where they belong allows your chest to stay open. This gives you a better breathing pattern and better circulation to and from your arms, both of which are especially important as you are using your arms to support yourself and guide the bicycle, and using your lungs to provide oxygen to your muscles and cells that are working hard during this exercise.


This cyclist in Lisbon, Portugal rides a well-fitting, front-suspension mountain bike. Her leg is externally rotated, with a slight bend in the knee. She demonstrates a J-spine with her torso and head stacked, and hinges at the hips. Finally, her shoulders are back and her grip on the handlebars is relaxed. Original image courtesy Justine Camacho on Unsplash.

Activating the inner corset as a shock absorber
Using the set of muscles deep in your abdomen and back that we call the “inner corset” helps protect the neck along with the lower back (that other pesky trouble spot for cyclists!). Inner corset engagement gives length to the whole spine, including the cervical discs, and creates more space between the vertebrae. You will better withstand any jarring sensation from uneven road surfaces, potholes, or gravel, with this brace of deep muscles engaged. This brace of muscles includes the longus colli — deep muscles in the neck, which, when engaged, keep the neck tall and straight, and as a bonus, allow your trapezius muscles, those “hunchy” shoulder muscles, to relax.


This cyclist in Manhattan uses his well-fitting bike skillfully. His pelvis is anteverted, his shoulders remain back, and he uses his eyes to lead his gaze, rather than compensating with an arched neck — even with a baseball hat on underneath his helmet. Original image courtesy Javier de la Maza on Unsplash.

Hands, arms, and handlebars
With your inner corset in place and holding your torso steady, your arms can be relaxed when they need to be and not doing more of the work than they need to. Your hands and arms want to be relaxed and not be squeezing or holding on too tightly to the grips and handlebars — that creates unnecessary tension and fatigue.


My family on a banana seat custom tandem: Skip, Willa (4 years old), and Coco (7 years old). Original image courtesy Ken Richardson.

Lengthening the neck and employing the gaze
Craning your neck is another unhealthy posture pattern that can both fatigue the superficial muscles in the neck and damage the delicate cervical discs. Instead of craning your neck to look around you, keep the back of your neck long and tilt the head on its axis, and use your eyes — they can see plenty well and will actually benefit from the exercise of looking out into the horizon and to the periphery. 


This cyclist in Vietnam demonstrates an open chest, relaxed shoulders, and healthy leg rotation while riding. Original image courtesy Minh Pham on Unsplash.

Putting it all together
All of these pieces work together to help keep your ride sustainable and pain-free. Our founder Esther Gokhale, in her two-part series on cycling posture and choosing the right bike seat for good posture, goes into great detail about ways to prevent more types of cycling-related pain through the application of Gokhale Method techniques. As Esther explains, stacksitting and hip-hinging are both crucial for sustainable cycling posture. If you need an introduction to these or other Gokhale Method techniques, keep in mind that you can get familiar with them in Esther’s book, or even work online with several of our teachers, one-on-one! Some teachers are even available for one-on-one teaching in person, where permitted. Don’t hesitate to reach out!

For more information on Tiffany’s teaching in the Boston area, contact her here.

Why Cycling is the Perfect Posture-Friendly Exercise for the COVID Era

Why Cycling is the Perfect Posture-Friendly Exercise for the COVID Era

Tiffany Mann
Date


I’m a longtime cyclist, former elite-level mountain bike racer, and Gokhale Method teacher. Learning and applying Gokhale Method techniques helped me reduce lumbar strain caused by unhelpful posture habits I used to employ while riding. I continue riding to this day, along with my whole family — now free of lower back pain.


Riding a bike can be a fantastically fun way to get away from devices, boost energy, and practice healthy posture, all in one...and of course we always want to wear a helmet, and ideally have our shoulders more posterior than this rider does! Image courtesy Ümit Yıldırım on Unsplash.

In my humble opinion, bikes are the most perfect exercise equipment of all time. This is especially true for the COVID era! What else serves as a human-powered vehicle that allows you exercise as it transports you to various destinations, all the while engaging your senses and doing no damage to the planet? Furthermore, it is something you can do by yourself or with your family or friends, while still maintaining social distance and is, perhaps most importantly, done outdoors. The wheel base between two bicycles is around 6 feet, so riding with others can be done safely. Add Gokhale Method techniques to the mix, and you’ve got a recipe for full-body health.


This rider is wearing a helmet, always recommended! Also, her shoulders stay posterior, with a nice give/relaxation in her arms, and her head rotates on its axis. Her behind is not tucked; her tail appears to be behind her. Image courtesy Victor Xok on Unsplash.

Freshen up your routine
While many of us are sheltering at home, and/or working from home, fresh air and movement are vital to our health and well-being, perhaps even more so now than ever! And when more of our time than usual is spent indoors due to lockdown restrictions, experiencing the outdoors more intimately, through our senses observing the horizon and peripheries and making judgements about traffic and road conditions, as well as minute adjustments that occur as a result, can be really invigorating and refreshing and provide a wonderful reset to the stresses of daily life.

The roads are quieter these days, with less traffic than before the pandemic. This makes it an ideal time to dust off your bicycle, put some air in your tires, and if it’s been a while, visit your local bike shop for a tune-up. Or perhaps think about increasing the riding you do! You definitely want to make sure your bike fits you well; a good fit will help with comfort and safety.


My daughter Wilhelmina Brown, age 5. She hasn't been formally taught how to sit (this photo was taken before I knew better myself), but since she is not yet spending hours in school, she still sits well, with her lovely J-spine intact. Image courtesy Ken Richardson.

Adjusting seat height to support healthy posture
If you are unsure about the right fit, or if you feel too stretched out or too cramped in your torso when on your bike, consult a bike shop. People who work in bike shops love bicycles and want more people to enjoy them too! Your seat wants to be high enough so your leg has only a slight bend at the 6 o'clock position, with the knees not coming up too high either. You want to feel safe and balanced when you are stopped and standing over your bike, with at least a couple of inches of clearance or standover height. Bike shops will be able to guide you about specific bike components — the seatpost and stem, for example, can be adapted to better fit and support the rider. You can also read our founder Esther Gokhale’s blog post on choosing a bike style to support your posture while riding if you’re thinking of picking up a new 2-wheeler.

The changing season brings with it more comfortable riding weather than even a few weeks ago, whether you’re in the Northern Hemisphere or the Southern. And air quality is thankfully improving in the West. There’s never been a better time to saddle up and hit the road!


Cycling is a great way to experience community while maintaining social distance and practicing healthy posture. Win-win-win! Image courtesy Ahshea1 Media on Pexels.

This is the first post in a 3-part series on cycling and posture: stay tuned for more to come! For more information on Tiffany’s teaching in the Boston area, contact her here.

How to Choose a Bike Seat for Good Posture (Part 2)

How to Choose a Bike Seat for Good Posture (Part 2)

Esther Gokhale
Date

In our part 1 blog post on the topic of bikes, we went over how to find the right frame for you. The next important step is to find the right seat for your body and your bike, since without a decent seat you may be uncomfortable, or may find it challenging to have healthy posture. Your seat should distribute your weight across regions comfortably; it should have padding, but not so much that it lacks support and stability; it should be set at an angle that allows your pelvis to antevert (that is, tip forward relative to the angle of your spine.) A good seat is crucial whether you prefer to be upright and stacksit, or if you prefer a racing style with a hiphinge. Here’s what you need to know about bike seats to find the right one for you:


Seat shape and angle: On most bike seats, it’s possible to change not just the height, but the horizontal position and the tilt of the seat. Make these adjustments carefully on any bike you plan to ride regularly. A small difference in the seat position can have a big difference on your posture as well as your comfort.

The angle of your bike seat—because it makes anteversion uncomfortable or because it tilts you too far forward or backward—may be causing you to tilt your pelvis in a direction that doesn’t allow for good back positioning. Many people prefer bike seats that carry most of their weight on their sitz bones (further back) rather than on the tissues under the pubic bone (further forward), because there are fewer sensitive nerves endings around your sitz bones. So if the front of your seat is tilted too far up (as in the image above left), this can encourage you to tuck your pelvis in an effort to relieve pressure on the pubic bone. And if the seat is really tilted too far up, it forces you into a tuck because of the backward slope of the seat—picture this as the opposite of the wedge you would use to facilitate stacksitting. If you try to sit on your bike with an anteverted pelvis (more angled than the angle of the hiphinge you need to reach your handlebars), and your seat causes you discomfort, you may need to angle the front of the seat downward.

Too much downward tilt is also problematic. If your seat makes you feel as though you are slipping forward off it when you antevert your pelvis, you will need to tip it back more so that you stay comfortably in place without having to brace all your weight against your handlebars. If your seat is tilted forward so that it doesn’t sufficiently ‘cradle’ your pelvis at the right angle, you may also be tucking in an effort to get your bottom further back on the seat.

It is possible that after playing with your seat to find a comfortable middle-ground, you will discover you need a new seat altogether. You should look for one that accommodates the shape and size of your sitz bones and carries your weight in the least-sensitive areas when you are properly hiphinging on your bike. Some seats are wider and may cause chafing against your thigh; you may need a cutout in your seat to relieve pressure under your public bone. To find a seat that matches your body, you may need to do a lot of testing!

Note that many newer “comfort” seats have a huge amount of padding and can amount to sitting on a small mound, rather than distributing your weight and ‘cradling’ your bottom. This extreme amount of padding can actually make it harder to comfortably antevert your pelvis:


Because these seats fall away from a padded peak, your weight is not well distributed; to find a comfortable spot for the pressure to land, you may end up tucking your pelvis so your sitz bones take all the force.

Older “saddle” style bike seats may appear too firm, but they can cradle your pelvis, distribute your weight comfortably, and promote stacking.


The slightly bowl-shaped curve of these seats provides lift in the back like a wedge, but catches your from sliding forward with the projection in the front.

Firmness and fabric covering on the seat will also make a difference in your riding experience. A slippery fabric may cause you to always be sliding around; a squishy seat may feel most comfortable at first, but end up chafing or lacking support. Finding the ideal seat is best accomplished through a lot of testing and laps around the block, so we recommend you find a very patient bike shop attendant to help you with this selection. You may need to purchase several seats so you can test them out on longer rides over several days before returning the rejects.

In addition to the more standard styles found in most bike shops, there are also many kinds of specialty seats available online which may work best for your needs and preferences:


Both of these seats provide a nice bowl shape that can support anteversion and comfortably distribute weight. Personal preference will dictate whether these fit your body, and enable a proper range of movement and a stable seat while on your bicycle.

Getting moving: When it’s time to actually get on your bike, how should you do it? The most gentle way to mount your bike will be to start by straddling the frame in front of the seat. Try doing this next to a railing or wall where you can brace yourself for balance, and move slowly while engaging your inner corset.


This young girl shows the ideal way to start your ride—straddle the frame and tallstand to align your pelvis and spine.

If you are not adept at swinging one leg through the air, or your balance isn’t what it used to be, a bike frame that dips very low in front (like comfort bikes) may be necessary to make getting on and off your bicycle easy. Make sure you can easily step over your frame without hurting your back or losing balance.


This comfort cruiser is ideal for maintaining a relaxed upright posture, and has a low bar in the front that makes getting on and off the bike a breeze!

Before you get up your seat, perform a shoulder roll and slowly reach your arms to your handlebars, to make sure you maintain good shoulder positioning with your elbows close to your sides, and no slump in the upper back. Keeping your shoulders in position may deepen the amount of bend you need to sit with, which will dictate how anteverted your pelvis should be.

When you get up onto your seat, you will have to perform an advanced hiphinge/stacksit, one that is done by bringing your hips back and up, rather than your torso down (while moving and balancing!). As you stand up on your pedals, make sure you start with a straight back, engage your rib anchor, and then slowly deepen your hiphinge as you move your hips back and up onto the seat, keeping your sitz bones out behind you.


Start hiphinging as you stand up on your pedals, before moving your bottom onto your seat.

The motion is similar to hiphinging before lowering down onto a chair for stacksitting:


As your lift yourself into your bike seat, you will need to hiphinge to some degree, more or less depending on the style of your bike and how upright it allows you to be.

If you need to adjust while you are on the move, you can make sure you are properly anteverted by lifting your bottom up a little and repositioning your sitz bones even farther behind you.

As you ride, you can lessen the work of your back, shoulder, forearm, and wrist muscles by keeping as much weight in your seat as possible, rather than supporting yourself on your handlebars. If you have experienced wrist or arm pain, you should consider a frame and seat that allows you to stacksit, since being fully upright will save your wrists from unnecessary stress.

Engaging your inner corset as you ride will also protect you from bumps and jostling. Because you will be in motion, manually checking your position or looking in a mirror is likely impossible, so you will have to rely on your proprioception and your body’s comfort levels to judge how well you are maintaining your posture. But like with everything else, practice makes perfect; with some repetition and regular breaks, you can soon master the Gokhale Method on two wheels!

Do you have any experiences to share about bike seats?


How to Ride a Bike with Good Posture (Part 1)

How to Ride a Bike with Good Posture (Part 1)

Esther Gokhale
Date

Most people, when they ride a bike, tuck their pelvis so the rear portion of their sitz bones rests on the seat. Then they lean over to reach the handlebars causing a lot of spine curvature. With the additional tension created from pushing the pedals and holding the handlebars, and the bouncing and jostling from the road, riding a bike this way can be a painful and harmful activity.


Many modern bike riders look like Mr. Bean when they ride a bike, sitting with an unnaturally curved spine.


Each of these modern-day bikers has a rounded spine and craned neck. Image courtesy John Matrix at bikelist.org.

With a few adjustments, riding a bike can be a harmonious and healthful activity. By using hiphinging and stacksitting, and by making sure you have the right bike and the right settings, you can enjoy this way of exercising and getting around. Here are the key things to look for in a bike frame:

Bike style: In some areas, road bikes and touring bikes—styles that require a deep bend to reach the handlebars—are very common. In other places, cruisers, hybrids, and flat-foot ‘comfort bikes’ are the norm. Pick a style that works best for you, but if you experience back pain, an upright model will likely more comfortable and conducive to good posture.

An additional advantage of an upright bike is that you won’t need much hamstring flexibility and back strength to maintain a J-spine. An upright bike allows you to stacksit on your seat with an easily maintained healthy neck position.


This comfort cruiser is ideal for maintaining a relaxed upright posture. It also has a low bar in the front that makes getting on and off the bike easy.


Shailene Woodley rides a bike with close-swooping handle bars, which make it easy to ride upright with the shoulders back.


This woman from yesteryear demonstrates an excellent J-spine on a ‘comfort’ frame that allows her to stacksit and easily keep her shoulders back. 


Here Kim Kardashian rides an upright with cruiser handlebars. With a slight hiphinge, she is able to maintain healthy spine and neck alignment. This position doesn’t require great hamstring flexibility; it does requires slightly more work than stacksitting.

For those who prefer a more aerodynamic racing style, you will need to do a deep hiphinge. It can be challenging to find a seat that allows for appropriate and comfortable pelvic anteversion. I will write more about bike seats in an upcoming sequel post.


To get closer to a racing position with your torso more horizontal, you will need a pronounced hiphinge to maintain a straight spine. This woman hiphinges quite a bit, but stops short of ideal and therefore has a slightly rounded lumbar spine. Ideally, you pivot your head upwards on the neck rather than crane the neck to look ahead (more on this in a future post). 

Frame size: For good bicycling posture, you will need an appropriately sized bike frame that allows you to maintain a relaxed shoulder and neck position, and allows you to touch your feet to the ground from your seat. The handlebars need to be within reach without your shoulders pulling forward. 


With a little effort, you can find just the right size and style frame to keep you straight and pain-free!

With With good posture and a good bike fit, biking is a pleasure to observe and experience.

The more upright you can be on your bike, the less work you will have to do to maintain your J-spine.

Children often maintain a J-spine on bikes without too much trouble. Children’s bikes are rarely designed for aerodynamic racing, but rather for ease of learning on.

A frame that is too small can cause you to scrunch up, tuck your pelvis, and round your spine. A frame that is too large can pull your shoulders too far forward to reach the handlebars. When your handlebars are in the wrong place and you rest a lot of weight on them, you may create shoulder and neck tension from bracing yourself continuously.


This rider’s bike is too small for him, resulting in a tucked pelvis and rounded spine.

If you are exceptionally tall, you may find it difficult to find a frame that is tall enough to fit you. If you need to lift your seat to its max to create enough legroom for yourself, consider also lifting your handlebars. There are extensions that can be attached to the stem of the handlebars, to bring them closer or farther away, as well as to add height. Your frame needs to be long enough to comfortably reach between seat and handlebars without hitting your knees or scrunching your torso.


This tall rider is having trouble fitting onto a too-small frame—the distance between the handlebars and seat is too short for his torso to fit without buckling at the spine.

For smaller-than-average adults, it is sometimes difficult to find a petite frame that allows you to lower the seat enough to reach the ground, without this causing the handlebars to be uncomfortably out of reach. Again, there are adjustable stems available for handlebars that are shorter than average, or can tilt the handlebars closer to you. With many bike seats, you can also adjust the seat position horizontally, and it may be easier to slide the seat closer to the handlebars than to bring the handlebars closer to the seat. Just make sure that your seat isn’t so far forward that pedaling becomes awkward or uncomfortable.

How well does your bike fit you? What has your experience been riding different kinds of bicycles? How good is your posture when you ride? Please do share!


Join us in an upcoming Free Workshop (online or in person).  

Find a Foundations Course in your area to get the full training on the Gokhale Method!  

We also offer in person or online Initial Consultations with any of our qualified Gokhale Method teachers.

Subscribe to bike riding