stacksit

Get Winter-Ready with Improved Circulation

Get Winter-Ready with Improved Circulation

Esther Gokhale
Date

As winter approaches and the weather cools, we all have one thing on our minds: staying warm! One major benefit of learning the Gokhale Method (and good posture in general) is improved circulation. We’ve often heard from students about their warmer hands and feet, and we’ve even heard from people who have significantly reduced their heating bill now that their extremities aren’t always freezing! When you align your body well, your blood flows unimpeded throughout the body, passing nutrients to cells and maintaining homeostatic processes, like regulating temperature, glucose, and sodium levels. Imbalances in this process can lead to illness and prevent healing.

Here are three simple ways to immediately improve your circulation:

1. The shoulder roll

Situate your shoulders in a relaxed and open position to ensure healthy circulation to and from your arms. This will repair damaged tissues and prevent future ailments, such as carpal tunnel and repetitive stress syndrome.

Activities like typing, writing, texting, and playing an instrument increase your hands’ demand for blood, so it is important to restore normal architecture around the axillary artery that runs under your pectoral region, the major thoroughfare for circulation to and from your arms.

To roll your shoulders back:

  1. Hunch one shoulder forward, causing it to round slightly.

  2. Lift the shoulder up toward your ear.

  3. Roll the shoulder far back, and bring the elbow behind your hips or your body’s midpoint, toward the spine, rather than letting it hang forward of the hips.

  4. Gently slide the shoulder blade down along your spine.

  5. Repeat with the other side.

Watch this Gokhale Moments video for a quick demonstration of the shoulder roll technique.


2. Stand with unlocked legs

When you stand, make sure the groin areas (the two creases at the junction of the torso with the legs) are soft and not locked. The softness there should feel similar to the crease of an unlocked elbow. This position allows ample room for the femoral artery and vein, makes standing more comfortable, and allows you to exercise longer without pain or injury. Healthy blood flow to your legs and feet heals little injuries fast and can prevent cold feet, varicose veins, blood clots, and Raynaud’s syndrome.

To soften the groin area:

  1. While standing, sink your body downward, bending equally at the knees and hip joints, but keeping your back straight (think of preparing to receive a serve in tennis, or of bending to sit on the toilet). Your pelvis should “nest” between your legs.    

  2. Leaving your weight primarily on your heels, slowly straighten just short of locking the groin (and the knees).

  3. Check the groin crease for softness by placing your fingers where the top of the legs hinge at the hip. You should feel some “give” in the soft tissue before feeling bone.


3. Stacksit

Stacking your spine on an anteverted pelvis while sitting provides you with a healthy way to relax at your desk, on public transit, or at the dining table. Your spine stacks naturally because of the architecture of the bones, but even a small hunch or pelvic tuck can unbalance a stacked spine.


Anterverted pelvis versus tucked pelvis

Because of this, many of us sit with tensed muscles, expending a lot more energy to sit less comfortably. When you stacksit, your back muscles relax, facilitating a healthy breathing pattern that moves the back with every breath. This movement provides a constant massage around your spine, optimizing circulation around the spine and keeping your tissues healthy.

To stacksit:

  1. Form a wedge by folding a blanket or towel, or even a sweatshirt, so that one end of the folded material is thicker than the other end.

  2. Place the wedge on a chair, with the higher side to the back of the chair. Alternatively, you can sit on the edge of the chair.

  3. Sit on the wedge or edge of the chair. Your pelvis should tip forward—you may need to extend your legs farther outward or tuck your feet under the chair to allow your thighs to angle toward the ground as well.

  4. Feel the way your spine stacks naturally and notice the easy expansion of your lungs with each breath. (If your pelvis still wants to roll into a tucked position when you try to relax, increase the anteverted tilt of your pelvis by making the wedge beneath you steeper.)

Once you are stacked, check that you do not have a sway (or arch) in your lower back. You can check this by feeling your spinal groove with your fingertips. A shallow groove that remains even all the way up your back is good; a deep groove in your lower back means you are swaying. To fix, place your fingers gently on the bottom edges of your rib cage, several inches above your belly button. If you can feel the edge of your rib cage through the flesh of your torso, use your hands to tuck your rib cage down and in, which will straighten out the spine. You can also remove a curve from your back by lengthening the torso as if you want to touch the crown of your head to the ceiling (a weight on the head is an excellent way to practice this).

Now feel your spine again to check that you have a shallow, even groove; above your sacrum, it should feel straight, rather than gently curving. You can practice this position with the aid of a mirror, or a partner who can give you feedback on your position, until you have a good sense for what a straight spine and a swayed spine feel like.

Check out this video on stacksitting to see the technique in action.


If you have a story about improving your circulation or temperature after correcting your posture, please share in the comments below!

How to Choose a Bike Seat for Good Posture (Part 2)

How to Choose a Bike Seat for Good Posture (Part 2)

Esther Gokhale
Date

In our part 1 blog post on the topic of bikes, we went over how to find the right frame for you. The next important step is to find the right seat for your body and your bike, since without a decent seat you may be uncomfortable, or may find it challenging to have healthy posture. Your seat should distribute your weight across regions comfortably; it should have padding, but not so much that it lacks support and stability; it should be set at an angle that allows your pelvis to antevert (that is, tip forward relative to the angle of your spine.) A good seat is crucial whether you prefer to be upright and stacksit, or if you prefer a racing style with a hiphinge. Here’s what you need to know about bike seats to find the right one for you:


Seat shape and angle: On most bike seats, it’s possible to change not just the height, but the horizontal position and the tilt of the seat. Make these adjustments carefully on any bike you plan to ride regularly. A small difference in the seat position can have a big difference on your posture as well as your comfort.

The angle of your bike seat—because it makes anteversion uncomfortable or because it tilts you too far forward or backward—may be causing you to tilt your pelvis in a direction that doesn’t allow for good back positioning. Many people prefer bike seats that carry most of their weight on their sitz bones (further back) rather than on the tissues under the pubic bone (further forward), because there are fewer sensitive nerves endings around your sitz bones. So if the front of your seat is tilted too far up (as in the image above left), this can encourage you to tuck your pelvis in an effort to relieve pressure on the pubic bone. And if the seat is really tilted too far up, it forces you into a tuck because of the backward slope of the seat—picture this as the opposite of the wedge you would use to facilitate stacksitting. If you try to sit on your bike with an anteverted pelvis (more angled than the angle of the hiphinge you need to reach your handlebars), and your seat causes you discomfort, you may need to angle the front of the seat downward.

Too much downward tilt is also problematic. If your seat makes you feel as though you are slipping forward off it when you antevert your pelvis, you will need to tip it back more so that you stay comfortably in place without having to brace all your weight against your handlebars. If your seat is tilted forward so that it doesn’t sufficiently ‘cradle’ your pelvis at the right angle, you may also be tucking in an effort to get your bottom further back on the seat.

It is possible that after playing with your seat to find a comfortable middle-ground, you will discover you need a new seat altogether. You should look for one that accommodates the shape and size of your sitz bones and carries your weight in the least-sensitive areas when you are properly hiphinging on your bike. Some seats are wider and may cause chafing against your thigh; you may need a cutout in your seat to relieve pressure under your public bone. To find a seat that matches your body, you may need to do a lot of testing!

Note that many newer “comfort” seats have a huge amount of padding and can amount to sitting on a small mound, rather than distributing your weight and ‘cradling’ your bottom. This extreme amount of padding can actually make it harder to comfortably antevert your pelvis:


Because these seats fall away from a padded peak, your weight is not well distributed; to find a comfortable spot for the pressure to land, you may end up tucking your pelvis so your sitz bones take all the force.

Older “saddle” style bike seats may appear too firm, but they can cradle your pelvis, distribute your weight comfortably, and promote stacking.


The slightly bowl-shaped curve of these seats provides lift in the back like a wedge, but catches your from sliding forward with the projection in the front.

Firmness and fabric covering on the seat will also make a difference in your riding experience. A slippery fabric may cause you to always be sliding around; a squishy seat may feel most comfortable at first, but end up chafing or lacking support. Finding the ideal seat is best accomplished through a lot of testing and laps around the block, so we recommend you find a very patient bike shop attendant to help you with this selection. You may need to purchase several seats so you can test them out on longer rides over several days before returning the rejects.

In addition to the more standard styles found in most bike shops, there are also many kinds of specialty seats available online which may work best for your needs and preferences:


Both of these seats provide a nice bowl shape that can support anteversion and comfortably distribute weight. Personal preference will dictate whether these fit your body, and enable a proper range of movement and a stable seat while on your bicycle.

Getting moving: When it’s time to actually get on your bike, how should you do it? The most gentle way to mount your bike will be to start by straddling the frame in front of the seat. Try doing this next to a railing or wall where you can brace yourself for balance, and move slowly while engaging your inner corset.


This young girl shows the ideal way to start your ride—straddle the frame and tallstand to align your pelvis and spine.

If you are not adept at swinging one leg through the air, or your balance isn’t what it used to be, a bike frame that dips very low in front (like comfort bikes) may be necessary to make getting on and off your bicycle easy. Make sure you can easily step over your frame without hurting your back or losing balance.


This comfort cruiser is ideal for maintaining a relaxed upright posture, and has a low bar in the front that makes getting on and off the bike a breeze!

Before you get up your seat, perform a shoulder roll and slowly reach your arms to your handlebars, to make sure you maintain good shoulder positioning with your elbows close to your sides, and no slump in the upper back. Keeping your shoulders in position may deepen the amount of bend you need to sit with, which will dictate how anteverted your pelvis should be.

When you get up onto your seat, you will have to perform an advanced hiphinge/stacksit, one that is done by bringing your hips back and up, rather than your torso down (while moving and balancing!). As you stand up on your pedals, make sure you start with a straight back, engage your rib anchor, and then slowly deepen your hiphinge as you move your hips back and up onto the seat, keeping your sitz bones out behind you.


Start hiphinging as you stand up on your pedals, before moving your bottom onto your seat.

The motion is similar to hiphinging before lowering down onto a chair for stacksitting:


As your lift yourself into your bike seat, you will need to hiphinge to some degree, more or less depending on the style of your bike and how upright it allows you to be.

If you need to adjust while you are on the move, you can make sure you are properly anteverted by lifting your bottom up a little and repositioning your sitz bones even farther behind you.

As you ride, you can lessen the work of your back, shoulder, forearm, and wrist muscles by keeping as much weight in your seat as possible, rather than supporting yourself on your handlebars. If you have experienced wrist or arm pain, you should consider a frame and seat that allows you to stacksit, since being fully upright will save your wrists from unnecessary stress.

Engaging your inner corset as you ride will also protect you from bumps and jostling. Because you will be in motion, manually checking your position or looking in a mirror is likely impossible, so you will have to rely on your proprioception and your body’s comfort levels to judge how well you are maintaining your posture. But like with everything else, practice makes perfect; with some repetition and regular breaks, you can soon master the Gokhale Method on two wheels!

Do you have any experiences to share about bike seats?


How to Ride a Bike with Good Posture (Part 1)

How to Ride a Bike with Good Posture (Part 1)

Esther Gokhale
Date

Most people, when they ride a bike, tuck their pelvis so the rear portion of their sitz bones rests on the seat. Then they lean over to reach the handlebars causing a lot of spine curvature. With the additional tension created from pushing the pedals and holding the handlebars, and the bouncing and jostling from the road, riding a bike this way can be a painful and harmful activity.


Many modern bike riders look like Mr. Bean when they ride a bike, sitting with an unnaturally curved spine.


Each of these modern-day bikers has a rounded spine and craned neck. Image courtesy John Matrix at bikelist.org.

With a few adjustments, riding a bike can be a harmonious and healthful activity. By using hiphinging and stacksitting, and by making sure you have the right bike and the right settings, you can enjoy this way of exercising and getting around. Here are the key things to look for in a bike frame:

Bike style: In some areas, road bikes and touring bikes—styles that require a deep bend to reach the handlebars—are very common. In other places, cruisers, hybrids, and flat-foot ‘comfort bikes’ are the norm. Pick a style that works best for you, but if you experience back pain, an upright model will likely more comfortable and conducive to good posture.

An additional advantage of an upright bike is that you won’t need much hamstring flexibility and back strength to maintain a J-spine. An upright bike allows you to stacksit on your seat with an easily maintained healthy neck position.


This comfort cruiser is ideal for maintaining a relaxed upright posture. It also has a low bar in the front that makes getting on and off the bike easy.


Shailene Woodley rides a bike with close-swooping handle bars, which make it easy to ride upright with the shoulders back.


This woman from yesteryear demonstrates an excellent J-spine on a ‘comfort’ frame that allows her to stacksit and easily keep her shoulders back. 


Here Kim Kardashian rides an upright with cruiser handlebars. With a slight hiphinge, she is able to maintain healthy spine and neck alignment. This position doesn’t require great hamstring flexibility; it does requires slightly more work than stacksitting.

For those who prefer a more aerodynamic racing style, you will need to do a deep hiphinge. It can be challenging to find a seat that allows for appropriate and comfortable pelvic anteversion. I will write more about bike seats in an upcoming sequel post.


To get closer to a racing position with your torso more horizontal, you will need a pronounced hiphinge to maintain a straight spine. This woman hiphinges quite a bit, but stops short of ideal and therefore has a slightly rounded lumbar spine. Ideally, you pivot your head upwards on the neck rather than crane the neck to look ahead (more on this in a future post). 

Frame size: For good bicycling posture, you will need an appropriately sized bike frame that allows you to maintain a relaxed shoulder and neck position, and allows you to touch your feet to the ground from your seat. The handlebars need to be within reach without your shoulders pulling forward. 


With a little effort, you can find just the right size and style frame to keep you straight and pain-free!

With With good posture and a good bike fit, biking is a pleasure to observe and experience.

The more upright you can be on your bike, the less work you will have to do to maintain your J-spine.

Children often maintain a J-spine on bikes without too much trouble. Children’s bikes are rarely designed for aerodynamic racing, but rather for ease of learning on.

A frame that is too small can cause you to scrunch up, tuck your pelvis, and round your spine. A frame that is too large can pull your shoulders too far forward to reach the handlebars. When your handlebars are in the wrong place and you rest a lot of weight on them, you may create shoulder and neck tension from bracing yourself continuously.


This rider’s bike is too small for him, resulting in a tucked pelvis and rounded spine.

If you are exceptionally tall, you may find it difficult to find a frame that is tall enough to fit you. If you need to lift your seat to its max to create enough legroom for yourself, consider also lifting your handlebars. There are extensions that can be attached to the stem of the handlebars, to bring them closer or farther away, as well as to add height. Your frame needs to be long enough to comfortably reach between seat and handlebars without hitting your knees or scrunching your torso.


This tall rider is having trouble fitting onto a too-small frame—the distance between the handlebars and seat is too short for his torso to fit without buckling at the spine.

For smaller-than-average adults, it is sometimes difficult to find a petite frame that allows you to lower the seat enough to reach the ground, without this causing the handlebars to be uncomfortably out of reach. Again, there are adjustable stems available for handlebars that are shorter than average, or can tilt the handlebars closer to you. With many bike seats, you can also adjust the seat position horizontally, and it may be easier to slide the seat closer to the handlebars than to bring the handlebars closer to the seat. Just make sure that your seat isn’t so far forward that pedaling becomes awkward or uncomfortable.

How well does your bike fit you? What has your experience been riding different kinds of bicycles? How good is your posture when you ride? Please do share!


Join us in an upcoming Free Workshop (online or in person).  

Find a Foundations Course in your area to get the full training on the Gokhale Method!  

We also offer in person or online Initial Consultations with any of our qualified Gokhale Method teachers.

Pregnancy and Lower Back Pain

Pregnancy and Lower Back Pain

Esther Gokhale
Date

I'm reaching out to pregnant women today, because I've been reflecting on a clinical study that captures the scope of the problem of lower back (lumbar) pain in expectant mothers and because I have all too vivid memories of how lower back and sciatic pain affected me when I was nine-months pregnant with my first child. This crippling pain continued for a year, at which point I had back surgery that provided only temporary relief. This painful chapter in my life is what started me on my path to understanding the causes and treatments for back pain.

Lower back pain and pregnancy--it's a problem!

Jozsef_Rippi-Ronai_Female_Back_Nude

If you're pregnant and have lower back pain, you're not alone. A 2004 study (Low back pain during pregnancy: prevalence, risk factors, and outcomes) published by Yale researchers in the American Journal of Obstetrics & Gynecology found that nearly 70% of the 645 pregnant women responding to a 36-question survey reported lower back pain during their current pregnancy. The researchers also found that:

  • Pregnant women who have experienced lower back pain prior to their current pregnancy (e.g., during their periods, during a previous pregnancy, prior to ever becoming pregnant) are particularly susceptible to lower back pain
  • Lower back pain disturbed the sleep of 58% of study respondents
  • Lower back pain negatively impacted the daily lives of 57% of the women surveyed
  • Two-thirds of women surveyed in this study did not share back-pain problems with their pre-natal caregivers and--if and when they did--only one-quarter of  these caregivers recommended any kind of treatment

Because I know that lower back pain in pregnancy is a manageable and in most instances a preventable problem, it's of course best if women who plan to become pregnant prepare their bodies for the dramatic physical, musculoskeletal, and hormonal changes that lie ahead. This, as the study confirms, is especially important for women with a history of back pain. But because so many expectant mothers are--at this very minute!--experiencing lower back pain and, in many instances, not seeking or receiving help, this is the topic I'll focus on for now.

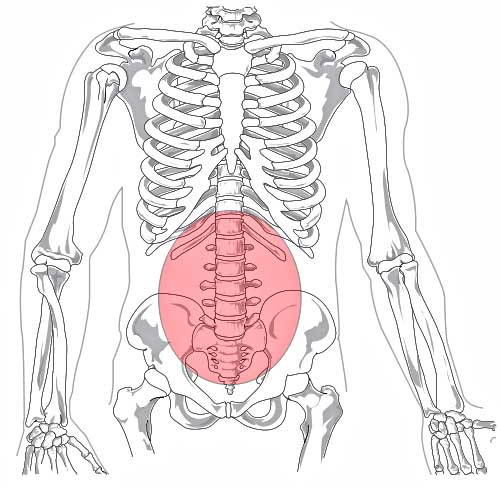
The lumbar spine is the region of the spine between the rib cage and the pelvis

Body stressors during pregnancy

I'll start by stating the obvious: During pregnancy a woman's body undergoes a number of changes, many that are inherently stressful. These of course include:

If, as we consider the lumbar region of the body, we reference the very pregnant Mandy in the photo just below, we can begin to imagine why lower back pain can be a problem for some 70% of expectant mothers.

Mandy-At-39-Weeks-+-4-Days

Mandy at 39 weeks + 4 days

By allowing the weight in her expanded belly to pull her lumbar spine into an exaggerated arch, Mandy is shifting her center of gravity forward, with the result that not only is there too much arch in her spine, there's too much weight on the front of her feet. To counter the arching of her spine and to lengthen and flatten the lumbar region, Mandy would need to use her internal oblique muscles to rotate her ribcage forward. This action, which is vital to proper alignment of the spine and good posture, is what I call "anchoring" the ribs. (Rib anchoring is discussed in greater detail and demonstrated in the video, below.)

What's healthy about Mandy's posture is that she is anteverting, or tilting forward, her pelvis. An anteverted pelvis helps prevent lower back pain because it allows for a natural stacking of the vertebrae, as well as a healthy alignment of the spine over the legs.


Extra weight

Anatomy-of-Human-Gravid-Uterus-Exhibited-in-Figures-by-WilliamHunter01

Where Does the Extra Weight Go During Pregnancy? (WebMD helpfully breaks this down.)

  • Baby: 8 pounds
  • Placenta: 2-3 pounds
  • Amniotic fluid: 2-3 pounds
  • Breast tissue: 2-3 pounds
  • Blood supply: 4 pounds
  • Larger uterus: 2-5 pounds
  • Stored fat for delivery and breastfeeding: 5-9 pounds

   Total: 25-35 pounds

Extra weight and foot structure. I've know for a long time that weight gain from pregnancy (in concert with the effects of the hormone relaxin) impact the feet and can increase a woman's shoe size by half a size or more, so it was interesting to review results of a study published in the March 2013 issue of the American Journal of Physical Medicine & Rehabilitation. The study, Pregnancy leads to lasting changes in foot structure, reports that for 60% to 70% of the 49 participants, their feet became longer and wider and, on average, the height and rigidity of their arches significantly decreased. Study authors also observed that the loss of arch height seems to be permanent, and that the first pregnancy may have the most significant impact on the feet.


Center of gravity


 Equadorian fertility figure

With pregnancy comes a shift in the center of gravity that can be compensated for with good movement patterns and by engaging the internal oblique muscles, which run along the side of the abdomen at about the level of the waist. These muscles can be used to flex the thorax forward and prevent the lower back from arching.  (The thorax is the part of the body between between the neck and the abdomen.) By rotating the ribcage forward and, once again, lengthening and flattening the lower back to "anchor" the ribs, even women well advanced in their pregnancy can maintain a comfortable center of gravity. Shifting the weight back solidly on the heels is also a good thing, because it counters distortion in alignment, while also offering the advantage of not overspreading the feet, which can result in loss of structure.

Relaxin

Pregnant women need to take especially good care of their ligaments because the hormone relaxin, which is produced by the ovaries and the placenta and which helps prepare the expectant mother's pelvis for delivery, also works to remodel other soft tissues, cartilage, and ligaments in the body. As a result, pregnant women are at risk of losing structure--for example (and as described above), in the feet.

The seated woman has made room for her belly, but by leaning so far back she strains her neck and her back. Visual cueing for poor posture surrounds this woman--as it surrounds us all!

Lower back pain and pregnancy--some solutions!

Authors of the "Low back pain in pregnancy" study, cited above, also make the point that lower back pain can start at any point during pregnancy. This means that whether a woman is one-month pregnant or on the cusp of giving birth, she may be experiencing pain in her lower back pain--pain the Gokhale Method helps address. Healthy spinal curvature can be maintained throughout a pregnancy

Healthy spinal curvature, as shown here, can be maintained throughout a pregnancy.

The good news is that by making adjustments women at every stage of pregnancy can prevent lower back pain from occurring, or--if pain is already an issue--take real steps to manage this pain.

Six tips

  1. Anchor your ribs
  2. Engage your inner corset
  3. Hinge your hips when you bend
  4. Stack your weight over your heels
  5. Engage your gluteus medias muscles when you walk
  6. Stretchlie on your side with supportive pillow

While the suggestions I outline in this post can begin to make a difference, much more can be gained from enrolling in the Gokhale Method Foundations Course, watching the DVD Back Pain: The Primal Posture Solution, and reading (and repeatedly referencing) 8 Steps to a Pain-Free Back('Where to learn more' details are provided at the bottom of this post.)

1. Anchor your ribs

With regard to the rib anchor, it's important to know that the ever-growing baby is potentially pulling the mother's back into an arch. An expectant mother who gives in to this pull will be increasingly swaying her back, which can cause lower back pain and other problems. Anchoring the ribs involves keeping the lower border of the rib cage flush with the abdomen. This lengthens the back and helps to frame and lengthen the lumbar spine. By engaging internal oblique muscles as the baby gets bigger, the expectant mother not only reduces the risk for lower back pain, she also gets very valuable abdominal muscle exercise during pregnancy. This not only negates the problem of lower back pain, it makes pregnancy an opportunity to strengthen abdominal muscles, rather than a liability to lose muscle tone.


http://www.youtube.com/watch?v=bLrBJzrMTxA


Keeping abdominal muscles nicely toned before during and after pregnancy perhaps even more ties in with engaging the inner corset, which is at the core of Tip Number 2.


2. Engage your inner corset 

Anchoring the ribs and periodically engaging the inner corset--that is, contracting the deep muscles in the abdomen and back to lengthen and support the spine--is the ticket to well-toned abdominal muscles before, during, and after pregnancy. No matter how pregnant a woman is, these muscles can be entirely engaged, which is especially beneficial, given that the usual abdominal exercises--for example, lying on the back and doing crunches--are not recommended.

Illustration of the inner corset from Lesson 5 of '8 Steps to a Pain-Free Back'

© Gokhale Method: Inner-corset muscles should not be engaged all the time, however. Instead, pregnant women (and everyone else!) will benefit from contracting deep back and abdominal muscles, off and on, over the course of the day.

3. Hinge your hips when you bend

Everybody needs to hip-hinge when they bend, but this is especially important for pregnant women. This is because lowering the body by bending with the knees and curving the back (as is so common in our culture) puts added stress on the spinal discs at a time when the discs are already being challenged by the additional weight of the pregnancy.  Keep in mind that the front of each disc in the curve being formed when the back is bent is compressed, pushing the contents of the discs backward, toward the spinal nerves. All authorities agree that this is a risky direction to distort the spine. The features of hip-hinging especially important for pregnant women are to get the legs externally rotated and set apart in a wide stance, so that when they hinge forward, there's room for the belly to settle between the legs. In other words, the legs have to be out of the way, so that the belly can settle between them. If the the knees are not externally rotated, but facing in, then the thighbones will interfere with the torso settling.Janine, soon-to-be-Gokhale-Method-teacher-in-training, hip-hinges in Chicago

Janine Farzin, soon-to-be Gokhale-Method teacher-in-training, hiphinges in Chicago

Because so much bending is involved in motherhood, a very good time to master hiphinging is before and during pregnancy. Doing so will prepare the expectant mother for all the bending that is to come.

4. Stack your weight over your heels

Positioning the pelvis so that it's slightly tipped forward (anteverted) allows for a natural stacking of vertebrae without muscle strain. Vertebral stacking is important for everyone, but a for a pregnant woman carrying extra weight and with an altered center of gravity, it's really essential. Not only does healthy stacking yield good posture that leaves spinal discs decompressed, it also protects ligamental integrity. Ligaments already loosened by the hormone relaxin are less likely to be taxed when bones are correctly stacked. This will also help protect the feet, which--as noted above--are at risk of losing structure.

5. Engage your gluteus medias muscles when you walk

Engaging the gluteus medius, the muscle located in the upper, outer quadrant of the buttocks, helps prevent lower back pain

Engaging the gluteus medius, the muscle located in the upper, outer quadrant of the buttocks, helps prevent lower back pain[/caption] Our "glutes," or buttocks, are made up of three major muscles: the gluteus maximus, gluteus medius, and gluteus minimus. Located in the upper, outer quadrant of the buttocks, the gluteus medius is the "middle" muscle, the one that moves the leg to the side and rotates the thigh. Gluteus medius weakness--a study. Because engagement of the gluteus medius plays such an essential role in a healthy kind of walking I have dubbed 'glidewalking,' and because this muscle also plays an essential role in healthy, pain-free posture, I was very interested to learn that researchers at the University of Iowa Department of Orthopaedics and Rehabilitation conducted a study that found a strong correlation between lower back pain in pregnant women and weakness of the gluteus medius. Specifically their 2009 pilot study, Association between gluteus medias weakness and low back pain during pregnancy, found that "pregnant women with gluteus medius weakness were roughly 6 to 8 times more likely to have low back pain than those without weakness." The findings confirm what I have long known from my own research and practice--that strengthening and regularly engaging the gluteus medius is really key.

6. Stretchlie on your side with supportive pillow

Stretchlying on the side--that is, lying with a lengthened back, anteverted pelvis, and knees slightly bent--represents an opportunity to restore healthy architecture during sleep and reinforce the neural pathways that will help create muscle memory for a healthy J-shaped spine (as opposed to a curved C-shaped spine or an over-arched S-shaped spine). Not only does stretchling on the side decompress discs and improve circulation when the expectant mother is at rest or asleep, it also helps create muscle memory for an anterverted pelvis and lengthened spine when she's up and about. For women unaccustomed to what good posture feels like, healthy muscle memory can be hugely helpful. Because the extra weight in the belly tends to pull the expectant mother's spine out of alignment, tucking a soft pillow in under the belly will help her resist the pull of gravity and maintain a neutral position. During pregnancy, anything that spares pull on the skin, muscles, flesh, ligaments, and spine, is a very good thing.Pregnant-Woman-Anna-Kosali

When pregnant and stretchlying on the side, it's important to tuck a soft pillow in under the belly


Model this!

Pregnant women experiencing lower back pain might help themselves by taking posture cues from these illustrations:

This very pregnant figure models very nearly perfect posture

This very pregnant figure models very nearly perfect posture[/caption] The image above captures very nice pregnant posture. The woman's back is not significantly arched, her spine is more or less J-shaped, and her shoulders are rolled back.

This French anatomical drawing from 1925 depicts a healthy neutral spine

This French anatomical drawing from 1925 depicts a healthy neutral spine

The illustration just above provides another excellent model for how a pregnant woman can stand without arching her back. Plucked from a 1925 French anatomy book, this image lets me know that the French at that time had right idea about healthy curvature of the spine!

Where to learn more?

The six-session Gokhale Method Foundations Course helps people, including pregnant women, improve their structure and function as they engage in everyday activities.  While my book,  8 Steps to a Pain-Free Back, is most helpful when it's read in its entirety, the following pages expand on the tips outlined in this post:

  • Rib Anchor: 39, 84, 140, 198
  • Inner Corset: 110,-127, 144, 153, 162-163, 190
  • Hiphinging: 150-167
  • Stack your weight over your heels:46-47, 138, 142
  • Engage gluteus medius muscles when you walk: 168-194
  • Stretchlie on your side with supportive pillow: 94-109

The DVD Back Pain: The Primal Posture Solution also features relevant training, including segments on:

  • Stretchsitting: Use the back of your chair to decompress your spinal discs and transform sitting into a healthy, therapeutic activity
  • Inner Corset: Learn to engage your deep back and abdominal muscles to protect your spine
  • Hip-hinging: Protect your spine and knees by learning to bend at the hips
  • Stacksitting: Learn how to sit anywhere without slouching, pain or tension
  • Tallstanding: Stack your bones well and prevent wear and tear
  • Stretchlying: Decompress your spinal discs and nerves while you sleep
  • Glidewalking: Learn to walk in a controlled series of forward propulsions that spares the joints

Photo and Video Credits:

The Happy Mother: Johann Anton de Peters, Wikimedia Commons Lumbar Region of the Human Skeleton: Wikimedia Commons Female Back Nude: oil on canvas: Jozsef Rippi-Ronai, Public Domain Mandy at 39 weeks + 4 days: Danielle deLeon, Wikimedia Commons Janine hip hinging: Courtesy of Janine Farzan, Chicago Equadorian figure of a pregnant woman: Walkers Art Museum, Wikimedia Commons Pregnant woman seated on bench: Peter va der Sluijs, Wikimedia Commons Healthy Spinal Curvature Throughout Pregnancy: Public Domain Gokhale Moment, Rib Anchor: © Gokhale Method Gluteus Medius: Creative Commons Model Maria Pesotskaya resting on her side: Anna Kosali, www.annakosali.com, Wikimedia Commons Pregnant Woman Facing Right: Public Domain French Anatomical Drawing, 1925: Public Domain

My Quest for a "Just Right" Chair

My Quest for a "Just Right" Chair

Esther
Date


Thoreau had three chairs

American philosopher-poet Henry David Thoreau wrote in the "Visitors" chapter of Walden, his 1854 account of his life in a cabin he built on the edge of Walden Pond, near Concord Massachusetts:

"I had three chairs in my house; one for solitude, two for friendship, three for society."

I'm a fan of Thoreau, and I favor simplicity. And although I have more than three chairs in my house, I have just one type of chair that has become "go-to seating" for most solitary and social activities--not just for me, but for family members, friends, and co-workers. The chair is the Gokhale Pain-Free™ Chair, and I designed it myself.


Pain-free sitting, at home and at work

If you were to stop by my house today you would find five Pain-Free™ Chairs arranged around our dining room table--a table that has served my family well, not just at mealtimes, but throughout days and nights as a communal work station/library/coffee shop. To some extent I credit this comfortable arrangement for regularly enticing my two daughters home from nearby college and grad school; they continue to be drawn to this familiar setting, in part because it's such a comfortable place to sit. And if you were to pop into our nearby Gokhale Method Institute office you would see that every member of my staff sits in this very same type of chair, not because it's required or because they feel obliged, but because this is their preference. Before the Gokhale Pain-Free™ Chair came to market, our office was furnished with relatively high-end task chairs (Herman Miller and Soma Ergonomics, among others). But when given the option to stay with the chair they had or to switch, everyone opted for the Pain-Free™ Chair.

Keeping it simple

"Simplicity is the law of nature for men as well as for flowers" is something else Thoreau wrote, and I subscribe to this philosophy. Tipping my hat to Thoreau, I would add that simplicity is also the law for chairs--or at least one of the laws. Too many chairs feature gratuitous, even counter-productive, features. It's not so much that--as Goldilocks observed--the chairs are "too hard" or "too soft," it's that many oblige sitters to tuck the pelvis into a retroverted position, a position that leads to tense low-back muscles, slumping, and--over time--problems with spinal discs, hamstrings, and even the pelvic organs. Such repercussions can of course cause discomfort or pain.

Desperately-seeking-a-"just-right"-chair

Like Goldilocks, I sought a chair that was "just right."

Simplicity was also a guiding principle when I set out to design my chair, in part because when the Pain-Free™ Chair was just a gleam in my eye I interviewed a chair repairman who came to our office to repair the same chair twice; it was one of the relatively high-end task chairs with perhaps one too many features.

Steering clear of bells and whistles

In search of a "just right" chair

In search of a "just right" chair

One valuable insight shared by the repairman was that he saw a direct link between chairs with a lot of features and chairs with a lot of dysfunction. This was especially true of chairs that recline via levers and were owned and operated by men. Men like to recline more than women, he observed, and while men apparently like to employ all available bells and whistles, they don't necessarily read operational instructions first! Reclining is of course a legitimate position (and in fact I'm beginning to think about designing a high-backed chair with headrest that reclines), but the desire to lean back becomes more urgent when a person is uncomfortable. If a task chair is designed to enable upright sitting and really support a person, then there's no need to recline.

The rationale for my chair

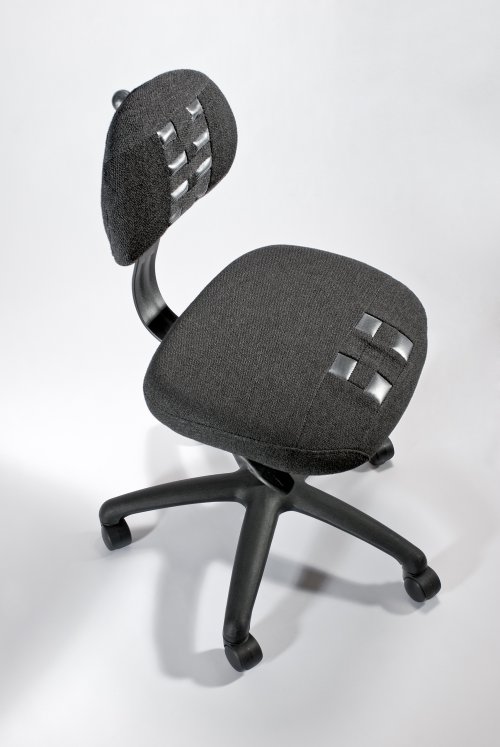
Even among high-priced chairs design flaws are common. The challenge, as I saw it, was to design a simple chair that transforms sitting into a healthful activity that actually feels good.Pain-Free™ Chair

Gokhale Pain-Free™ Chair

Above all, I wanted to create a chair that promotes the natural stacking of the vertebrae without muscle strain, a chair that would enable two healthy ways of sitting--stretchsitting and stacksitting, techniques demonstrated in the video, below, and more thoroughly explored in the Gokhale Method Foundations course, my book 8 Steps to a Pain-Free Back, and the DVD Back Pain: The Primal Posture Solution. Again, the goal was to keep it simple and incorporate only those elements that absolutely matter:

  • Traction on the seatback
  • Seatpan with a downward slope
  • Adjustable seat height
  • Elimination of armrests
  • Highest quality materials

The Gokhale Pain-Free™ Chair

My chair, with its respectful-of-the-human-skeleton design, offers a healthful–even therapeutic–alternative for people committed to good posture who want to simply sit without pain. And these are the features that make a difference:

Traction on the seatback

Stretchsit® nubs on the seatback provide spine-lengthening traction

Stretchsit® nubs

Whether people have an upright and tense “S” spine (swayed), a relaxed and slumped “C” spine (rounded), or a compressed “I” spine (collapsed), stretchsitting is an easy way to regain some natural length. For this technique to work, people need a “grippy” support to meet the midback. Located higher than a lumbar support, but lower than the shoulder blades, soft Stretchsit® nubs built into the backrest of the Pain-Free™ Chair enables sitters to "hitch up" the spine and gently stretch the back. This, in turn, decompresses spinal nerves and discs, which not only feels good, but allows stressed-out discs to rehydrate and absorb nutrients from surrounding tissues and renew the process of self-repair. Also, because the seatback stops short of the shoulder blades, it's easy to roll open the shoulders for a relaxed position that promotes healthy circulation in the arms and better breathing.

Seatpan with a downward slope

It's not good to sit the same way all day. Whereas stretchsitting allows for a sustained stretch and is well-suited to relatively passive tasks, stacksitting is generally more versatile because it enables us to reach for what we need and move around. Because we derive different benefits from stretchsitting and stacksitting, and because each lends itself to different tasks, I designed the seatpan of the Pain-Free™ Chair to enable both types of  sitting and make it easy for people to move back and forth.


The seatpan promotes healthy stacking

While the back of the seatpan is flat, the front half, which features "grippy" rubberized patches, slopes downward. This design anteverts the pelvis, tipping it slightly forward to allow the vertebrae to stack easily and naturally and enable the back muscles to completely relax. Again, healthy stacking promotes healthy breathing, which in turn provides a gentle and revitalizing spinal massage. The flat half of the seatpan, which allows for sitting back in the chair and stretchsitting, prevents the combination of anteversion and stretchsitting, which together would introduce sway in the lower back. The seat cushion made of top-quality memory foam is reallycomfy. I designed this so that when people with underdeveloped glutes (something quite common in our culture) take a seat, they will not be the least bit aware of the hard board beneath the cushion--even if they stay seated all day.

Adjustable seat height

In Thoreau’s time people had sufficiently flexible hamstrings to sit comfortably and with naturally stacked spine on chairs of any height. Because people today tend to have less flexible hamstrings, a hydraulic lift helps. My own preferences is to raise the seat a little higher when I'm stacksitting, because this facilitates the downward sloping of my thighs and healthy anteversion of my pelvis. I lower the height of the seat when I stretchsit. Take a look. http://www.youtube.com/watch?v=8mJWP8fWbyg

Elimination of armrests

Why did I opt not to include armrests when I designed the Pain-Free™ Chair? Too often, armrests prevent people from moving in close to their work surface. When we sit upright and relaxed with our shoulders rolled back and well hung, we can move our arms freely, without straining.

Highest quality materials

Thoreau's Cabin 

Thoreau's Cabin

It's no exaggeration to say that chair is as well constructed as it is designed. I chose each part--steel, wheels, hydraulic lift, memory foam, and GREENGUARD-certified fabric--for its top-notch quality and durability...which brings me back to the spirit of Walden and the philosophy of Thoreau: “There is some of the same fitness in a man's building his own house that there is in a bird's building its own nest."When I sit in the chair I'm proud to have designed and now share with others, I think I know what Thoreau meant.

Photo Credits: Henry David Thoreau, 1861: Wikimedia Commons The Three Bears: Arthur Rackham, Wikimedia Commons Goldilocks: Swift's Premium Soap Products, 1916, Public Domain Gokhale Pain-Free™ Chair (and details of the chair): © Gokhale Method Pain-Free™ Chair Tutorial: © Gokhale Method Drawing of Thoreau's cabin from the title page of the first edition of Walden: Sophia Thoreau, Public Domain, Wikimedia Commons

Subscribe to stacksit