inner corset

Teaching My 95-Year-Old Lithuanian Mom the Gokhale Method, Part 2

Teaching My 95-Year-Old Lithuanian Mom the Gokhale Method, Part 2

Aurelia Vaicekauskas
Date

 
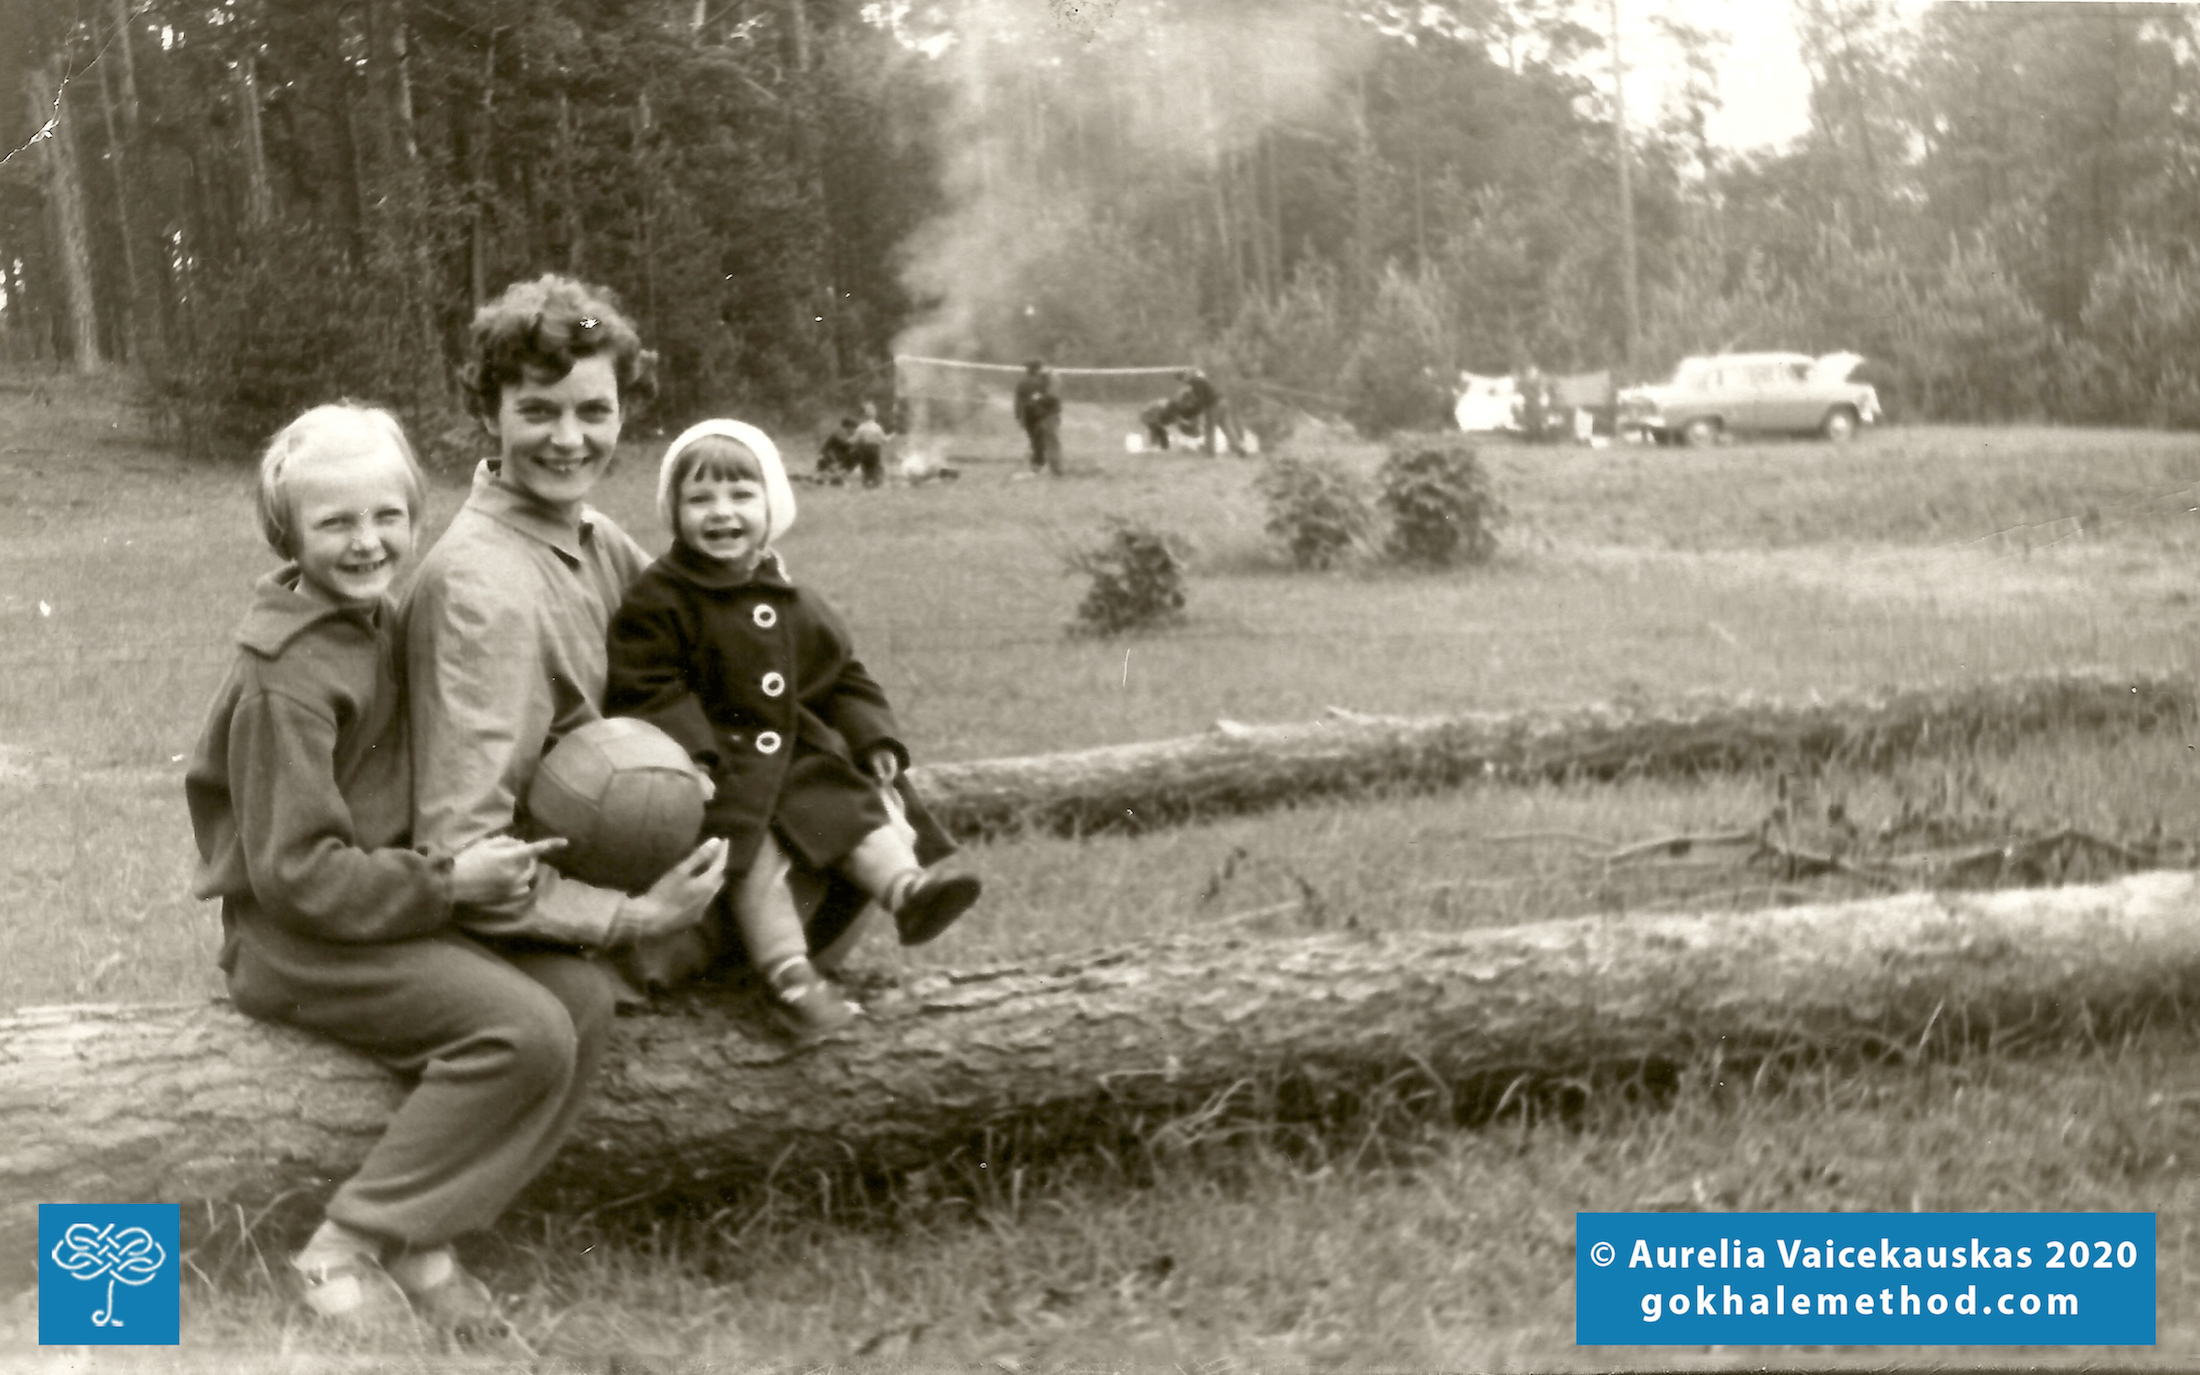
Lithuania, 1967. My mom is in the center, with my sister and me on either side of her.

My mom had beautiful posture when she was young, as you can see in the photo above. Here she is, flanked by my sister and me. Note her open chest, lengthened neck, and head pivoting on the axis of the spine. I believe healthy posture has helped her age well. When she recently developed leg pain, she assumed it was part of the aging process and that there was nothing she could do about it. But happily, after working with some Gokhale Method techniques, her pain has subsided.

As a result, she now sleeps better and has more energy. She’s even resumed some light housekeeping. To help protect her back while vacuuming and sweeping the floor, I taught her the inner corset technique.

The inner corset: what is it?
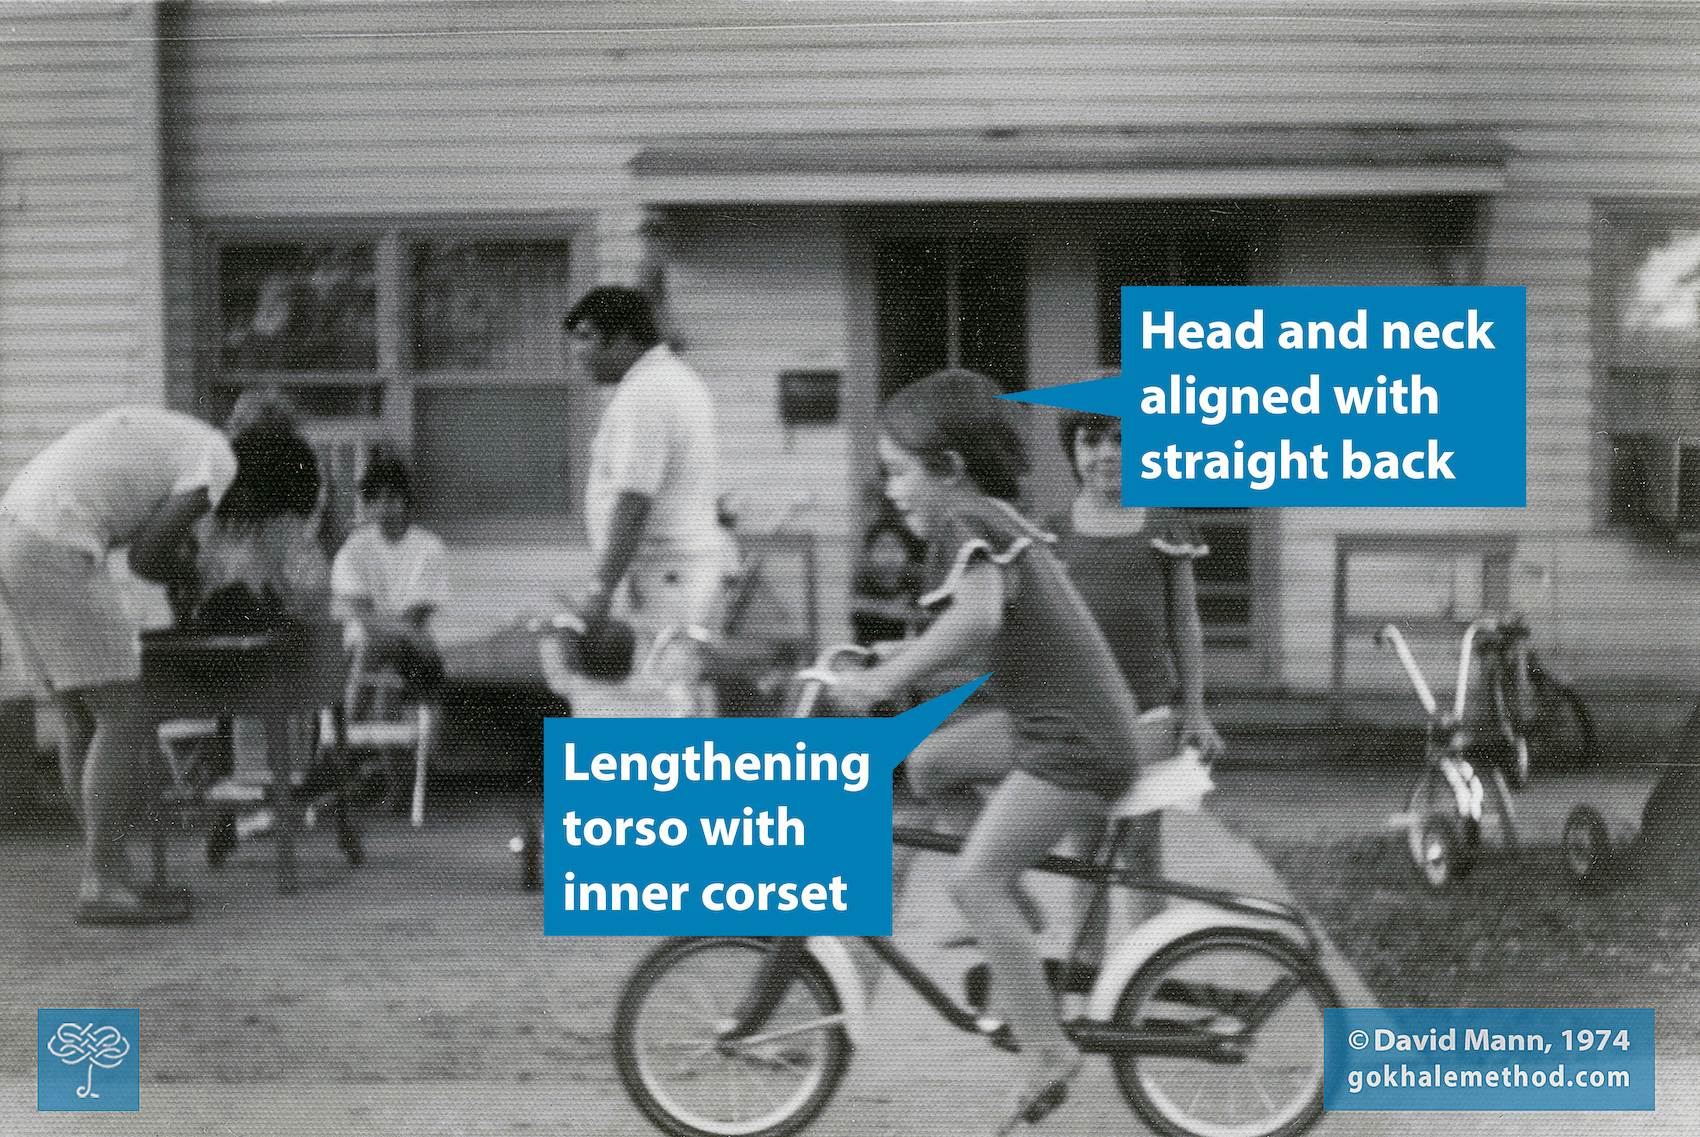
Anytime one lifts, twists, or moves their arms or legs away from the body, there is an opportunity to distort the spine. Distortion puts unhealthy stress on bones, joints, and nerves. The inner corset technique is crucial in protecting one's back while in action. It lengthens and decompresses the spine by activating our deepest abdominal and deepest back muscles (transversus abdominis, obliques and rotatores, and multifidi). This muscular engagement forms a “corset,” which preserves the spine through physical activities. Notice how the discs are protected with extra space in the illustration below.

We all have this muscular engagement pattern available. It is automatically activated with activity that poses an immediate threat to the spine, such as jumping off a high place. However, when the threat is low: picking up a grocery bag or vacuuming, this instinctive bracing is not activated. Most back problems are a result of cumulative misuse of the body. Therefore, learning to use the inner corset in daily activities is the key!

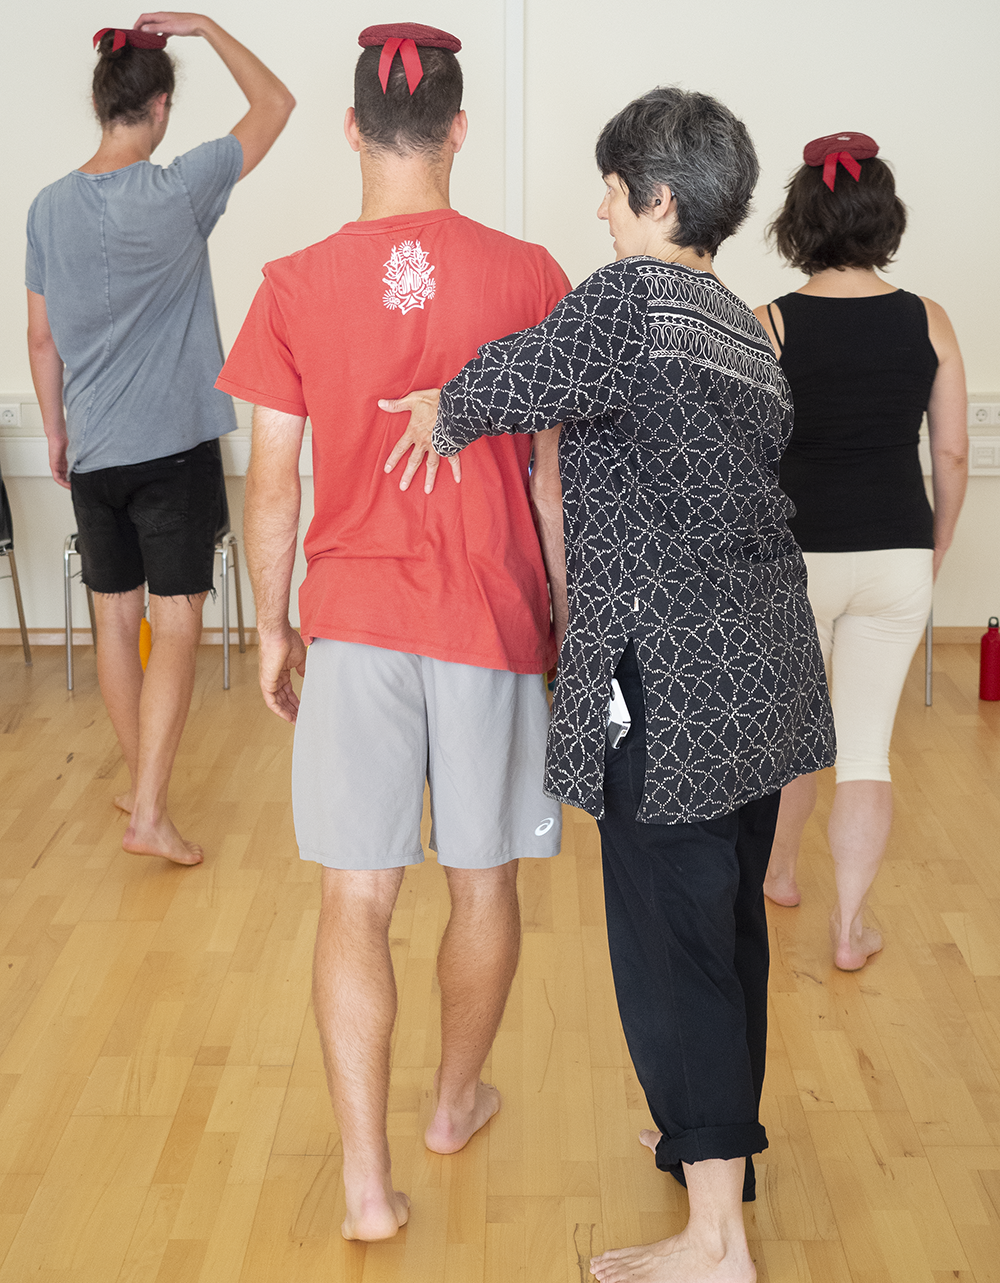
Hands-on help from a Gokhale Method teacher is the best way to find the right muscles. This is true of teaching my mom, as well. While working with her, I was able to help her use her breath to engage her inner corset (see below). Teachers often practice this with students several times to create new muscle memory, and I did the same with my mom. 

 
Helping my mom locate the correct muscles by using her breath also helps her build muscle memory.

Vacuuming with an active inner corset
Alas, with her inner corset in place, my mom is now ready for action. She has always enjoyed housekeeping and continues to vacuum and clean at 95! Now she can keep her back lengthened and maintain her spine’s structural integrity while she does this work. Engaging her inner corset allows her arms to move independently of her torso. It’s a win-win: a workout session for the abdominal and back muscles; meanwhile, the back is protected, and the house is clean! 


My mom shows no sign of slowing down now that she’s learned Gokhale Method techniques.

Summary
I am so grateful my mom gave the Gokhale Method a chance. Not only did it help relieve her nighttime leg pain — as I described in my previous blog post — she now has tools to keep her activities safe! To her huge credit, it took an open mind, a bit of courage, and effort to try something new. I am so proud of her. I believe one is never too old to learn a few Gokhale Method tricks. And we never know what changes are possible until we try!

Posture in Old Lithuania

Posture in Old Lithuania

Aurelia Vaicekauskas
Date


Harvesting rye with scythes in early twentieth-century Lithuania. Original photograph Balys Buročas, 1923.

The Gokhale Method has improved my understanding of how posture correlates to our health and physicality. The method is based on healthy body architecture and has been informed by movement patterns from populations without back pain, those shared by our ancestors worldwide. This inspired me to take a look at my own forefathers in Lithuania, especially their posture while laboring in the fields. 

Memories of my youth
I was born and raised in urban Soviet Lithuania. Yet, we had a little plot of land outside the city in “kolektyviniai sodai” (collective gardens) and most of our weekends and summers were spent there. It was heaven to play in the fields, but there was always plenty of work.

My sister and I were often assigned weeding, watering, or harvesting to complete. It was definitely good exercise and a learning experience. I remember how proud I was when, one summer, my dad deemed me grown-up enough to show me how to cut grass with a scythe. It took a lot of coordination and control to swing the blade just so, to catch the grass low enough and to not drive the blade into the ground.


Harvesting rye with scythes in Juodėnai village, Lithuania. Original photograph Povilas Butkus, 1938.

In the summertime, we frequently visited with our relatives in the country. The grownups helped with harvesting and us kids followed them around and entertained ourselves with lighter tasks. My parents, aunts, and uncles all grew up on farms and were used to this type of work. I remember them teasing each other and laughing in the fields. Yet, it was hard work and they were all exhausted by the end of the day.

My own ancestors in Old Lithuania, like ancestral peoples everywhere, must have carried much body wisdom. Working the land shaped their bodies and their posture. Theirs wasn’t just a weekend task: it was a day-by-day, year-after-year way of life.

Photo treasures
Much more recently, I found a treasure trove of photos on E-paveldas. I immediately recognized the pristine body architecture and beautiful movements of the Lithuanian farmers. Here were women and men working with a clear J-shaped spine — which is found in highly functioning and musculoskeletally sound populations and is a cornerstone of the Gokhale Method. I was not surprised to see the J-spine show up in historical photos from Lithuania. How else could one exert oneself on a daily basis and remain productive and intact?

Before machinery, harvesting was a communal affair. Men did most of the chopping, plowing, and scything. Women raked and gathered, but also did heavier work when needed. Hay and grain harvesting was done with scythes. When harvesting grain, as in both photographs above, the cuttings were gathered and bundled into neat bunches and stacked in big piles in the fields. If harvesting hay, the cuttings were first spread out to dry and once dry, the hay was gathered and transported to the barns (below).


Young women from Didsodė village harvesting hay. Original photographer unknown, ca. 1940.

In the picture below, we see women hefting piles of dry hay to load up a horse cart.


Women loading harvested and dried hay onto a horse cart. Original photographer unknown, 1935.

Postural highlights
These old photographs give us a good view of people’s silhouettes. In contrast to modern-day postural tendencies in industrialized societies, there is no tucking of the pelvis. Behinds are very much behind. Shoulders are back and necks are lengthened. That’s J-spine, the same spinal shape we all had when we were little! 

This body architecture sets a foundation for inner corset engagement. Here, the obliques, transverse abdominis, rotatores, and multifidi muscles are all engaged. 

The inner corset muscles stabilize and decompress the spine so there is no wear and tear on spinal structures during exertion. This is how repetitively thrusting with pitchforks, lifting weights over the head, forcefully swinging scythes across the body, or reaching and pulling with rakes can be performed without hurting one’s back. Of course, the inner corset muscles get a huge workout! Meanwhile, they become stronger and in turn better support the spine.

Additionally, heavy arm and shoulder actions require correct shoulder placement. Notice that the farmers’ chests are open and wide, and shoulders are set further back. This shoulder location allows for better arm circulation, opens the chest cavity for better breathing, and prevents the upper spine from slumping. This position is key for efficient movement and protection from injury.

Bending well is essential to avoid back pain. You can see all the women hinging beautifully from their hips and keeping their backs flat while harvesting potatoes, doing laundry, and cooking. In spite of long hours bending, they did not hunch their shoulders, round their backs, or distort their spines.


Potato harvest in the Džiuginėnai fields. Original photograph Juzefas Perkovskis, 1940.

This healthy way of bending does no damage to the bones, discs or ligaments. Instead, it strengthens the muscles in the back (erectors and rhomboids) and provides the best stretch for the leg and hip muscles (external hip rotators and hamstrings).


Women hip-hinging while doing laundry. Original photograph Balys Buračas, 1923.


Hip-hinging while cooking in an open-air summer kitchen. Original photograph Stasys Vaitkus, 1937.

Another beautiful image (below) depicts three shepherd boys with their instruments. Notice that their lengthened leg and hip muscles in turn allow the spine to stack without slumping even when squatting on the ground. Their legs remain externally rotated, and their foot arches intact.


Village shepherds. Note the deep, healthy squat at left. Original photograph Stasys Vaitkus, 1938. 

In the last image (below), an older couple carries a yoke (naščiai) and baskets. What a clever way to carry a load! The yoke is placed close to the spine — the best place to bear weight, just like in weight lifting, while arms and hands are spared.


Marija and Augustas Šarkai on their way to harvest potatoes. Group Photograph/Bernardas Aleknavičius, 1971.

This couple encapsulates what we find across all ancestral populations:

  1. Their feet are turned out and bean-shaped.

  2. Their behinds are behind them.

  3. Their ribcages are flush with the contours of the torsos, which means their lower backs are lengthened.

  4. Their shoulders are set way back and their arms are externally rotated.

  5. Their necks are long; their chins angle down.

Furthermore, this couple is not young anymore. I am sure they worked throughout their lives, yet they retain beautiful, erect posture.

Reflection
This was a brief glimpse of village life in Lithuania in the early twentieth century. The photographs of my ancestors laboring in the fields are brimming with body wisdom. This wisdom is a part of a common worldwide heritage that has been displaced by modern culture. Yet, it is still available to us through photographs, stories from elders, and posture work.

I felt inspired by the wisdom and proud of my Lithuanian heritage when looking at these pictures. I encourage you to do the same! Look through your own family photos, if you have them, or historical photography books. Let these images inspire you and reaffirm how well our bodies are designed, and how sturdy and strong they are when used well.

What is the Best Ab Exercise?

What is the Best Ab Exercise?

Esther Gokhale
Date


The abdominal crunch, though ubiquitous, is actually quite detrimental to the spinal discs and nerves. Better to find an abdominal exercise which respects and protects the spine! Image courtesy Jonathan Borba on Unsplash.

Happy Holidays! The dawning of a new year is a time when many people make efforts to establish new habits, many of them body-related. With the desire to improve ourselves often comes a (sometimes unhealthy) heightened awareness of how our bodies and their shapes appear to others. This is particularly true of abdominal muscles. Photoshopped, unrealistic images of sculpted torsos plaster newsstand covers every January. Crunches are the most commonly recommended exercise for increasing ab strength, often with six-packs as the goal. But do six-packs actually indicate broad-spectrum ab strength? What is actually the best ab exercise —  something protective of our backs rather than detrimental to our spinal health? How can we balance form with function?

The Gokhale Method describes two important sets of abdominal muscles that keep us healthy: the “rib anchor” and the “inner corset.” The rib anchor helps prevent the lower back from arching. The inner corset protects the back from a variety of compressive threats — weight-bearing, impact, and vibration, as well as any distortion in shape like arching, rounding, or twisting. The inner corset includes the rib anchor plus a more extensive set of deep abdominal and back muscles.  

Well-designed ab exercises would:

  • tone the deeper layers of the abdominal wall that constitute the rib anchor and inner corset muscles, while de-emphasizing the shallower rectus abdominis (six-pack) muscle 

  • put no unhealthy stress on your neck, spinal discs, or spinal nerves

  • take as little time out of your day as possible


Here, my daughter Monisha, a high-level athlete, demonstrates how rib anchor and inner corset activation can make all the difference in pull-up form.

Now for some specific measures to strengthen the rib anchor and inner corset muscles. Based on how much time they take out of your day, we will divide them into 3 tiers: 

Tier 1: Everyday activities
These strengthening measures are fully integrated into your everyday activities. They don’t take any time at all out of your day. Your daily activities need to be vigorous enough that they would ordinarily stress your spine. However, by activating the rib anchor and/or the inner corset every time your spine would get stressed, you not only prevent damage — you get your ab exercise as well. Think about this approach like “on-the-job training.” The advantages are numerous:

  • You strengthen the various components of your “brace” or “inner corset” in exactly the proportion they need to be strong. No overdevelopment of the six-pack (this is common and tucks the pelvis); no neglecting the deeper abdominal and back muscles (this is also common and leaves the area weak and unprotected).

  • There’s no threat or damage to your spinal discs, nerves, or neck in this approach. Compare this with the threat and damage caused by crunches, which unfortunately remain the most popular ab workout in gym routines. 

  • It takes no time! It takes no longer to lift well (with the inner corset engaged) than it takes to lift poorly. It takes no longer to twist well (with the inner corset engaged) than it takes to twist poorly. And it takes no longer to run well (with the inner corset engaged) than it takes to bounce around willy nilly and destroy your discs and nerves.


Proper abdominal engagement is crucial for safe running technique — and it doesn’t necessarily look like a six-pack. Image courtesy nappy on Pexels.

Tier 2: Modified activities
These ab strengthening measures are slightly contrived (but not awkward) ways of modifying everyday postures and ways of moving to get our ab exercise needs taken care of. This is the next best choice if your everyday activities don’t quite cover your exercise needs.  As many of us sit behind computers for larger and larger fractions of the day, I’ve begun recommending engaging the inner corset 10% whenever a student can remember to do so. This is the extent to which these muscles would have been recruited in sitting were they primed by carrying weights as much as our hunter-gatherer ancestors clearly did.


Laptops and other computers are wonderful tools, but they also encourage us to be passive and increasingly sink into ourselves over the course of a work day. Inner corset and rib anchor activation, even 10%, can help us learn to “wake up” our deeper abdominal muscles. Image courtesy Brooke Cagle on Unsplash.

Tier 3: Supplemental exercises
Doing supplemental exercises and therapies to strengthen the abs. These take time. To be efficient, I recommend whole-body exercises, yoga poses, or dance sequences that enable you to do several exercises in parallel. Some of my faves are chair pose, samba, and TRX planks.


Samba is a fun, social, sensual way to actively engage and strengthen the inner corset. It’s never too soon to start getting ready for Carnaval! Original image courtesy PlidaoUrbenia on Wikimedia Commons under CC BY-SA 2.5.

Helping it stick
Do you find it difficult to fit posture work into your daily schedule, or struggle to form new habits? (This is part of being human!) I’m excited to announce our new Gokhale Exercise Challenge, a live-streamed, daily 15-minute exercise session I’ll be leading personally at 7:00am Pacific / 10:00am Eastern every morning from January 1, 2020 through January 21, 2020. This enrichment of our Online University content is free for all Online University members.

If you are an alum of our Foundations Course or Pop-up Course and haven’t yet enrolled in our Online University, join today by calling 1-888-557-6788 to receive a special discount on your annual membership between now and January 8, 2020.

Q. What if I miss a session or live in a completely different time zone — can I still participate?
A. Yes! If this time slot doesn’t suit you, you can watch each session at your convenience for up to 24 hours after the live session.

Q. I’m not in great shape. Is this accessible to me?
A. Absolutely! All Gokhale Method alumni at any level of fitness will benefit from these exercises.

I look forward to starting the New Year with you!

Holiday Poem

Holiday Poem

Lori Szalay
Date

Written by Lori Szalay, Gokhale Method Teacher


Here’s a little story I’d like to tell,

Some of you may know it well…..


Twas the day of the Foundations Course and all through the room,

Backs, necks, shoulders and much more were aching and there was a feeling of doom.

The stretchsit cushions were attached on the chairs with care,

A Posture Poised Teacher was there with knowledge to share.


The students knew they would learn to stretchlie to be comfortable in their beds,

As visions of a pain-free life continued to dance in their heads!

With compressed spines, slouchy shoulders and many with rounded backs,

Each had their own concern yet all eager to learn the posture modification facts.


When they lengthened their spines and used the stretchsit cushion for traction,

They sighed with relief from such a simple therapeutic action! 

Next was the shoulder roll…forward, up, back and down,

There was a sound of a crackle, a pec stretch….. but not a single frown!  


Onto the feet, to reshape them like a “Kidney Bean,”

It lines up your knees and hips….if you’ve done it you know what I mean!

With the illusion of helium filling up in their heads,

Their necks elongated, going from pressed down to much taller instead.   


With their inner corset engaged and ribs anchored in,

Standing up proved to give a feeling of being a bit thin.

With feet shaped just right and weight shifted back on their heels,

Each stood so straight…. it really was a big deal! 


As they anteverted their pelvis, tipping forward a slight,

Their ‘bum’ floated back and up…. and landed just right!

Keeping their upper body strong… shoulders back, neck straight,

Each knew healthy posture was part of their fate!


As they learned to bend using a technique call ‘hip-hinge,’

Having flexible hamstrings and hip-rotators is how to avoid any muscle twinge!

Checking the ‘groove’ assuring their back stays tall,

Realizing each hinge is a bend…. no matter how big or small!


Next onto Glidewalking, a four part check list straight from the book,

Now using their muscles with every step they took!

To the sound of music and courses they came, 

They walked and practiced each part by name….

“Keep your heel down, leg straight and extended back,

Squeeze your glutes, land with a soft knee…..Relax!


There is so much more to learn and much more to tell,

If you are student of the Gokhale Method you know all this too well!

If you are thinking about taking the course, do not fret or hesitate,

Log onto the website, register to take the course and begin your Posture Fate!


One more thing to leave you as I go…. Happy Holidays to all and a "BIG HO-HO-HO!!"

How to Choose a Bike Seat for Good Posture (Part 2)

How to Choose a Bike Seat for Good Posture (Part 2)

Esther Gokhale
Date

In our part 1 blog post on the topic of bikes, we went over how to find the right frame for you. The next important step is to find the right seat for your body and your bike, since without a decent seat you may be uncomfortable, or may find it challenging to have healthy posture. Your seat should distribute your weight across regions comfortably; it should have padding, but not so much that it lacks support and stability; it should be set at an angle that allows your pelvis to antevert (that is, tip forward relative to the angle of your spine.) A good seat is crucial whether you prefer to be upright and stacksit, or if you prefer a racing style with a hiphinge. Here’s what you need to know about bike seats to find the right one for you:


Seat shape and angle: On most bike seats, it’s possible to change not just the height, but the horizontal position and the tilt of the seat. Make these adjustments carefully on any bike you plan to ride regularly. A small difference in the seat position can have a big difference on your posture as well as your comfort.

The angle of your bike seat—because it makes anteversion uncomfortable or because it tilts you too far forward or backward—may be causing you to tilt your pelvis in a direction that doesn’t allow for good back positioning. Many people prefer bike seats that carry most of their weight on their sitz bones (further back) rather than on the tissues under the pubic bone (further forward), because there are fewer sensitive nerves endings around your sitz bones. So if the front of your seat is tilted too far up (as in the image above left), this can encourage you to tuck your pelvis in an effort to relieve pressure on the pubic bone. And if the seat is really tilted too far up, it forces you into a tuck because of the backward slope of the seat—picture this as the opposite of the wedge you would use to facilitate stacksitting. If you try to sit on your bike with an anteverted pelvis (more angled than the angle of the hiphinge you need to reach your handlebars), and your seat causes you discomfort, you may need to angle the front of the seat downward.

Too much downward tilt is also problematic. If your seat makes you feel as though you are slipping forward off it when you antevert your pelvis, you will need to tip it back more so that you stay comfortably in place without having to brace all your weight against your handlebars. If your seat is tilted forward so that it doesn’t sufficiently ‘cradle’ your pelvis at the right angle, you may also be tucking in an effort to get your bottom further back on the seat.

It is possible that after playing with your seat to find a comfortable middle-ground, you will discover you need a new seat altogether. You should look for one that accommodates the shape and size of your sitz bones and carries your weight in the least-sensitive areas when you are properly hiphinging on your bike. Some seats are wider and may cause chafing against your thigh; you may need a cutout in your seat to relieve pressure under your public bone. To find a seat that matches your body, you may need to do a lot of testing!

Note that many newer “comfort” seats have a huge amount of padding and can amount to sitting on a small mound, rather than distributing your weight and ‘cradling’ your bottom. This extreme amount of padding can actually make it harder to comfortably antevert your pelvis:


Because these seats fall away from a padded peak, your weight is not well distributed; to find a comfortable spot for the pressure to land, you may end up tucking your pelvis so your sitz bones take all the force.

Older “saddle” style bike seats may appear too firm, but they can cradle your pelvis, distribute your weight comfortably, and promote stacking.


The slightly bowl-shaped curve of these seats provides lift in the back like a wedge, but catches your from sliding forward with the projection in the front.

Firmness and fabric covering on the seat will also make a difference in your riding experience. A slippery fabric may cause you to always be sliding around; a squishy seat may feel most comfortable at first, but end up chafing or lacking support. Finding the ideal seat is best accomplished through a lot of testing and laps around the block, so we recommend you find a very patient bike shop attendant to help you with this selection. You may need to purchase several seats so you can test them out on longer rides over several days before returning the rejects.

In addition to the more standard styles found in most bike shops, there are also many kinds of specialty seats available online which may work best for your needs and preferences:


Both of these seats provide a nice bowl shape that can support anteversion and comfortably distribute weight. Personal preference will dictate whether these fit your body, and enable a proper range of movement and a stable seat while on your bicycle.

Getting moving: When it’s time to actually get on your bike, how should you do it? The most gentle way to mount your bike will be to start by straddling the frame in front of the seat. Try doing this next to a railing or wall where you can brace yourself for balance, and move slowly while engaging your inner corset.


This young girl shows the ideal way to start your ride—straddle the frame and tallstand to align your pelvis and spine.

If you are not adept at swinging one leg through the air, or your balance isn’t what it used to be, a bike frame that dips very low in front (like comfort bikes) may be necessary to make getting on and off your bicycle easy. Make sure you can easily step over your frame without hurting your back or losing balance.


This comfort cruiser is ideal for maintaining a relaxed upright posture, and has a low bar in the front that makes getting on and off the bike a breeze!

Before you get up your seat, perform a shoulder roll and slowly reach your arms to your handlebars, to make sure you maintain good shoulder positioning with your elbows close to your sides, and no slump in the upper back. Keeping your shoulders in position may deepen the amount of bend you need to sit with, which will dictate how anteverted your pelvis should be.

When you get up onto your seat, you will have to perform an advanced hiphinge/stacksit, one that is done by bringing your hips back and up, rather than your torso down (while moving and balancing!). As you stand up on your pedals, make sure you start with a straight back, engage your rib anchor, and then slowly deepen your hiphinge as you move your hips back and up onto the seat, keeping your sitz bones out behind you.


Start hiphinging as you stand up on your pedals, before moving your bottom onto your seat.

The motion is similar to hiphinging before lowering down onto a chair for stacksitting:


As your lift yourself into your bike seat, you will need to hiphinge to some degree, more or less depending on the style of your bike and how upright it allows you to be.

If you need to adjust while you are on the move, you can make sure you are properly anteverted by lifting your bottom up a little and repositioning your sitz bones even farther behind you.

As you ride, you can lessen the work of your back, shoulder, forearm, and wrist muscles by keeping as much weight in your seat as possible, rather than supporting yourself on your handlebars. If you have experienced wrist or arm pain, you should consider a frame and seat that allows you to stacksit, since being fully upright will save your wrists from unnecessary stress.

Engaging your inner corset as you ride will also protect you from bumps and jostling. Because you will be in motion, manually checking your position or looking in a mirror is likely impossible, so you will have to rely on your proprioception and your body’s comfort levels to judge how well you are maintaining your posture. But like with everything else, practice makes perfect; with some repetition and regular breaks, you can soon master the Gokhale Method on two wheels!

Do you have any experiences to share about bike seats?


Working With Scoliosis (Gokhale Method Teacher Cynthia Rose's Back Story)

Working With Scoliosis (Gokhale Method Teacher Cynthia Rose's Back Story)

Cynthia Rose
Date

When I was 12 years old my mother took me to our family doctor for a check up. I remember him looking at me and saying “One of your shoulders slopes down more than the other. Isn’t that interesting!” What’s interesting to me is that the word scoliosis never came up in the conversation and that there wasn’t any further investigation of my sloping shoulder. As a 12-year old I had never heard of scoliosis, so I thought my sloping shoulder was just an oddity I would live with.

It was not until many years later when I returned to school to study massage therapy that I began to notice changes in my spine that manifested as chronic low back pain. I thought it was because of the sitting I was doing in classes or the crawling around on the floor for shiatsu practice sessions. The pain never really subsided, though I did find temporary relief through bodywork and the application of heat. Though the pain was not severe, it was bothersome because it was relentless.

When I was in my early 40’s, I worked with a chiropractor who took a standing X-ray of my complete spine. This was the first time I saw my scoliosis clearly. I also saw how my lumbar vertebrae compromised my discs. No measurements were taken so I don’t know about the progression of my scoliosis over time. But the pain that lived on the left side of my lower back and extended into my left sacroiliac joint was my motivator to do something.

I approached my back pain in a similar way to how I now approach my patients’ complaints as a licensed Acupuncturist and Bowen therapist. I work with a complaint, especially a longstanding one, as a puzzle and pay close attention as I observe changes, both positive and negative. Though there were days when my back felt OK, the exact same pain would inevitably return. I kept trying different things to make it better. Exercise became a big part of my life. Too little exercise resulted in more pain; too much exercise had the same effect.

In 2014, I came across a blog in the NYTimes about the Schroth Method (https://well.blogs.nytimes.com/2014/05/12/hope-for-an-s-shaped-back/). Everything about it sounded promising and I was ready to explore this direction. I found a group of three therapists at Alta Physical therapy in Manhattan that were trained in Schroth and spent about a year working with them. The sessions gave me a deep understanding of what was happening in the curves, as well as the rotations that compensated for the curves. I began to understand what was weak in my back and how I needed to strengthen and stretch to relieve the pain.

The exercises were changing my upper spine more than the lower spine and I began to feel there were gaps between doing the exercises and how I moved in my day-to-day life. I went back to re-read the article in the Times and noticed the many comments on the posting. They included information about other methods, techniques, and braces that had helped other readers. I looked through these and clicked on every link.  This is where I first heard of the Gokhale Method®.

As readers on this blog know, the Gokhale Method teaches you how to sit, stand, bend, walk, lift, and lie in bed with what Esther Gokhale calls “primal posture”. You find the ideal way to stack your bones in relation to gravity so that there is less wear and tear on the structure and less impingement on the intervertebral discs.  For a scoliotic this can be difficult to feel but the method is taught in a way that benefits anyone. Having a clear picture of the twists and turns in my spine from my Schroth work helped me a great deal. I had always felt that posture was contributing to my pain; the Gokhale Method helped me learn, with clarity, the correct way to position my pelvis and my rib cage to optimize my posture no matter what activity I was doing.

I took the six-lesson Gokhale Foundations Class in December of 2014 - about six months into my Schroth sessions - and it made a big difference in how I was feeling and moving through my day. It gave me clarity on where my body should be in space and I felt almost immediate improvements in the frequency and intensity of my pain. The best part was that when I had pain I could ask myself “how am I using my body that could be causing the pain? What could I change that would make the pain go away?” With the Gokhale Method I had specific knowledge of what I needed to change.

The change of my pelvic position from tucked to anteverted took a lot of pressure off of my disc at L5-S1. A tucked position was my default and I had a lot of stiffness around that joint, but even the smallest change to an anteverted pelvis helped me a lot. You can see this in the before and after pictures taken at the class.


Cynthia Rose (after reading 8 Steps to a Pain-Free Back, but before taking the Gokhale Method Foundations course)


Cynthia Rose after taking the Gokhale Method Foundations course


Cynthia Rose bending (after reading 8 Steps to a Pain-Free Back, but before taking the Gokhale Method Foundations course)


Cynthia Rose bending after taking the Gokhale Method Foundations course

The Gokhale Method teaches how to elongate the spine in both passive positions (such as sitting or lying) and in active techniques like using the inner corset. This elongation changes the shape of the scoliotic curves in the spine and puts a positive stressor on the bones and muscles allowing them to change in a positive way. For me, this quickly translated to less pain and, over time, I can feel the changes in the muscles on either side of my spine. The pictures below show my back without and then with my inner corset engaged.


Gokhale Method teacher Cynthia Rose shows a view of her scoliosis with the inner corset (right) and without (left)

The Schroth exercises taught me what it felt like to have my curves evened out and my rotations untwisted. I continued doing the exercises for a while. They involved a lot of props (poles, cushions, multiple chairs) and eventually felt too complicated to continue wth them. The Gokhale Method taught me how to move with healthy posture to prevent wear and tear on my structure and reduce my pain. I was able to use what I learned throughout my day and night, withot taking time out to do so.

Not everyone who has scoliosis has pain - I didn’t until my late 30’s. Pain is now one of my reminders to check how I’m using my body; I also use mirrors and my reflection in store windows to take a glance at the shape of my spine. Often, I see the return of my old habit of tucking my pelvis or rounding of my shoulders; I can easily make corrections.

People-watching has become a hobby of mine. The primal posture we teach in the Gokhale Method can readily be seen in people who are from a non-industrialized environment. I live in NYC so there are many of these beautiful people for me to learn from.

The work has had such a profound effect on me, that in 2015 I trained to become a teacher of the Gokhale Method. It has been a valuable asset for many of my acupuncture patients who have chronic or recurrent pain. I am able to teach them posture using the Gokhale Method language I have trained in. It is exciting to be able to communicate with depth and clarity what I use for myself to someone else and to see the changes that can happen in their bodies.

I enjoy being a part of the network of over 50 Gokhale Method teachers around the world all trained by Esther Gokhale. Though her book 8 Steps to a Pain Free Back is a good way to begin changing posture, Esther always recommends getting hands-on instruction from a qualified teacher. I, like many of my colleagues, am available to travel, as well as to answer questions you might have.


Abigayil Tamara's Experience with the Gokhale Method

Abigayil Tamara's Experience with the Gokhale Method

Abigayil Tamara
Date

We set a high bar for our six-lesson Gokhale Method Foundations course. We expect our students will 

  1. Sit, stand, walk, lie, and bend in new (old!) and better ways
  2. Experience significantly less pain and more function
  3. Expect more from their body and life. 
  4. Use the word “life-transforming” somewhere in their evaluation forms.

Even with this high bar, a student sometimes surprises us with the extent or speed of their progress over the course. Abigayil Tamara is one such student - here is her story. 

My Experience With the Gokhale Method
~Abigayil Tamara, MA, MSW

I looked into the Gokhale Method after someone in a grocery store told me how much it had helped his mother. 

My back issues began over 34 years ago, in 1983. I was given epidural injections. When I reached the point where I was unable to sit down, I had my first back surgery, a laminectomy on L4/L5, L5/S1. After the surgery, I used a walker for many years. In 2009, I had a second back surgery, a fusion at L4/L5, L5/S1. My third and fourth back surgeries In 2013 and 2016 involved removal of previous hardware, and fusion of L1-S1. Besides walkers, canes, and mobility scooters, I also had a service dog with a harness that I used for balance and support. Over the years I have worn a number of braces including two substantial back braces and braces for both legs. My back issues had resulted in burning in both calves and feet, and bursitis in both hips with pain extending down my right leg.  I have had numerous tries of Physical Therapy, the most successful being Aquatic Physical Therapy in a warm water pool. Since my last surgery I have seen three Physiatrists and two Internists, one with an Anesthesiology specialty, in my search to heal my back, resolve severe pain, increase my functionality, and be able to stop wearing the brace I had worn for over ten months following the last surgery.

With my history, I wasn’t sure that the Gokhale Method® was going to be able to help. I attended the Free Workshop, and then had a consultation with Esther Gokhale. I found her extremely knowledgeable, and able to immediately offer help for my situation. She taught me how to engage and develop my Inner Corset. I then started the Foundations Course individually with Monisha White. After the first session with Monisha I was able to discontinue use of my back brace and haven’t needed it since. With Monisha’s help I was able to continually improve my posture, with Stretchsitting (I love shoulder rolls), Stacksitting, Tallstanding, Stretchlying (side and back), Glidewalking, Hip-Hinging, and wonderful Kidney-bean shaped feet. Because my back was very stiff and painful, lying down and going to bed had been extremely difficult activities. Once I learned Stretchlying, lying in bed was very comfortable, and I looked forward to getting into bed.

Having spent years as a teacher and in helping professions, it is always wonderful to find others who are passionate about their subject matter and able to teach in a way that enables others to absorb the information and apply it in their lives. This has been my experience with the Gokhale Method®. Demonstration, visuals, positioning my body, review, practice, and homework involving reading and exercises continually reinforced the information.

I own the Gokhale Pain Free™ Chair and two Stretchsit® Cushions (one permanently in my car, and the other for use on chairs at home or other places), and these help me sit comfortably. 

With the conclusion of the six session Foundations Course, I am engaging in continuation of the learning. It is important to me to build on current knowledge, to continually practice, stay engaged with others on this journey and learn new information. I am a senior with years of having a compromised back. I was amazed that in a short time with the Gokhale Method I was able to make significant changes to enhance the quality of my life. I am hopeful that others will learn this information and avoid the many years of suffering that characterized my life. I am very appreciative of Esther Gokhale’s work, and grateful for the many methods she has developed to help others.

Stretchsitting®

Stretchsitting Before/After
The difference in neck curvature between the two is particularly marked

Stacksitting®

Stacksitting Before/After
Note the strong improvement in shoulder and head placement

Hiphinging

Hiphinging Before/After
Abigayil will now build up the flexibility and strength she needs to deepen her bend, instead of compromising her spine above her fusions to reach the ground

Tallstanding®

TallStanding Before/After
Notice how much stronger and more confident Abigayil appears while standing, after!

How to Not Sway Your Back in the Shower

How to Not Sway Your Back in the Shower

Date

As your mother always said, practice makes perfect. Luckily, every day you are presented with countless opportunities to perfect your posture while sitting, walking, sleeping and...showering.


Lathering is a good time to practice healthy posture

Yes, that’s right. You can, and should, be aware of your posture even while performing the most mundane of tasks. So before your next shower, take a few meditative minutes to enjoy the healing properties of warm water...and then pause before you grab your shampoo bottle. Why? Because the half-minute you spend lathering your hair is probably the most vulnerable shower-time for your back.


Just before you lather is an important time to pause and set your posture

Most people in industrial cultures, when lifting their arms above their head, will sway their backs and put themselves at risk for a couple of problems. Swaying is an excessive arching of the back that compresses spinal discs and compromises circulation around the spine--not good. In the shower, be careful not to lean your head too far back while shampooing because this movement can exacerbate the sway.


Raising the arms above the head can easily result in a swayback

To prevent this, I recommend a technique called “anchoring the ribcage”. I teach this maneuver to students to help them achieve a healthy shape in the low back. To anchor your ribcage, you want to contract your internal oblique abdominal muscles to pull the front of the rib cage downward and inward. This is easier said than done! Your goal is to lengthen and straighten your low back.  To isolate the internal obliques (as opposed to rectus abdominis, the ab muscle modern Westerners are more aware of and tend to overuse), it helps to guide the action with your forearm or fists. Place either your forearm or your fists over the lower border of your ribcage (you want to feel bone), and gently press backwards so as to rotate your ribcage forward a little.


 Gently pushing back on the lower border of your ribcage helps rotate the ribcage forward and fix a sway back

When you think you’ve got it, you can assess the spinal groove in your low back with your fingers. A healthy low back shape has a mild groove, embedded bumps (your vertebrae), and soft ridges on either side of the groove. If you feel taut muscle ridges on either side of a deep spinal groove, then your back is still swayed.  Perform this maneuver to maintain a relaxed and lengthened position next time you shampoo.  Lather, rinse, repeat, and before you know it, you’ll be a proper posture pro!


Esther demonstrating how to anchor the ribcage to prevent swaying the lower back


Join us in an upcoming Free Workshop (online or in person).  

Find a Foundations Course in your area to get the full training on the Gokhale Method!  

We also offer in person or online Initial Consultations with any of our qualified Gokhale Method teachers.


Put Your Baggage to Work

Put Your Baggage to Work

Esther Gokhale
Date

When the weather is cold, we bundle up in gloves, scarves, hats, and sweaters. But these aren't the only extra burdens we carry. From Kleenex and chapstick in our purses, to holiday shopping bags, skis, and umbrellas, being prepared for the season means taking on extra weight. If carried incorrectly, extra loads contribute to neck and shoulder tension, fatigue in the arms, and back pain. If carried well, winter loads provide a welcome exercise opportunity at a time when exercise is harder to come by.

The following tips can help you reap benefits, rather than back pain, from carrying a purse and other bags.

1) Let the weight of the purse pull your shoulder gently downward. Don't tense your shoulder upward against the weight of the purse. This gently stretches your trapezius muscle, instead of tightening it, and gives your muscles a rest.

2) Carry your purse closer to your spine than your belly button. Use your elbow to nudge the bag or straps towards your back. This way, there's less torque on your back, the purse doesn't slide from your shoulders as easily, and the weight of the purse helps settle your shoulder backward instead of forward.


On the left, Maya uses her purse to keep her shoulder 
back, and to stretch her pec and trapezius muscles.
On the right, she has unhealthy shoulder posture.

3) Use your inner corset so that carrying your purse/bag becomes a healthy workout for your abdominal and intrinsic back muscles. By using your muscles to carry the weight of your bag, you spare your spinal discs and nerves. Chapter 5 in 8 Steps to a Pain-Free Back teaches you how to use your inner corset. Click here to download this chapter for free.


If this woman from Burkina Faso was not
using her inner corset, the weight of the bucket
would compress her spine.

Cheers,
Esther

Stretch It Out

Stretch It Out

Esther Gokhale
Date

Lengthening the spine is an important component of the Gokhale Method and the best way to begin a posture transformation. Creating space between the vertebrae decompresses the discs and promotes healthy nerve function. Allowing your spine to be in gentle traction often throughout the day is an excellent way of creating a healthy baseline. We can do this by sitting, standing and sleeping with good posture. In addition to these Gokhale Method basics, sometimes your back muscles crave an even deeper stretch. Below I’ve outlined three additional ways you can stretch your spine that are safe and therapeutic.

Stretchsitting and Stretchlying

Especially if you have back pain or a very sensitive back, creating a gentle stretch over a long period of time is a wonderful place to begin. Using external objects such as your bed (Stretchlying on the back or side), or your chair’s back rest (Stretchsitting), or a Stretchsit® Cushion​, can help stretch your back and relax your muscles. You can find directions for these techniques in 8 Steps to a Pain-Free Back.

Stretch your spine while you sit. Click here for an instructional video on stretchsitting.

One of the steps in stretchlying. Click here for an instructional video on stretchlying.

Inner Corset

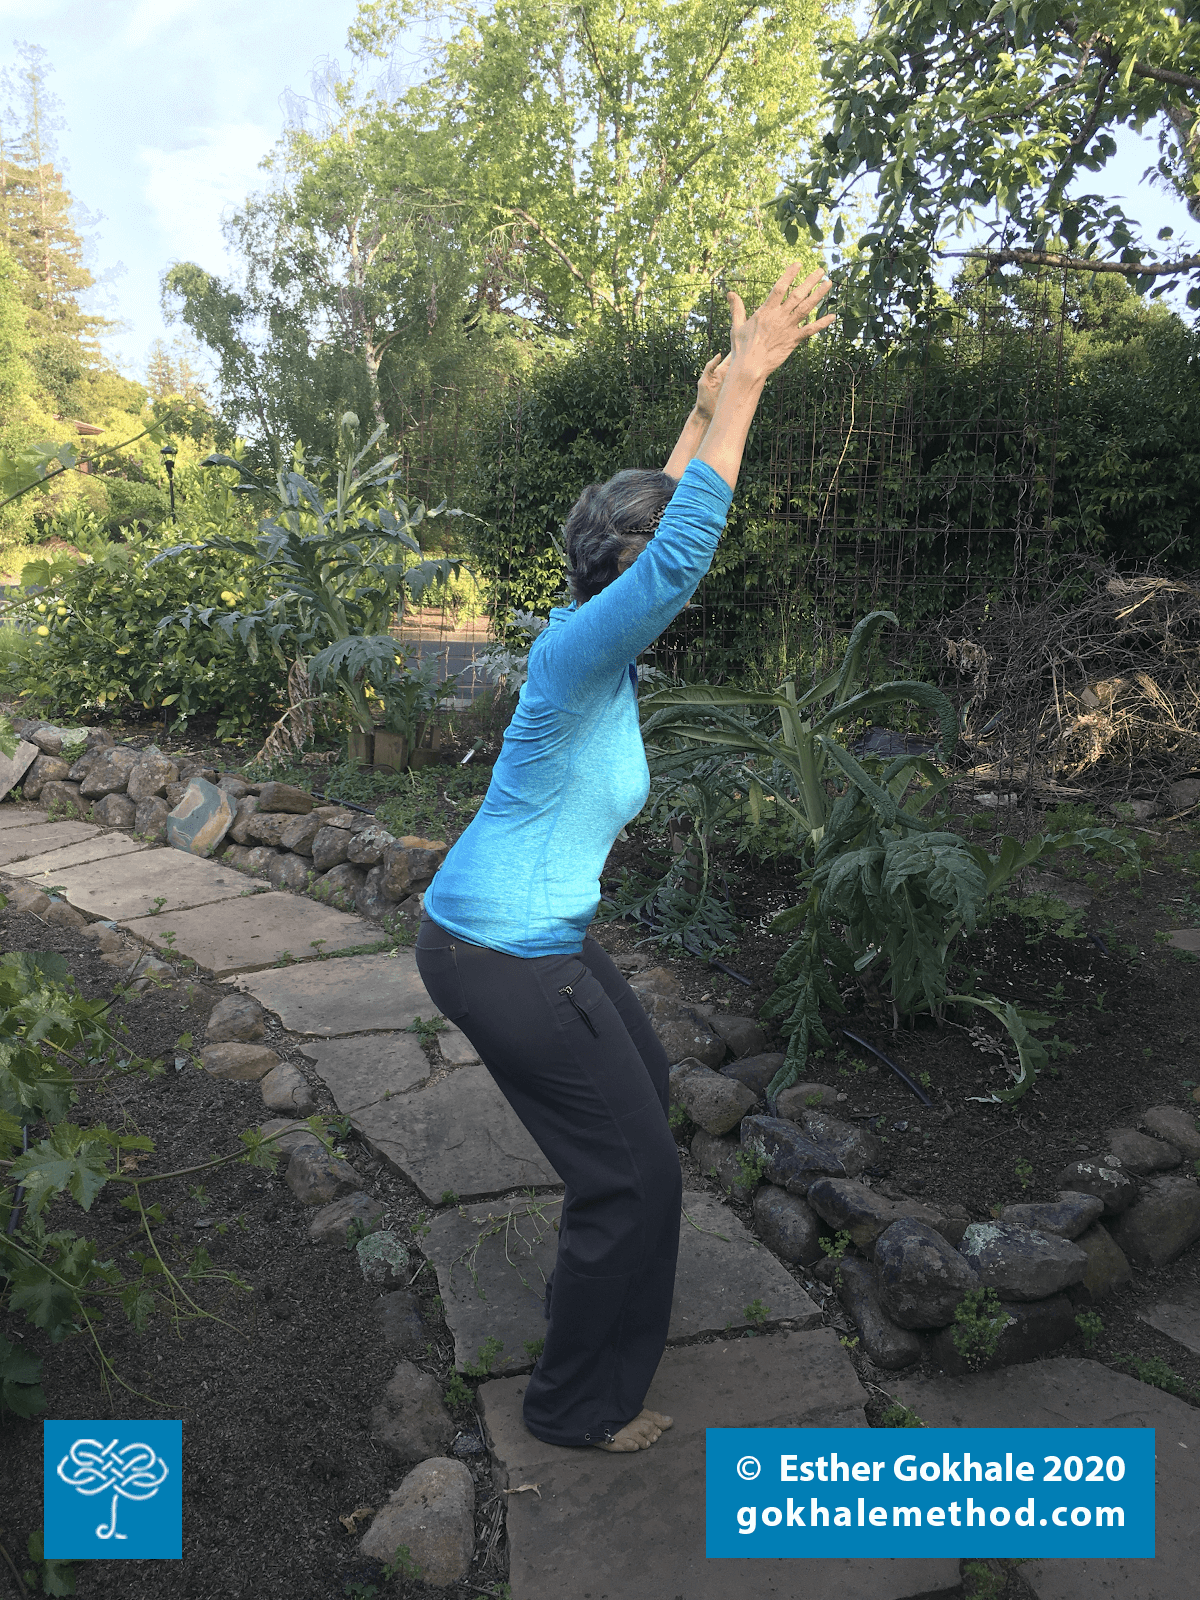
There are times when you will not have the support of an external object. When you sit without a backrest or stand up, you still have the ability to lengthen our spine. By engaging your deep abdominal and back muscles, you can make yourself taller with the Inner Corset. Not only will this protect your spine during times of activity, or when lifting something, it can also provide an excellent stretch for your erector spinae muscles (the long muscles that run parallel to your spine). The erectors can be very tight for some of us, especially if we are struggling with a swayed back. Lift your arms high above your head as though you are reaching for a high shelf slightly in front of you. Then let your chest come up and around an imaginary bar at chest height, so as not to bend backwards into an arch. Feel how tall you can make your self and try and maintain that height even after the arms come back down to your sides.

Steps to engaging your inner corset. Download this chapter here from 8 Steps to a Pain-Free Back.

Jazz Shear

The ability to isolate the movement of your ribcage from your pelvis can be a challenging but excellent way to stretch your deepest back muscles (multifidi, rotatores). Stand in front of a mirror with your feet at least hip distance apart. Set your tallstanding position well with kidney bean shaped feet, soft knees and your ribs anchored with an anteverted pelvis. Place your hands on your hips to help keep them still. Then, let your entire ribcage shift laterally to the right. Feel a satisfying stretch in your deep back close to your spine. Then shift the ribs to the left. Watch that your pelvis doesn’t tuck or lift to one side. Also try and maintain your rib anchor as the ribs shift side to side—the front of the ribs want to stay flush with the abdomen, or you will sway your back. Try holding each side for 5-10 seconds at a time and try for about 20 reps. Or put on some engaging music and let your body yield to the rhythm.

Anchoring your ribcage and shifting it from side can be a great stretch while standing.

Quadratus Lumborum Stretch

The “QL” is a muscle that connects the back of your pelvis to your ribcage. It’s common for QL to be tight, unilaterally or bilaterally. When QL is tight on one side, it is often misdiagnosed as a leg length discrepancy and the person may be given a shoe lift that exacerbates the problem (always get this diagnosis double-checked). To stretch the QL muscle, find an open doorway with some room to the side to arrange your body as shown in the photo below. Create a long arc running from your left hand past your outstretched left arm, through your torso to the leftt leg through to the left heel. Lengthen this arc (and your left QL) by hooking your left fingers around the door jam and pulling your left foot away from the hold while gently arcing your body and stretching the left side of your torso in the process. Your left arm should be straight, your right leg forward and bent, and your left leg back and straight. Hold for at least 20 seconds to give your QL muscle a chance to release deeply. Repeat on the other side.

Left QL stretch using a doorway.

Modified baby pose

Place your lower legs about hip width on the floor and running parallel to each other. Toes relaxed. Place your forehead on the floor and your outstretched arms at a comfortable width as in the Muslim prayer position shown below. Let your bottom, the highest point in your body, gently pull away from where your forehead is weighted to the floor. Let your back mucles relax into a vertical stretch; let your outstretched arms augment the stretch around your spine at the shoulder blade level. It takes about 20 seconds to release the paraspinal muscles into this stretch.

All the best,
Esther


Join us in an upcoming Free Workshop (online or in person).  

Find a Foundations Course in your area to get the full training on the Gokhale Method!  

We also offer in person or online Initial Consultations with any of our qualified Gokhale Method teachers.

Subscribe to inner corset