lumbar spine

Recline and Relax, Executive-style!

Recline and Relax, Executive-style!

Esther Gokhale
Date


Over the years, I have often shown students with recliners that they can get a compression-relieving stretch in their lower back as the backrest slides away from the seat (assuming the mechanism is designed advantageously). This is something you might like to try out for yourself. 


The benefits of gentle back traction


We developed our Stretchsit® Cushion and our Gokhale® Pain-Free Chair with incorporated “sticky” nubs that give the same advantages of gentle traction to the back. The unique design of the nubs teases apart all the lumbar vertebrae, easing compression in the lower spine, and taking the pressure off the spinal nerves, discs, and bones. Stretchsitting can now be done virtually anywhere, and has provided a healing breakthrough for thousands of back pain sufferers, making comfortable, therapeutic sitting available in the car, the office, and the home. You can watch our free introductory video on stretchsitting here.

Photo of a Gokhale Stretchsit® Cushion fastened to a driver’s car seat.
Our Stretchsit Cushion has made travel comfortable again for thousands of people.

A natural advantage of reclining over upright sitting is that the change in angle reduces weight on the spinal discs, nerves, and bones, especially at the “bottom of the heap.” No wonder so many people of all ages find it so comfortable. And it is super relaxing!

Photo of a woman reclining in a beach chair by the sea, evening light.
We instinctively recline to relax more completely. Image from Pexels


An executive chair with three healthy sitting options


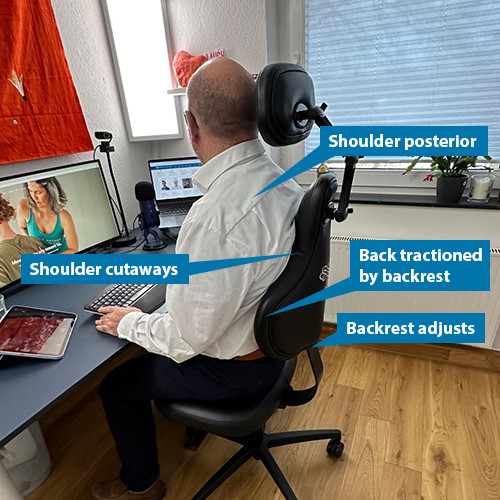
We wanted our recently launched Gokhale® Executive Chair to offer all the benefits of the healthy sitting positions that we teach in our Gokhale® Foundations course, one-day Gokhale® Immersion course, and our online Gokhale® Elements course. Its comprehensive design enables you to stretchsit against its adjustable backrest, to perch perfectly to stacksit at your keyboard, or to recline and reset your entire spine. In the photographs below you can see these three healthy sitting positions in action in the office.

Photo of a man stretchsitting at a desk in a Gokhale Executive chair.
Not only can you stretchsit perfectly against the adjustable backrest, but it also has shoulder cutaways to allow you to posteriorly align your shoulders. 

Photo of a man stacksitting at a desk in a Gokhale Executive chair.
The downward slope at the front of the seat tips your pelvis gently forward, allowing your vertebrae to stack easily and your back muscles to relax. The resulting freedom allows a gentle spinal massage with every breath. 

Photo of a man reclining at a desk in a Gokhale Executive chair. 
The multi-adjustable headrest can give precise cervical alignment and support. Recline and reset your spine to take calls, think outside the box, or simply enjoy the feeling. 


Materials and craftsmanship


This chair is handcrafted to order from the highest quality Italian leather, chosen for both durability and breathability. It is upholstered with high-resilience foam to remain as comfortable and supportive over the years as on day one. 

Labeled photo of a Gokhale Executive chair.
We think you’ll agree that our executive chair is altogether the perfect package!

On receiving her chair, Gokhale Elements alumna Katie Stringer wrote:

Thank you all so much. I received my Gokhale Method chair today. I want you to know that this is by far the most comfortable chair I’ve ever sat in. I am beyond thankful to have found you and your wonderful method.


A special opportunity to learn healthy sitting


Learning our well-honed Gokhale Method techniques for healthy sitting will give you optimal results from your Gokhale Executive Chair. We are delighted to offer, with each chair purchased between December 1 and December 26, a complimentary 25-minute personal consultation (worth $99) with one of our expert teachers.

During this session, you or the happy recipient of the chair will learn:

  • How to use the chair's features for effective stretchsitting at your desk
  • Optimal settings for restorative stretchreclining
  • How to lengthen your neck
  • Custom adjustments for your body and needs


This video demonstrates how the chair’s features improve your alignment.

People at their desks the world over need our executive chair! It is currently available with free shipping within the US and Canada. If you live elsewhere, please contact Customer Support at [email protected], +1 844 777 0440 (8 a.m. to 5 p.m. MonSat, US PST), who will be pleased to help you.


Best next action steps 


If you would like help with your stretchsitting and stretchreclining, get started by booking a consultation, online or in person, with one of our teachers.

You are also invited to sign up below to join any one of our upcoming FREE Online Workshops…
 

Wake Up Your Glutes, They Snooze, You Lose

Wake Up Your Glutes, They Snooze, You Lose

Esther Gokhale
Date

In surveys of what people find physically attractive in a partner, a shapely butt is often highly rated. Perhaps it’s no surprise, but if you want, there are even apps to help! So, are good-looking glutes all about sex appeal and filling out our clothing in a flattering fashion? While these concerns may be valid, it is also true that well-toned glutes have many other, profound, but less widely recognized attributes. 

This blog post takes a look at the bigger picture of glute function. You may be surprised to find out just how much your glutes can contribute to healthy posture and a pain-free body.  

Glorious glutes—not just a “nice to have”

Your glutes potentially form the largest muscle group and have the largest impact. Most of us realize at some point in our lives, perhaps due to overdone squats or steep hill climbing, that the glutes are major players in sports and exercise. But if we don’t need them for competitive sports or challenging hiking, is it still worth investing in them for better returns? Let’s take a look at the dividends.

Reduce stress on your lower back

Glutes have a crucial role in offloading stress from the lower back and sacroiliac joints. When the glutes are weak, the lower back muscles work harder to try and stabilize the pelvis and trunk, leading to overuse and pain. When the glutes are strong, along with the inner corset, they steady the pelvis and lower back. This reduces the risk of wear and tear to discs and bones, nerve pain, and muscle spasm in the area.

Time lapse photos by Eadweard Muybridge (in book) of man speed walking, naked.
Vigorous and/or repetitive movement, without the gluteal strength and pelvic stability shown here, leaves the back and spine more vulnerable to damage. (Photographs by Eadweard Muybridge, 1872​​1885)

Avoid sciatica and piriformis syndrome 

True sciatica occurs when there is pressure on the sciatic nerve, usually from a herniated disc or degenerative changes in the spinal joints. The symptoms may be numbness, tingling, burning and/or electrical shock-like pain. It usually extends from the buttock down the leg, and sometimes the foot, on one side. The Gokhale Method helps by restoring the anteverted position of the pelvis, and decompressing the lumbar spine where the sciatic nerve roots exit. We call the resulting natural alignment a J-spine.

Piriformis Syndrome is a condition characterized by pain, tingling, or numbness in the buttocks and often down the leg. It occurs when the piriformis muscle compresses or irritates the sciatic nerve. The sciatic nerve passes under (or, in some individuals, through) the piriformis muscle, and is particularly prone to overwork and disturb the sciatic nerve if its neighbor, gluteus medius, is not doing its duty. The Gokhale Method encourages healthy pelvic positioning and gluteal function to allow the sciatic nerve free passage through the area. 

Front and side-view diagrams of sciatic nerves in skeleton/body.
The profile view (right) shows swayed, leaning back posture, which causes problematic tightening in the posterior chain muscles and compresses the lower spine, including its discs and nerves. 

Make your movement strong, flexible, and stable

Your glutes are the powerhouse muscles that propel you in climbing, squatting, running, jumping, and more. They also work to control those movements, and are key to maintaining your balance. But glutes are not just for vigorous exercise…

In walking, it is your glutes that enable you to correctly achieve forward motion, rather than relying overly on your psoas and quads, shuffling, or falling forward. Glute activation brings a natural smoothness and grace to walking that we call glidewalking. Glidewalking allows your front foot to meet the ground deliberately but lightly, which is gentle on your joints; it also stretches your psoas with every step. 


Long jumper Khaddi Sagnia of Sweden uses her glutes to power the run up and propel her amazing jumping…and also to glidewalk away.

Muscles support a healthy metabolism 

The muscular system plays an integral role in our body’s metabolism. Well-used muscles will be larger, helping to burn calories rather than store them. This can help to keep insulin levels low in the blood and can contribute to a healthy metabolism and weight range. 

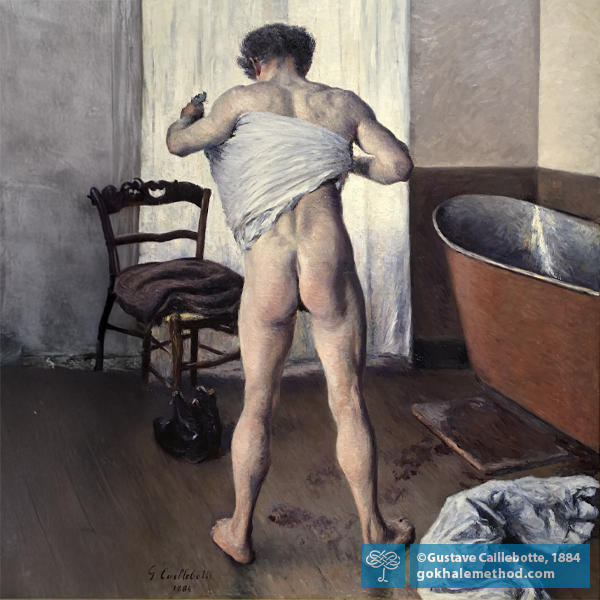
Man at His Bath, toweling dry, back view, oil painting by Gustave Caillebotte, 1884.
Well-toned glutes contribute to a healthy muscular and metabolic system. Man at His Bath by Gustave Caillebotte, 1884.

The foremost antiaging strategy—beautiful buttocks!

Never mind face yoga, cosmetic lifts, or surgical implants. Rather than costly interventions that do nothing to stop you losing your balance, strength, and mobility, embrace the art and science of how to rejuvenate your body by learning to move as you are meant to. Healthy posture can greatly improve your body’s architecture, self-confidence, health span—and your appearance as a bonus!

 Infant standing aligned on bike pedal, back view; contrast with elderly person teetering with cane.
As infants (left) we instinctively align ourselves well, making good use of our muscles. In our society, adopting poor postural habits as we go through life results in lack of healthy muscle tone, like “glute amnesia”—flat, wasted muscles that have forgotten how to work (right).

Best next action steps

We invite you to join us for a themed Free Online Workshop: Wake Up Your Glutes, They Snooze, You Lose, on Friday, September 6 at 12:30 pm PST, in which you will learn how to make every step a rep! A replay will be available over the weekend if you cannot join live. So sign up, and you will also receive a special offer.

This workshop launches our 21-day Strong Glutes, Strong Body Gokhale Fitness challenge, which will run from Sept 9–29, to help you continue to build strength and improve your posture.

How to Swim with Healthy Posture: Breaststroke

How to Swim with Healthy Posture: Breaststroke

Esther Gokhale
Date

Vacation time is in full swing in the northern hemisphere. For many of us, being beachside or poolside gets us yearning for a dip, a splash, and a swim. And I’m guessing that many of us have been mesmerized and inspired by watching the Olympic pool athletes in action. 

Young girl splashing/jumping in swimming pool.
Swimming can be fun for all ages and abilities—and healthy posture keeps it back pain free. Image from Unsplash

In this blog post we’ll discuss breaststroke, which happens to be my favorite way of swimming, and how healthy posture enables you to swim breaststroke better, and avoid the neck and back aches that some people experience after. 

Swimming starts with the inner corset

Have you ever wondered why some swimmers manage to move so well through the water? Here are some things they are likely doing: 

  • They are activating their inner corset strongly. This enables the trunk and spine to maintain its alignment in an aquadynamic position, reducing drag.
  • Their limb movements originate from the large trunk muscles of the back, chest, psoas, and gluteal muscles, which produce the most power. 
  • These two things enable an efficient, coordinated, smooth technique that avoids “flailing” in various directions and dissipating energy. 

There are many preferred variations with arm and leg angles, hand and finger positions, cadence, and so on. But these are details compared with the all-important strong inner corset. Once your torso has lost its structural integrity, any movement you generate will work partially against you, rather than contribute to propulsion.

Gokhale Method teacher Clare Chapman using her inner corset walking in a pool. 
We need our inner corset in many activities to prevent distortions of the spine. Maintaining a straight course walking in the pool takes a strongly activated inner corset and is excellent prep for swimming.

The clue’s in the name

The name “breaststroke” is a good descriptor for the chest-opening benefits of this stroke. Done well, breaststroke can be a great antidote to many aspects of modern life that encourage us into stooped posture, rounding our shoulders, collapsing our chest, and breathing into our belly. As the hands and arms pull back, most of the muscle power behind that action comes from the upper back and rhomboids contracting to draw the shoulders back. We simultaneously open the ribcage and chest to fill the lungs.

How to breathe in but not sway your back

Breaststroke has an advantage over crawl in that breathing in is relatively easy while your head is well above the waterline. If, however, the lifting of the upper body happens in the upper lumbar spine rather than at L5-S1, the result is likely to be an achy neck and/or low back. 

Professional or elite breaststroke swimmers have the strength and thrust to heave a large part of their upper body up out of the water, bending back exclusively at L5-S1; the upper lumbar spine and neck then have minimal need to extend back, if at all.

Olympic Gold Medalist Adam Peaty pulls up with straight spine in breaststroke.
Olympic Gold Medalist Adam Peaty maintains a largely straight spine throughout most of his stroke. Image from Wikimedia

Cecily Frederick in a back dive with a healthy L5-S1 backbend.
Cecily Frederick, a teacher of the Gokhale Method for many years, does a back dive with a healthy L5-S1 backbend—her upper lumbar area through to her head remains aligned straight. 

Whatever your level of swimming, it is important when swimming breaststroke to counter any habit of lifting and swaying from the upper lumbar spine. The solution to this habit is to learn to engage the rib anchor muscles very strongly; with your rib anchor in place, you can learn to cultivate a healthy J-shaped spine rather than an S-shaped spine. You can learn more about spine shape here.

The posture benefits of the exhale phase

During the exhale phase the body settles horizontally into the water. This brings the great advantage of being able to rest, recover, and prepare the limbs for the next stroke. Part of this will include gliding through the water, which is conducive to recruiting the inner corset to steady and slenderize you. It offers a solid platform from which to launch the next stroke.

Male swimmer gliding face down horizontally, arms out ahead.
Practice floating or gliding through the water in a face-down, horizontal position. Then apply this to your stroke. Image from Pexels

If you don’t have the confidence to swim with your head in the water, consider gradually building familiarity with this skill with a friend or sympathetic swimming coach. Most people find it well worth mastering and, approached in the right way, much more enjoyable and comfortable. Wear goggles so that you can still see. Snorkels and full-face snorkels can be a useful measure for getting used to being face down in the water and experiencing the advantages of swimming in a horizontal position. 

Man and young girl snorkeling, from above.
Snorkeling is a great way to get used to swimming in a face-down position with a long, more relaxed neck. Image from Unsplash

Hips and kicks

If your hips are very stiff, then you will benefit from breaststroke’s built-in opportunity to gradually increase your range of motion and muscular strength without loading the hip joint. 

While it’s impressive to watch someone kicking wide with strong, flexible hips, it is not necessary, or even optimal, to go very wide with the legs. Watching a bird’s eye view of modern Olympic breaststrokers, you may be surprised by the narrowness of their kick. A narrower kick turns out to be more explosive and minimizes drag. Adam Peaty, the fastest breaststroker on the planet, estimates that up to 70% of his speed is generated by this narrow kick.  

A narrow kick also makes breaststroke more accessible, especially for people with a limited range of motion in one or both hips. To narrow your kick, hold a pull buoy or two between the thighs as you swim. This leg arrangement also helps you to pattern healthy external rotation in your hips, legs, and feet, so you have a carry-over benefit for your land-based posture too!

A narrowed breaststroke kick has the advantages of speed, power, and developing external rotation in the legs. These young swimmers are training with a pull buoy.

If you have a pelvic rotation and/or SI joint instability, you may be prone to difficulties when attempting a wider kick; you are more likely to kick asymmetrically (called a screw kick), which is inefficient, and possibly risks injury. A narrow kick reduces these complications.

Legs externally rotated, a J-shaped spine, shoulders posterior, and an anchored rib cage, are not just tips for swimmers. These healthy posture principles are taught in our in-person Foundations course, one-day Pop-up course, our online Elements course, and our Gokhale Exercise program. Our students often report how much their swimming improves simply by applying these techniques.

Best next action steps for newcomers

If you would like insight on your posture, in and out of the pool, consider scheduling an Initial Consultation, online, or in person.

You can sign up below to join one of our upcoming FREE Online Workshops. . .

How to Fix a Tight Psoas

How to Fix a Tight Psoas

Esther Gokhale
Date

When students first meet with a Gokhale Method® teacher they are sometimes surprised to learn that one of the reasons for their back pain is a tight psoas muscle. What does this little-known muscle, embedded deep within our bodies, have to do with back pain? And what do we need to do to have it recede in the background and leave our backs alone?

Get to know your psoas muscle 

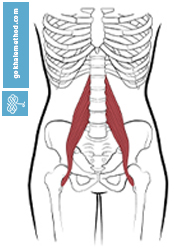
Psoas major (pronounced so-as) is a deep-lying muscle with a downwards trajectory through the abdomen. There can be some individual variation, but it usually originates from T12-L4, and it inserts at the lesser trochanter of the femur. Its main job is to contract and pull the thigh up—as in walking, running, and climbing, for example. 

Anatomy drawing of the psoas muscle located in the body.
The psoas muscle lifts your thigh—or pulls on your lower back, depending on how it’s used.

For those who are not offended by meat analogies, this muscle is the filet mignon, or the tenderloin—it is meant to be lean, juicy, malleable, and stretchy. But in modern industrial populations, the psoas is often somewhat dry, tough, and short. The shortened length and tightness of the muscle can wreak havoc on the spine as it pulls forward on the lumbar spine, causing compression, wear and tear, and pain.

How do I know if I have a tight psoas?

There are various signs and symptoms associated with a tight psoas, including:

  • A pronounced sway in the lumbar area
  • Pain when going from sitting to standing
  • Back pain either caused or eased by walking
  • A sore insertion point on the thigh
  • Feeling stiff and unable to straighten up, or “vulnerable” in the lower back, especially first thing in the morning  

Why did my psoas get tight?

  • Sitting for extended periods without movement breaks is one reason that our psoas adapts to a shorter length because the muscle then spends a long time at the shorter end of the range of what it can do. 
  • The shortening effect of sitting is made more likely when we sit poorly with our pelvis tucked. A modern issue with sitting is that we have poorly designed furniture, such as bucket seats and deep sofas, which encourage us to tuck and slouch. 

Man sitting, tucked, on a fashionable white bucket-style chair.
Most modern furniture is designed for aesthetic appeal rather than to enable us to sit well. Image from: Pexels

  • Back pain patients are often recommended to use a chair with built in lumbar support, or to add a lumbar cushion. The extra curvature then reinforces a habit of swaying the lower back, which in turn enables the psoas to remain short and tight.

Mesh lumbar support in car
Most backrests follow the S-shaped spine paradigm and are designed to give “lumbar support.” This creates exaggerated curvature and compression in the lumbar spine. (Google, n.d.)

  • A tight psoas can also have a psychosomatic cause, as this muscle is deeply linked to both chronic stress and trauma responses in the body. We see this response even in babies in the Moro or startle reflex.

Restoring length in your psoas 

A common remedy for a tight psoas is a lunge or other psoas stretch. Though effective, the problem with this approach is that it is not possible to do enough stretching to make a sustainable difference to the length of this muscle. The stretch feels good, but the muscle quickly goes back to its short resting length. For some people, if they have been stretching aggressively and the attachments of the muscle are inflamed, stretching can cause additional pain and dysfunction.

Another common approach is to get a gifted practitioner to “release” your psoas. This very intense maneuver can also be effective, but has the same problem as the stretching approach—it provides temporary relief, but does not sustainably reset the resting length of the muscle when poor daily posture is shortening it.  

The only sustainable way I know of resetting a tight psoas is to recruit Nature’s solution for keeping this muscle healthy, which is to learn how to walk naturally/skillfully/effectively. 


Our natural gait pattern is evident in our young children, our ancestors, and villagers in non-industrialized parts of the world. It gives the psoas muscle both the engagement and stretch it needs in a gentle and consistent way.
(central painting: Fisher Girl, Winslow Homer, 1894. Museum at Amherst College, Petegorsky/Gipe.) 

Nature’s built-in solution to stretching your psoas

To describe the action of healthy walking, we use the term glidewalking. With this pattern, every step becomes a psoas stretch. Refinements in walking like learning to contract your glutes with every step and leaving your rear heel down for an extended time, augment the psoas stretch. If, however, you don’t know how to maintain a long, stable lumbar spine, these same improvements in gait can be counterproductive and pull your spine into additional sway.

Esther Gokhale demonstrating PostureTracker™showing a healthy back shape in walking
Our PostureTracker™ wearable enables you to monitor and maintain your rib anchor and a healthy, stable spine as you walk (shown in green), naturally stretching your psoas. Here I am on the Alumni Live Chat in December last year, demonstrating.

Esther Gokhale demonstrating PostureTracker™showing a swayed back in walking
PostureTracker™ will tell you (shown in red) if you forget your healthy posture cues! Notice that I have let my back sway severely at the end of my stride.

Advanced Glidewalking Course for Alumni

If you are an alumnus, you are encouraged to join me in our Advanced Glidewalking Course. This course is a comprehensive deep-dive to both revisit the basics of healthy, natural walking, refine its many components, and learn advanced techniques that are not included in our beginner courses. Your psoas will thank you! Six weekly lessons start Wednesday, February 28, 11 a.m. (PST), 8 p.m. (CET). You can sign up here.

Best next action steps for newcomers

If you are new to the Gokhale Method, get started by booking a consultation, online, or in person with one of our teachers to find out how the Gokhale Method can help you.

You can sign up below to join any one of our upcoming FREE Online Workshops. . .

Align Your Rib Cage and Solve Your Back Tension

Align Your Rib Cage and Solve Your Back Tension

Esther Gokhale
Date

Choose your remedies carefully

There are many approaches to stretching tight back muscles that involve rounding the back. Though these exercises give temporary relief, we recommend against them because they threaten the spinal discs, nerves, and ligaments. They can also result in the back muscles contracting even more tightly to stabilize the area. 

Three photos of people rounding to stretch their backs in different positions.
Rounded stretching exercises increase existing upper back curvature (hunching) while pulling aggressively on tight soft tissues and ligaments. Our tissues respond better to sustained, gentle realignment to make healthy changes. Pexels


By contrast, the Gokhale Method rib anchor maneuver brings relief from compression without any negative side effects. It restores your spine to a healthy J-shape, preserving the spinal discs, nerves, and ligaments. Over time, this alignment encourages a more natural, relaxed baseline tone in your back muscles as well as better abdominal tone.

How your rib anchor works

Rib anchor describes the pivot of the rib cage around a horizontal axis at about breast height, bringing the lower border of the front of the rib cage in and down thus sending the back of the rib cage up and out. Since the back of the ribs are attached to the vertebrae, this pulls the curvy “necklace” of the lumbar spine into a flatter, longer arrangement. This means of tractioning the lower spine is a fundamental Gokhale Method technique for removing sway. It restores healthy length in the lumbar area, alleviating compression of the discs, nerves, and vertebrae.  

a.                                                          b.             

Two diagrams showing swayed to vertical alignment of the torso. 
A forward pivot of the rib cage at breast height (b.) corrects for a tight lower back (a.), restoring lumbar length. Maintaining this orientation requires the abdominal muscles that anchor the ribs down to develop a healthy baseline tone.

The art of transmission 

Over many years of hands-on work helping students with their rib anchor, I became increasingly aware of an intuitive sequence of moves in what I was doing. My hands could guide a student to a pleasing endpoint, but what exactly I was doing fell short of verbal description and a conceptual framework. The gap between what we were doing and articulating in words showed up especially when our teachers got together for continuing education offerings, when questions and case studies were discussed. There was a need for new language, fresh insights, and deeper understanding. While teaching posture is both an art and a science, it is also a hallmark of our method that there be kinesthetic, visual, and intellectual understanding of our process; this takes the right words and analogies.

A fresh analogy for the rib anchor

For a very long time, we’ve taught three things that need to happen to help most people find a healthy head position. It’s a combination of: 

  1. Pivoting around an axis from ear to ear
  2. Lengthening the neck through relaxing certain muscles and recruiting others (especially the longus colli)
  3. Shearing the head and neck gently back               

1.                                         2.                                       3.

Drawings showing three movements for healthy head alignment.

Gliding the rib cage home follows a similar pattern:

  1. Pivoting around an axis that goes from side to side through the chest at about breast level (this being the main component of what I’ve described as rib anchor so far)
  2. Relaxing the erector spinae and other muscles and recruiting the deep abdominal and back muscles (inner corset) to create additional length in the back, as described and included in our teachings
  3. Shearing the ribcage backward relative to the pelvis. This is the movement that I’d been intuitively weaving into my hands-on ministrations that previously wasn’t well described

When students aligned their ribs by only pivoting the rib cage, I could see that it sometimes resulted in an awkward movement that did not integrate the rib cage into the torso quite right. Adding, and even better with practice, integrating this element of shear, transformed their outcome and experience. 

We can describe the shear element, for both the head and the rib cage, as analogous with backing your car into its garage: 

Diagram of a car backing into a garage.

An analogy that is true and versatile

Neat and easy parallels can, of course, be seductive but false. However, here we have a really useful and accurate analogy of what needs to happen. Deploying your rib anchor to come into a healthier orientation usually feels somewhat strange at first—especially if you have spent years actually leaning backwards from your waist—but this new analogy is already helping our students to enjoy a more buoyant uprightness, and less of a leaning forward sensation. 

This “backing up” of the ribcage can be tailored to affect different levels of the spine, as appropriate for each person. And while every body is a unique landscape known only to its owner, a teacher’s guidance is always available to help you map it out sooner. 

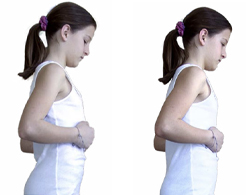
a.                                                          b.             

Two photos of a girl adjusting her ribcage angle.  
This girl (a.) stands with her lower back swayed. Her rib cage is angled back, and she can feel her lower front ribs popping up under her hands. She gently but firmly presses on her ribcage to “back it into the garage” and into a healthy alignment (b.), removing the sway in her lower back as she does so. 

Best next action steps

If you are new to the Gokhale Method, are resuming your posture journey after a little while, or struggle with your rib anchor, book a consultation, online, or in person with one of our teachers, who will be happy to help.

You can sign up below to join one of our upcoming FREE Online Workshops. . .

Ronald Katz’s Gokhale (Gō-clay) Method® Success Story

Ronald Katz’s Gokhale (Gō-clay) Method® Success Story

Excerpts from an interview with Ronald Katz
Date

Before I settle in to recount my back pain story, let me fetch my Gokhale Pain-Free™Chair. This is the chair I now use for all my writing, and that’s important, as I am an author of mystery short stories, and spend many hours composing at my desk. Pain-free, I’m now glad to say.

Website portrait/logo of Ronald Katz wearing sunglasses.
Since retiring from over four decades as a trial lawyer, I write about The Sleuthing Silvers, Barb and Bernie. This image is from my website, sporting my detective shades. www.thesleuthingsilvers.com

I’ve had back problems for many years and coped with it by going to any number of orthopedists, chiropractors, physical therapists, and neurologists. In my experience, doctors (general physicians) can’t do much for ordinary mechanical back pain, other than advise on painkillers.

That management worked for some 25 years, and then I started having chronic pain that wouldn’t respond to my usual formula and go away. I was becoming somewhat desperate as it affected my whole life. I was grumpy enough by nature before the pain started, but became much more grumpy after! 

My rheumatologist, who I’d seen many times, said, “Well, you might want to read this book.” I had never read a self-help book for my health—I just generally don’t believe in them—but I was so desperate that I went ahead and bought Esther’s book, 8 Steps to a Pain-Free Back

I actually liked the subtitle, “Remember When It Didn’t Hurt.”  You do remember how when you were younger, even if you had back pain, it would be a little bit better each day. You could count on it being better tomorrow, and then soon you would be fine. That certainly wasn’t happening.

Front cover of 8 Steps to a Pain Free Back by Esther Gokhale
Esther’s Book was the only self-help book I ever bought—reluctantly.

I was cynical going into this work, and admit I had a very negative attitude. I had already made some of the arguments against working with my posture that were anticipated in the book—you’re too old for this, it’s too far gone…Yet I have come around to endorsing all the amazing testimonials I read in the book. Because I live in the same location as Esther, I actually know many of the doctors and patients quoted in the book who experienced transformational results with the Gokhale Method.

So I read the introduction. That’s what really did it for me—it’s so persuasive, and it’s so simple—it’s something you then want to do. So I started to antevert my pelvis. After months of pain, I woke up the next day and felt noticeably better. I thought, well, this must be a mistake. The following day I was substantially better, and the next day after that I was pain-free and have been ever since. 

I was just blown away by this, and so read the whole book that explains the Gokhale Method. Esther focuses on her subject like a laser beam. I got the impression she knows the spine as well as anyone on earth. I wanted to meet Esther Gokhale, and as we both live in Palo Alto, I was able to do that and take the six Gokhale Method Foundation's Course lessons. 

Google world map locating Gokhale Method teachers.
The in-person  Gokhale Method Foundations' Course originated in Palo Alto and is now taught by teachers in many parts of the globe. Our online Elements course makes the Gokhale Method accessible to students the world over. www.maps.google.com

When we met, even Esther was surprised by my body’s rapid positive response to the Gokhale Method. She explained to me that I had actually been lucky to have gotten positive results having immediately anteverted my pelvis. Attempting to antevert the pelvis to start with is not recommended as most people have some stiffness at the L5-S1 joint and are therefore likely to sway higher in their lumbar spine as they try to get their behinds behind them, creating even more compression in that area. Alternative techniques, designed to first bring healthy length into the lower spine, are advised as an initial phase. It seems I was lucky—one of a small percentage of people with sufficient protective stiffness in my lumbar area to avoid any sway and additional damage.

Two torso diagrams in profile contrasting a compressed with a lengthened lumbar area.
(a.)                                           (b.)

Most people will inadvertently sway their backs when trying to stand or sit upright with their behinds behind them (a.). This tightens lower back muscles and compresses the lumbar vertebrae and discs. To avoid this, the Gokhale Method first teaches techniques to elongate and stabilize the spine (b.). 

Anteverting my pelvis made a huge difference to me. I had been doing all the wrong things to my spine, such as sleeping in a fetal position, but soon I learned how to sleep, sit, stand, and walk without compressing my spine. In fact, I could now decompress my problematic area around L5-S1. I came to understand how much of our modern furniture puts us into compressive shapes that tuck the pelvis under, pinching the L5-S1 disc and causing it to bulge back toward the nerves. 

Two diagrams of vertebrae showing anteverted and tucked sacrum and L4&5 
An anteverted pelvis preserves the wedge-shaped L5-S1 disc (a.). A tucked pelvis cannot accommodate this and the lower discs will suffer undue pressure and bulge toward the nerve roots (b.).

When I first showed up for the lessons, I explained that I thought the introductory chapters said it all, and that the rest of it was somewhat repetitive. But I was wrong. Every chapter will give you a little something that may look inconsequential, but the magic is in the detail! And even though I was doing very well with the book, the precision adjustments and personal coaching I got from having the lessons made a huge difference.

These things were so simple, made such sense, and worked. Even while I was so thrilled to have found this work, I also felt very angry that nobody else had been able to tell me these things. I have seen umpteen specialists over the years, and no one ever mentioned the Gokhale Method. The upcoming Randomized Control Trial that has apparently been funded entirely by satisfied students will hopefully put the Gokhale Method on their radar. I would like to see the Gokhale Method become a prominent part of every doctor’s prescription for back pain.

It makes sense that changing your posture can make a huge difference to structures as sensitive as your spinal nerves. Just a millimeter either way can determine whether you get agony, or relief from back pain. I also appreciate the wider health benefits of making these posture shifts. I’ve noticed that my organs work better, and my breathing is better. 

Mystery stories author Ronald Katz sat in Gokhale Pain-Free Chair at keyboard.
I now realize it’s not sitting that’s the problem. The issue is the furniture you choose and how you sit. The Gokhale Pain-Free Chair helps me to stretchsit, decompressing my lower spine.

My understanding of the relationship between breathing and the inner corset is much clearer from having had the lessons. Reading the book did not make it clear to me how muscle tone in the abdominal wall would act to resist any ballooning outward when breathing, and translate into healthy movement in my back with every breath. What Esther calls our “inner massage therapist.” Lessons enabled me to get that. 

I used to get tired and sore standing in line for just a few minutes. More recently, after about 10 minutes in that situation I thought, “Hey, something’s different, I should be tired by now,” and I realized that standing with my weight in my heels, my body aligned as I learned from the Gokhale Method, I felt fine! Cumulatively these details really work. 

Ronald Katz sat at a table with his young granddaughter.
Enjoying pain-free time with my granddaughter and her American Girl Tea Party puzzle.

When I first read the chapter on glidewalking, I thought I needed a PhD in mechanical engineering to understand it! But in the lessons, you get it bit by bit, and the teacher gives exactly what the student is ready for. When I was younger, before I had had so much back pain, I loved to walk—I would walk 40 minutes every day. Then I had a hip replacement in 2018, and since then I have had problems. Esther showed me how my left gluteus medius was weak, and had likely caused my piriformis (a deeper external hip rotator) to overwork and cause other problems. 

Ronald Katz hiking in the Tahoe National Forest, California.
I’ve been keen to improve my walking. Here I am hiking in the Tahoe National Forest, California.

Portrait of philosopher and reformer Jeremy Bentham, 1748–1832, by Henry William Pickersgill.
This is a quote I can relate to: Nature has placed mankind under the governance of two sovereign masters, pain and pleasure. It is for them alone to point out what we ought to do, as well as to determine what we shall do.” Anglo-American philosopher of law and social reformer Jeremy Bentham, 1748–1832. Portrait by Henry William Pickersgill (d. 1875). Wikipedia

I’m in the early days of my journey and I’ve only finished the course recently. I’m tempted to declare myself “cured” and move on—I can bike ride, swim, and ski without any pain. I’m hopeful that I’ve mastered and internalized what I need to know and keep doing to get on with my life. But I will stay in communication—I can set up an appointment anytime if I need to—all I want is to remain pain-free. I’m so grateful to the Gokhale Method and all who are associated with it. It has changed my life. 

If you would like to find out more about how the Gokhale Method can help support you, sign up to join one of our upcoming FREE Online Workshops. . .

Running: Part 6: Upper Body

Running: Part 6: Upper Body

Michelle Ball, Gokhale Method teacher
Date

Welcome to the sixth blog post in our series on running. My name is Michelle Ball, and I am a Gokhale Method® teacher living in Tasmania. I am also a lifelong runner and am passionate about sharing the benefits of healthy posture with the running community, be that beginners, seasoned runners, or anyone in between. Even if you walk rather than run, the posture principles outlined in this post can still help you to enjoy an active and pain-free body well into old age.

Running with a well-positioned upper body

In this post we will consider the upper body. Runners are inclined to pay far less attention to the upper half of the body than the lower half, as they focus on gait pattern, cadence, footwork, and propulsion. This is hardly surprising, but the lower body, while super-busy, really is just half the story. 

Healthy posture in the upper body brings the following benefits:

  • Protected spinal structures
  • Improved biomechanics
  • Unimpeded flow and momentum
  • Support that makes the body feel lighter
  • Athletic appearance

4 elite female runners in profile showing healthy form.
Healthy posture principles are important for the upper body as well as the lower. Implementing them can both protect your spine, and bring mechanical advantage to your running. Unsplash

I have found the upper body principles that we teach in the Gokhale Method® in-person Foundations and Pop-up courses, and our online Elements course, made a world of difference to my running. Let me share some key points with you. . .

Anchoring your ribs

As explained in my previous post, Running: Part 5: Anteverted Pelvis, a forward leaning position when running helps to avoid compression in the lower back. In our culture it is common that people have tight lower back muscles (erector spinae), and weak opposing muscles of the torso (internal obliques). This creates a sway back, which pulls the torso into a backward leaning position. A deliberate forward lean will help counter this. 

Gokhale Method teacher Michelle Ball running angled forward, side view.
Here you can see me keeping a consistent forward angle throughout my torso, neck, and head.

Most people will benefit from some degree of forward rotation of the thorax to fully correct a sway and bring their torso into a straight and healthy alignment. This adjustment can be made and maintained by engagement of the internal oblique muscles, or rib anchor, as we Gokhale Method teachers call it. The rib anchor can be learned with a simple but precise maneuver which you can learn here

Female runner (upper body) in profile showing swayback and lifted chin.
Overly contracted back and neck muscles can give a misleading feeling and appearance of being upright. In reality, overly muscles are pulling the lumbar and cervical spine into compression, threatening discs and nerves. Pexels

Deeper support and protection for your spine

Running is classed as a “high impact” activity. This is one reason to run with the best posture and technique you can. Even if you are running smoothly with impeccable form, running will generate additional forces that impact the spine on landing. Perhaps that is how “jogging” got its name! 

Using your inner corset while running lends natural protection to the joints, discs, and nerves of the spine in two important ways. Firstly, it creates and maintains length, and secondly, it confers stability, preventing untoward twisting, forward, back, and sideways movement. The trunk and pelvis remain a single unit, with no jiggling from micro-flexing and extension, or bobbing up and down—and the head travels at a continuous level, sparing the neck. In these respects good running form is the same as good walking form. The spine and its tissues are saved from both acute injury and long-term wear and tear. How to find and deploy your inner corset is explained in detail in Esther’s bestselling book, 8 Steps to a Pain-Free Back.

An S-shaped spine medical illustration from 1990, and a J-shape spine from 1911.
These two medical illustrations from 8 Steps to a Pain-Free Back show how, in modern times (e.g., 1990), deeper spinal curves have come to be regarded as normal and desirable. The Gokhale Method advocates a return to a straighter, longer spinal shape (e.g., 1911). 

Avoiding neck pain while running

Deep engagement of the inner corset will preserve length in the lumbar spine, and this supportive structure also encourages length in the cervical spine, or neck. In addition, locally, the longus colli muscle, which attaches to the front and side of the neck and upper thoracic vertebrae, needs to be engaged to draw the neck back into a tall, lengthened position in line with your body. 

 Anatomical drawing of the longus colli muscle.

The longus colli muscle (seen here in red) draws the vertebrae of the neck back into a healthy, tall, and spacious alignment. Wikimedia

Gliding your head up and back, while allowing your chin to rest down, will provide stable and relaxed carriage for your head, and a happier neck. You can learn how to glide your head back here.

Woman running with head and neck back in line with body, side view
Your head and neck want to remain back in line with your body, even as you lean forward. 

Man running with tucked pelvis, internal rotation of feet and legs, rounded torso, and forward head carriage
You don’t want to jut your chin forward and let your head literally run ahead of you. Pexels

Trunk stability

The trunk stability that protects the spine also enables efficiency when running, as energy is not dissipated into incidental movements that detract from forward motion. It enables all propulsion to be well channeled, rather than just pulling the spine around. As running expert Marc Cucazella reminds us, ‌“You‌ ‌can’t‌ ‌fire‌ ‌a‌ ‌cannon‌ ‌from‌ ‌a‌ ‌canoe.”‌ In the upper body this propulsion comes from the arms.

Arm movements in running

Whereas in glidewalking the arms largely rest, in running the arms actively contribute to propulsion and alternate with the leg action. In sprinting the arms are especially important, moving straight forward and back like pistons on either side of the body. The arms‌ ‌are bent at‌ ‌45 degrees ‌or‌ ‌slightly‌ ‌more,‌ with the hands‌ ‌moved ‌in‌ ‌a‌ ‌circular‌, ‌‌rearward‌ ‌pull motion,‌ ‌‌as‌ ‌if‌ ‌you‌ ‌were‌ ‌chopping‌ ‌wood.‌ The arms‌ ‌then‌ ‌recoil‌ ‌forward,‌ ‌very slightly rotating‌ the shoulders‌.‌ What you don’t want is the arms to be crossing the midline of your body and pulling you off balance. Arm action can be much more relaxed at an easy jogging pace or in distance running. 

4 elite female sprinters in profile showing strong arm action.
The vigorous piston action of the arms in sprinting requires a well-configured shoulder joint. Unsplash

Whatever your running speed, it is extremely important that the shoulders be well positioned, so that the joint—where the bone of the upper arm, shoulder blade, and collarbone meet—can connect well, and the soft tissues, nerves, and circulation can function optimally. You want your shoulders to be happily at home in their natural, posterior position. You can learn how to roll your shoulders back here.

Open, posterior shoulders will also help you to access breathing in your upper chest. If you tend to hunch forward, draw your elbows more together behind you to assist the external rotation of your shoulders.

Relaxed and bouncy shoulders

In gentler jogging and long distance running, the shoulder area can be more relaxed. Healthy alignment within the shoulder joint is still important for the hundreds of to-and-fro arm reps, and to cushion the impacts traveling through the joint with every stride. A healthy postural relationship between the upper back, the shoulder girdle, and the neck will help the shoulders to be responsive rather than held tight, and to bounce a little as you run. 

Anatomical drawing of the trapezius muscle.
The trapezius muscle is at the center of healthy upper back, neck, and shoulder posture. It helps the shoulder to lift, lower, and gently bounce through impactful movement. Wikimedia

Stick or twist?

The synchronized alternation of arm and leg movement is vital for momentum and balance during running. This will be integrated by the torso twisting somewhat. There is a counter movement of pelvic rotation backward as the chest moves forward on the opposite side. The key is neither to over stiffen, nor over twist the torso. A stiff body keeps the hips from extending fully, can shorten your stride, and puts more pressure on the knees and leg joints. Over twisting can cause a “sloppy” run and impinge on the spinal joints. This is where staying tall with a strong inner corset is invaluable, as the inner corset allows healthy rotation both through and beyond it.  

In particular, avoid an upper/lower torso separation with twisting happening almost entirely at the T12/L1 junction, where the ribs meet the lumbar area. Twisting here is sometimes misguidedly encouraged to help power the arms, especially in fitness walking classes. However, there is no ball and socket joint at T12/L1 that makes swiveling here a good idea for the spine! 

South African sprinter Wayde van Niekerk running, side view
This runner’s torso shows considerable rotation, but it is distributed along the spine—it does not twist at just one point. South African sprinter Wayde van Niekerk sets a world record at the 2016 Olympics. Alessandro Bianchi / Reuters

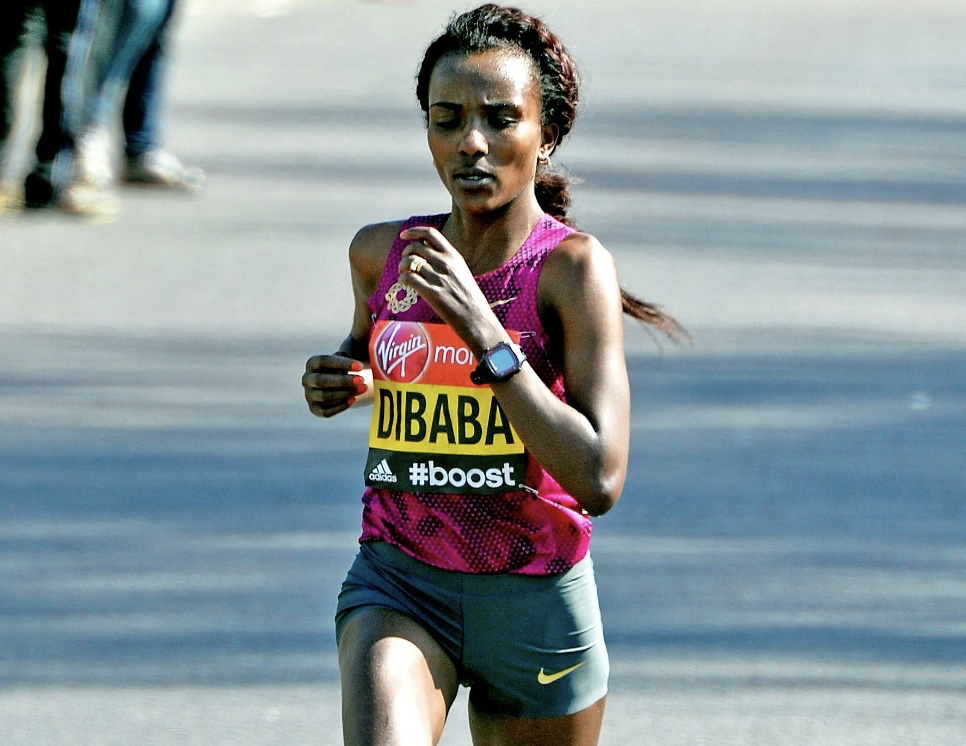
Olympic gold medalist Tirunesh Dibaba running, front view
Olympic gold medalist Tirunesh Dibaba also shows even rotation of her torso from hip to opposite shoulder. I’ve also noticed that most East African runners have a significantly higher arm carriage, and are among the best runners in the world. Bretta Riches – Run Forefoot

If you would like guidance on any aspect of your posture and/or running, including your head, neck or shoulder position, consider scheduling an Initial Consultation, online or in person, with a Gokhale Method teacher.

Here are previous running posts you might like:

Running P1: Introduction, Esther Gokhale

Running P2: Meet Your Feet, Michelle Ball 

Running P3: How to choose running shoes, Michelle Ball 

Running P4: Taking care of your knees, Michelle Ball

Running P5: Anteverted Pelvis

If you would like to find out more about how the Gokhale Method can help support you, sign up to join one of our upcoming FREE Online Workshops.

Running: Part 5: Anteverted Pelvis

Running: Part 5: Anteverted Pelvis

Michelle Ball, Gokhale Method teacher
Date

Welcome to the fifth blog post in our series on running. My name is Michelle Ball, and I am a Gokhale Method® teacher living in Tasmania. I am also a lifelong runner and am passionate about sharing the benefits of healthy posture with the running community, be that beginners, seasoned runners, or anyone in between. Even if you don’t run, but do want an active and pain-free body well into old age, this blog post is for you!

What is an anteverted pelvis? 

Pelvis refers to the bony pelvis, and means basin, or bowl, in Latin. Anteverted means tipped, turned, or inclined forward, from the Latin ante to go before or in front, and vertere to turn. So we are referring to a pelvis that tips forward. 


The angled belt line of the Ubong tribesman on the left shows that his pelvis is anteverted—mildly tipped forward. Contrary to popular belief, an anteverted pelvis does not cause excessive lumbar lordosis (sway back) when there is a healthy angle at the L5-S1 junction. His back remains surprisingly straight by conventional standards. 

Three standing figures in profile showing anteverted, “neutral”, and tucked pelvis
(a.) An anteverted pelvis facilitates heath posture. The commonly advocated “neutral pelvis.” (b.) is actually mildly tucked and does not allow the correct lumbo-sacral angle and stacking of the spine. (c.) A markedly tucked (retroverted) pelvis leads to a tense, compressed lumbar area, or to slumping., 

How an anteverted pelvis benefits the spine:

As you see in the image above, an anteverted pelvis (see example (a.)), is the foundation for a healthy, straighter, more vertical spine, which does not sway or round. It provides the correct orientation for the sacrum to support the L5-S1 disc, which is wedge-shaped, and then for the L5 vertebra and those above to stack well. A tucked pelvis, over time, will likely cause the L5-S1 disc to suffer wear and tear, bulging, or worse, and put pressure on the sciatic nerve roots.


(a.) An anteverted pelvis preserves the wedge-shaped L5-S1 disc. (b.) A tucked pelvis cannot accommodate this and the lower discs will suffer undue pressure and bulging toward the nerve roots.


Like the Ubong tribesmen and people throughout the nonindustrialized world, these elite runners show both an anteverted pelvis and an upright torso. Unsplash

Running leaning forward

Some running coaches teach a forward lean of the torso, which I agree reproduces some of the benefits of a healthy L5-S1 angle for runners who are currently stiff at that joint and therefore slightly tucked if they remain upright. Leaning forward helps compensate for any lack of L5-S1 angle, and harnesses power from the energy of impact when the back leg pushes off. 

Leaning forward is strongly advocated in the ChiRunning technique, which was developed by Danny Dreyer. You can watch Esther in conversation with Danny here, where he explains his approach.

Graphic over photo of runner in profile showing benefits of leaning forward 
Danny Dreyer advocates a forward lean when running, with shoulders, hips and ankles aligned. This is a useful technique to help orient the pelvis, especially if the L5-S1 angle does not allow for the torso to be upright. It also provides additional momentum.


World-renowned Kenyan runners often run with a good L5-S1 angle that anteverts the pelvis, combined with only a slight forward lean. Flikr

Powerful glutes 

An anteverted pelvis also confers mechanical advantage to the buttock muscles. With the behind behind, they can contract powerfully to pull the legs back and aid propulsion. Under-developed glutes are a common casualty when the pelvis is tucked. 


You can see here that I am running with my pelvis anteverted, and a slight lean forward, both of which put my glutes behind to help power my stride.

It is important that, in an effort to get your behind behind, the anteverted pelvis is not mimicked by simply sticking your bottom back with tension (sway) in the lower back. The pelvis needs to settle into anteversion naturally, with healthy articulation at the L5-S1 joint, relaxed back muscles and hip joints, and healthy alignment throughout the body. Gokhale Method teachers have the techniques and expertise to help you get there without inadvertently creating more postural problems. 

Young woman running with behind behind but swayed back
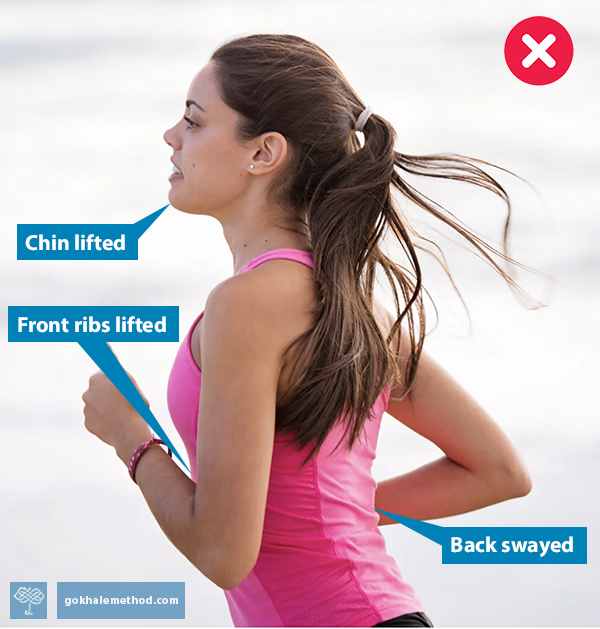
This runner has her behind behind her—but, as the creases in her top confirm, she is tensing her back into a sway and lifting her front ribcage to get there. Pexels


This footballer has his behind behind with an anteverted pelvis that articulates at L5-S1. His torso remains largely straight, which enables him to twist with good length in his spine, rather than compounding compressed discs and nerves. Pixabay

I find it interesting that a forward-leaning stance which aligns the torso with the extended back leg and supports pelvic anteversion is also a key ingredient in learning to glidewalk. Glidewalking is taught in detail in our Gokhale Method® in-person Foundations and Pop-up courses, and our online Elements course. Glidewalking produces a natural, smooth and powerful gait, which in particular strengthens the glutes and the feet. Students who have learned glidewalking find their running improved by the Downtime Training™of simply walking—but walking well. 

Good hip health

The anteverted pelvis is part of nature’s blueprint for healthy human posture and sound biomechanics. It is no surprise therefore that it confers many benefits throughout the body. An anteverted pelvis gives the best fit and function for the hip joints, avoiding the misalignments that occur with tucking. Poorly aligned hips can cause bursitis, labral tears, and osteoarthritis within the joints, and soft tissue issues such as muscle strains, tendonitis, and ITB (iliotibial band) problems further down. 


Jogging or walking with a tucked pelvis encourages tight hip joints, internal rotation of the feet, legs, and hips, rounding of the torso, and forward head carriage. Pexels

Pain in the knees, lower legs, and feet 

When runners get pain in their knees, lower legs, or feet, one of the last places they are likely to look for a remedy is their pelvic position. They are far more likely to blame their shoes! While the right shoes are important, (see Running P3: How to choose running shoes), it is often a revelation for runners to realize how the angle of the pelvis affects their gait. 

One serious problem with tucking the pelvis that hits runners particularly hard is excessive heel strike. While this may also occur in walking with a tucked pelvis, running or even slow jogging will mean that an unduly forward thrusting front leg will suffer more impact. This may result in not only wear and tear, but immediate and painful damage, as the femoral head (top of the thigh bone) is jammed back into the hip socket, and the knee joint of a more forward and likely more straightened leg is jarred.  Sticking the heel forward is like ramming the brakes on while still stepping on the gas! The answer to a thudding heel strike is not to buy excessively padded shoes, but to antevert the pelvis.


A tucked pelvis points the thighs forward, resulting in an excessive heel strike and jarring through the front leg knee and hip. sportssurgeryclinic.com


This runner has her behind behind, but the orientation of her pelvis comes from a
swayed lumbar area, not from L5-S1. The front of her rib cage and chin are pulled up.
She is about to heel strike—bad news for her straightened front leg and hip joint.
Unsplash

Doing a much better job, an anteverted pelvis:

  • Puts the muscles and soft tissues, especially the glutes, in a position of mechanical advantage, without threatening the lumbar spine
  • Enables better weight distribution and therefore bone health 
  • Places the thigh in a healthier position to absorb forces in the hip socket 
  • Allows landing with a bent front knee, with better shock absorption 
  • Facilitates a light heel/midfoot landing, avoids excessive heel strike, is more energy-efficient

Female runner in back/profile view showing good form and anteverted pelvis 
This runner has good form. Her behind is behind because of a pronounced angle at L5-S1 (anteverted pelvis). Her back remains largely straight, her shoulders back, her neck tall. She will land without unduly jarring her joints. Unsplash

Support for the pelvic organs 

An important benefit of an anteverted pelvis is that the bones of the pubis are able to play their part in supporting the pelvic organs. Organ prolapse and incontinence can affect everyone, especially as we age, and is also a common problem in our culture for women during or after pregnancy. When the pelvis is tucked the organ support is overly reliant on the soft tissues of the pelvic floor, such as the Kegel muscle.

 Two diagrams in profile showing anteverted and tucked pelvis effect on pelvic organs.
(a.) With an anteverted pelvis, the pubic bone is positioned to support the pelvic organs. (b.) With a tucked pelvis, the Kegel muscle is obliged to assume this role.

There is nothing worse than getting a run in and having to use the bathroom, especially if there is not one available! Heather A. Dunfee is a physical therapist in the Mayo Clinic Healthy Living Program, and a certified Pregnancy and Postpartum Corrective Exercise Specialist. She does not refer specifically to the anteverted pelvis, but she is clear that tucking the pelvis is bad news:

For runners, good alignment can help your core to better absorb impact, preventing leaks. For example, a slight forward lean helps to put your deep core "canister" in the best alignment to do its job. Think about stacking your rib cage over your pelvis, something that comes naturally when running uphill. . . Hills are great because they force the body into a position of rib cage over pelvis and untuck the bum.

If you would like guidance on any aspect of your posture and/or running, including pelvic position, consider scheduling an Initial Consultation, online or in person, with a Gokhale Method teacher.

Here are previous running posts you might like:

Running P1: Introduction, Esther Gokhale

Running P2: Meet Your Feet, Michelle Ball 

Running P3: How to choose running shoes, Michelle Ball 

Running P4: Taking care of your knees, Michelle Ball

If you would like to find out more about how the Gokhale Method can help support you, sign up to join one of our upcoming FREE Online Workshops.

Why Keep the Body forward in Warrior I Pose?

Why Keep the Body forward in Warrior I Pose?

Esther Gokhale
Date


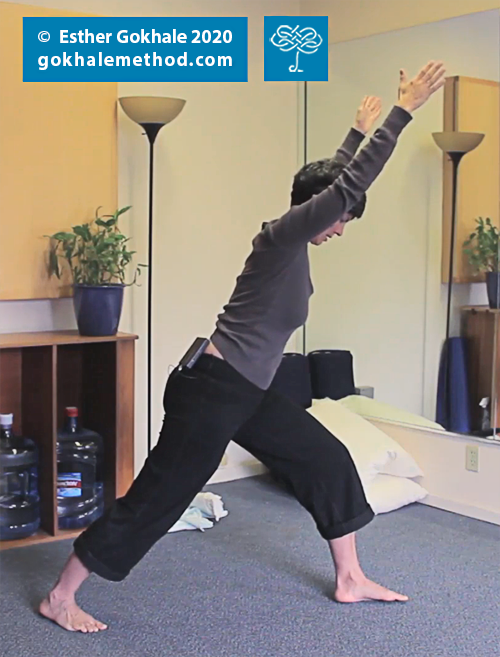
When doing yoga with a Gokhale Method filter, we use specific adjustments to maintain healthy posture and avoid unnecessary injury. Note the distinct lack of curvature in my lumbar spine.

A general tenet of the Gokhale Method approach is that micro-level adjustments can lead to macro-level results. Like the world we live in, the human body is a complex, interconnected system. So it is not surprising that attainable tweaks in how we use our bodies can have beneficial effects on our function and well-being.

Yoga is no different. If you have an established yoga practice, you’ve probably discovered for yourself that small adjustments are not so small in the aggregate!


Even when practicing yoga, we would do well to refrain from swaying our lower backs. Image courtesy Elly Fairytale on Pexels.

Warrior I and healthy posture
Take Warrior I Pose (Virabhadrasana I), for example. This pose is one in which yoga models (a group that used to count me among its numbers, decades ago in India) often demonstrate a vertical upper body above their hips.


By keeping her upper body vertical above her hips, this yogini is predisposing herself to lumbar curvature. Image courtesy Sigurdas on Wikimedia Commons under CC BY-SA 3.0.


If you look carefully at her silhouette, you’ll see that this yogini’s lumbar sway is quite visible, putting undue pressure on her delicate spinal discs and nerves. Image courtesy Mor Shani on Unsplash.

However, when I practice Warrior I today, I make sure to keep the upper body leaned forward rather than vertical. Why is this?

The story connects with L5-S1 mobility. This special “saddle joint” is a cylindrical disk in quadrupeds. In bipeds (that would be us, humans!), it’s wedge-shaped. In spite of this baseline shape, the joint is actually capable of quite a lot of healthy variation in shape.


The L5 vertebra, one of the two elements of the L5-S1 (lumbosacral) joint, as depicted in Gray’s Anatomy. Public domain image.

B.K.S. Iyengar famously demonstrated extreme L5-S1 mobility, surely the result of his practicing yoga intensively for 8-ish hours a day over decades of his life. His remarkable L5-S1 mobility facilitated extreme (and still healthy) backbends as well as verticality in poses like Warrior I.


Of course, we’re not all built like B.K.S. Iyengar! Most of us have limited L5-S1 mobility. One can cultivate additional mobility in this saddle joint, but it takes time, dedication, and expertise to do it safely.


A forward-projecting upper body in Warrior I protects the lumbar spine from swaying.

In one of our upcoming Gokhale Premium workshops this month, I’ll apply the Gokhale Method filter to all the poses of the original Sun Salutation sequence. You are invited to join me! I’ll also be offering new Free Online Workshops on topics including:

What are some tiny posture adjustments you’ve made that have made a big difference in your life?

Upgrade Your Downward-Facing Dog with the Gokhale Method and SpineTracker™

Upgrade Your Downward-Facing Dog with the Gokhale Method and SpineTracker™

Cecily Frederick
Date

Studying and teaching yoga has been part of my life for several years. However, after learning the Gokhale Method, I approached the well-known yoga posture “downward-facing dog” (Adho Mukha Svanasana) in a new way.


Hip-hinging with my even spinal groove visible — GOOD! Image courtesy Cecily Frederick.

In the Gokhale Method Foundations Course, I learned how to hip-hinge and keep my spine from flexing when bending. I wanted to maintain about the same spinal shape in my “downward-facing dog” pose as I had learned when hip-hinging. This spinal shape, with an even spinal groove from the lower to the upper back, meant that my intervertebral discs, nerve roots and spinal ligaments would be protected during bends, and my hip joints would be used in a healthy way.

Also informing the adjustments I made to my downward-facing dog was receiving detailed feedback about my spinal shape from the new SpineTracker wearable device developed by the Gokhale Method Institute. This technology is available to participants of the new Pop-up Course and in private lessons with participating teachers.


Here, I’m wearing a set of SpineTracker sensors on my back to determine my lumbar spinal shape. Image courtesy Cecily Frederick.

Here is an example of the SpineTracker feedback for a hip-hinge. To contextualize, each dot is the location of a sensor.


SpineTracker snapshot of my spinal shape while hip-hinging — GOOD!

Although many yoga practitioners hip-hinge in their “downward-facing dog” posture, I had a habit of slightly flexing my lumbar spine in this pose.


The practitioner in this version of "downward-facing dog" pose shows a slightly flexed lumbar spine, putting the lumbar discs under strain. Image courtesy Form on Unsplash.

After many years of spinal flexion occurring with most hip flexion, I had developed chronic low back pain. Not all spinal flexion is easy to see (or feel internally), as my former downward-facing dog form, demonstrated below, shows.


Here I am in downward-facing dog with some lumbar spine flexion and hip flexion (knees straight, heels down) — BAD! Image courtesy Cecily Frederick.

To heal my irritated back, I began revisiting the way I approached this yoga posture. It was a worthy project since this pose shows up frequently in my yoga practice and yoga teaching sessions.

First, I needed to learn how to stabilize my overly mobile lower back and ease into deeper flexion in my hips. Luckily, hip-hinging practice had helped me learn how to achieve both of these goals. Then I needed to transfer this skill to one common yoga pose: downward-facing dog.


In this photo, I’m in downward-facing dog with my spinal groove visible (knees bent, heels up) — GOOD! Image courtesy Cecily Frederick.


Here’s another view of my downward-facing dog, wearing the SpineTracker sensors on my back (knees bent, heels up) — GOOD! Image courtesy Cecily Frederick.


The upgraded downward-facing dog pose creates an even spinal groove which I’m able to feel with my fingertips — GOOD! Image courtesy Cecily Frederick.

A great way to capture the shape of the spine in a complex yoga pose is to take an image with the SpineTracker device. The SpineTracker sensors stick directly to the skin over the spine and are able to give detailed information about the spine’s shape (and your hands can stay on the floor).


SpineTracker snapshot of my spinal shape in upgraded downward-facing dog (knees bent, heels up), more spinal extension — GOOD!


For comparison, this SpineTracker snapshot of my spinal shape in unmodified downward-facing dog (knees straight, heels down) reveals noticeably more spinal flexion than in the upgraded form — BAD!


In my upgraded downward-facing dog pose: no spinal flexion, heels up, knees bent — GOOD! Image courtesy Cecily Frederick.

To refine my downward-facing dog pose, I needed to:

  1. Learn how to hip-hinge from a Gokhale Method teacher
  2. Come to a hands and knees position (“dog pose”) with a J-spine
  3. Lift hips into downward-facing dog position without changing spinal shape and gently pull hips back, away from hands

Things that might also help if you have shortened hamstrings and calf muscles and/or internally rotated femurs:

  1. Keep knees softly bent and kidney bean shape the feet to allow the pelvis to settle well
  2. De-emphasize dropping heels to the floor
  3. Allow the pose to feel awkward at first (but not painful)

One additional advantage to structuring a downward-facing dog this way is that the pose becomes a great way to lengthen the entire spine, which can make other yoga poses healthier and more accessible. Yoga is one of many topics addressed in the Online University content for alumni.

Is there a yoga pose that causes you some back discomfort?

Subscribe to lumbar spine