how-to

How (and Why) to Keep Your Neck Tall

How (and Why) to Keep Your Neck Tall

Esther Gokhale
Date

Why is neck length so important? When I have taught in corporate settings, neck pain seems to be an even more common problem than back pain. It doesn’t help that most ergonomic furniture is not only unhelpful, but even counterproductive (the Herman Miller Aeron chair won the “cool” race in corporate America — and it’s my least favorite of all). Posturenomics®, a term I coined, reflects the philosophy that it's not furniture alone, but also knowledge, which together create the conditions for healthy posture.

We’re also surrounded by people who model poor (usually slumpy) posture with forward head — and whether we know it or not, it’s in our DNA to mimic what’s around. And last, but not least, our lay and medical experts have adopted a particularly unhelpful (and in fact, counterproductive) set of posture guidelines (including “chin up,” “chest out,” “stand up straight,” do crunches, tuck your pelvis — all of which harm the neck among other parts of the body).


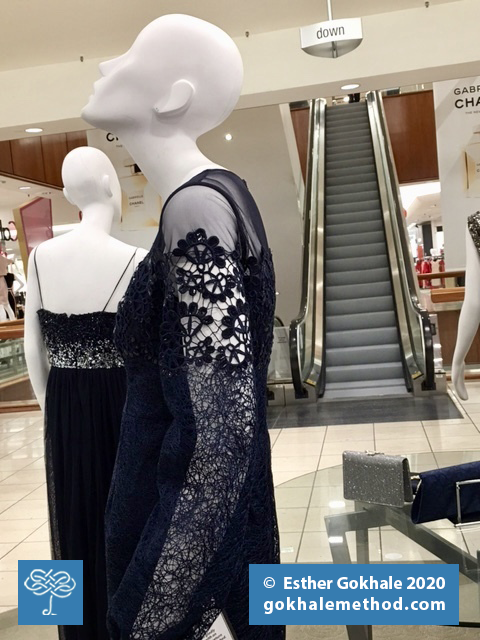
I photographed this mannequin at the Stanford Shopping Mall years ago. "Her" neck curvature is intense and unhealthy.

Observe this mannequin from the Stanford Shopping Mall in Palo Alto, CA. She cranes her neck to look up. The base of the skull where it meets the neck is fine as a joint to rotate on, but the amount of curvature in her neck here is intense and unhealthy. I like to think of the neck as beginning in the thoracic spine (upper back). T5 is usually at the apex of the thoracic curve. Her thoracic curve is excessive. The origin of this problem is actually lower in the back and pelvis. Her pelvis is tucked, causing excessive sway in the lumbar spine, which gets reflected higher up as excessive curve in the thoracic spine, Then, in order to look ahead of her, instead of down toward the ground, she cranes her neck. If you pattern yourself on mannequins like this, you’ll soon end up bent out of shape.

 
This renowned arm surgeon working in the OR displays intense neck curvature as well. Unfortunately, many surgeons develop spinal problems.

Observe this surgeon’s cervical (neck) curvature. This posture will not serve to maintain healthy cervical discs and nerves. Surgeons are remarkably able to step up to work incredibly long hours, and sacrifice comfort for the benefit of their patients, but at some point the effects of bad working posture catch up with even the most determined of us. Paresthesias in your hands are not symptoms anyone can will their way past. Surgeons have trust in their craft, and seem to readily subject themselves to surgery (I saw a surprising number of neck scars in my 2-week stint as an observer in the OR at Stanford University hospital). But if surgery is not accompanied by measures that get to the root of the problem, the problem comes back — like it did with my own failed back surgery. The plight of many surgeons is to be forced into early retirement due to injury. They have usually earned enough to have a financially comfortable retirement, but their older years are often compromised by pain and disability.  Most of this, based on my experience, is preventable — and such a poor reward for enormous effort and societal contribution.


As is true of surgeons, forward heads and craned necks among dentists often lead to problems over time. Image courtesy H Shaw on Unsplash.

Dentists also receive no training on sustainable, healthy ways to bend over their patients and twist to examine their teeth. A full third of dentists retire early due to disability.


This Yao woman’s head and neck posture are exemplary. Not only does she have a regal and dignified bearing, but her healthy posture also protects her neck and spinal health.

Decades ago, I had the chance to hike to remote locations in the highlands of Thailand. I was fortunate to have encountered this woman and child when I did: more recently, this area has become more heavily trafficked by trekkers and finding a spot where the local people welcome a non-commercial interaction with foreigners is more challenging. But in those days, it was possible. I’m actually the proud owner of a Yao jacket. It has a wool ruff sewn onto a hemp shell, a fabric so durable that only after 30 years is it starting to fray. This woman’s elegant, lengthened neck is something we can all learn to approach.

How to get to a lengthened neck: a few techniques

  1. Gather in your hands a handful of hair at the base of your skull on each side and gently and smoothly tug upward and backward. Try to pull symmetrically. if you’re able to move your arm back enough to grab one tuft of hair and pull back and up, go for it, but this does require some mobility in the shoulder joint.
  2. You can also pull on your head itself. Be careful that you’re not pushing or pulling your face in the opposite direction from the front. Your hands should be on your ears or behind them, gently guiding your head up and back.
  3. My favorite way uses the tips of your three central fingers on each hand (index, middle, ring) on the occiput to gently push the base of the skull back and up.
  4. You can also imagine that you have a helium balloon inside your head. Survey the area, discover and release tensions, and let your head waft up.

The key ingredient in all of these techniques is to first relax your neck. If you tense your neck, your hands are going to be challenged to help with lengthening. You want to yield to the push/pull of your hands.

There’s more to learn, but if you begin with the above steps, you’ll be well on your way to repairing whatever damage has happened and preventing future damage. Your neck will then be able to live a long and happy life!

My Favorite Exercises for When You Can’t Get to the Gym, Part 2: Toning the Gluteus Medius

My Favorite Exercises for When You Can’t Get to the Gym, Part 2: Toning the Gluteus Medius

Esther Gokhale
Date

This is the second post in our series on home exercise during shelter-in. For Part 1 on Chair Pose, click here!


The gluteus medius is an oft-overlooked muscle which supports healthy posture and attractive appearance. Thankfully, we can learn to tone and strengthen it through targeted exercise.

Exercise is wonderful not only for keeping us strong and healthy, but also for relieving stress and anxiety. Now that gyms are shut down again here in California, home exercise is even more important than ever before. In the first part of this series on home exercise for shelter-in, we focused on how to approach Chair Pose as a means to build strength and maintain healthy posture, no equipment necessary.

In today’s installment, we’ll focus on an exercise I’ve devised over the years designed to isolate and strengthen the oft-overlooked gluteus medius. This muscle is almost always underdeveloped in people who’ve been raised in industrialized cultures. But it is an important player in gait, running, and athletics. It also helps with balance and fall-prevention as we move through the world, no matter our age. And it’s “behind” all the peachy, perky behinds out there in the world!


Equipment needed: a chair.

Directions for each side:

  1. Start with a bean-shaped foot and externally rotated legs so all the right muscles are getting strengthened and stretched. 
  2. While maintaining external rotation in both legs, leave one leg on the floor, lean forward, and extend the other leg out behind you.
  3. If you need help, by all means support yourself by holding on to the back of a chair. At this point, your gluteus medius will be strongly contracted.
  4. If you don’t lean on a surface, you will be challenging gluteus medius on both sides. Glut med works to sustain the raised leg of the same side; the other is working to preserve a horizontal pelvis. If you don’t activate the gluteus medius on the standing leg, you’ll be sinking into the posture. It takes the glut med to keep the pelvis horizontal on the weight-bearing leg side.

Posture tips: 

  • Make sure the lifted leg has the knee turned out (externally rotated). That isolates the glut med. 
  • Don’t let your back sway. Use the internal oblique abdominals to prevent any sway in your lower back.
  • Lean forward, but only as much as you need. 
  • Remember that the back of your neck is part of your spine, so be sure to let it feel long, like a continuation of the spine.
  • Don’t forget to do this exercise on both sides so both gluteus medii are strengthened and toned.

If you’re feeling especially zesty, and don’t need to stabilize with a chair back, you can give yourself another layer of challenge by slowly and carefully hopping in a backward circle on the standing leg. You can even add arms, which helps with balance while in motion and adds a dancelike element to the exercise. I love this variation.


For a deep dive into strengthening exercises you can do at home, plus a one-on-one live follow-up session with a Gokhale Method teacher, don’t miss tomorrow’s special Premium Workshop, Strengthening Exercises - The Gokhale Way! I look forward to showing you how to approach home exercise with healthy posture, improving your form and preventing injury.

What have you been doing to keep yourself strong during quarantine?

Cultivating a J-Spine with Chair Pose (Utkatasana)

Cultivating a J-Spine with Chair Pose (Utkatasana)

Cecily Frederick
Date

As a student and teacher of yoga and practitioner of the Gokhale Method, I choose yoga poses that make good use of my time. “Chair pose” is well worth the time investment. In fact, it has become one of my favorite strength-building postures. It is useful for cultivating a J-shaped spine. It helps increase gluteal tone. It helps to pattern healthy hip movement. It is strengthening for the legs and spinal stabilizers. And, last but not least, it allows a yoga practitioner to smoothly transition between a standing forward fold and mountain pose — without compression of the intervertebral discs.


Cecily Frederick in chair pose with J-spine visible, overlaid with SpineTracker™ snapshot.

   
Detail of Cecily Frederick’s spinal shape in chair pose, overlaid with SpineTracker snapshot.


SpineTracker snapshot of Cecily Frederick’s spinal shape in chair pose.

Chair pose is also Esther Gokhale's favorite way to cultivate strength in all the muscles needed to tallstand well. She recommends it to students who tend to park in their joints (locking the knees and groin, flattening the feet, arching the back and introducing extra curves throughout the spine). After practicing chair pose, the small amount of muscular effort it takes to stand well becomes easy to access.

To practice chair pose, stand with your feet about hip-width apart and kidney bean shape your feet. Reach your arms forward and up as you simultaneously bend your knees, hips and ankles as if you were sitting down and back into a chair. Hold for a few seconds and then press down through your feet (and especially through your heels) to come back to standing while lowering your arms.  

A couple of practice sequences you could consider: 

  • Transition from tallstanding (“mountain pose” or Tadasana) to chair pose and back to tallstanding 4-6 times.

  • Transition from tallstanding to chair pose to an upward forward fold (Urdhva Uttanasana) to chair pose (Utkatasana) to tallstanding 4-6 times.


Cecily Frederick in upward forward fold (Urdhva Uttanasana or hip-hinge).

Five refinement tips

1. Strengthen your butt / spare your knees
To help develop gluteal strength and avoid knee strain, don’t let your knees come forward over your toes as your knees bend. Think about pulling your butt back behind you. Consider using a stool that you position in front of your shins while standing, and don’t let yourself push it forward as you move into chair pose.


Cecily Frederick using a stool to cue chair pose, with help from a friend.

2. Save your discs
To help avoid swaying the back and compressing upper lumbar discs, don’t reach your arms up vertically. Instead let them reach forward. 

3. Settle your pelvis
To help the pelvis to settle well, you might not want the feet and knees too close together. Experiment with different widths between your feet. Remember what you learned in the Foundations Course or Pop-up Course about hip-hinging.

4. Less is more
Don’t force yourself into a deep knee, hip, or ankle bend. Allow your chair pose to begin where it begins. Less is often more in a yoga practice. 

5. Break it down
If you have an injured shoulder you can lower your arms, bring them to your hips or press the palms together in prayer position in front of the sternum.

Opening Your Heart Space

Opening Your Heart Space

Esther Gokhale
Date


This bronze figure shows an open chest and “heart space;” his shoulders are well back and his ribcage is anchored. He is part of a fountain in Piccadilly Circus, London, sculpted by Sir Alfred Gilbert in 1893. Referred to (erroneously) as “Eros,” the figure is in fact Anteros, Eros’ brother, who represents a more mature, less capricious love. Original image courtesy Gareth Williams under CC BY 2.0.

“Heart space” is a term used in yoga to describe the upper part of the chest where the heart is located. Valentine’s Day is an ideal time to give some special attention to this region, and explore its relation to your posture and wellbeing. 

The Gokhale Method teaches four particular techniques which enable you to open your chest without doing damage to your back:

  1. Rib anchor video
    Learning to engage your rib anchor is an important first step. It will prevent your lower ribs from popping up and your back from swaying in the techniques that follow.
     
  2. Up and back with the neck video
    By drawing the base of the skull gently backwards and upwards, the chest is no longer crowded into the body, but rather allowed to expand outwards and upwards.
     
  3. Shoulder rolls video
    Shoulder rolls help position the arms further back along the torso, which immediately opens the chest to expansion with breathing. In the long run, this results in a larger, more open chest.


This Ecuadorian school teacher is much loved by his pupils. Note that the teacher and his pupils have open chests and posterior shoulder placement.

  1. Breathing into the upper chest
    The first three techniques may already leave you feeling more open-hearted. They enable you to breathe more deeply, but this may not yet be your habit. Take a few slow, deep breaths that further open your upper chest. Then rest a few breaths before repeating. It is common to feel resistance in the chest at first, but by using these techniques to open your structure and deepen your breathing, with practice it will become easy and pleasurable. 

The functioning of the heart is clearly essential to good health and life itself, but the organ and its position in the chest are also given special importance in many religious and cultural frameworks. Even our language is full of familiar, evocative idioms such as “from the bottom of my heart,” “faint-hearted,” “heart of the matter,” “heart and soul,” “heartening,” and so on.  Let’s explore the symbolism and associations a little further, especially where they intersect with posture.

Heart symbolism in Western European cultures
Let’s begin with St. Valentine. According to most popular accounts, Saint Valentine was either a priest or a bishop in the times of the Roman Empire, who, with great bravery and compassion, ministered to persecuted Christians. He was martyred and buried north of Rome on February 14, which has been observed as St. Valentine's Day since 496 AD. Another plausible legend suggests that when Roman Emperor Claudius II outlawed marriage for young men – reasoning that single men made better soldiers than those with wives and families – Valentine defied Claudius and continued to perform marriages for young lovers in secret. 

Whichever legend has truth, love, bravery, and compassion are all qualities said to reside in the heart in many Western European cultures. In Catholic Christianity, the Sacred Heart of Jesus symbolises his unconditional love, and the church and its patrons commissioned many paintings on this theme. These paintings show the heart radiating divinity; they often also show the very visceral detail of an attached aorta!  


Allegorical painting of the Sacred Heart of Jesus. The central heart radiates hearts gathered up by putti (cherubs). Painting by Robert la Longe, ca. 1705. Public domain, via Wikimedia Commons.

The heart-shaped symbol ♡ evolved around the 14th century, loosely based on the organ’s shape. Today we have numerous emojis preprogrammed in our smartphones, ready to use as shorthand for love, broken-heartedness, and associated feelings and events.

Heart symbolism in South Asian and East Asian cultures
Many Asian cultures also identify the heart space as essential to our wellbeing. Traditional Indian medicine describes energy centers, or chakras, that lie along the central axis of the body. The heart chakra (Anahata) is considered the center of love and compassion that can become blocked by grief or selfishness. An unblocked anahata is associated with loving-kindness and peacefulness. Tibetan Buddhist understandings of chakras also typically include a chakra located in the center of the chest.


This illustration from an 1899 Tibetan manuscript shows the body’s energy centers (chakras), including the twelve-petalled heart chakra. Public domain. Original image courtesy Wikimedia Commons.

In Japanese language and culture, the word kokoro (distinct from the physical organ) encapsulates heart, spirit, mind, and soul, among other concepts. And in Chinese medicine, the Mu, or front correspondence point, of the heart is located at the midpoint of the nipples, and is used to heal emotional hurt.


This Buddha figure in Sri Lanka displays a beautifully relaxed, open chest and heart space. Original image courtesy Sadaham Yathra on Pexels.

Posture and the heart space
Of course, with its emphasis on our structure, it is natural to think of healthy posture and the Gokhale Method as primarily benefiting our bodies. It is certainly true that having a well-developed ribcage and open chest are important ingredients for a straight spine and well-positioned shoulders. Such good structure also benefits physiological functions such as blood circulation, breathing, digestion, and allows space for the brachial nerve plexus. However, our structure is also intimately connected to our body language, revealing and communicating how we feel.


An open heart space can often look like balanced, approachable confidence. Original image courtesy nappy on Pexels.

A mounting body of research connects open upper body posture with confidence and vitality; and crumpled upper body posture with depression, exhaustion, shame, and poor health. According to a 2017 New Zealand study, it is more challenging to be depressed with open upper body posture than with slumped upper body posture. According to another, even our performance in subjects like math improves when we adopt an open posture.


These subway commuters, with their varied seated and standing postures, demonstrate a wide range of heart space openness. Original image courtesy Laura Dewilde on Unsplash.

It strikes me that there is much cross-cultural convergence on associating this area of the body with “matters of the heart.” How does your experience and knowledge of other cultures stack up with this?

When Is It Good to Pull Back Your Shoulders?

When Is It Good to Pull Back Your Shoulders?

Esther Gokhale
Date

This is the second post in our series on shoulder positioning. Read Part 1 here!


Typing with shoulders too far forward.

Often, in industrialized cultures, the shoulders are slumped or held forward. There are so many daily tasks in the modern world that make it all too easy for these bad habits to set in: holding our arms out front for hours with poor shoulder placement while we are typing, gaming, driving, and so on. Over the years this is likely to cause various problems:

  • Impingement, bursitis, wear-and-tear

  • Reduced circulation to the arms 

  • Compromised breathing patterns

  • Reduced athletic performance, increased injuries

  • Hunched upper back and forward head

Common pitfalls in getting the shoulders back
Unfortunately, well-intentioned advice such as “pull your shoulders back” often has negative consequences. When we try and correct our shoulder position by pulling back, we are likely to either tense and sway our lower backs, or tighten the rhomboid muscles between our shoulder blades —  or both! Neither of these responses are healthy or comfortable for very long.

Meet the rhomboids
The rhomboids, which pull the shoulder blades together, are not designed to be squeezed tightly for long periods. If you consistently rely on them to pull your shoulders back, they can become sore, knotted, and inflamed


The rhomboids are not designed to be squeezed tightly for long periods. Original image courtesy Wikimedia user Anatomography under CC BY-SA 2.1 jp.

Those of you familiar with the Gokhale Method are probably already practicing the shoulder roll. This gentle movement brings the shoulders home to a naturally sustainable position.  For detailed tips on refining your shoulder roll, please see my recent blog post on shoulder positioning.

Though the rhomboids should not be continuously contracted when you are upright, they exist for good reason. The rhomboids play an important role in keeping the shoulder joint stable, especially when you bend forward, carry heavy objects, or reach for something in front of you. These actions would otherwise displace the shoulders forward. 


Inactive or weak rhomboids allow the shoulders to be pulled forward when carrying loads in front of the body.


Changing lifestyles


This farmer doesn’t bring his shoulder forward to carry his watering can.


This Burkinabé teenager pounds millet with her shoulders staying far back.

Our ancestors, like people in traditional and non-industrialized cultures today, had many more opportunities in daily life to use their rhomboids and upper back muscles: drawing water, clearing land, sweeping the yard, and harvesting crops. We can get much of this conditioning from sport such as rock climbing, games such as tug-o’-war, and chores such as gardening or vacuuming, but suitable activity may not continue into a more sedentary adult life. Without regular challenges, the muscles of the upper back can become weak and lax, allowing the shoulders to drift forward and the upper back to round.

Rhomboid toner exercise
Exercises are useful to isolate and strengthen muscles that have been systematically under-used. I find the rhomboid toning exercise below to be effective.

  1. Hold a physical therapy band or strap. Keep your wrists straight, palms facing up.
  2. Begin by performing a shoulder roll. This healthy shoulder position places your rhomboids in a position of mechanical advantage.
  3. Pin elbows to your sides at a 90º angle. The position is similar to when you’re carrying a tray.
  4. Draw your shoulder blades as close together as you can. Your hands will move away from each other. The band or strap provides resistance to this motion, challenging the rhomboids. Be sure not to tense the shoulders or neck.
  5. Hold for a few seconds. Repeat 5 to 10 times.

Getting your rhomboids to work for you when you need them will benefit both your shoulder health and your posture. Next time you are carrying heavy bags or pulling a door towards you, notice how these muscles help to preserve your shoulder position. Sometimes a little pulling back goes a long way!

Your Most Striking Posture Feature: Shoulder Position

Your Most Striking Posture Feature: Shoulder Position

Esther Gokhale
Date


The arm and shoulder of this African carpenter align with the back of his torso.

One of the most striking features of good posture is the position of the shoulders. The posture of this African carpenter shows how, with the shoulders well back, the arms align more with the back of the body than the front. The side of the chest and ribcage are clearly visible. Positioning the shoulders well brings you many benefits. It aligns your shoulder joint correctly, avoiding impingement, bursitis, arthritis, tendinitis, and general wear and tear. It improves circulation to your arms, as well as your breathing pattern. Optimal shoulder positioning improves athletic performance: throwing, punching, and swinging a racket or bat are all mechanically advantaged when your shoulders remain “home.” And last but not least, it helps prevent hunching your upper back and protruding your head forward.

If your shoulders have drifted forward over the years, a shoulder roll can ease your shoulders home into a healthy position. This maneuver gently realigns the many structures of the shoulder joint and immediately relieves stress and increases comfort. Punctuating your days with occasional shoulder rolls will gradually lengthen any tight, shortened muscles in the front of your chest and shoulders, giving you a wider, more open chest. 


Michelangelo’s ‘David’ shows the shoulders well behind a wide, open chest. Original image courtesy Igor Ferreira on Unsplash.

Your shoulders will be increasingly happy to settle back, returning nearer to where they were when you were a young child.


Children have naturally well-aligned shoulders.

If you don’t already know how to do a Gokhale Method shoulder roll, or would like to refresh your shoulder roll technique, this short video will show you how to gently roll each shoulder forward, up, and back.

The shoulder roll is so gentle you can repeat it whenever you need. (If you already have some soreness in your shoulder, then wait until it has recovered, or try mini shoulder rolls —  you do not want to cause pain.) However, the aim is not to be continually rolling your shoulders!

Here are my tips for making your shoulder roll last longer:

Tip 1: Once you have taken your shoulder forward, up, and then back, remember to release your arm down right there — you don’t want to just scoop your shoulder full circle! Check that you have fully relaxed the muscles on the top of your shoulder and neck. Feel the weight sinking down to your elbow. Expect this to both look and feel different from your old position — that’s progress!


Ratchet the shoulder soft tissue back in a similar way to a gear mechanism.

Tip 2: When sitting with your hands on your lap, place your hands close to your body and not close to your knees as this will tend to pull your shoulders forward again. Let your elbows drop straight down and be heavy. You can also hook your thumbs on your belt, pant rim, or pockets.


Your shoulders will be pulled forward if your hands slide too close to your knees.

Tip 3: Sit or stand up close to any task you may be doing. That may be typing, chopping vegetables, or working at a bench. This will make it easier to keep your shoulders rested back. You may be surprised how this simple step can help you break old habits of slouching the shoulders forward to reach things. 


Create new posture habits around daily tasks.

Tip 4: Notice how you go to move your coffee cup, pen or computer mouse —  are you automatically reaching your shoulder forward? With your shoulder back and relaxed after a shoulder roll, try extending your arm by opening up the angle of your elbow. 

Tip 5: Before driving, adjust your position to accommodate and keep your shoulder roll. See my blog post, How to Modify Your Car Seat for a Pain-Free Ride.

These five tips will help your arm, shoulder, and upper back muscles to work harmoniously and pain-free. I look forward to sharing further tips in Part 2 of this blog, and exploring when it is absolutely ok to pull your shoulders back!

How to Sit on the Floor, Part 3: Sitting with Legs Outstretched

How to Sit on the Floor, Part 3: Sitting with Legs Outstretched

Esther Gokhale
Date

This is the third post in our multi-part series on floor-sitting. Read Part 1 on floor sitting and Part 2 on squatting!

It’s very common for women in Africa to sit with their legs outstretched. I’ve seen rows of women use this position to spin yarn, engage in idle chatter, sort items, and more. I’ve seen babies massaged by women using this position both in Burkina Faso and in the U.S. by a visiting Indian masseuse who does traditional baby massage in Surat, India. In Samiland I saw this position used to bake bread in a lavoo (a Sami structure very similar to a teepee).


The Sami, who I visited in July 2015 (see my post Sleeping on Birch Branches in Samiland), bake with outstretched legs in their traditional lavoos (teepees). This is my friend Fredrik’s family.

Sitting with legs outstretched is useful when you need an extended flattish lap and your hamstring flexibility allows it. The ground needs to be dry and clean to make this an inviting position. It’s a particularly useful position for childcare. In addition to the aforementioned baby massage, our team member Angela Häkkilä has observed Anatolian women using their outstretched legs as a cradle for babies and toddlers, who are rocked to sleep with a sideways motion of the legs and a gentle lullaby.

 
In this case, the Burkinabé woman at the left is leaning against a wall for extra comfort while carding wool. With her degree of hamstring and gluteus maximus flexibility, she’d be fine without a wall, too!

The problem
Many people don’t have the hamstring and gluteus maximus flexibility to sit on the floor with outstretched legs and not round the spine. Tight hamstrings and gluteal muscles cause the pelvis to tuck under, preventing upright and relaxed stacking. Over time this can lead to a rounded back, degenerated discs, and pain. 

The fix
Place something under the bottom to encourage the pelvis to antevert, and/or consider sitting against a wall, tree trunk, or other surface to counteract the tendency to round the spine. 

With the modification of adding a support under or behind you, you will not only have expanded your repertoire of healthy sitting positions and possible activities, you will also be elongating your hamstrings to better garden, clean, and hip-hinge in general.


Though this Orissa woman would probably be just fine sitting on the ground, her technique of elevating the seat is very helpful for people in modern societies.

 
This Burkinabé massage therapist is testing the temperature of the water she will use to massage a newborn baby. Note her outstretched legs, sitting stool, and seated hip-hinge, all of which support the baby, the action, and the massage therapist to be healthy.

If this way of sitting would be helpful in your life, or if you’d benefit from increased hamstring and gluteus maximus flexibility, we recommend beginning by sitting on a support that will help antevert your pelvis, or with your behind against a wall for support. Since it’s only an issue of muscle flexibility, it’s certainly possible to work up to sitting with your legs outstretched without other support.

Glidewalking: Sitting’s Long-Lost Counterpart

Glidewalking: Sitting’s Long-Lost Counterpart

Esther Gokhale
Date


Mother and son in a tribal Orissan village demonstrating excellent walking form. Notice that their heels remain on the floor well into their stride.

Do you have tight psoas muscles? Do you suspect the cause is too much time spent sitting in your daily life? There’s a complementary activity that helps counterbalance the time we spend sitting: walking — or, more specifically, glidewalking. Glidewalking helps balance our sitting in numerous ways — walking is dynamic versus sitting which is static. Yang balances Yin, viewed in the framework of traditional Chinese medicine. One underappreciated way in which walking can balance sitting pertains to the psoas muscle.

The psoas muscle originates on the front of the sides of all the lumbar vertebrae and discs, and ends on the lesser trochanter of the femur.


This pathway is quite circuitous and runs adjacent to several pelvic organs. With long hours of sitting, the psoas can adapt to a short resting length. Original image courtesy Anatomography on Wikipedia under CC BY-SA 2.1 JP.

A short psoas pulls forward on the lumbar spine any time the legs are outstretched. This is why many people are uncomfortable lying on the back with outstretched legs, and why some people feel sciatic twinges when they stand and walk. The natural antidote for this tendency of the psoas muscle to shorten in sustained sitting is glidewalking. Glidewalking is really natural or primal walking given a special name because it is a rare thing in modern times and deserves to be celebrated with a special name! Every step done with proper form naturally stretches the psoas. That amounts to 5,000 mini psoas stretches on each side if you are glidewalking the recommended 10K steps a day. This will keep your psoas in a healthy, stretched out, pliable state!


This Orissan woman demonstrates beautiful walking form with her body in line with her back leg, her back leg straightened but not locked, and her back heel staying close the ground well into her stride.

The best way to get your psoas stretches, or resets, is to punctuate your day with glidewalking. No instance of glidewalking is insignificant: glidewalking to the bathroom, glidewalking to get a glass of water, and glidewalking in kinhin (walking meditation) all help. So are the longer, more obvious instances of glidewalking such as the daily constitutional and the weekend hike.


Orissan women carrying water on their heads. Notice how the woman in front propels herself off her rear heel. This additionally gives her a healthy psoas stretch with every step she takes.

It has become popular to consider that “sitting is the new smoking.” Poor form and long stretches of uninterrupted sitting do indeed have a deleterious effect on health, but I believe that a significant unknown contributor is that most people do not walk in a way that resets the psoas muscle after it shortens during extended sitting.

Apart from responding to extended sitting, the psoas muscle is also very responsive to psychological stress. We see this in the Moro reflex in babies when they respond to loud noises and traumatic stimuli such as real or perceived falling. Addressing psoas tension is at the core of certain body modalities, such as Tension & Trauma Releasing Exercises (TRE), and innovative developments in psychotherapy involving polyvagal theory.


This Rodin sculpture shows its subject well into a stride with the rear heel still down on the ground. This stance is a natural part of gait and stretches the psoas muscle.

It’s a tad complex to learn to stretch the psoas in glidewalking, but well worth the effort. It takes a combination of the following actions to do the job.

  1. The rib cage needs to be anchored to stabilize the lumbar spine. Without this step, any other effort to stretch the psoas will result in arching the lower back. 

  2. The back heel needs to stay on the ground a long time into a stride. Most people lift their heel up from the ground prematurely, losing the full extent of the psoas stretch that nature designed to be built into every step.

  3. The gluteal muscles of the rear leg engage appropriately, further augmenting the psoas stretch.

Proper technique can help you avoid the cycle of tight psoas muscles, reduced activity, tighter psoas muscles, further-reduced activity…

How much have you succeeded in putting these pieces together? What helped the techniques coalesce? The book? The DVD? One of our courses? A topical workshop on glidewalking for our Gokhale Method Alumni? I’d love to hear from you in the comment section below.

Subscribe to how-to