neck curvature

How (and Why) to Keep Your Neck Tall

How (and Why) to Keep Your Neck Tall

Esther Gokhale
Date

Why is neck length so important? When I have taught in corporate settings, neck pain seems to be an even more common problem than back pain. It doesn’t help that most ergonomic furniture is not only unhelpful, but even counterproductive (the Herman Miller Aeron chair won the “cool” race in corporate America — and it’s my least favorite of all). Posturenomics®, a term I coined, reflects the philosophy that it's not furniture alone, but also knowledge, which together create the conditions for healthy posture.

We’re also surrounded by people who model poor (usually slumpy) posture with forward head — and whether we know it or not, it’s in our DNA to mimic what’s around. And last, but not least, our lay and medical experts have adopted a particularly unhelpful (and in fact, counterproductive) set of posture guidelines (including “chin up,” “chest out,” “stand up straight,” do crunches, tuck your pelvis — all of which harm the neck among other parts of the body).


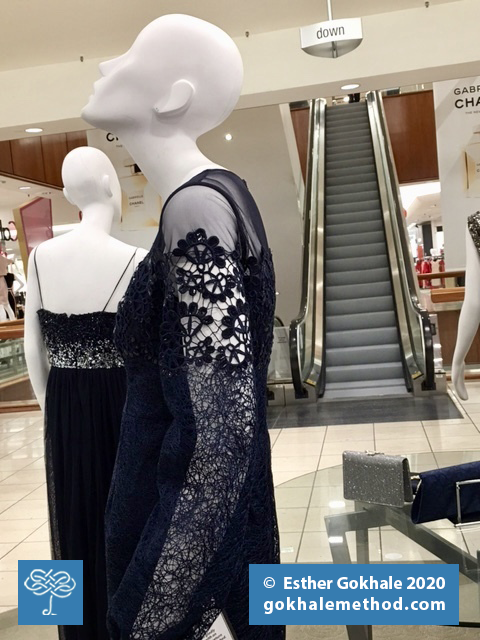
I photographed this mannequin at the Stanford Shopping Mall years ago. "Her" neck curvature is intense and unhealthy.

Observe this mannequin from the Stanford Shopping Mall in Palo Alto, CA. She cranes her neck to look up. The base of the skull where it meets the neck is fine as a joint to rotate on, but the amount of curvature in her neck here is intense and unhealthy. I like to think of the neck as beginning in the thoracic spine (upper back). T5 is usually at the apex of the thoracic curve. Her thoracic curve is excessive. The origin of this problem is actually lower in the back and pelvis. Her pelvis is tucked, causing excessive sway in the lumbar spine, which gets reflected higher up as excessive curve in the thoracic spine, Then, in order to look ahead of her, instead of down toward the ground, she cranes her neck. If you pattern yourself on mannequins like this, you’ll soon end up bent out of shape.

 
This renowned arm surgeon working in the OR displays intense neck curvature as well. Unfortunately, many surgeons develop spinal problems.

Observe this surgeon’s cervical (neck) curvature. This posture will not serve to maintain healthy cervical discs and nerves. Surgeons are remarkably able to step up to work incredibly long hours, and sacrifice comfort for the benefit of their patients, but at some point the effects of bad working posture catch up with even the most determined of us. Paresthesias in your hands are not symptoms anyone can will their way past. Surgeons have trust in their craft, and seem to readily subject themselves to surgery (I saw a surprising number of neck scars in my 2-week stint as an observer in the OR at Stanford University hospital). But if surgery is not accompanied by measures that get to the root of the problem, the problem comes back — like it did with my own failed back surgery. The plight of many surgeons is to be forced into early retirement due to injury. They have usually earned enough to have a financially comfortable retirement, but their older years are often compromised by pain and disability.  Most of this, based on my experience, is preventable — and such a poor reward for enormous effort and societal contribution.


As is true of surgeons, forward heads and craned necks among dentists often lead to problems over time. Image courtesy H Shaw on Unsplash.

Dentists also receive no training on sustainable, healthy ways to bend over their patients and twist to examine their teeth. A full third of dentists retire early due to disability.


This Yao woman’s head and neck posture are exemplary. Not only does she have a regal and dignified bearing, but her healthy posture also protects her neck and spinal health.

Decades ago, I had the chance to hike to remote locations in the highlands of Thailand. I was fortunate to have encountered this woman and child when I did: more recently, this area has become more heavily trafficked by trekkers and finding a spot where the local people welcome a non-commercial interaction with foreigners is more challenging. But in those days, it was possible. I’m actually the proud owner of a Yao jacket. It has a wool ruff sewn onto a hemp shell, a fabric so durable that only after 30 years is it starting to fray. This woman’s elegant, lengthened neck is something we can all learn to approach.

How to get to a lengthened neck: a few techniques

  1. Gather in your hands a handful of hair at the base of your skull on each side and gently and smoothly tug upward and backward. Try to pull symmetrically. if you’re able to move your arm back enough to grab one tuft of hair and pull back and up, go for it, but this does require some mobility in the shoulder joint.
  2. You can also pull on your head itself. Be careful that you’re not pushing or pulling your face in the opposite direction from the front. Your hands should be on your ears or behind them, gently guiding your head up and back.
  3. My favorite way uses the tips of your three central fingers on each hand (index, middle, ring) on the occiput to gently push the base of the skull back and up.
  4. You can also imagine that you have a helium balloon inside your head. Survey the area, discover and release tensions, and let your head waft up.

The key ingredient in all of these techniques is to first relax your neck. If you tense your neck, your hands are going to be challenged to help with lengthening. You want to yield to the push/pull of your hands.

There’s more to learn, but if you begin with the above steps, you’ll be well on your way to repairing whatever damage has happened and preventing future damage. Your neck will then be able to live a long and happy life!

Back-Saving Tips for the Outdoor Enthusiast

Back-Saving Tips for the Outdoor Enthusiast

Esther Gokhale
Date

There are several more weeks of summer vacation before school starts again: plenty of time to squeeze a family camping trip or two out of the sunshiny drops of Summer!  Here are a few tips to promote healthy posture while you’re on the road, by the campfire, and in your tent.


Are We There Yet?

During the long haul to your nearest national park, it’s easy to strain your cervical spine (the vertebrae in your neck) by craning your neck forward to see the road.


Justin Bieber, in this photo, is demonstrating forward head—his ear is forward of his collar bones, and his chin is far in front of his sternum

If you notice your head drifting out of alignment with the rest of your spine, a quick fix is to gently pull your chin in so it aligns above your sternum, and stretch the crown of your head—the part of the head that’s home to many a cowlick--up towards the roof of the car.


You can give your neck a little manual lengthening by pressing up on your occipital bones, behind your ears

Once you’ve lengthened your neck, relax your head into alignment with the rest of your spine. It should be a smoother drive from here on out!
(For further specifics on setting up your car for comfort, see this blog post on modifying your seat for Stretchsitting.)


Relaxing Fireside

Collapsible fabric and steel chairs are popular with campers, but these seats are often draped in a way that promotes slumping and slouching.


Fabric that hangs without any support induces a curved body position, and will force you into tucking your pelvis and slumping

A better option is to bring along a collapsible stool instead.  With a stool, you’re better equipped to “leave your behind behind you” while you roast your s’mores.


A tri-pod style fabric stool can be used to help antevert the pelvis, because although the fabric hangs, you can tip your pelvis forward using the elevated corners in the same way as a wedge; a firm-topped stool may be even better for stacksitting, and will allow more flexibility in how open your hips are while sitting


Lights Out

Except for encountering a bear, sleeping in your tent can be the most uncomfortable part of camping. In the Gokhale Method Foundations Course, we teach our clients a technique called “Stretchlying” that decompresses the spine and can help sleepers tolerate a wide range of bed firmness. Here are two tips borrowed from the Stretchlying technique that may help prevent an achy back the next morning:

When sleeping on your back, check the position of your pillow (or if you don’t traditionally pack pillows on your camping trips, whatever you stuff under your head).  Your head, neck and shoulders should be slightly raised on the pillow.

If you are too low on the pillow, it can cause your neck to curve forward. If you are too high, it can cause your neck to sway and compress your cervical vertebrae.


Your pillow should be able to support your head, neck, and shoulders without your head tilting back as if slipping off the top end of the pillow, which can cause a sway; a pillow that is too full can cause you to round your neck and/or back. Your pillow should provide just enough padding to support your current cervical curvature and encourage a very gentle lengthening stretch

I also recommend positioning a pillow underneath your knees when you sleep.  Many people have tight psoas muscles, which can cause an unhealthy sway in your back if you lie down with outstretched legs.  A pillow beneath your knees keeps them in a slightly bent position, which relieves the stress on your low back.  Again, if you didn’t pack a pillow, you can always use a folded up fleece or other extra clothes you brought on the trip.


Stretchlying with a pillow supporting the head, neck, and shoulders, and a second pillow providing gentle support under the knees, can greatly improve your night’s sleep on a thin camping pad

An outstanding technique to use for sleep when camping, is the way most of the world sleeps—one leg is straight, one leg is bent, the body is ¾ -turned toward toward the ground.


This is an assisted version of sleeping ¾ turning toward the ground, using extra pillows under the knee and arm to help support the rotation and avoid a sway and a slumped shoulder

The challenges here are to not sway the lumbar spine, not tuck the pelvis, not force the head to turn more than it easily can, and not slump the upper shoulder forward. Easier said than done! We teach these techniques in our advanced technique classes after people have learned the basics of healthy sitting, lying on the back and side, standing, bending, lifting, and walking.

In the meantime, take along a thicker sleeping pad and extra pillows to make sleeping on the back comfortable for you.


Hopefully these tricks, along with supportive hiking shoes and plenty of bug spray, will keep your whole family in good spirits during your next excursion. And if you capture any good pictures that show these techniques in use, post them in the comments below!


Join us in an upcoming Free Workshop (online or in person).  

Find a Foundations Course in your area to get the full training on the Gokhale Method!  

We also offer in person or online Initial Consultations with any of our qualified Gokhale Method teachers.

Abigayil Tamara's Experience with the Gokhale Method

Abigayil Tamara's Experience with the Gokhale Method

Abigayil Tamara
Date

We set a high bar for our six-lesson Gokhale Method Foundations course. We expect our students will 

  1. Sit, stand, walk, lie, and bend in new (old!) and better ways
  2. Experience significantly less pain and more function
  3. Expect more from their body and life. 
  4. Use the word “life-transforming” somewhere in their evaluation forms.

Even with this high bar, a student sometimes surprises us with the extent or speed of their progress over the course. Abigayil Tamara is one such student - here is her story. 

My Experience With the Gokhale Method
~Abigayil Tamara, MA, MSW

I looked into the Gokhale Method after someone in a grocery store told me how much it had helped his mother. 

My back issues began over 34 years ago, in 1983. I was given epidural injections. When I reached the point where I was unable to sit down, I had my first back surgery, a laminectomy on L4/L5, L5/S1. After the surgery, I used a walker for many years. In 2009, I had a second back surgery, a fusion at L4/L5, L5/S1. My third and fourth back surgeries In 2013 and 2016 involved removal of previous hardware, and fusion of L1-S1. Besides walkers, canes, and mobility scooters, I also had a service dog with a harness that I used for balance and support. Over the years I have worn a number of braces including two substantial back braces and braces for both legs. My back issues had resulted in burning in both calves and feet, and bursitis in both hips with pain extending down my right leg.  I have had numerous tries of Physical Therapy, the most successful being Aquatic Physical Therapy in a warm water pool. Since my last surgery I have seen three Physiatrists and two Internists, one with an Anesthesiology specialty, in my search to heal my back, resolve severe pain, increase my functionality, and be able to stop wearing the brace I had worn for over ten months following the last surgery.

With my history, I wasn’t sure that the Gokhale Method® was going to be able to help. I attended the Free Workshop, and then had a consultation with Esther Gokhale. I found her extremely knowledgeable, and able to immediately offer help for my situation. She taught me how to engage and develop my Inner Corset. I then started the Foundations Course individually with Monisha White. After the first session with Monisha I was able to discontinue use of my back brace and haven’t needed it since. With Monisha’s help I was able to continually improve my posture, with Stretchsitting (I love shoulder rolls), Stacksitting, Tallstanding, Stretchlying (side and back), Glidewalking, Hip-Hinging, and wonderful Kidney-bean shaped feet. Because my back was very stiff and painful, lying down and going to bed had been extremely difficult activities. Once I learned Stretchlying, lying in bed was very comfortable, and I looked forward to getting into bed.

Having spent years as a teacher and in helping professions, it is always wonderful to find others who are passionate about their subject matter and able to teach in a way that enables others to absorb the information and apply it in their lives. This has been my experience with the Gokhale Method®. Demonstration, visuals, positioning my body, review, practice, and homework involving reading and exercises continually reinforced the information.

I own the Gokhale Pain Free™ Chair and two Stretchsit® Cushions (one permanently in my car, and the other for use on chairs at home or other places), and these help me sit comfortably. 

With the conclusion of the six session Foundations Course, I am engaging in continuation of the learning. It is important to me to build on current knowledge, to continually practice, stay engaged with others on this journey and learn new information. I am a senior with years of having a compromised back. I was amazed that in a short time with the Gokhale Method I was able to make significant changes to enhance the quality of my life. I am hopeful that others will learn this information and avoid the many years of suffering that characterized my life. I am very appreciative of Esther Gokhale’s work, and grateful for the many methods she has developed to help others.

Stretchsitting®

Stretchsitting Before/After
The difference in neck curvature between the two is particularly marked

Stacksitting®

Stacksitting Before/After
Note the strong improvement in shoulder and head placement

Hiphinging

Hiphinging Before/After
Abigayil will now build up the flexibility and strength she needs to deepen her bend, instead of compromising her spine above her fusions to reach the ground

Tallstanding®

TallStanding Before/After
Notice how much stronger and more confident Abigayil appears while standing, after!

Subscribe to neck curvature