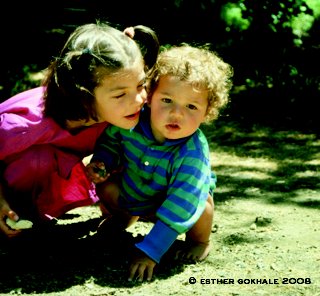
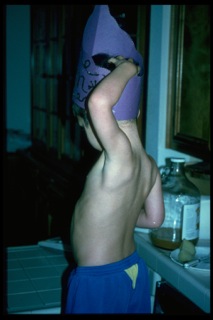
shoulder roll

Clare’s Gokhale Method® Success Story

Clare’s Gokhale Method® Success Story

Excerpts from an interview with Clare Rosenfield
Date

In January and February this year I took the Gokhale Method Elements course, which consists of 18 brief (13 minute) but potent lessons. I would like to share my experience of the Gokhale Method with you in this blog post.

My goals were to find out how to sit, stand, and walk well, so that I don’t overstress the scoliotic parts of my back. I was also in search of more comfortable and beneficial sleeping positions. I felt I needed guidance to help me develop a better sense of my body posture and alignment. To be able to do a one-on-one course online made this possible for me. 

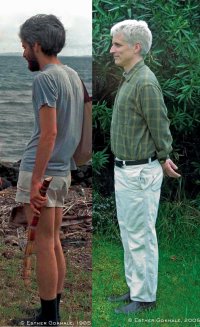
It was only when I saw the difference between my “Before” and “After” pictures that I realized just how much change it was possible to make to my posture in such a relatively short period. 

Clare Rosenfield standing side on for Before and After photos.
Learning to stand well has been transformational for me. You can see that I used to park my hips forward and sway back, pressuring on my lower spine and sending my neck forward—little wonder I was in so much pain. Though still a work in progress, I know how to align my weight better throughout my whole body.

I have always enjoyed exercise, movement, and body work, including hiking, Qigong, and yoga. I now have a healthy standing point from which to do all these activities.

When walking, for the first few steps I might omit to squeeze my glutes and check through the other things I know to do…but it is becoming more habitual so my muscle memory soon kicks in. Or I recall my favorite prompt of Esther’s, “if your glutes snooze, you lose.” 

The J-spine concept was entirely new to me. I had tucked my pelvis under (as you saw in the above “Before” photo) all my life as far as I can recall. Consequently, I believe, the place that hurts for me is around L5-S1 at the very bottom of my spine, so I have to be accurate to squeeze my glutes from a relaxed pelvic position and not to sway and compress my lower back trying to make it happen with the wrong muscles. A single follow-up lesson on this was really useful to help me relax my pelvis back even more.

Diagrams showing the lower lumbar vertebrae and sacrum, (a.) anteverted at L5-S1, (b.) retroverted (tucked) at L5-S1.
A healthy L5-S1 angle (J-spine) permits the wedge-space disc there the space that it needs (a.). Learning the Gokhale Method finally enabled me to stop tucking my pelvis and sacrum, and damaging my L5-S1 disc (b.).

Due to my scoliosis I have to be extra careful about how I do things, and with poor bending form, I would always ache—or have a more acute disaster. Now I understand why. I use the hip-hinging technique as I’ve been taught (plus putting my hands on my hips) and I can bend comfortably—it amazes me! I don’t straighten my legs like some of the pictures we see, as I don’t have the hamstring length, but I can follow the principles involved. 

Clare Rosenfield standing side on and hip-hinging for Before and After photos.
Since learning to hip-hinge I can bend without distorting my back and without pain. There are many principles to learn that contribute to healthy bending, which comes later in the course, but it has been well worth it.

Since 2005 I have been playing the harp, for which being in the right position is important. I pull the harp towards me more now, and when I bend, I bend at the hips, not rounding my back. When sitting with a backrest I have found using the Stretchsit® Cushion makes a good deal of difference to my comfort—I have one in the car, and in fact I’m sitting with one in this interview right now to reduce the pressure on my lower back.

The Gokhale Method Stretchsit® Cushion

The gentle traction you can get in your lumbar area by using a Stretchsit® Cushion reduces compression and asymmetry in your spine.  

Since a hysterectomy in 1995, I have lost bone density and three inches in height. I am working nightly with stretchlying to lengthen my spine and reduce my scoliosis. I am confident that stretchlying at night and using my inner corset to support my spine during the day will prevent any further height loss and increase in my scoliosis, as I have already seen such improvement in my posture. These two measures may well enable me to regain some of the height in my spine that I have lost.

In October I had an eye surgery, a partial cornea transplant, and to make sure that it stayed in place, for three days following the operation I had to keep my head still and remain on my back. I practiced stretchlying carefully leading up to the operation and found I could lie there all night comfortably; stretchlying is the best!

Come morning I have the option of switching to stretchlying on my side, which I also learned in the course. Again, I found a follow-up lesson on stretchlying on the side helpful as it involves a little more technical precision, especially with anteverting the pelvis, to work its magic.

For me the biggest help for my upper body was learning the shoulder roll…and I feel like my neck automatically gets into the right place after I’ve positioned my shoulders well. It also positions me better in sitting and standing, and helps me do more of the things I care deeply about.

One of those things is artwork, and I am now much more aware of my body while I’m doing it. For example, I’m standing straighter, and if I start to slouch—oops—I can feel it. 

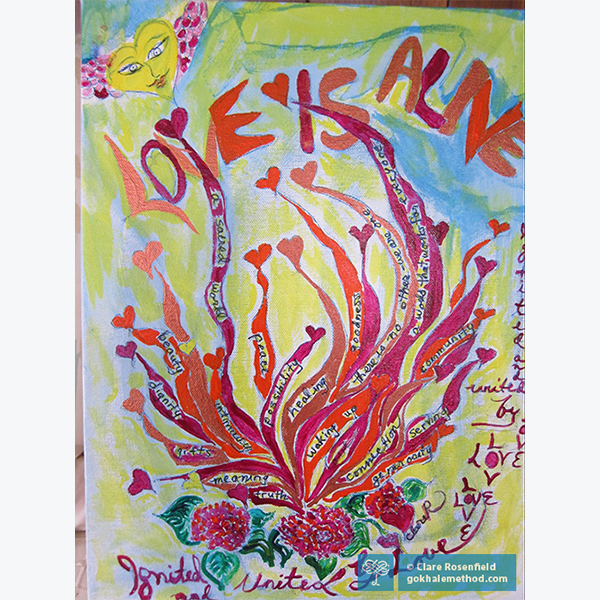
Colorful drawing with words by Clare Rosenfield
I love the poetry of combining imagery and words in my artwork.

I’m also at the computer writing books, including a biography, children’s books, and poetry. As I spend a good deal of time sitting, it’s important to do it well. 

Books variously written, illustrated, and recorded by Clare Rosenfield Books variously written, illustrated, and recorded by Clare Rosenfield
These are four of the numerous books I've published. I have illustrated the three books shown along the top here. Seven Meditations for Children I have recorded as an audiobook—see how the child is sitting with a nice straight back!

My husband had an eminent career in public health which took us all over the world. Rather than take a lucrative post as an Obstetrics and Gynecology trained MD, he chose instead to work for the poor and underserved of the world, becoming Founder-Director of the Center for Population and Family Health, 1975–86. He was then Dean of the Mailman School of Public Health at Columbia University, 1986–2008, and honored while alive with the naming of the Allan Rosenfield Building and after his passing by the Tribute Wall I fundraised for. The first year of our marriage was spent in Nigeria, and we were in Thailand for six years. I must have seen a lot of examples of elegant posture in the rural areas of those countries, but back then I didn’t recognize how important it was.

Photo of the Tribute Wall to Clare Rosenfield’s husband, Allan Rosenfield MD
Here is a photo of the Tribute Wall to my husband—there we are together, bottom left. My husband served in Korea as an Air Force doctor. You can see people headloading in Nigeria (left hand panel, photo top right).

I have six grandchildren, three boys and three girls, aged 12–23. When I’m with them I try to help them with their posture—they spend so much time hunched over. I guess it’s hard for children to envisage they are statistically likely to have back pain down the line, but at least I can sow the seeds for them to think about posture, and set as healthy an example as I can. I’m so glad that the Gokhale Method is there to help all generations—and especially the young—to rediscover their healthy posture heritage.

I’m known to my grandchildren as “the Nana who raps instead of naps!” Here is a rap I would like to share with you:

IT'S TIME WE VOW TO SPEAK RIGHT NOW
 

It's time we vow to speak right now

our vow to share a peace we dare

to live and keep and not let sleep

In mere intentions while old conventions

Toot horns of war. No more, no more,

We shout out loud, no more to shroud

Our depths of heart. It's time to start,

Yes, twenty-four seven, on Earth bring Heaven,

So one, two, three, it's you and me

To take a dive in what's alive,

Our YES to fate before too late

To emanate our LOVE not wait,

to one and all, the world enthrall

So they will see that all we be

One family! Yes all we be

One FAMILY!

Best next action steps for newcomers

If you would like insight on your posture, consider scheduling an Initial Consultation, online, or in person.

You can sign up below to join one of our upcoming FREE Online Workshops. . .

Comparing and Contrasting the Herman Miller Aeron Chair and the Gokhale Pain-Free™ Chair

Comparing and Contrasting the Herman Miller Aeron Chair and the Gokhale Pain-Free™ Chair

Esther Gokhale
Date

I frequently get questions about what makes a good office chair. Of course, some office chairs are primarily fashioned for style and aesthetic appeal. In general, I would say these may be easy on the eye, but, over time, hard on the body!

Lakeland Furniture 1960s retro office chair, front view at angle.
 This office chair sparkles with 1960s retro-chic. However, its markedly concave seat will internally rotate your legs, encouraging malalignment in the hips and knees, and flat feet. Its straight backrest leaves no space for your behind, encouraging you to sit on your tail and tuck your pelvis. lakeland-furniture.co.uk

Ergonomic chairs

People often ask my opinion on how various ergonomic chairs on the market might help them. This makes sense given the rising prevalence of back pain¹. “Ergonomic” means that something is designed primarily for the health, comfort, and protection of users, and among the specific chairs people ask me about, the Herman Miller Aeron Chair tops the list. To answer efficiently, I like to compare and contrast it with the chair I designed, the Gokhale Method Pain-Free™ chair, as this embodies the posture principles confirmed by my research and experience. 

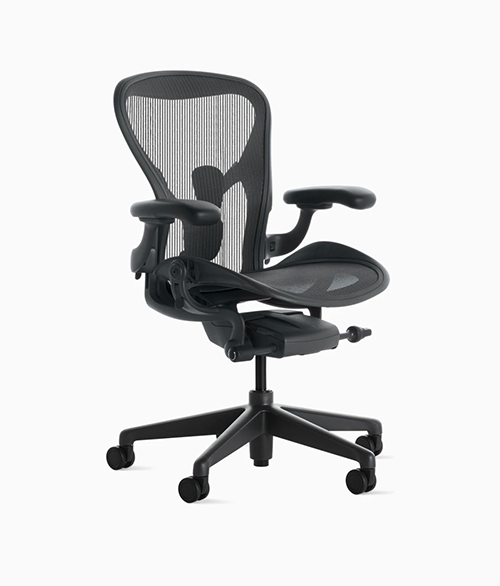
The Herman Miller Aeron Chair, front view at angle.
The Herman Miller Aeron Chair. hermanmiller.com

 The Gokhale Method Pain-Free chair, front view at angle.
The Gokhale Method Pain-Free chair.

Even though they are both designed to be “ergonomic,” they are clearly very different. The Gokhale Method Pain-Free chair reflects the paradigm shift that underlies the Gokhale Method® philosophy. This makes the chair quite different from every other office chair on the market.

How chairs shape your spine

The Aeron chair has been designed following the conventional wisdom of the S-shaped spine, the “S” being formed by alternating lumbar, thoracic, and cervical curves. Over the last 100 years or so, this shape has become the received knowledge learned by physical therapists, medics, and designers, resulting in chairs whose contours support a significant curve in the lumbar area, and accommodate a thoracic curve in the upper back. From a Gokhale Method perspective this excessive curvature is the primary cause of disc bulges and herniations, nerve impingements, muscular spasms, and the degenerative conditions that cause back pain. 

The Herman Miller Aeron Chair, side view without feet.
The Aeron chair is based on the concept of significant lumbar and thoracic curvature being desirable.  hermanmiller.com

The Gokhale Method advocates a J-shaped spine, which is the shape we see in infants and young children, in historical artifacts and photographs, and which still persists in non-industrial societies across the world. The J-spine is especially relevant when sitting upright, where, due to an anteverted pelvis, the behind is behind and the vertebrae of the spine can stack more vertically. We call this stacksitting.

No tensing the back muscles to get upright, no collapsing into a slump—and no alternating between these two problematic positions, which is a common strategy to try and relieve the discomfort they cause. Just comfortable, healthy sitting. You can read more about spine shape here.

Sitting upright at your desk

Both the Herman Miller Aeron Chair and the Gokhale Method Pain-Free chair have a waterfall front (where the seat pan front angles downward), which is ideal for upright sitting. If you know how to arrange your legs and trunk well, this will facilitate pelvic anteversion and all the good things for your spine and general health that come with it. Pelvic anteversion is central to the Gokhale Method and is taught in our in-person Foundations Course, Pop-up courses, or online Elements Course. 

The Herman Miller Aeron Chair, front view at angle, cropped.
The seat pan of the Aeron chair features a waterfall front in a mesh fabric. Some users may find the adjustment lever under the seat is too close for easy operation when the seat is tilted forward for stacksitting.  hermanmiller.com

I designed the seat pan of my chair using a combination of materials that give optimal support for sitting. The sitz bones need to experience a firm foundation for the pelvis and spine above, but they also need to be padded for comfort. In my experience this combination cannot be equalled or improved on by a single material or mesh fabric.

The Gokhale Method Pain-Free chair, side view of seat pan, cropped.
The seat pan of the Gokhale chair combines materials for optimal support and comfort.

Note that the metal backrest support is curved to accommodate the behind behind, another feature that helps in anteversion of the pelvis. 

To further aid stacksitting the Gokhale Method Pain-Free chair seat pan also has four soft, textured, rubbery nubs sewn into its front edge. These provide grip which help keep your pelvic position, and prevent any slipping off the chair. 

The Gokhale Method Pain-Free chair, aerial view of seat pan, angled.
The Gokhale chair seat pan features four nubs which help you to stacksit for upright working at your desk.

Our seat pan is also slightly convex to facilitate external rotation of the legs and feet—that is, it encourages them to gently turn outward. This brings healthy alignment of the hip, knee, and ankle joints, and also the foot arches. A mesh fabric, pulled taut, cannot support external rotation in this way. 

Esther Gokhale sitting on her Pain-Freechair, side view, legs externally rotated.
Stacksitting with healthy external rotation of the legs. 

Armrests

Many office chairs come with armrests. It is healthier for the shoulders, which are very mobile joints, not to be continually fixed in position by armrests, however adjustable. Far better to learn to shoulder roll, which encourages range of motion and optimal arrangement in the joint. Shoulder rolls also help adjacent problem areas such as the trapezius muscle, neck, and upper back, and improve circulation to the area. A well-connected shoulder can support the weight of the arm effortlessly as you do your tasks.

Arm rests also create the significant problem of not being able to come close in to the keyboard, thus encouraging rounding of the shoulders. The absence of arm rests allows an almost cockpit like feeling of being surrounded by the desk and keyboard with no temptation to migrate the shoulders forward.

Backrests—traction trumps lumbar support

The Y-shaped feature at the back of the recent models of the Aeron chair has a support for the base of the spine which can be used to support the sacrum in mild anteversion. It also has a lumbar support which is less aggressively curved than that of earlier models. While these are considerable improvements, the mesh back of the Aeron chair is still not able to provide therapeutic length to the spine through traction, as the Gokhale chair does, or space for posterior shoulder placement. Nor does the backrest easily accommodate our trusty Stretchsit® Cushion

The Herman Miller Aeron Chair, back view at angle, cropped.
A contemporary Aeron chair features support for the base of the spine (sacrum) and lumbar area.  hermanmiller.com

The Gokhale Method Pain-Free chair backrest, front view, cropped.
The Gokhale chair backrest provides therapeutic length to the lumbar spine with soft, built-in nubs for traction.

Beyond supporting a healthy J-shape in your spine, ideally a backrest would also help tease out any tension in the lumbar area. The Stretchsit Cushion success in improving back shape and reducing back tension has inspired the same successful features in our Pain-Free chair. With a little know-how, these soft textured nubs in the backrest can give you hours of therapeutic traction at your desk, reducing pressure on your spinal discs and nerves, and improving circulation in the surrounding tissues. We call this stretchsitting

Are adjustable chairs better?

As consumers we have become increasingly familiar with hi-tech products that we can adjust and customize to meet our individual needs and preferences, and the Aeron chair reflects this throughout its design. 

The Gokhale Method Pain-Free chair requires just one adjustment, and that is the gas lift height adjuster. This is key to the use of the chair, which is designed to be raised for stacksitting so the thighs and pelvis can angle downward, and lowered a little for stretchsitting against the backrest so that the feet can still meet the floor well. The lifting mechanism comes in three different heights, and there is also our Petite Gokhale Method Pain-Free™ Chair, ideal for both smaller people and smaller spaces. 

The Gokhale Method Pain-Free chair backrest, front view, cropped.
The Petite Gokhale Method Pain-Free chair gives a range of working heights, and a foot ring

Foot rings

One additional feature on our Petite Gokhale chair is a foot ring, which gives more options for foot and leg placement, and prevents legs from dangling and pulling the pelvis into a tuck. It also avoids the constriction to circulation which may occur if the thighs hang over a seat edge.

The Gokhale Method Pain-Free chair foot ring, and castors, cropped.
A foot ring helps take care of the lower body—an area often overlooked in conventional office chairs. 

From a Gokhale Method perspective, adjustments for spinal curves or arm rests are simply not required once the basics of healthy posture are understood. Better to address these fundamentals before going all out on the bells and whistles. This means there’s less to go wrong—with your chair, and your body!

Sitting well is a partnership 

Almost every employer who wants to demonstrate care for their executives finds themselves purchasing a Herman Miller chair. Yet within the budget of an Aeron chair they can buy a Gokhale chair and treat their employee to a one day Pop-up Course or six-lesson Group Foundations Course in the Gokhale Method where they will learn postural skills that last a lifetime.

Healthy sitting is a partnership. It takes a good chair on the one hand, and good posture on the other. With the Gokhale Method Pain-Free™ chair and the Gokhale Method you have the perfect combination.

References:

¹Janet K. Freburger et al., “The Rising Prevalence of Chronic Low Back Pain,” Archives of Internal Medicine 169, no. 3 (Feb. 2009), 251–58, doi: 10.1001/archinternmed.2008.543

If you would like to find out more about how the Gokhale Method can help support you, sign up to join one of our upcoming FREE Online Workshops…

The Virtues of a Hard Copy Book in Digital Times

The Virtues of a Hard Copy Book in Digital Times

Esther Gokhale
Date

It has been 14 years since my book 8 Steps to a Pain-Free Back came out in hard copy. For years I had wished I had a book to send to those people who called me from the East Coast or Midwest. These were often relatives or friends of people I had worked with in California, who were suffering terrible back pain and needed help. And so I got writing. 

A book to solve back pain

Although there was clearly a huge need for a book to solve back pain, I was still surprised to find I had written a bestseller. It reached number two on Amazon.com following our American Public Television program in 2011, and number three following the New York Times article (paywall) naming me “The Posture Guru of Silicon Valley” in 2013. It has now been published in 12 languages (Croatian later this year), and sold over 250,000 copies.

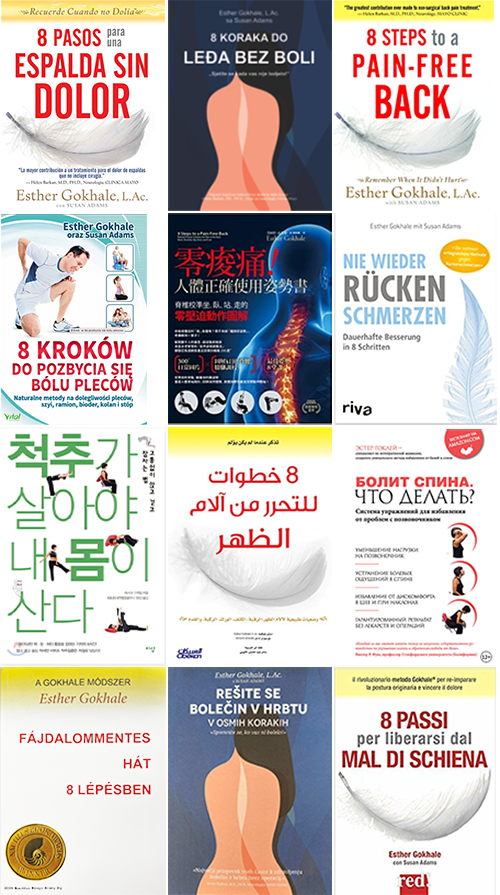
8 Steps to a Pain-Free Back - Spanish 8 Steps to a Pain-Free Back - Croatian 8 Steps to a Pain-Free Back - English

8 Steps to a Pain-Free Back - Polish 8 Steps to a Pain-Free Back - Chinese 8 Steps to a Pain-Free Back - German

8 Steps to a Pain-Free Back - Korean 8 Steps to a Pain-Free Back - Arabic 8 Steps to a Pain-Free Back - Russian

8 Steps to a Pain-Free Back - English 8 Steps to a Pain-Free Back - Slovenian 8 Steps to a Pain-Free Back - Italian
 8 Steps to a Pain-Free Back is available in many languages: Spanish, Croatian, English, Polish, Simplified Chinese, Traditional Chinese, German, Korean, Arabic, Russian, Hungarian, Slovenian, and Italian editions. 

Digital download or hard copy?

In recent times digital books have revolutionized publishing. It is perhaps surprising that figures from the US publishing industry show that, in 2020, hard copy was still outselling downloads by 2 to 1¹. 8 Steps to a Pain-Free Back is available as a digital download, but the paperback version continues to be in high demand. I have come to realize that there are numerous and perhaps unusual virtues for having a paperback edition of this book, some of which I would like to share to inspire you!

Every digital book has the primary advantages of price and portability, but can remain out of sight and out of mind. Encountering a physical book invites you to engage with it, to pick it up and thumb through it. You don’t have to sign into wifi or wait for it to load—you just start reading. 

Visual cues help pattern healthy posture

One factor which works against us developing and maintaining healthy posture in our society is that we don’t have good examples and reminders around us. In fact, we are continually exposed to a norm of bad posture, while our culture’s idea of good posture, the S-shaped spine, is deeply problematic. What we want is to be surrounded by healthy visual examples on which to model ourselves.

8 Steps to a Pain-Free Back has over 1,100 images, mostly photographs, showing healthy posture from all over the world, from history, and in infants. Students find these images a motivating and practical reminder on their posture journey. Many a person has fallen in love with the African carpenter on the frontispiece, who insisted I take his picture, or marveled at the babies stacksitting with ease. 

African carpenter standing tall by bench 
This African carpenter stands tall and relaxed by his bench. This is also excellent form for preparing food in the kitchen, or any work at a counter8 Steps to a Pain-Free Back, pg 3.

Esther Gokhale’s youngest baby stacksitting by tub
My youngest child stacksitting next to her “sitting tub.” 8 Steps to a Pain-Free Back, pg 69.

You can of course collect your own posture pinups, and I encourage you to do so. But selecting your favorites from 8 Steps to a Pain-Free Back is convenient, plus you will know the posture shown passes muster. The quality of the prints means that they look completely at home popped into a frame, or even laminated and placed around the garden or garage or in your shower stall (true story about the tallstanding image leading Lesson 6). The key thing is to place them exactly where you need the reminders. For example:

Esther Gokhale standing modeling inner corset pg 127
Here I am reaching up to engage my inner corset. Use this reminder near a high shelf or cupboard that you regularly reach up to. 8 Steps to a Pain-Free Back, pg 127.

African woman hip-hinging harvesting water chestnuts 
This African woman is hip-hinging as she harvests water chestnuts—a perfect picture reminder for your vegetable garden.  8 Steps to a Pain-Free Back, pg 151.

Esther Gokhale modeling stretchsitting 
Here I am stretchsitting. Place this reminder by your easy chair or sofa, where you may otherwise tuck and slouch. 8 Steps to a Pain-Free Back, pg 47.

If you are of a technical bent you may be drawn to the many diagrams. Students find the mechanism of a shoulder roll drawing helpful in executing this technique. The shoulder roll helps your shoulder joint to return home to a healthy posterior position. 

Gokhale Method® mechanism of a shoulder roll diagram 
The mechanism of a shoulder roll diagram is especially useful at any desk or computer. 8 Steps to a Pain-Free Back, pg 42.

Lastly, the recaps at the end of each chapter make a handy cheat sheet while you are revising a new technique. For example, the recap of stretchlying on the side may be beneficial pinned onto your bedside table. 

Starting a conversation about healthy posture

Your book can take pride of place on the coffee table, where, unlike a download, it will always be there to catch the eye. This is a nice organic way of keeping posture on your radar and introducing it as a talking point with family and visitors. We certainly know of parents who leave 8 Steps to a Pain-Free Back strategically placed for their children to discover!

8 Steps to a Pain-Free Back on a coffee table 
The coffee table is a great place for browsing a book. 

Introducing your wider circle to healthy posture 

If you are part of a wellness group, then 8 Steps to a Pain-Free Back is a natural fit for study. If you are a book club member, then this may be the book you are looking for to invite discussion beyond back pain extending into anthropology, history, health, and lifestyle. 

Given that 80% of people in the US will experience back pain², not to mention the many other musculoskeletal problems addressed in its pages, this book has broad relevance. Many of our students are grateful to have discovered 8 Steps while visiting their physician or other healthcare professional. 

To help you spread the word among your family and social networks we have created “clan packs." The launch price has an additional discount: 4 books for $79 (instead of $99), or 8 books for $119 (instead of $159), and is valid until March 13, 2022.

Sometimes when I speak at conferences or wellness events (e.g., Google, Mimosa Systems, TiE Silicon Valley, Global Fund for Women), the company offers their employees/members/donors a gift copy of my book. To encourage this, we offer special bulk discounts. For information please contact [email protected]. For speaking engagements please contact [email protected]. 

References:

¹Felix Richter, “Infographic: E-Books Still No Match for Printed Books,” Statista Infographics, August 9, 2021, https://www.statista.com/chart/24709/e-book-and-printed-book-penetration/. 

²Janet K. Freburger et al., “The Rising Prevalence of Chronic Low Back Pain,” Arch Intern Med 169, no. 3 (2009): 251-258, doi:10.1001/archinternmed.2008.543

Free Online Workshops

If you would like to find out more about how the Gokhale Method can help support you, sign up to join one of our upcoming FREE Online Workshops.

    My Favorite Exercises for When You Can't Visit the Gym, Part 1: Chair Pose

    My Favorite Exercises for When You Can't Visit the Gym, Part 1: Chair Pose

    Esther Gokhale
    Date

    This is the first post in our series on home exercise during shelter-in. For Part 2 on Toning the Gluteus Medius, click here!


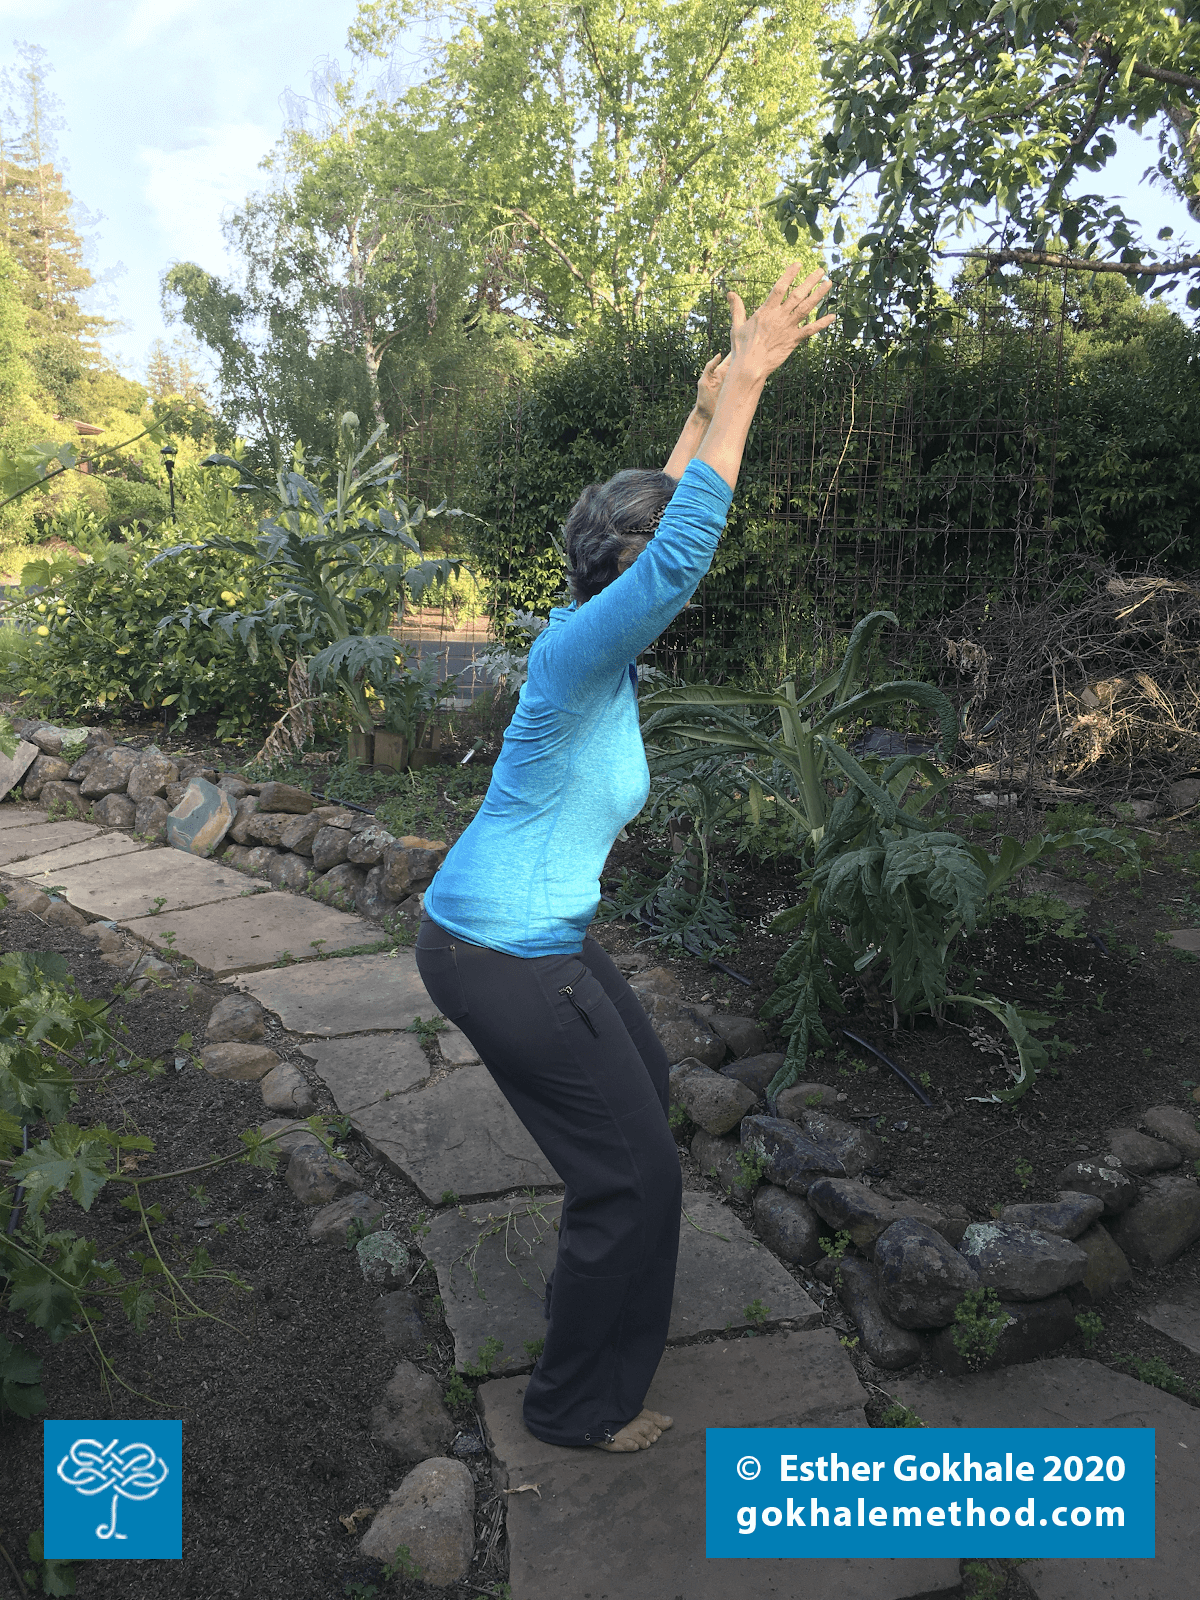
    Making the most of shelter-in by practicing chair pose Gokhale-style in my backyard garden.

    Whether you are on the road, in a campground, or just stuck at home during quarantine, you can always exercise. In the daily lead-up to our ongoing Posture 1-2-3 Challenge for alumni subscribers, I often turn to dance as a way to process whatever baggage might have set foot in my psyche that particular morning, and also to get the group moving and warmed up for the main program. I’ve been dancing since I was a young child, so I have a very strong bias for dance as a way of exercising, but I also like to change it up with other types of exercise. It turns out that we have a lot of options, even when we can’t access the gym.

    First up is Chair Pose, from yoga. Chair Pose (Utkatasana in Sanskrit) is a great example of an at-home, equipment-free exercise which can strengthen a variety of muscles in very little time. You don’t have to spend forever and a day in Chair Pose to reap its benefits. This makes it a perfect fit for our busy lives.


    In the image above, Cecily's behind is well behind, and her J-spine visible — both good details from a Gokhale Method perspective. The overlaid graphic conveys her Gokhale SpineTracker™ readings. Note on foot placement: in the Gokhale Method, we teach placing the feet about hip width apart and facing slightly outwards as a way of optimally supporting primal leg architecture.

    Chair pose with a Gokhale Method filter:

    1. Prepare your lower body. Start with kidney bean-shaped feet, and do a little squat, to let gravity assist in settling your pelvis between your legs. Then come back up, but not to a parked position (that is, avoid locking your hips forward and knees backward). A parked position allows the muscles to “check out” (that’s why we find ourselves drifting to this position repeatedly!), but is damaging to the joints. Rather than parking in your joints, get your body into a “ready position:” that is, a position with a little spring in it that is easy on the joints and also enables you to move on a dime.
    2. Prepare your upper body. Use the rib anchor technique, with your shoulders rolled and the back of the neck tall. Now we’re ready to begin with Chair Pose.
    3. Bending the knees slowly, go down-down-down, keeping the knees from crossing over the toes. Yes, this detail makes it harder, and you may have to grip on the floor with your feet.  This is good for your feet! The main reason for this is to minimize stress to the knees and maximize challenge to various leg muscles.
    4. Add in the inner corset. If you are able, raise your arms ahead of you or, even better, up above your head. In this case, be super-attentive to ramping up your rib anchor to not allow your back to sway. Now, you just stay there. It’s challenging, and that’s the point. Visit your boundaries, but stay on the healthy side of them.

    Let’s review: Chair Pose actively recruits your inner corset. The action of raising the arms above the head can be used to recruit the inner corset especially strongly. If you were to look at your belly (in a mirror) while in Chair Pose, you may come out looking a bit like a greyhound with a slenderized, sleeker abdomen below your full ribcage. To finish, return to a ready position with a little spring in it (again, not parked).


    This practitioner demonstrates the “greyhound look” of an activated inner corset. Note on foot placement: In the Gokhale Method, we teach placing the feet about hip width apart and facing slightly outwards as a way of optimally supporting primal leg architecture. Image courtesy Elly Fairytale on Pexels.

    I’ll be describing other favorite exercises in future blog posts — in the meantime, try “sitting” it out in Chair Pose during work breaks and as part of your exercise regimen. Consider setting your timer to go off every 20 minutes to remind you to do Chair Pose (or some other future pose) for about a minute. In this way you will make rapid progress in tone, form, and your experience of life! I look forward to teaching you Gokhale Yoga 101 and Strengthening Exercises - The Gokhale Way. Let’s make the most of our ongoing situation!

    Get Winter-Ready with Improved Circulation

    Get Winter-Ready with Improved Circulation

    Esther Gokhale
    Date

    As winter approaches and the weather cools, we all have one thing on our minds: staying warm! One major benefit of learning the Gokhale Method (and good posture in general) is improved circulation. We’ve often heard from students about their warmer hands and feet, and we’ve even heard from people who have significantly reduced their heating bill now that their extremities aren’t always freezing! When you align your body well, your blood flows unimpeded throughout the body, passing nutrients to cells and maintaining homeostatic processes, like regulating temperature, glucose, and sodium levels. Imbalances in this process can lead to illness and prevent healing.

    Here are three simple ways to immediately improve your circulation:

    1. The shoulder roll

    Situate your shoulders in a relaxed and open position to ensure healthy circulation to and from your arms. This will repair damaged tissues and prevent future ailments, such as carpal tunnel and repetitive stress syndrome.

    Activities like typing, writing, texting, and playing an instrument increase your hands’ demand for blood, so it is important to restore normal architecture around the axillary artery that runs under your pectoral region, the major thoroughfare for circulation to and from your arms.

    To roll your shoulders back:

    1. Hunch one shoulder forward, causing it to round slightly.

    2. Lift the shoulder up toward your ear.

    3. Roll the shoulder far back, and bring the elbow behind your hips or your body’s midpoint, toward the spine, rather than letting it hang forward of the hips.

    4. Gently slide the shoulder blade down along your spine.

    5. Repeat with the other side.

    Watch this Gokhale Moments video for a quick demonstration of the shoulder roll technique.


    2. Stand with unlocked legs

    When you stand, make sure the groin areas (the two creases at the junction of the torso with the legs) are soft and not locked. The softness there should feel similar to the crease of an unlocked elbow. This position allows ample room for the femoral artery and vein, makes standing more comfortable, and allows you to exercise longer without pain or injury. Healthy blood flow to your legs and feet heals little injuries fast and can prevent cold feet, varicose veins, blood clots, and Raynaud’s syndrome.

    To soften the groin area:

    1. While standing, sink your body downward, bending equally at the knees and hip joints, but keeping your back straight (think of preparing to receive a serve in tennis, or of bending to sit on the toilet). Your pelvis should “nest” between your legs.    

    2. Leaving your weight primarily on your heels, slowly straighten just short of locking the groin (and the knees).

    3. Check the groin crease for softness by placing your fingers where the top of the legs hinge at the hip. You should feel some “give” in the soft tissue before feeling bone.


    3. Stacksit

    Stacking your spine on an anteverted pelvis while sitting provides you with a healthy way to relax at your desk, on public transit, or at the dining table. Your spine stacks naturally because of the architecture of the bones, but even a small hunch or pelvic tuck can unbalance a stacked spine.


    Anterverted pelvis versus tucked pelvis

    Because of this, many of us sit with tensed muscles, expending a lot more energy to sit less comfortably. When you stacksit, your back muscles relax, facilitating a healthy breathing pattern that moves the back with every breath. This movement provides a constant massage around your spine, optimizing circulation around the spine and keeping your tissues healthy.

    To stacksit:

    1. Form a wedge by folding a blanket or towel, or even a sweatshirt, so that one end of the folded material is thicker than the other end.

    2. Place the wedge on a chair, with the higher side to the back of the chair. Alternatively, you can sit on the edge of the chair.

    3. Sit on the wedge or edge of the chair. Your pelvis should tip forward—you may need to extend your legs farther outward or tuck your feet under the chair to allow your thighs to angle toward the ground as well.

    4. Feel the way your spine stacks naturally and notice the easy expansion of your lungs with each breath. (If your pelvis still wants to roll into a tucked position when you try to relax, increase the anteverted tilt of your pelvis by making the wedge beneath you steeper.)

    Once you are stacked, check that you do not have a sway (or arch) in your lower back. You can check this by feeling your spinal groove with your fingertips. A shallow groove that remains even all the way up your back is good; a deep groove in your lower back means you are swaying. To fix, place your fingers gently on the bottom edges of your rib cage, several inches above your belly button. If you can feel the edge of your rib cage through the flesh of your torso, use your hands to tuck your rib cage down and in, which will straighten out the spine. You can also remove a curve from your back by lengthening the torso as if you want to touch the crown of your head to the ceiling (a weight on the head is an excellent way to practice this).

    Now feel your spine again to check that you have a shallow, even groove; above your sacrum, it should feel straight, rather than gently curving. You can practice this position with the aid of a mirror, or a partner who can give you feedback on your position, until you have a good sense for what a straight spine and a swayed spine feel like.

    Check out this video on stacksitting to see the technique in action.


    If you have a story about improving your circulation or temperature after correcting your posture, please share in the comments below!

    Posture Tips to "Stand" a Holiday Party

    Posture Tips to "Stand" a Holiday Party

    Esther Gokhale
    Date

    The holiday season has arrived, and with it, the formidable holiday party. If, like most people, your back starts aching after an hour (or less!) at the hors d'ouevres table, consider this advice for your next yuletide function:

    1. Put your weight over your heels. When we balance the weight of our bodies towards our toes, it can disturb the alignment of our weight-bearing joints. The dense and sturdy heel bone is much better equipped to bear weight than the delicate bones of the forefoot.


    On the left, Brian has parked his pelvis
    forward, which places excessive
    pressure on the delicate structures in
    the front of his feet--over time, this
    may result in bunions or other foot
    conditions. On the right, his pelvis is
    properly positioned posteriorly and his
    spine stacks well over his heels.

    2. Soften your knees. It is a common habit to lock the knees and groin while standing. This can wreak havoc on the knee and hip joints and may inhibit circulation to your lower legs and feet. Conversely, if the knees are too bent, the quadriceps are obliged to work overtime, leading to fatigue and unnecessary tension.


    This model's knees
    and groin are soft,
    which helps her to
    stand for long periods
    without fatigue, pain
    or damage.Standing with
    locked knees or a pelvis
    that is "parked"
    forward impinges the
    femoral arteries, veins
    and nerves, and can
    predispose people to knee,
    hip and leg pathologies.

    3. Roll your shoulders back. Hunched shoulders are a common problem in modern society. Not only does this wreak havoc on your neck and upper back, it also emits an anti-social vibe. We suggest rolling back one shoulder at a time: a little forward, a little up, a lot back--and totally relax.


    When standing, let your arms hang
    towards the back of your torso
    and your thumbs face forward.

    Here's to a holiday season of connecting with your friends and family!

    Cheers,
    Esther


    --

    Join us in an upcoming Free Workshop (online or in person).  

    Find a Foundations Course in your area to get the full training on the Gokhale Method!  

    We also offer in person or online Initial Consultations with any of our qualified Gokhale Method teachers.

    Holiday Health (Posture Tips)

    Holiday Health (Posture Tips)

    Esther Gokhale
    Date


    One shoulder at a time — a little forward,
    a little up, a lot back, and totally relax.

    The holidays are upon us and ‘tis the season for cooking, cleaning and entertaining. You may find yourself especially reliant upon your body as you enjoy the added festivities. We want to help keep you safe and healthy with some seasonal posture tips!

    Shoulder positioning

    Whether you are baking dozens of cookies or wrapping bundles of presents, your shoulders may feel uncomfortable if neglected. Firstly, assess your surroundings. Whatever your task, ensure that it is within comfortable reach. For example, if you are cooking, get close enough to your countertop so you can easily manage all of your ingredients. Or, if you are working while seated, find a suitable height for your chair and/or table. From here, do a shoulder roll. One shoulder at a time — a little forward, a little up, a lot back, and totally relax. Ideally you can still reach what you need without pulling the shoulders out of this position. This will alleviate tension or pulling between your shoulder blades, which over time would tax your rhomboid muscles. And, with the shoulders back and down, you will encourage healthy circulation to your arms and hands to keep up your stamina.


    Notice how the baby's knees are bent in a wide stance to
    allow his pelvis to settle comfortably between his legs.

    Hip-Hinging

    Decorating, cooking and preparing for house guests all require a lot of bending. Bending well by hip-hinging is a must to keep your back healthy. Always allow the legs to rotate open to make room for the pelvis. You want to make room for the pelvis to rotate, drop and nest between the legs.

    For shallow bends, you will likely not need to bend your knees very much if at all while standing. If you are seated, the legs usually don’t have to be very far apart. As you bend forward, nothing else along your spine and torso moves. Your shoulders want to stay back, your neck remains elongated, and your ribs stay in place.

    For deeper bends, the knees will probably need to bend more generously depending on your hamstring flexibility. If you are gathering things from the floor, you may want to take a wider stance as well, especially if those hamstrings are pulling your pelvis into a tucked position rather than the optimal tipped or anteverted position. Deep seated bends will likely feel better when the legs are opened as well.


    This man uses his inner corset to lift a box.
    Notice that his arms are still close to his
    torso and his body is squared toward
    the object.

    Lifting with your Inner Corset

    Heavy or bulky items require a great reliance upon your Inner Corset. While maintaining your hip-hinging form, add your Inner Corset AND bend your knees more generously when lifting heavy items. Often resting an elbow or two on your thigh can provide more leverage as well. And, always stay close to whatever you are handling—things feel heavier the further they are from your center.

    Hopefully you can square your body toward any object you are handling. Sometimes, however (especially in decorating or cleaning those hard to reach spots) you may find your self in a slightly twisted, distorted, otherwise compromised position. During these times, it is especially vital to use your Inner Corset for extra protection. Creating more length allows room for the spine to handle bits of distortion. And, gathering your muscles up and in will stabilize your spine and prevent unnecessary compression.

    Join us in an upcoming Free Workshop (online or in person).  

    Find a Foundations Course in your area to get the full training on the Gokhale Method!  

    We also offer in person or online Initial Consultations with any of our qualified Gokhale Method teachers.

    Wishing everyone a warm holiday season!
    Esther

    Settle Into Fall

    Settle Into Fall

    Esther Gokhale
    Date

    As the season turns and the colors around us are changing, leaves begin to float off their branches.  Just as our environment is settling in, we too can ground our bodies, using gravity as our guide.  The ability to relax downwards is an essential part of feeling comfortable within your body.  Here are some ways you can fall into your natural posture:


    Nesting the Pelvis


    Help your pelvis navigate its way home. While standing, take a little zigzag squat. Imagine you are about to sit down on a chair located behind you (not just directly under you) and let the pelvis fall forward. Feel your pelvis dropping between the legs, as though it is “nesting.” As your stand up out of your squat, see if you can retain that relaxed sensation in the front of the pelvis. This is an excellent way to let gravity help you antevert, or “tip” your pelvis forward.


    The problems associated with a tucked pelvis, explained in an excerpt from our DVD


    Esther's son, Nathan White, showing a
    relaxed pelvis, rib cage and shoulder
    position in spite of a challenging reach.


    Releasing the rib cage


    Ideally, the front of the ribs want to be flush with the contour of your torso. However, the ribcage may feel “seized” by a tight set of low back muscles which pull your back into a swayed position. The low back muscles need to release so the ribcage can drop forward, which can be challenging for some. We often need a little help from our rib anchor muscles (the internal obliques) which harness the ribcage into place. As your rib anchor strengthens, your low back is given a reprieve. Try placing two fists at the base of your ribs, below your chest, and gently push in and down. As much as you can, consciously try and relax the low back. Then, as your remove your fists, see if you can maintain the settled ribcage position.


    Young man from Burkina Faso
    showing healthy, settled shoulder posture.
     

    Settle the shoulders


    Continue to roll your shoulders. Remember, a little forward, a little up, a lot back, and relax. When you create a homebound pathway for the shoulders, there is a nice little niche for them to settle down and back. So, don’t forget to relax after your roll-you might be surprised that your shoulders will often drop down even further.


    Young girl in Otavalo,Ecuador,
    showing relaxed, settled lower
    jaw position.

    Slacken the jaw


    If you strain the neck, the lower jaw can become tense and tight. As the back of neck lengthens and the jawline angles down, gravity will coax the lower jaw forward relative to the upper jaw. This is helpful for those of us who have an "overjet" (sometimes erroneously called an overbite in colloquial English). Use your hands to adjust your head. To enhance this effect, grasp a clump of hair at the base of the neck, gently pull back and then upward, and allow the lower jaw to soften and slide slightly downward.


    Wishing you the best in this season of change,


    Esther


    --


    Join us in an upcoming Free Workshop (online or in person).  

    Find a Foundations Course in your area to get the full training on the Gokhale Method!  

    We also offer in person or online Initial Consultations with any of our qualified Gokhale Method teachers.


    Pitching Posture and Evolution

    Pitching Posture and Evolution

    Esther Gokhale
    Date

     Why chimps don't pitch in Major, Minor, or Little Leagues


    Major League pitchers routinely throw baseballs 100 miles per hour

    Baseball season is well underway and the 2014 All Star Game will soon be upon us. As always, power and precision pitching will be key, which is one reason why not a single chimpanzee will find himself in either of the All Star Team rotations. Given that adult chimps are overall stronger than even the most powerful baseball players, how can it be that a chimp’s “fast” ball clocks in at only about 20 miles per hour, whereas today’s Major League pitchers routinely throw balls at 90-100 mph.

    Why chimp strength doesn’t translate into throwing a fastball–and why relatively weak human beings are so much better at powerfully and accurately throwing–is a line of questioning anthropologist Neil T. Roach and a team of researchers set out to explore. Their findings–reported in “Elastic energy storage in the shoulder and the evolution of high-speed throwing in Homo,” a study published last year in Nature, is what inspires this post. For a wonderfully engaging overview, take a look at this 2-minute video.


    The ability to throw was necessary for our survival

    Baseball pitching is akin to how our hominid ancestors threw weapons and, as noted in the video, because Homo erectus  was relatively weak and defenseless, the ability to throw with speed and accuracy was really key. Think about it: Without the clawed paws and fangs of saber-toothed cats and other fierce predators who shared our ancestors’ Pleistocene world, the ability to hurl objects with force and precision was necessary to their very survival.

    Hurling weapons and running fast

    John Shea, a paleoanthropologist at Stony Brook University who was not involved in the “elastic energy” study, but who conducts tool-use experiments in an attempt to reconstruct human behavior through the analysis of stone tools, believes that spears date back 400,000 years.

    Shea also points out that Homo erectus was a good runner. “You put these things together and you have the primate equivalent of a fighter jet — something that can run for a long time, and has projectile weapons on board.” He also observes that while archaeologists have frequently found “hand-grenade-sized stones” along with skeletons from that era, new findings suggest that those stones may have been used by ancient humans as weapons to hunt and chase away other predators from their kill.

    Adaptations that enable humans to pitch Major League ball

    As you saw in the “Why chimps don’t play baseball” Nature video, above, Neil Roach and his team applied reflective markers to the shoulders, elbows, wrists, and waists of 20 college athletes, then used 3-D cameras to film the young men throwing baseballs at a target. Subsequent analysis of the footage showed that the sling-shot action of the shoulder, where criss-crossed ligaments and tendons store elastic energy as the athletes cock their throwing arms and prepare to pitch, is really crucial. Also really key is the subsequent release of this energy in the arm’s follow-through forward motion.

    The researchers also highlighted anatomical adaptations that enable human beings to throw more powerfully than their chimp cousins:

    • Lateral organization of the scapula, or shoulder blades
    • Relatively long, mobile waists that permit greater rotation in the torso
    • Humeral torsion, a twist in the humerus, the bone of the upper arm

    Of these adaptations, the organization of the shoulder blades is the most sensitive to posture shifts and Gokhale Method techniques. The front- and back-view composite illustrations below illustrate the differences between chimpanzee and human shoulders.

    Poor posture undermines evolutionary advantages and predisposes us to injury

    Many common postural distortions in modern societies take us backward in time and undermine some of the anatomical and physiological advantages we have accrued over millennia. It’s also true that some of these advantages, if not supported by healthy usage, can expose us to injury. We can’t take these advantages for granted; human beings require cultural tending–healthy modeling and molding behaviors that are so fundamental to healthy posture. (Molding involves tactile input–holding a child well, choosing a good office chair; modeling is visual.)

    Bottom line: When we compromise our posture, we lose some of our evolutionary edge.

    The shoulder roll

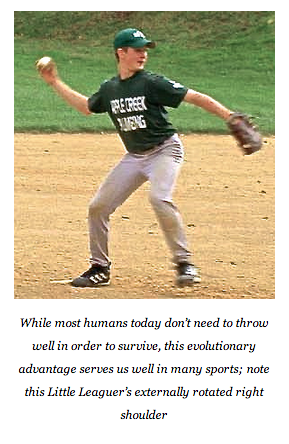
    To zero in on just one example of “posture degradation” as it relates to the Gokhale Method, too many people today internally rotate their shoulders. This modern deterioration of posture results in the forward hunching that gives rise to the additional handicaps of contracted pectoral muscles and stiffness in the muscles between the ribs. Internal rotation also reduces healthy circulation through our arms, our capacity to breathe, and our capacity to throw!


    As modeled in the video, the shoulder roll helps position shoulders back and down. This helps position the scapula flat against the back.


    Image and Video Credits:


    Screen grab of Google image search for ‘MLB pitchers’; Homo erectus couple, Wikipedia;  Baby chimp in six consecutive stages of general excitement, Wikimedia Commons; Little League pitcher, Winesburg, Ohio, Wikimedia Commons, Kwat Kwat hunting emu from Tommy McCrae’s ‘Sketchbook of Aboriginal Activities,’ Wikimedia Commons; Inuit hunter, Wikipedia; Girl throwing stone, Wikimedia commons; Cy Young pitching, Wikipedia; screen grabs of human versus chimp shoulders and scapula, Neil Roach study; Gokhale Moment Shoulder Roll video, Gokhale Method Institute; Human scapula, Wikipedia


    Subscribe to shoulder roll