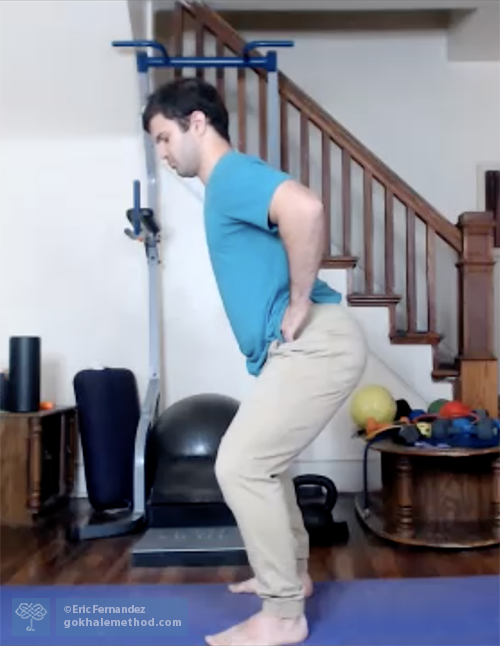
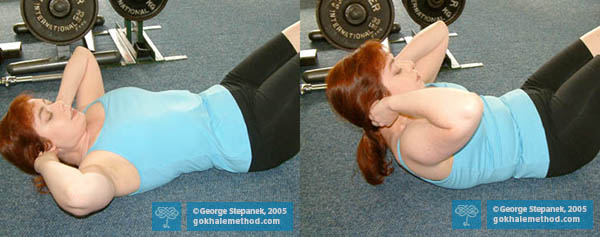
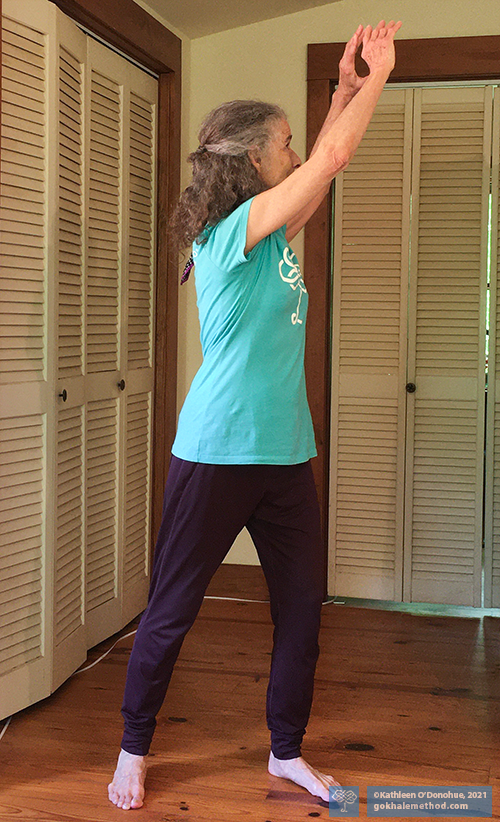
rib anchor

Laura’s Success Story

Laura’s Success Story

Laura Goldman Weinberg
Date

In keeping with Laura’s wishes her student photographs are not featured in this blog post. We are always happy to respect our contributors' wishes for privacy. We are very grateful for Laura’s generosity in sharing her personal posture journey, and are sure that you, our readers, will appreciate it too.
—Esther Gokhale

I’ve had significant back issues for a long time. I’ve had X-rays over the years, and they show some degenerative spinal discs, scoliosis, osteoarthritis, osteoporosis, stenosis—quite a list!

I went down both the alternative and conventional routes…I saw chiropractors, acupuncturists, and other practitioners, and I’ve had quite a lot of physical therapy over the years. I’ve done their exercises, got lumbar support cushions thinking they were good for me (they are not), cervical pillows to sleep on, a back stretcher that was supposed to decompress the spine, and, over time as things got worse, I started to wear a back brace. 

Just going around the block for a 15–20 minute walk I would have to take breaks and just pray that I could make it home. I thought, well, I’m in my 70s—I’m just going to have to live with this.

I am, painting by Laura Goldman Weinberg
I Am, painting by Laura Goldman Weinberg 
This is among the many colorful images I created for one of my books, I AM ONE: Attributes of the I AM.

Finding the Gokhale Method—it’s what friends do for each other!

Five months ago I had a friend come to visit who gave me some things to put in the fridge. I said, “I can’t bend to go down to the lower shelf.” She asked me what was going on, and I told her, to which she said, “Have you heard of the Gokhale Method®?” She told me all about it and how she and a friend had been so helped by it, and they had told another friend who initially didn’t do it—but who told a friend who then got helped, and so that friend ended up doing it too! That had me intrigued. The approach sounded very different from anything I was familiar with… 

I then spoke to another person who I discovered had also done the Gokhale Method! I decided I needed to be a bit more open-minded and started reading and watching the many free videos available online at the website. At first, I learned to do the rib anchor, and the different ways that Esther teaches to sit well. The first time I did that in my dining room chair as I sat to eat, I felt a tremendous difference. I realized immediately I should look into this more seriously. I got Esther’s book 8 Steps to a Pain-Free Back, her DVDs Secrets to Pain-Free Sitting and Back Pain: The Primal Posture Solution, and started implementing as much as I could in my life. Things started to improve.

Light, painting by Laura Goldman Weinberg

Personal guidance on my Gokhale Method journey

I realized I had my own individual issues, and would benefit from a personal consultation with Esther. She pointed out immediately that it was important that I address things in a certain order, otherwise I could possibly hurt myself implementing things (like anteverting my pelvis) before my body was well-prepared. 

When I showed her my back, she pinpointed the vertebrae—to the exact spot—where she saw a significant issue—she was right on. Nobody else had done that. I then took a wonderful one-on-one online Gokhale® Elements course with teacher Kathleen O’Donohue. The Gokhale Elements course is extremely interactive and perfect for online learning. 

Even though sitting had been almost an immediate fix for me, tackling my worst problem—bending—made it very clear to me that you do best by putting in the work in the proper order. I’d had grabber sticks in every room in the house since I could not pick anything up from the floor. Laundry day was a nightmare! Once I got to the latter part of the course and had all the prerequisites in place to learn hip-hinging safely, bending became my favorite exercise!

Life in Full Blossom, painting by Laura Goldman Weinberg

Life gets back to being better!

Daily life is so much easier now—and so much more enjoyable. Arriving back home from my local Whole Foods store I frequently had to lie down to soothe back pain gotten from bending to the lower shelves and products. I now don’t have that pain; I just get on with putting my groceries away. I walk an hour every morning—no back issues. Every week my life is getting better, and I’m about to turn 73.

I am an author and an artist, and my newfound comfort in my body makes these activities so much more pleasurable. I work on a covered ping-pong table, often at quite a large scale—I have even used a shower curtain and a king-size sheet as my “canvas,” so I don’t bend down, but bend over while using my inner corset.

Blast of Colors, recent painting by Laura Goldman Weinberg
Blast of Colors, recent painting by Laura Goldman Weinberg (November 2024). You can see more of my work on my website.

My healing trajectory

I still have a tiny twinge at the “origin” point on my spine, and, while it is nothing compared to what I had, my intention for the future is to get rid of that. I also experienced a brief flare up of back spasm at the beginning of December, but to my delight it completely went away in a couple of days after careful attention to my rib anchor and inner corset. Given my back pain history this “wobble” in my healing trajectory is very mild, and the direction of travel remains onward and upward. I responded really well early on in the course, and there’s no reason to suppose I won’t continue to improve so long as I respect my body’s architecture and continue to support its healing. Now that I am doing my part, it seems likely that any intervention by my chiropractor can take me even further and stay put longer than previously. I couldn’t be more pleased with my much improved experience of life, as I expressed in the poem below.

New Life Within Life

Life is full of opposites
But with the Gokhale Method
We find what truly fits

Walking, standing, sitting, lying
Even with bending
I'm no longer crying

I pray others find relief from pain
As I'm filled with gratitude
For the new life I've gained

Laura Goldman Weinberg
Copyright 2024

Special New Year, New You free online workshops for newcomers

I encourage newcomers to enjoy Esther’s special, free, One Year Older, Ten Years Younger Gokhale Method beginner workshop, on Saturday, January 4, 1:00 p.m.–2:00 p.m. (PST). Esther will be teaching two techniques not normally taught in free workshops, to help you look—and feel—younger! Find out more, and sign up here

Due to anticipated demand, time-limited replays, and a repeat workshop on Sunday, January 12, 7:30 a.m.–8:30 a.m. (PST), are also offered, for which you can sign up here.

Best next action steps 

If you would like help coming home to a more youthful posture, get started by booking a Gokhale® Consultation, online or in person, with one of our teachers.

You can sign up below to join any one of our upcoming FREE Online Workshops…

Helping Hands for Healthy Posture: Tall Neck

Helping Hands for Healthy Posture: Tall Neck

Esther Gokhale
Date

Most of us are familiar with the idea of self-massage. For many it may grow from instinctively rubbing a sore spot. For a few it grows into an essential healing art, and may even incorporate skills such as trigger point work, myofascial release, and acupressure. 

Healing hands 

Many students opt for the in-person Gokhale Method® offerings (Free Workshops, Initial Consultations, Foundations, Pop-up, and Alumni Classes) because they place great value on their teacher’s hands-on work. I have found that hands-on work continues to be a force for good even in online work. For our online Elements students, who don’t get guidance from a teacher’s hands, it’s especially important to learn to do hands-on work with their own hands.

One of the most useful hands-on techniques that we teach you to do for yourself, whether you are an in-person or online student, is the hair pull. It is the subject of one of our free Gokhale® Moments videos, and one that we frequently refer to. In fact, Hair Pull is our most liked Gokhale Moment! See if you like it too…

The hair pull involves gently gliding your head back and up, lengthening the neck, aligning it more vertically, and pivoting the head slightly downward.

Confine your movement to the neck and head

When performing the hair pull, make sure that you are not pulling your torso and swaying your back. You may detect a straightening of the upper thoracic spine and feel stretch in the upper chest when gliding your neck back, which is fine. Other than that, focus on isolating the movement to your head and neck. If you find yourself swaying back with your front ribs lifting, you want to prevent this and protect against compressing your lower back by first learning to use your Rib Anchor—another Gokhale Moment video that we frequently refer to. 

Healthy head carriage

Rather than having forward head carriage, we want to return to healthy head carriage. Carrying not only your head on your spine, but an additional load on the head, is an almost universal practice in traditional societies, and both necessitates and encourages healthy neck alignment. 

Woman headloading in Odisha market, India

A well-positioned neck and head align directly over the torso—not to the front or behind

The Gokhale® Head Cushion has just enough weight to help you find the verticality you are looking for in your neck. By strengthening your deeper neck muscles, it also helps to relax the more peripheral neck musculature that is often tight. (You can use our $5 discount code TallNeck, valid through Sunday October 13, to purchase a head cushion.)

An image of the Gokhale Head Cushion

Letting go

Undoing well-established patterns such as tensing the back of the neck can still be difficult to navigate by yourself. Often the body has “held tight” to a position for decades. This is rather like pulling on a knotted piece of string—the harder we pull, the tighter the knot gets. Take things slowly to allow your nervous system time to find a different response, and your tissues time to relax. If the back of your neck only knows how to draw tighter, you can call on the expertise of a Gokhale Method teacher who has guided other students through this same difficulty and out the other side. Once you have unlocked these patterns together, you can continue to gently coax the elastic release you have discovered using your own hands. 

Esther Gokhale using hair pull technique with a young male student.
Here I am guiding a student to experience more mobility, length, and verticality in his neck.

Pain will not bring gain

If you have any pain when you try this maneuver, stop. Don’t feel obliged to follow general instructions that are not tailored for you. Nature spent millions of years evolving a sophisticated way of telling you not to do something, and you don’t want to disregard that signal. This is an instance where a qualified Gokhale Method teacher can look at your health history, together with the advice of your preferred health professional if appropriate, and work with you to progress comfortably and safely. 

Painting by Manet of woman in black dress and hat with tall neck.

Previous generations rarely exhibited the forward head carriage and curved necks that commonly cause tension, pain, and degenerative conditions today.

Help that’s at hand

Once you have mastered this hands-on maneuver, you can remind your neck and head how to move back home into a healthier alignment as frequently as needed. Practice regularly and mindfully, and you will progress with both your range of motion and your baseline posture. 

Teacher Julie Johnson helps a student lengthen her neck with a head cushion and hands-on.
Gokhale Method teacher Julie Johnson offers a student hands-on help in combination with a Gokhale® Head Cushion to gently lengthen her neck. The weight of the cushion encourages the deep spinal muscles of the neck to work, so that the outer muscles can relax.

Share your progress!

If you have practiced our “hair pull” technique and would like feedback on your neck and head position, please consider uploading a “Before” and an “After” picture in the comment section below. It’s a great way for all of us to share and learn from each other. 

Esther Gokhale demonstrating neck lengthening to teenage class. 
Here I was in 2009, demonstrating the lengthening effect of pulling up the back of the head to a group of teenagers. Hopefully they have continued to enjoy the benefits of space for their cervical discs, nerves, and bones!

Best next action steps 

If you would like help to improve your neck and head posture, get started by booking a consultation, online or in person, with one of our teachers. 

You can sign up below to join any one of our upcoming FREE Online Workshops…

How to Swim with Healthy Posture: Breaststroke

How to Swim with Healthy Posture: Breaststroke

Esther Gokhale
Date

Vacation time is in full swing in the northern hemisphere. For many of us, being beachside or poolside gets us yearning for a dip, a splash, and a swim. And I’m guessing that many of us have been mesmerized and inspired by watching the Olympic pool athletes in action. 

Young girl splashing/jumping in swimming pool.
Swimming can be fun for all ages and abilities—and healthy posture keeps it back pain free. Image from Unsplash

In this blog post we’ll discuss breaststroke, which happens to be my favorite way of swimming, and how healthy posture enables you to swim breaststroke better, and avoid the neck and back aches that some people experience after. 

Swimming starts with the inner corset

Have you ever wondered why some swimmers manage to move so well through the water? Here are some things they are likely doing: 

  • They are activating their inner corset strongly. This enables the trunk and spine to maintain its alignment in an aquadynamic position, reducing drag.
  • Their limb movements originate from the large trunk muscles of the back, chest, psoas, and gluteal muscles, which produce the most power. 
  • These two things enable an efficient, coordinated, smooth technique that avoids “flailing” in various directions and dissipating energy. 

There are many preferred variations with arm and leg angles, hand and finger positions, cadence, and so on. But these are details compared with the all-important strong inner corset. Once your torso has lost its structural integrity, any movement you generate will work partially against you, rather than contribute to propulsion.

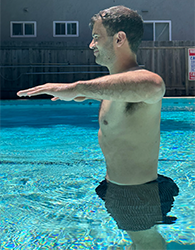
Gokhale Method teacher Clare Chapman using her inner corset walking in a pool. 
We need our inner corset in many activities to prevent distortions of the spine. Maintaining a straight course walking in the pool takes a strongly activated inner corset and is excellent prep for swimming.

The clue’s in the name

The name “breaststroke” is a good descriptor for the chest-opening benefits of this stroke. Done well, breaststroke can be a great antidote to many aspects of modern life that encourage us into stooped posture, rounding our shoulders, collapsing our chest, and breathing into our belly. As the hands and arms pull back, most of the muscle power behind that action comes from the upper back and rhomboids contracting to draw the shoulders back. We simultaneously open the ribcage and chest to fill the lungs.

How to breathe in but not sway your back

Breaststroke has an advantage over crawl in that breathing in is relatively easy while your head is well above the waterline. If, however, the lifting of the upper body happens in the upper lumbar spine rather than at L5-S1, the result is likely to be an achy neck and/or low back. 

Professional or elite breaststroke swimmers have the strength and thrust to heave a large part of their upper body up out of the water, bending back exclusively at L5-S1; the upper lumbar spine and neck then have minimal need to extend back, if at all.

Olympic Gold Medalist Adam Peaty pulls up with straight spine in breaststroke.
Olympic Gold Medalist Adam Peaty maintains a largely straight spine throughout most of his stroke. Image from Wikimedia

Cecily Frederick in a back dive with a healthy L5-S1 backbend.
Cecily Frederick, a teacher of the Gokhale Method for many years, does a back dive with a healthy L5-S1 backbend—her upper lumbar area through to her head remains aligned straight. 

Whatever your level of swimming, it is important when swimming breaststroke to counter any habit of lifting and swaying from the upper lumbar spine. The solution to this habit is to learn to engage the rib anchor muscles very strongly; with your rib anchor in place, you can learn to cultivate a healthy J-shaped spine rather than an S-shaped spine. You can learn more about spine shape here.

The posture benefits of the exhale phase

During the exhale phase the body settles horizontally into the water. This brings the great advantage of being able to rest, recover, and prepare the limbs for the next stroke. Part of this will include gliding through the water, which is conducive to recruiting the inner corset to steady and slenderize you. It offers a solid platform from which to launch the next stroke.

Male swimmer gliding face down horizontally, arms out ahead.
Practice floating or gliding through the water in a face-down, horizontal position. Then apply this to your stroke. Image from Pexels

If you don’t have the confidence to swim with your head in the water, consider gradually building familiarity with this skill with a friend or sympathetic swimming coach. Most people find it well worth mastering and, approached in the right way, much more enjoyable and comfortable. Wear goggles so that you can still see. Snorkels and full-face snorkels can be a useful measure for getting used to being face down in the water and experiencing the advantages of swimming in a horizontal position. 

Man and young girl snorkeling, from above.
Snorkeling is a great way to get used to swimming in a face-down position with a long, more relaxed neck. Image from Unsplash

Hips and kicks

If your hips are very stiff, then you will benefit from breaststroke’s built-in opportunity to gradually increase your range of motion and muscular strength without loading the hip joint. 

While it’s impressive to watch someone kicking wide with strong, flexible hips, it is not necessary, or even optimal, to go very wide with the legs. Watching a bird’s eye view of modern Olympic breaststrokers, you may be surprised by the narrowness of their kick. A narrower kick turns out to be more explosive and minimizes drag. Adam Peaty, the fastest breaststroker on the planet, estimates that up to 70% of his speed is generated by this narrow kick.  

A narrow kick also makes breaststroke more accessible, especially for people with a limited range of motion in one or both hips. To narrow your kick, hold a pull buoy or two between the thighs as you swim. This leg arrangement also helps you to pattern healthy external rotation in your hips, legs, and feet, so you have a carry-over benefit for your land-based posture too!

A narrowed breaststroke kick has the advantages of speed, power, and developing external rotation in the legs. These young swimmers are training with a pull buoy.

If you have a pelvic rotation and/or SI joint instability, you may be prone to difficulties when attempting a wider kick; you are more likely to kick asymmetrically (called a screw kick), which is inefficient, and possibly risks injury. A narrow kick reduces these complications.

Legs externally rotated, a J-shaped spine, shoulders posterior, and an anchored rib cage, are not just tips for swimmers. These healthy posture principles are taught in our in-person Foundations course, one-day Pop-up course, our online Elements course, and our Gokhale Exercise program. Our students often report how much their swimming improves simply by applying these techniques.

Best next action steps for newcomers

If you would like insight on your posture, in and out of the pool, consider scheduling an Initial Consultation, online, or in person.

You can sign up below to join one of our upcoming FREE Online Workshops. . .

How to Fix a Tight Psoas

How to Fix a Tight Psoas

Esther Gokhale
Date

When students first meet with a Gokhale Method® teacher they are sometimes surprised to learn that one of the reasons for their back pain is a tight psoas muscle. What does this little-known muscle, embedded deep within our bodies, have to do with back pain? And what do we need to do to have it recede in the background and leave our backs alone?

Get to know your psoas muscle 

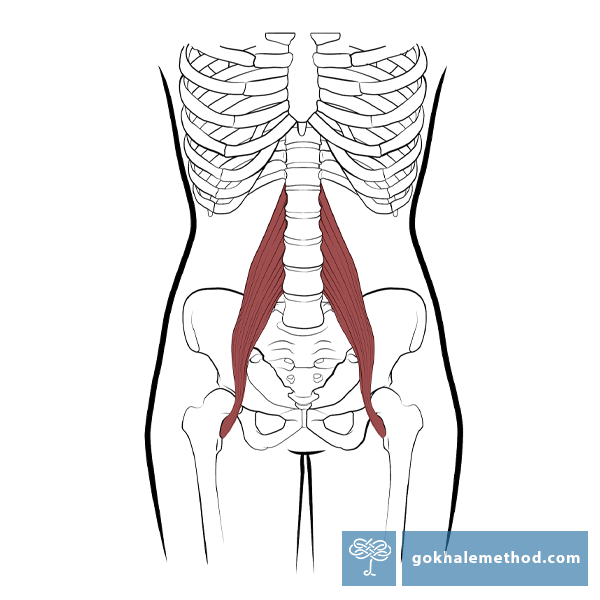
Psoas major (pronounced so-as) is a deep-lying muscle with a downwards trajectory through the abdomen. There can be some individual variation, but it usually originates from T12-L4, and it inserts at the lesser trochanter of the femur. Its main job is to contract and pull the thigh up—as in walking, running, and climbing, for example. 

Anatomy drawing of the psoas muscle located in the body.
The psoas muscle lifts your thigh—or pulls on your lower back, depending on how it’s used.

For those who are not offended by meat analogies, this muscle is the filet mignon, or the tenderloin—it is meant to be lean, juicy, malleable, and stretchy. But in modern industrial populations, the psoas is often somewhat dry, tough, and short. The shortened length and tightness of the muscle can wreak havoc on the spine as it pulls forward on the lumbar spine, causing compression, wear and tear, and pain.

How do I know if I have a tight psoas?

There are various signs and symptoms associated with a tight psoas, including:

  • A pronounced sway in the lumbar area
  • Pain when going from sitting to standing
  • Back pain either caused or eased by walking
  • A sore insertion point on the thigh
  • Feeling stiff and unable to straighten up, or “vulnerable” in the lower back, especially first thing in the morning  

Why did my psoas get tight?

  • Sitting for extended periods without movement breaks is one reason that our psoas adapts to a shorter length because the muscle then spends a long time at the shorter end of the range of what it can do. 
  • The shortening effect of sitting is made more likely when we sit poorly with our pelvis tucked. A modern issue with sitting is that we have poorly designed furniture, such as bucket seats and deep sofas, which encourage us to tuck and slouch. 

Man sitting, tucked, on a fashionable white bucket-style chair.
Most modern furniture is designed for aesthetic appeal rather than to enable us to sit well. Image from: Pexels

  • Back pain patients are often recommended to use a chair with built in lumbar support, or to add a lumbar cushion. The extra curvature then reinforces a habit of swaying the lower back, which in turn enables the psoas to remain short and tight.

Mesh lumbar support in car
Most backrests follow the S-shaped spine paradigm and are designed to give “lumbar support.” This creates exaggerated curvature and compression in the lumbar spine. (Google, n.d.)

  • A tight psoas can also have a psychosomatic cause, as this muscle is deeply linked to both chronic stress and trauma responses in the body. We see this response even in babies in the Moro or startle reflex.

Restoring length in your psoas 

A common remedy for a tight psoas is a lunge or other psoas stretch. Though effective, the problem with this approach is that it is not possible to do enough stretching to make a sustainable difference to the length of this muscle. The stretch feels good, but the muscle quickly goes back to its short resting length. For some people, if they have been stretching aggressively and the attachments of the muscle are inflamed, stretching can cause additional pain and dysfunction.

Another common approach is to get a gifted practitioner to “release” your psoas. This very intense maneuver can also be effective, but has the same problem as the stretching approach—it provides temporary relief, but does not sustainably reset the resting length of the muscle when poor daily posture is shortening it.  

The only sustainable way I know of resetting a tight psoas is to recruit Nature’s solution for keeping this muscle healthy, which is to learn how to walk naturally/skillfully/effectively. 


Our natural gait pattern is evident in our young children, our ancestors, and villagers in non-industrialized parts of the world. It gives the psoas muscle both the engagement and stretch it needs in a gentle and consistent way.
(central painting: Fisher Girl, Winslow Homer, 1894. Museum at Amherst College, Petegorsky/Gipe.) 

Nature’s built-in solution to stretching your psoas

To describe the action of healthy walking, we use the term glidewalking. With this pattern, every step becomes a psoas stretch. Refinements in walking like learning to contract your glutes with every step and leaving your rear heel down for an extended time, augment the psoas stretch. If, however, you don’t know how to maintain a long, stable lumbar spine, these same improvements in gait can be counterproductive and pull your spine into additional sway.

Esther Gokhale demonstrating PostureTracker™showing a healthy back shape in walking
Our PostureTracker™ wearable enables you to monitor and maintain your rib anchor and a healthy, stable spine as you walk (shown in green), naturally stretching your psoas. Here I am on the Alumni Live Chat in December last year, demonstrating.

Esther Gokhale demonstrating PostureTracker™showing a swayed back in walking
PostureTracker™ will tell you (shown in red) if you forget your healthy posture cues! Notice that I have let my back sway severely at the end of my stride.

Advanced Glidewalking Course for Alumni

If you are an alumnus, you are encouraged to join me in our Advanced Glidewalking Course. This course is a comprehensive deep-dive to both revisit the basics of healthy, natural walking, refine its many components, and learn advanced techniques that are not included in our beginner courses. Your psoas will thank you! Six weekly lessons start Wednesday, February 28, 11 a.m. (PST), 8 p.m. (CET). You can sign up here.

Best next action steps for newcomers

If you are new to the Gokhale Method, get started by booking a consultation, online, or in person with one of our teachers to find out how the Gokhale Method can help you.

You can sign up below to join any one of our upcoming FREE Online Workshops. . .

Align Your Rib Cage and Solve Your Back Tension

Align Your Rib Cage and Solve Your Back Tension

Esther Gokhale
Date

Choose your remedies carefully

There are many approaches to stretching tight back muscles that involve rounding the back. Though these exercises give temporary relief, we recommend against them because they threaten the spinal discs, nerves, and ligaments. They can also result in the back muscles contracting even more tightly to stabilize the area. 

Three photos of people rounding to stretch their backs in different positions.
Rounded stretching exercises increase existing upper back curvature (hunching) while pulling aggressively on tight soft tissues and ligaments. Our tissues respond better to sustained, gentle realignment to make healthy changes. Pexels


By contrast, the Gokhale Method rib anchor maneuver brings relief from compression without any negative side effects. It restores your spine to a healthy J-shape, preserving the spinal discs, nerves, and ligaments. Over time, this alignment encourages a more natural, relaxed baseline tone in your back muscles as well as better abdominal tone.

How your rib anchor works

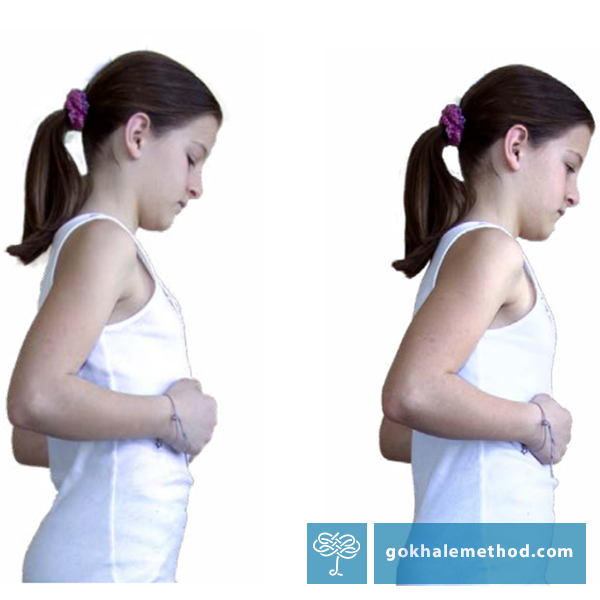
Rib anchor describes the pivot of the rib cage around a horizontal axis at about breast height, bringing the lower border of the front of the rib cage in and down thus sending the back of the rib cage up and out. Since the back of the ribs are attached to the vertebrae, this pulls the curvy “necklace” of the lumbar spine into a flatter, longer arrangement. This means of tractioning the lower spine is a fundamental Gokhale Method technique for removing sway. It restores healthy length in the lumbar area, alleviating compression of the discs, nerves, and vertebrae.  

a.                                                          b.             

Two diagrams showing swayed to vertical alignment of the torso. 
A forward pivot of the rib cage at breast height (b.) corrects for a tight lower back (a.), restoring lumbar length. Maintaining this orientation requires the abdominal muscles that anchor the ribs down to develop a healthy baseline tone.

The art of transmission 

Over many years of hands-on work helping students with their rib anchor, I became increasingly aware of an intuitive sequence of moves in what I was doing. My hands could guide a student to a pleasing endpoint, but what exactly I was doing fell short of verbal description and a conceptual framework. The gap between what we were doing and articulating in words showed up especially when our teachers got together for continuing education offerings, when questions and case studies were discussed. There was a need for new language, fresh insights, and deeper understanding. While teaching posture is both an art and a science, it is also a hallmark of our method that there be kinesthetic, visual, and intellectual understanding of our process; this takes the right words and analogies.

A fresh analogy for the rib anchor

For a very long time, we’ve taught three things that need to happen to help most people find a healthy head position. It’s a combination of: 

  1. Pivoting around an axis from ear to ear
  2. Lengthening the neck through relaxing certain muscles and recruiting others (especially the longus colli)
  3. Shearing the head and neck gently back               

1.                                         2.                                       3.

Drawings showing three movements for healthy head alignment.

Gliding the rib cage home follows a similar pattern:

  1. Pivoting around an axis that goes from side to side through the chest at about breast level (this being the main component of what I’ve described as rib anchor so far)
  2. Relaxing the erector spinae and other muscles and recruiting the deep abdominal and back muscles (inner corset) to create additional length in the back, as described and included in our teachings
  3. Shearing the ribcage backward relative to the pelvis. This is the movement that I’d been intuitively weaving into my hands-on ministrations that previously wasn’t well described

When students aligned their ribs by only pivoting the rib cage, I could see that it sometimes resulted in an awkward movement that did not integrate the rib cage into the torso quite right. Adding, and even better with practice, integrating this element of shear, transformed their outcome and experience. 

We can describe the shear element, for both the head and the rib cage, as analogous with backing your car into its garage: 

Diagram of a car backing into a garage.

An analogy that is true and versatile

Neat and easy parallels can, of course, be seductive but false. However, here we have a really useful and accurate analogy of what needs to happen. Deploying your rib anchor to come into a healthier orientation usually feels somewhat strange at first—especially if you have spent years actually leaning backwards from your waist—but this new analogy is already helping our students to enjoy a more buoyant uprightness, and less of a leaning forward sensation. 

This “backing up” of the ribcage can be tailored to affect different levels of the spine, as appropriate for each person. And while every body is a unique landscape known only to its owner, a teacher’s guidance is always available to help you map it out sooner. 

a.                                                          b.             

Two photos of a girl adjusting her ribcage angle.  
This girl (a.) stands with her lower back swayed. Her rib cage is angled back, and she can feel her lower front ribs popping up under her hands. She gently but firmly presses on her ribcage to “back it into the garage” and into a healthy alignment (b.), removing the sway in her lower back as she does so. 

Best next action steps

If you are new to the Gokhale Method, are resuming your posture journey after a little while, or struggle with your rib anchor, book a consultation, online, or in person with one of our teachers, who will be happy to help.

You can sign up below to join one of our upcoming FREE Online Workshops. . .

Posture Workouts in a Swimming Pool

Posture Workouts in a Swimming Pool

Esther Gokhale
Date

August is peak holiday time across the northern hemisphere, and many of us who live here will find ourselves poolside, or even better, in it!

Being in water has the natural advantage of lifting weight off the joints while providing gentle resistance training. Aching backs or knees can find relief from compression in the natural buoyancy that water provides. This has made pool exercises a popular prescription with physical therapists over many years, especially for post-operative or post-injury rehabilitation. 

On land, to relieve pain and compression, people usually use elaborate measures like inversion tables, traction units, or going to outer space! In the Gokhale Method we provide decompression for the lower back relatively simply with the Stretchsit® Cushion or the nubs on our Gokhale™Pain-Free Chair. But stepping into water is the simplest of all, giving you freedom of movement and the ability to strengthen yourself simultaneously.

Women in a swimming pool exercising with dumbbells.
Pool exercise also provides a fun and refreshing environment for exercise in summer heat waves! Wikimedia

This blog post gives you three ways to harness the unique benefits of being in water to practice and develop healthier posture. These exercises are challenging enough to do as a stand-alone workout or as a way to prime your swim session.

Healthy posture habits honed in water will benefit your daily life on land, as well as giving you greater stability and power for your swimming or other sports. 

For safety and best results, I recommend that you progress the session in the order given here, starting with Exercise 1 and, once you are familiar with it, move on to Exercise 2 and finally add Exercise 3. 

1. Stabilize your spine by using your inner corset

You will use a natural brace of muscles as you walk across the pool. It will give you the stability you need to cut through the resistance of the water without wobbling and threatening the alignment of your spine. 

Imagine you are getting into ice cold water. Feel how all the muscles around your middle can contract and make you more slender. You want to work hard enough to feel this from deep in the pelvis all the way up to your rib cage. You want to feel the muscular engagement all the way around your mid torso, like a tightly laced corset. 

Drawing of the muscles of the inner corset on a standing female figure. 
The muscles of the inner corset include the deep intrinsic back muscles, the abdominis transversus, and the obliques. 

Gokhale Method teacher Eric Fernandez shows how engaging the inner corset draws the abdomen in and makes the torso slender.

This is one way of recruiting your “inner corset," which will help stabilize your spine as you walk and is key to swimming with a more streamlined, efficient stroke. We teach this technique and others in more detail in our in-person Foundations course, one-day Pop-up course, our online Elements course, plus our Gokhale Exercise program. You can read more about your inner corset here.

2. Headload to lengthen your neck and to find deep spinal support

In industrialized cultures we have an epidemic of forward head carriage, putting enormous strain on the neck and structures throughout the back. Finding healthy alignment through your neck, combined with the inner corset, helps your whole spine to support itself well. Resting even a modest additional weight on the head can help us to find our vertical axis and stand tall. This is the reason I developed the Gokhale™ Head Cushion

Drawing of the muscles of the inner corset on a standing female figure ; woman in Burkina Faso with a tall, straight neck and functional head posture.
Headloading encourages recruitment of the deepest muscles of the inner corset and the neck, especially the longus colli at the front of the spine. 

In the pool I suggest you use what you have at hand—your hands! Rest them on your head and push up against them with your head. Keep your nose and chin angled downward. Proceed very gently if you have neck issues. You can gradually build up the intensity over a number of sessions. 

Gokhale Method teacher Clare Chapman headloading her hands walking in a pool. 
Gokhale Method teacher Clare Chapman headloading in the pool using the weight of hands and arms. Create space between your shoulders and your ears—keep your shoulders down as your neck grows tall. 

Establishing healthy length in your neck will help you to retain a straighter, more spacious alignment while swimming, especially in breaststroke where people tend to crane their necks to hold their heads above water. Consider training to swim with your head in the water, if you do not do this already, which will enable a much healthier alignment of your torso, neck, and head.

Gokhale Method teacher Eric Fernandez engaging the muscles of the inner corset in the pool, hands on head.
Especially when you raise your arms, you may need to use your rib anchor muscles to prevent your back from swaying.

3. Power up your walking using your feet and glutes

Many of us compromise our walking by overusing our quads and hip flexors (psoas muscle) and underusing our glutes. We predominantly reach our front leg forward in our strides, instead of generating propulsion from the rear leg with our glutes and foot muscles. 

Woman walking in market, Odisha, India.
Our ancestors and many people living in more traditional or nonindustrialized societies—where joint and back pain are rare—walk using their glute and foot muscles more than we typically do.

As you walk in the pool, make each step a rep. Each step wants to progress through a pose that includes a straight back leg and a bent front knee. As each leg goes back behind you in turn, squeeze your buttock muscles on that side. Engage the upper outer quadrant of your glute pack. This is not the kind of glute squeeze that clenches your lower butt cheeks together and tucks your pelvis. 

Gokhale Method Alumna Christine Andrew in a glidewalking pose in the pool (underwater shot).
Gokhale Method Alumna Christine Andrew working hard to achieve healthy walking form in the buoyancy and resistance of water.

Grab the floor of the pool with the whole sole of your foot, and then push off from your toes. Focus on maintaining the convex foot shape as you do this. Propel to glide forward, not bounce upward.

Gokhale Method teacher Eric Fernandez grabs with his foot in the pool, aerial view.
Eric actively grabs the floor of the pool with each foot to pull the body forward and then push back.

Putting it all together: Aim to keep healthy form and walk as smoothly as you can through the water. This develops both healthy length and muscle power in the right places.

If you notice your back arches back as you walk, take smaller steps and lean more forward until you master the art of keeping your spine stable with the rib anchor and inner corset techniques. Enjoy!

Best next action steps for newcomers

If you would like to know which posture changes will help you be pain-free and functional, schedule an Initial Consultation, online, or in person.

You can sign up below to join one of our upcoming FREE Online Workshops. . .

Home Exercises Part 5: Squats

Home Exercises Part 5: Squats

Esther Gokhale
Date

In this blog post, the fifth in our series scrutinizing popular home exercises, we are looking at squats. Is it a beneficial exercise, and how does it stack up—or not—against the principles of healthy posture?

Squats are a popular and effective exercise designed primarily to strengthen the quads, stabilize the knee joint, tone the glutes, and also work the back muscles. 

4 stages of kettlebell snatch, man squatting
A squat is an essential baseline position for many athletic movements including this kettlebell snatch. Wikimedia

How low should they go?

Deep squats have become increasingly popular in recent decades, following a trend towards cross-training and exercise based on “natural movement.” Fitness and movement trainers have sought to emulate people in non-industrialized societies or traditional cultures who squat with ease, often for long periods.

Deep squats present challenges unless you grew up in a culture that routinely sits and squats on the ground. The challenge is not only in the muscles around the hips, knees, and ankles, but also in the bony part of the joints. When you are born your hip joint is made entirely of cartilage. By age 16, it is fully ossified. If you are not continually sitting and squatting low in your formative years the ossification pattern will not facilitate the angles necessary for squatting as an adult. It is therefore impossible for most westerners to squat low without tucking the pelvis and rounding the back, just like it is hard for them to sit crossed legged and relaxed.

Woman in heels in deep squat with rounded back.  Indian woman in deep squat with straight back.
Even though her high heeled shoes reduce the angle of bend required to squat, the woman on the left rounds her back to squat. The Indian villager (right) can squat with a straight back. Unsplash

The benefits of standing/partial squats

For this reason I highly recommend partial squats, which are a safer option and offer many of the benefits of a full squat. They are also a perfect exercise to focus on and develop healthy posture.

Anyone who has ever done a fitness or yoga class may also know this exercise as Chair Pose. In some schools of fitness training, it is regarded as a foundational exercise. In traditional yoga it is known by its Sanskrit name, Utkatasana. Utkatasana translates as intense, powerful, fierce, difficult—you get the idea. 

BKS Iyengar in Utkatasana, side view.
BKS Iyengar in Utkatasana, showing the challenge of the pose. Facebook

Squats can indeed be demanding. Lowering and raising your body weight into and out of the partial squat works the biggest muscles in the body (the leg and buttock muscles) hard, as they alternately contract (concentrically), and then release their length (eccentrically). 

When you start training with squats you don’t want to go down too far—better to do a shallow, more open zigzag squat that eases you into the exercise. This avoids the risk of injury and you can increase the intensity and demands on your body by going deeper over time, as you get stronger and more flexible. 

How to do a healthy squat

   1. Preparation

To facilitate a healthy amount of external rotation in the legs and hips, softness in the groin and nestling of the pelvis, we recommend doing the paper clip stretch or figure four as it is also known. This is a good preparatory exercise before squatting, and, done regularly over time, will encourage a healthy nestling of the pelvis and alignment of the legs.


In this video I am demonstrating the paperclip stretch, which prepares the legs and hips for healthy squatting. Clip from Gokhale Method Open University video.

   2. Start from a “Ready Stance”

A well-aligned standing posture is essential to maintain healthy form as you execute squats. The Gokhale Method teaches a position we call “Ready Stance which aligns your feet, legs, and hips for correct movement. In this stance you will find the key characteristics of a squat, but in embryonic form:

  • Stand with your feet hip width apart and pointing 10°–15° outward. Have a tiny bend at the hips and knees, as if you are about to play tennis or dance, bringing softness to the groin and back of the knees. 

Eric in ready stance, side view, hands on hips.
Gokhale Fitness teacher Eric Fernandez demonstrates the Ready Stance. It is like an ultra-mini squat.

ancient Greek statue, front and side views
This ancient Greek statue captures the softness and depth you want at the groin even in everyday standing. To get there, take the Ready Stance and then stop short of locking your joints as you straighten up.  

   3. Going into a squat

  • In the Ready Stance, rest your hands on the top of your thighs in your groin crease.
  • Initiate your squat from your hips. As you fold deeper at the hips your behind will travel further back behind you. 
  • Your knees will bend in response to your bend at the hips. Keep them wide and pointing outward and your thighs out of the way as you bend.
  • As you squat, allow your torso to angle forward at the groin as your pelvis rotates on your thigh bones. Check that your stance has a zigzag shape.
  • Focus on maintaining the straightest possible spine by using your rib anchor
  • Keep your chin down. You want your neck and head to remain in the same orientation as the rest of your torso.

Eric in partial squat, side view, hands on hips.
A healthy squat embodies all the points above.

  • When you are confident with the above you can raise your arms smoothly as you squat. Maintain your rib anchor, especially if you have stiff shoulders and are more likely to sway to lift your arms. If possible, bring your arms to the same angle as your torso.

Eric in partial squat, side view, arms up.
Raising your arms in line with your torso requires a strong rib anchor to prevent your back from swaying.

Cecily’s spinal shape in chair pose, with SpineTracker
Gokhale Method teacher Cecily Frederick in Chair Pose, overlaid with SpineTracker™ snapshot. The SpineTracker gives real time feedback on the shape of the spine. Note that Cecily’s spine remains straight in the lumbar area and the J-shaped angle at the L5-S1 junction puts her behind behind her—she does not arch her back.

   Cecily’s spinal shape in chair pose, with SpineTracker, detail
Detail of Cecily Frederick’s spinal shape in Chair Pose, overlaid with SpineTracker snapshot.

Common Mistakes: 

  • Swaying the back. Fix this by using your rib anchor to remove the sway.

Woman swaying in partial squat, side view
Swaying the back compresses the lumbar discs and nerves. Unsplash

  • Knees and/or feet collapsing inward. Fix this by angling your feet outward.

Eric in partial squat, front view, legs in internal and external rotation 
Internal rotation of the legs (left) puts pressure on the inner knees and flattens the foot arches. Feet turned outward and knees and thighs kept wide helps support your structure while allowing the pelvis to settle.

  • Lifting the chin. Avoid looking up or ahead. Fix this by softening your gaze and aligning your head and neck with the rest of your torso.

Person in partial squat from side lifting chin.

Lifting the chin risks putting pressure on the discs and nerves of the cervical spine. It is better to cultivate a long, tall neck. Wikimedia

   4. Increasing the challenge in squat

Once you have good technique and can perform squats smoothly with good form, you can increase their intensity in several ways—though not all at once!

  • Increase the number of reps.
  • Go deeper—take your thighs towards horizontal. Make sure your torso also pivots closer towards your thighs, your behind stays behind, and your knees do not go forward of your toes. 
  • Hold a squat position for a number of breaths. Maintain a strong rib anchor so as not to flare the ribs and sway with each inhalation. 

Free Online Workshops

If you would like to find out more about how the Gokhale Method can help support you, whether through exercise or posture education, sign up to join one of Esther’s upcoming FREE Online Workshops.

Home Exercises Part 2: Crunches

Home Exercises Part 2: Crunches

Esther Gokhale
Date

This is our second blog post in the series where we put popular exercises under scrutiny to examine how they stack up—or not—against the principles of healthy posture. Here we are looking at crunches, a common abdominal exercise.


Crunches are often seen as a better targeted and safer 
abdominal exercise than sit-ups—but there is still a downside.

Crunches are done lying down on the floor, face up, knees bent with feet on the floor, and with the hands placed behind or to the side of the head. They involve using the muscles of the rectus abdominis and the obliques to repeatedly raise and lower the upper body. 

Crunches are well named—they crunch your discs and crunch your nerves. Lifting the weight of the head—which at around 11 lb. or 5 kg is the weight of an average bowling ball—can put considerable strain on your neck and threaten its delicate structures. It also encourages rounding of the back and shoulders, as you can see in the above photo. We recommend against this exercise.


Doing poorly designed exercises and overtraining the “six-pack” muscles will encourage a tucked pelvis
and a rounded upper spine. Freepik

Why are crunches so popular?

People in our culture are conditioned to feel more attractive when they have a flat stomach and an impressive six-pack, and so may turn to all manner of treatments, diet regimens, and abdominal exercises to target this area. People who have experienced an episode of debilitating back pain also want, quite understandably, to strengthen their abs and core in order to protect their back. 

Do most people need to strengthen their abs?

   
Parking the pelvis forward is a common postural habit that pushes into the groins and compresses the lower back. It indicates that the deep abdominal muscles are not engaged and prevents them from fulfilling their postural role. Freepik

Most people in our culture sit, stand, bend, and walk in ways that actually discourage their abdominal muscles from working in their day-to-day lives. Those who either arch or round their backs are holding themselves upright with their back muscles or stressing their joints. With these poor posture habits the “inner corset” (deep muscles of the abdomen and lower back) is not recruited to perform its natural role and becomes progressively weaker. 


This woman in Burkina Faso and man in Brazil use their inner corset in their everyday tasks.

Learning healthy posture as taught in our online Elements course and in-person Gokhale [Go-clay]Method Foundations Course holistically addresses this problem. In the courses we teach specific, well-chosen exercises designed to jump-start weak muscles and awaken your inner corset. Some of these are illustrated in Appendix 1 of my book 8 Steps to a Pain-Free Back

Are crunches a safer exercise than sit-ups?

Crunches are often regarded as a safer and better choice of abdominal exercise than sit-ups. And they are. The Canadian Armed Forces discontinued the use of sit-ups in training and physical-fitness tests due to the large numbers of injuries caused to their personnel. The U.S. military also has a plan to phase them out by 2021. Stuart McGill, Professor of Spine Biomechanics at the University of Waterloo in Canada and a leading researcher on the subject, points to numerous studies that show that repeated sit-ups, which load the discs in a particularly dangerous direction, cause bulging, sequestrated, and herniated discs as well as spinal nerve damage. 


Neither of these people doing crunches have healthy form. Their necks are doing too much, and the man is also tucking his pelvis. Crello

Gym instructors often prefer crunches over sit-ups because they are safer and result in less tension in the psoas (hip flexors). But are they safe enough? 

In our view, classic rounded crunches are still a risky, disc-compressing exercise which encourage tension in the groin, while also training the body in poor postural form (tucking the pelvis and rounding the upper back and neck).


Doing a crunch twisting the head towards the knee encourages the neck to do too much and the pelvis to tuck. Crello

Rounded crunches are sometimes done with a twist at the waist to work the abs more obliquely. This is often done by bringing up the entire upper body and reaching one elbow towards the knee of the opposite leg. 

Effective ab exercises that are healthy for your posture


There are healthy alternatives to crunches that give your abdominal muscles a good workout! 

Our healthy and posture-positive version of this exercise keeps the head supported in the hands. The arm on the side to which you are turning continues to be supported on the ground. You can watch Gokhale Method Fitness teacher Eric Fernandez performing the exercise in this video. You will see that he maintains his spinal alignment throughout the exercise, rather than tucking and rounding his torso. 

When doing this exercise:

  • Support your head in your hands and relax your neck 
  • Rest your upper arm on the floor as you turn towards it, lifting the opposite arm and shoulder from the floor
  • Do not pull your head forward
  • Do not tuck your pelvis
  • Aim for small, smooth, accurate movements

If your abdominal muscles are weak or you are currently or intermittently experiencing back pain, then we recommend that you start with a less challenging exercise. To correctly identify and safely bring your abdominal obliques and other upper abdominal muscles to a healthy baseline tone, we recommend first watching this Gokhale Method rib anchor exercise video, and then learning to use your inner corset. The inner corset is explained in detail in 8 Steps to a Pain-Free Back

Free Chapter of 8 Steps to a Pain-Free Back

As a special gift to newsletter subscribers who have confirmed their subscription, we would like to send you the Inner Corset chapter from Esther's book, 8 Steps to a Pain-Free Back.

Please enter your email address in the field below and you will be sent an email with your Inner Corset chapter. You may receive a confirmation email to sign up to the Positive Stance newsletter first.

Free Chapter of 8 Steps to a Pain-Free Back


If you are looking for a way to exercise regularly that is healthy for your back and improves your posture, sign up for our Gokhale Exercise Free Trial:


1-2-3 Move happens daily with Esther at 9:45 a.m. (Pacific Time)
Gokhale Fitness with Eric runs Mondays, Wednesdays, Fridays from 7–7:25 a.m.
(Pacific Time), and Tuesdays, Thursdays, Saturdays from 3–3:25 p.m. (Pacific Time)

Read our Home Exercises Part 1 blog post on Cobra here.

Gokhale Moving Meditation

Gokhale Moving Meditation

Clare Chapman
Date

In this blog post Gokhale Method teacher Clare Chapman interviews Roberta Cooks and Kathleen O’Donohue to find out more about their Gokhale Moving Meditation classes. Roberta and Kathleen have been Gokhale Method teachers for 11 and 5 years respectively—and longtime practitioners of Tai Chi Chih (Roberta), and Tai Chi Qigong (Kathleen).* 

*Please note that various traditions referred to in this newsletter use different spellings—so for example “Chi” can also be written “chi”, “ch’i”,  “qi” or “Qi," depending on the tradition. 


Kathleen keeps her ribs anchored 
as she lifts her arms for “Painting Rainbows."

1. Tai Chi and Qigong are practices many people have heard of, but perhaps don’t know much about. Can you explain the practice? 

Kathleen: Tai Chi and Qigong are centuries-old related mind body practices that originated in China, and can be translated as “life-energy cultivation." Both include postures and gentle movements to cultivate mental focus, breathing, and relaxation. Movements can be adapted for sitting, standing, and walking.

Roberta: Tai Chi Chih is a moving meditation practice that was developed by Justin Stone, a Tai Chi Chuan Master, who created a gentle practice that could be learned relatively easily by people of all ages and abilities. It is made up of 19 movements and a final pose. Each movement is repeated many times while focusing on relaxing the body, breathing, and feeling the flow. The goal of practice is to activate, balance, and circulate the chi, the life force that keeps us breathing, healthy, and vital. 

2. How did you each come to your practice and to teaching it? 

Kathleen: My Tai Chi and Qigong experience began in 1985 as a student of Professor Chi, Kwan Wen, a student of Chen Man-Ch’ing. In 1988, with the encouragement of Professor Chi, I became an instructor of Yang Style short and long form. In 2009, I became certified by the Tai Chi for Health Institute in Dr. Paul Lam's Tai Chi for Arthritis program. I have taught it and several other forms ever since.

Roberta: I was an Argentine Tango dancer for many years, which I found to be a very meditative dance. I also practiced many kinds of mindful meditation including Medical Qigong with Dr. Roger Jahnke and Wisdom Healing Qigong with Master Mingtong Gu. By chance, I found a Tai Chi Chih class at my local YMCA. I felt such joy and peacefulness without any of the effort of doing a sitting meditation practice. I continue to feel its physical, mental, emotional, and spiritual benefits in my own life. Teaching is always the deepest form of learning and shared practice in a group adds energy and depth for all involved. 


Moving Meditation incorporates many Gokhale Method skills, such as using your inner corset, keeping your neck tall, and externally rotating your feet and legs. 
Here Kathleen applies them in “Flying Dove Spreads its Wings." 

3. What do the Moving Meditation classes bring to the Gokhale Exercise program?

Kathleen: Tai Chi and Qigong teach us gentle, flowing movements that enhance relaxation. They can be done sitting and standing, at a pace and duration of one’s choice and ability in the moment. It is a relaxing situation in which you can be talked through and shown another activity in which you can apply your Gokhale Method posture skills, gaining fresh awareness and openness.

Roberta: We offer a way to practice the Gokhale Method which focuses on learning how to relax increasingly deeply into movement. We teach a limited number of moves that we repeat many times. There is a special kind of learning that happens when you become more familiar with a movement and can then focus on its finer points. You also have a chance to repeat the class material and delve deeply into it with our class video recordings.

4. What do your classes have in common with the Gokhale Method teaching on posture? 

Kathleen: Both of these teach healthy ways to move. Tai Chi Qigong teaches one to move with “beautiful upright posture." In my decades of being a student of Tai Chi Qigong, I’ve never been instructed to “tuck” my pelvis. Unfortunately, I’ve met students who have been taught this. I asked a Master Trainer directly about this and she stated that she does not teach tucking and believes it is a mistranslation.

Roberta: Although you can learn the 19 movements of Tai Chi Chih relatively quickly, they are subtle and must be practiced mindfully over and over to make them an effortless part of you. Learning the Gokhale Method is very similar. Students learn the elements of healthy posture in a short period of time, and then repetition integrates them into daily life. 

5. How do the movements you teach help Gokhale Method students?

Kathleen: It’s a new way for students to cultivate their kinesthetic and proprioceptive skills—becoming more aware of their posture and position in space. They are likely to be freer from old habitual patterns as they are doing sometime new with their bodies. Students can experience stress and tension before and during their postural change journey. This helps them let go of that.

The healthy posture principles taught in the Gokhale Method are woven into each 
Moving Meditation class, as Roberta shows in this video.

Roberta: The Moving Meditation is so compatible with what is taught in the Gokhale Method. For example, the grounding and flowing movements help students consolidate the principles of tallstanding and glidewalking. In my classes I weave in Gokhale posture principles throughout, reminding students how to use rib anchor, shoulder rolls, external rotation of the legs, and kidney bean feet, to make the movements flowing, relaxed, and comfortable. 

6. Can you say something about the meditational component of your classes. Do you find it resonates with the Gokhale Method?

Kathleen: I find both to be mindfulness practices. Each allows me to be present in my body in each moment and to find deeper levels of relaxation and wellbeing. They are great opportunities to let go, release, and return to the present.


Roberta demonstrating “Pulling Taffy." This is part of a sequence where, as the lower body 
moves from side to side, the stacked arms move apart as if pulling taffy (candy). 
Mindfulness builds better coordination of these different movements. 

Roberta: All moving meditation practices keep us in the present moment, mindfully focused on each part of our bodies moving through space. The Gokhale Method also takes us mindfully back into our bodies to relearn how to sit, stand, walk, bend, and sleep. I tell my students that the best way to integrate healthy posture into your life is to think of it as a mindfulness practice that you weave through your daily life for your physical health and total well-being.

7. In what ways has learning the Gokhale Method enhanced your Tai Chi Chih and Qigong practice?

Kathleen: The Gokhale Method enhanced my practice of Tai Chi and Qigong by adding excellent postural knowledge to apply to this activity that I love. 

Roberta: The Gokhale Method has given me a solid foundation for moving. Many others who teach and practice Tai Chi Chih do not have this same healthy posture foundation and without my Gokhale training I might have integrated unhealthy movements into my practice. My Gokhale Method training helps me to teach my Tai Chi Chih students to move in a healthy way. 

8. Do you find the Gokhale PostureTracker™ helps in Moving Meditation?

Kathleen: Yes, because the PostureTracker sensors and app monitor posture are ideal for use with slow moving activity. For example, the Upright and Relaxed setting can tell you if you are either swaying or rounding your spine. The Level Head setting gives real-time feedback that helps you keep your head well-balanced on a long neck rather than jutting forward. 

  
Using the PostureTracker allows you to catch any poor posture habits as they happen, 
correcting them using the Gokhale Method techniques. 

Roberta: I love the idea of using the PostureTracker to check and improve my posture practice. The PostureTracker can be especially useful if I want to work out the best way to execute particular Tai Chi Chih movements. When I am actually doing the practice of Qigong I want to be absorbed in my body, totally relaxed and feeling the flow of energy. At that point I integrate what I have learned by using the PostureTracker in my pre-practice work. 

9. Do you have a favorite Qigong movement or practice?

Kathleen teaching “Wave Hands in Clouds." As in the Gokhale Method, imagining specific actions can help bring particular qualities, such as lightness and smoothness, to your movement.

Kathleen: I generally don’t have favorites, but one movement brings especially fond memories of my original teacher, Professor Chi, Kwan Wen. He frequently did Wave Hands in Clouds while waiting, instead of just wasting time.


Roberta showing the crossed hand position in “Daughter on the Mountaintop."

Roberta: My favorite movements are always changing, based on changes in my practice, aha moments, and my mood and body sensations on a particular day. One I always love to do is Daughter on the Mountaintop. This is part of a forward and back movement sequence where hands and arms start low and then move to the top of the mountain, hands crossed with the left hand nearer the heart. 

10. Is your program suitable for all levels and abilities? 

Kathleen: Indeed! These slow, gentle movements can be done sitting or standing, modified to your range of motions and your choice of duration and number of repetitions. Come join us!

Roberta: Absolutely! Our movement meditation programs are meant to be practiced by people of all ages and abilities. They can be easily modified to fit with your physical comfort level. We devote time for student questions at the end of each session.

Gokhale Moving Meditation classes take place every Monday at 2PM (Pacific Time) with Roberta and every Wednesday at 12PM (Pacific Time) with Kathleen. 

Please share below your questions or comments about Moving Meditation:

My Favorite Exercises for When You Can't Visit the Gym, Part 1: Chair Pose

My Favorite Exercises for When You Can't Visit the Gym, Part 1: Chair Pose

Esther Gokhale
Date

This is the first post in our series on home exercise during shelter-in. For Part 2 on Toning the Gluteus Medius, click here!


Making the most of shelter-in by practicing chair pose Gokhale-style in my backyard garden.

Whether you are on the road, in a campground, or just stuck at home during quarantine, you can always exercise. In the daily lead-up to our ongoing Posture 1-2-3 Challenge for alumni subscribers, I often turn to dance as a way to process whatever baggage might have set foot in my psyche that particular morning, and also to get the group moving and warmed up for the main program. I’ve been dancing since I was a young child, so I have a very strong bias for dance as a way of exercising, but I also like to change it up with other types of exercise. It turns out that we have a lot of options, even when we can’t access the gym.

First up is Chair Pose, from yoga. Chair Pose (Utkatasana in Sanskrit) is a great example of an at-home, equipment-free exercise which can strengthen a variety of muscles in very little time. You don’t have to spend forever and a day in Chair Pose to reap its benefits. This makes it a perfect fit for our busy lives.


In the image above, Cecily's behind is well behind, and her J-spine visible — both good details from a Gokhale Method perspective. The overlaid graphic conveys her Gokhale SpineTracker™ readings. Note on foot placement: in the Gokhale Method, we teach placing the feet about hip width apart and facing slightly outwards as a way of optimally supporting primal leg architecture.

Chair pose with a Gokhale Method filter:

  1. Prepare your lower body. Start with kidney bean-shaped feet, and do a little squat, to let gravity assist in settling your pelvis between your legs. Then come back up, but not to a parked position (that is, avoid locking your hips forward and knees backward). A parked position allows the muscles to “check out” (that’s why we find ourselves drifting to this position repeatedly!), but is damaging to the joints. Rather than parking in your joints, get your body into a “ready position:” that is, a position with a little spring in it that is easy on the joints and also enables you to move on a dime.
  2. Prepare your upper body. Use the rib anchor technique, with your shoulders rolled and the back of the neck tall. Now we’re ready to begin with Chair Pose.
  3. Bending the knees slowly, go down-down-down, keeping the knees from crossing over the toes. Yes, this detail makes it harder, and you may have to grip on the floor with your feet.  This is good for your feet! The main reason for this is to minimize stress to the knees and maximize challenge to various leg muscles.
  4. Add in the inner corset. If you are able, raise your arms ahead of you or, even better, up above your head. In this case, be super-attentive to ramping up your rib anchor to not allow your back to sway. Now, you just stay there. It’s challenging, and that’s the point. Visit your boundaries, but stay on the healthy side of them.

Let’s review: Chair Pose actively recruits your inner corset. The action of raising the arms above the head can be used to recruit the inner corset especially strongly. If you were to look at your belly (in a mirror) while in Chair Pose, you may come out looking a bit like a greyhound with a slenderized, sleeker abdomen below your full ribcage. To finish, return to a ready position with a little spring in it (again, not parked).


This practitioner demonstrates the “greyhound look” of an activated inner corset. Note on foot placement: In the Gokhale Method, we teach placing the feet about hip width apart and facing slightly outwards as a way of optimally supporting primal leg architecture. Image courtesy Elly Fairytale on Pexels.

I’ll be describing other favorite exercises in future blog posts — in the meantime, try “sitting” it out in Chair Pose during work breaks and as part of your exercise regimen. Consider setting your timer to go off every 20 minutes to remind you to do Chair Pose (or some other future pose) for about a minute. In this way you will make rapid progress in tone, form, and your experience of life! I look forward to teaching you Gokhale Yoga 101 and Strengthening Exercises - The Gokhale Way. Let’s make the most of our ongoing situation!

Subscribe to rib anchor