rib cage

Helping Hands for Healthy Posture: Tall Neck

Helping Hands for Healthy Posture: Tall Neck

Esther Gokhale
Date

Most of us are familiar with the idea of self-massage. For many it may grow from instinctively rubbing a sore spot. For a few it grows into an essential healing art, and may even incorporate skills such as trigger point work, myofascial release, and acupressure. 

Healing hands 

Many students opt for the in-person Gokhale Method® offerings (Free Workshops, Initial Consultations, Foundations, Pop-up, and Alumni Classes) because they place great value on their teacher’s hands-on work. I have found that hands-on work continues to be a force for good even in online work. For our online Elements students, who don’t get guidance from a teacher’s hands, it’s especially important to learn to do hands-on work with their own hands.

One of the most useful hands-on techniques that we teach you to do for yourself, whether you are an in-person or online student, is the hair pull. It is the subject of one of our free Gokhale® Moments videos, and one that we frequently refer to. In fact, Hair Pull is our most liked Gokhale Moment! See if you like it too…

The hair pull involves gently gliding your head back and up, lengthening the neck, aligning it more vertically, and pivoting the head slightly downward.

Confine your movement to the neck and head

When performing the hair pull, make sure that you are not pulling your torso and swaying your back. You may detect a straightening of the upper thoracic spine and feel stretch in the upper chest when gliding your neck back, which is fine. Other than that, focus on isolating the movement to your head and neck. If you find yourself swaying back with your front ribs lifting, you want to prevent this and protect against compressing your lower back by first learning to use your Rib Anchor—another Gokhale Moment video that we frequently refer to. 

Healthy head carriage

Rather than having forward head carriage, we want to return to healthy head carriage. Carrying not only your head on your spine, but an additional load on the head, is an almost universal practice in traditional societies, and both necessitates and encourages healthy neck alignment. 

Woman headloading in Odisha market, India

A well-positioned neck and head align directly over the torso—not to the front or behind

The Gokhale® Head Cushion has just enough weight to help you find the verticality you are looking for in your neck. By strengthening your deeper neck muscles, it also helps to relax the more peripheral neck musculature that is often tight. (You can use our $5 discount code TallNeck, valid through Sunday October 13, to purchase a head cushion.)

An image of the Gokhale Head Cushion

Letting go

Undoing well-established patterns such as tensing the back of the neck can still be difficult to navigate by yourself. Often the body has “held tight” to a position for decades. This is rather like pulling on a knotted piece of string—the harder we pull, the tighter the knot gets. Take things slowly to allow your nervous system time to find a different response, and your tissues time to relax. If the back of your neck only knows how to draw tighter, you can call on the expertise of a Gokhale Method teacher who has guided other students through this same difficulty and out the other side. Once you have unlocked these patterns together, you can continue to gently coax the elastic release you have discovered using your own hands. 

Esther Gokhale using hair pull technique with a young male student.
Here I am guiding a student to experience more mobility, length, and verticality in his neck.

Pain will not bring gain

If you have any pain when you try this maneuver, stop. Don’t feel obliged to follow general instructions that are not tailored for you. Nature spent millions of years evolving a sophisticated way of telling you not to do something, and you don’t want to disregard that signal. This is an instance where a qualified Gokhale Method teacher can look at your health history, together with the advice of your preferred health professional if appropriate, and work with you to progress comfortably and safely. 

Painting by Manet of woman in black dress and hat with tall neck.

Previous generations rarely exhibited the forward head carriage and curved necks that commonly cause tension, pain, and degenerative conditions today.

Help that’s at hand

Once you have mastered this hands-on maneuver, you can remind your neck and head how to move back home into a healthier alignment as frequently as needed. Practice regularly and mindfully, and you will progress with both your range of motion and your baseline posture. 

Teacher Julie Johnson helps a student lengthen her neck with a head cushion and hands-on.
Gokhale Method teacher Julie Johnson offers a student hands-on help in combination with a Gokhale® Head Cushion to gently lengthen her neck. The weight of the cushion encourages the deep spinal muscles of the neck to work, so that the outer muscles can relax.

Share your progress!

If you have practiced our “hair pull” technique and would like feedback on your neck and head position, please consider uploading a “Before” and an “After” picture in the comment section below. It’s a great way for all of us to share and learn from each other. 

Esther Gokhale demonstrating neck lengthening to teenage class. 
Here I was in 2009, demonstrating the lengthening effect of pulling up the back of the head to a group of teenagers. Hopefully they have continued to enjoy the benefits of space for their cervical discs, nerves, and bones!

Best next action steps 

If you would like help to improve your neck and head posture, get started by booking a consultation, online or in person, with one of our teachers. 

You can sign up below to join any one of our upcoming FREE Online Workshops…

Align Your Rib Cage and Solve Your Back Tension

Align Your Rib Cage and Solve Your Back Tension

Esther Gokhale
Date

Choose your remedies carefully

There are many approaches to stretching tight back muscles that involve rounding the back. Though these exercises give temporary relief, we recommend against them because they threaten the spinal discs, nerves, and ligaments. They can also result in the back muscles contracting even more tightly to stabilize the area. 

Three photos of people rounding to stretch their backs in different positions.
Rounded stretching exercises increase existing upper back curvature (hunching) while pulling aggressively on tight soft tissues and ligaments. Our tissues respond better to sustained, gentle realignment to make healthy changes. Pexels


By contrast, the Gokhale Method rib anchor maneuver brings relief from compression without any negative side effects. It restores your spine to a healthy J-shape, preserving the spinal discs, nerves, and ligaments. Over time, this alignment encourages a more natural, relaxed baseline tone in your back muscles as well as better abdominal tone.

How your rib anchor works

Rib anchor describes the pivot of the rib cage around a horizontal axis at about breast height, bringing the lower border of the front of the rib cage in and down thus sending the back of the rib cage up and out. Since the back of the ribs are attached to the vertebrae, this pulls the curvy “necklace” of the lumbar spine into a flatter, longer arrangement. This means of tractioning the lower spine is a fundamental Gokhale Method technique for removing sway. It restores healthy length in the lumbar area, alleviating compression of the discs, nerves, and vertebrae.  

a.                                                          b.             

Two diagrams showing swayed to vertical alignment of the torso. 
A forward pivot of the rib cage at breast height (b.) corrects for a tight lower back (a.), restoring lumbar length. Maintaining this orientation requires the abdominal muscles that anchor the ribs down to develop a healthy baseline tone.

The art of transmission 

Over many years of hands-on work helping students with their rib anchor, I became increasingly aware of an intuitive sequence of moves in what I was doing. My hands could guide a student to a pleasing endpoint, but what exactly I was doing fell short of verbal description and a conceptual framework. The gap between what we were doing and articulating in words showed up especially when our teachers got together for continuing education offerings, when questions and case studies were discussed. There was a need for new language, fresh insights, and deeper understanding. While teaching posture is both an art and a science, it is also a hallmark of our method that there be kinesthetic, visual, and intellectual understanding of our process; this takes the right words and analogies.

A fresh analogy for the rib anchor

For a very long time, we’ve taught three things that need to happen to help most people find a healthy head position. It’s a combination of: 

  1. Pivoting around an axis from ear to ear
  2. Lengthening the neck through relaxing certain muscles and recruiting others (especially the longus colli)
  3. Shearing the head and neck gently back               

1.                                         2.                                       3.

Drawings showing three movements for healthy head alignment.

Gliding the rib cage home follows a similar pattern:

  1. Pivoting around an axis that goes from side to side through the chest at about breast level (this being the main component of what I’ve described as rib anchor so far)
  2. Relaxing the erector spinae and other muscles and recruiting the deep abdominal and back muscles (inner corset) to create additional length in the back, as described and included in our teachings
  3. Shearing the ribcage backward relative to the pelvis. This is the movement that I’d been intuitively weaving into my hands-on ministrations that previously wasn’t well described

When students aligned their ribs by only pivoting the rib cage, I could see that it sometimes resulted in an awkward movement that did not integrate the rib cage into the torso quite right. Adding, and even better with practice, integrating this element of shear, transformed their outcome and experience. 

We can describe the shear element, for both the head and the rib cage, as analogous with backing your car into its garage: 

Diagram of a car backing into a garage.

An analogy that is true and versatile

Neat and easy parallels can, of course, be seductive but false. However, here we have a really useful and accurate analogy of what needs to happen. Deploying your rib anchor to come into a healthier orientation usually feels somewhat strange at first—especially if you have spent years actually leaning backwards from your waist—but this new analogy is already helping our students to enjoy a more buoyant uprightness, and less of a leaning forward sensation. 

This “backing up” of the ribcage can be tailored to affect different levels of the spine, as appropriate for each person. And while every body is a unique landscape known only to its owner, a teacher’s guidance is always available to help you map it out sooner. 

a.                                                          b.             

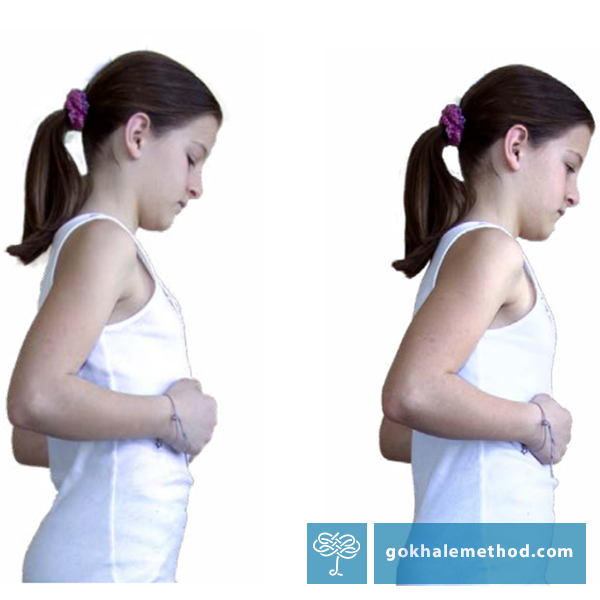
Two photos of a girl adjusting her ribcage angle.  
This girl (a.) stands with her lower back swayed. Her rib cage is angled back, and she can feel her lower front ribs popping up under her hands. She gently but firmly presses on her ribcage to “back it into the garage” and into a healthy alignment (b.), removing the sway in her lower back as she does so. 

Best next action steps

If you are new to the Gokhale Method, are resuming your posture journey after a little while, or struggle with your rib anchor, book a consultation, online, or in person with one of our teachers, who will be happy to help.

You can sign up below to join one of our upcoming FREE Online Workshops. . .

Settle Into Fall

Settle Into Fall

Esther Gokhale
Date

As the season turns and the colors around us are changing, leaves begin to float off their branches.  Just as our environment is settling in, we too can ground our bodies, using gravity as our guide.  The ability to relax downwards is an essential part of feeling comfortable within your body.  Here are some ways you can fall into your natural posture:


Nesting the Pelvis


Help your pelvis navigate its way home. While standing, take a little zigzag squat. Imagine you are about to sit down on a chair located behind you (not just directly under you) and let the pelvis fall forward. Feel your pelvis dropping between the legs, as though it is “nesting.” As your stand up out of your squat, see if you can retain that relaxed sensation in the front of the pelvis. This is an excellent way to let gravity help you antevert, or “tip” your pelvis forward.


The problems associated with a tucked pelvis, explained in an excerpt from our DVD


Esther's son, Nathan White, showing a
relaxed pelvis, rib cage and shoulder
position in spite of a challenging reach.


Releasing the rib cage


Ideally, the front of the ribs want to be flush with the contour of your torso. However, the ribcage may feel “seized” by a tight set of low back muscles which pull your back into a swayed position. The low back muscles need to release so the ribcage can drop forward, which can be challenging for some. We often need a little help from our rib anchor muscles (the internal obliques) which harness the ribcage into place. As your rib anchor strengthens, your low back is given a reprieve. Try placing two fists at the base of your ribs, below your chest, and gently push in and down. As much as you can, consciously try and relax the low back. Then, as your remove your fists, see if you can maintain the settled ribcage position.


Young man from Burkina Faso
showing healthy, settled shoulder posture.
 

Settle the shoulders


Continue to roll your shoulders. Remember, a little forward, a little up, a lot back, and relax. When you create a homebound pathway for the shoulders, there is a nice little niche for them to settle down and back. So, don’t forget to relax after your roll-you might be surprised that your shoulders will often drop down even further.


Young girl in Otavalo,Ecuador,
showing relaxed, settled lower
jaw position.

Slacken the jaw


If you strain the neck, the lower jaw can become tense and tight. As the back of neck lengthens and the jawline angles down, gravity will coax the lower jaw forward relative to the upper jaw. This is helpful for those of us who have an "overjet" (sometimes erroneously called an overbite in colloquial English). Use your hands to adjust your head. To enhance this effect, grasp a clump of hair at the base of the neck, gently pull back and then upward, and allow the lower jaw to soften and slide slightly downward.


Wishing you the best in this season of change,


Esther


--


Join us in an upcoming Free Workshop (online or in person).  

Find a Foundations Course in your area to get the full training on the Gokhale Method!  

We also offer in person or online Initial Consultations with any of our qualified Gokhale Method teachers.


Subscribe to rib cage