longus colli

Align Your Rib Cage and Solve Your Back Tension

Align Your Rib Cage and Solve Your Back Tension

Esther Gokhale
Date

Choose your remedies carefully

There are many approaches to stretching tight back muscles that involve rounding the back. Though these exercises give temporary relief, we recommend against them because they threaten the spinal discs, nerves, and ligaments. They can also result in the back muscles contracting even more tightly to stabilize the area. 

Three photos of people rounding to stretch their backs in different positions.
Rounded stretching exercises increase existing upper back curvature (hunching) while pulling aggressively on tight soft tissues and ligaments. Our tissues respond better to sustained, gentle realignment to make healthy changes. Pexels


By contrast, the Gokhale Method rib anchor maneuver brings relief from compression without any negative side effects. It restores your spine to a healthy J-shape, preserving the spinal discs, nerves, and ligaments. Over time, this alignment encourages a more natural, relaxed baseline tone in your back muscles as well as better abdominal tone.

How your rib anchor works

Rib anchor describes the pivot of the rib cage around a horizontal axis at about breast height, bringing the lower border of the front of the rib cage in and down thus sending the back of the rib cage up and out. Since the back of the ribs are attached to the vertebrae, this pulls the curvy “necklace” of the lumbar spine into a flatter, longer arrangement. This means of tractioning the lower spine is a fundamental Gokhale Method technique for removing sway. It restores healthy length in the lumbar area, alleviating compression of the discs, nerves, and vertebrae.  

a.                                                          b.             

Two diagrams showing swayed to vertical alignment of the torso. 
A forward pivot of the rib cage at breast height (b.) corrects for a tight lower back (a.), restoring lumbar length. Maintaining this orientation requires the abdominal muscles that anchor the ribs down to develop a healthy baseline tone.

The art of transmission 

Over many years of hands-on work helping students with their rib anchor, I became increasingly aware of an intuitive sequence of moves in what I was doing. My hands could guide a student to a pleasing endpoint, but what exactly I was doing fell short of verbal description and a conceptual framework. The gap between what we were doing and articulating in words showed up especially when our teachers got together for continuing education offerings, when questions and case studies were discussed. There was a need for new language, fresh insights, and deeper understanding. While teaching posture is both an art and a science, it is also a hallmark of our method that there be kinesthetic, visual, and intellectual understanding of our process; this takes the right words and analogies.

A fresh analogy for the rib anchor

For a very long time, we’ve taught three things that need to happen to help most people find a healthy head position. It’s a combination of: 

  1. Pivoting around an axis from ear to ear
  2. Lengthening the neck through relaxing certain muscles and recruiting others (especially the longus colli)
  3. Shearing the head and neck gently back               

1.                                         2.                                       3.

Drawings showing three movements for healthy head alignment.

Gliding the rib cage home follows a similar pattern:

  1. Pivoting around an axis that goes from side to side through the chest at about breast level (this being the main component of what I’ve described as rib anchor so far)
  2. Relaxing the erector spinae and other muscles and recruiting the deep abdominal and back muscles (inner corset) to create additional length in the back, as described and included in our teachings
  3. Shearing the ribcage backward relative to the pelvis. This is the movement that I’d been intuitively weaving into my hands-on ministrations that previously wasn’t well described

When students aligned their ribs by only pivoting the rib cage, I could see that it sometimes resulted in an awkward movement that did not integrate the rib cage into the torso quite right. Adding, and even better with practice, integrating this element of shear, transformed their outcome and experience. 

We can describe the shear element, for both the head and the rib cage, as analogous with backing your car into its garage: 

Diagram of a car backing into a garage.

An analogy that is true and versatile

Neat and easy parallels can, of course, be seductive but false. However, here we have a really useful and accurate analogy of what needs to happen. Deploying your rib anchor to come into a healthier orientation usually feels somewhat strange at first—especially if you have spent years actually leaning backwards from your waist—but this new analogy is already helping our students to enjoy a more buoyant uprightness, and less of a leaning forward sensation. 

This “backing up” of the ribcage can be tailored to affect different levels of the spine, as appropriate for each person. And while every body is a unique landscape known only to its owner, a teacher’s guidance is always available to help you map it out sooner. 

a.                                                          b.             

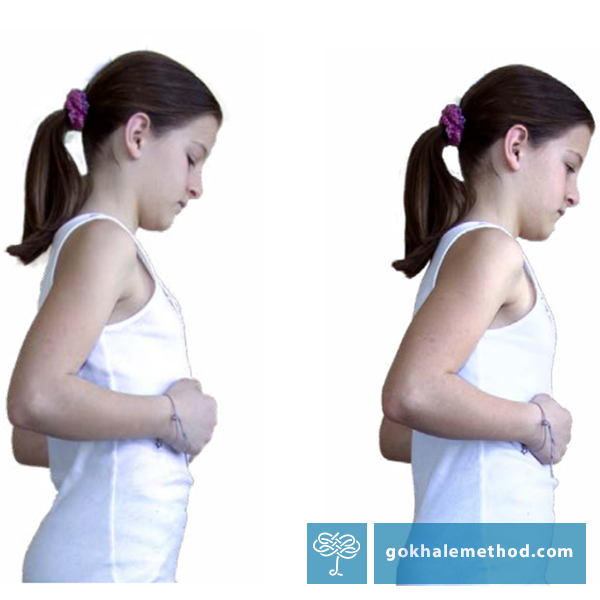
Two photos of a girl adjusting her ribcage angle.  
This girl (a.) stands with her lower back swayed. Her rib cage is angled back, and she can feel her lower front ribs popping up under her hands. She gently but firmly presses on her ribcage to “back it into the garage” and into a healthy alignment (b.), removing the sway in her lower back as she does so. 

Best next action steps

If you are new to the Gokhale Method, are resuming your posture journey after a little while, or struggle with your rib anchor, book a consultation, online, or in person with one of our teachers, who will be happy to help.

You can sign up below to join one of our upcoming FREE Online Workshops. . .

Posture Workouts in a Swimming Pool

Posture Workouts in a Swimming Pool

Esther Gokhale
Date

August is peak holiday time across the northern hemisphere, and many of us who live here will find ourselves poolside, or even better, in it!

Being in water has the natural advantage of lifting weight off the joints while providing gentle resistance training. Aching backs or knees can find relief from compression in the natural buoyancy that water provides. This has made pool exercises a popular prescription with physical therapists over many years, especially for post-operative or post-injury rehabilitation. 

On land, to relieve pain and compression, people usually use elaborate measures like inversion tables, traction units, or going to outer space! In the Gokhale Method we provide decompression for the lower back relatively simply with the Stretchsit® Cushion or the nubs on our Gokhale™Pain-Free Chair. But stepping into water is the simplest of all, giving you freedom of movement and the ability to strengthen yourself simultaneously.

Women in a swimming pool exercising with dumbbells.
Pool exercise also provides a fun and refreshing environment for exercise in summer heat waves! Wikimedia

This blog post gives you three ways to harness the unique benefits of being in water to practice and develop healthier posture. These exercises are challenging enough to do as a stand-alone workout or as a way to prime your swim session.

Healthy posture habits honed in water will benefit your daily life on land, as well as giving you greater stability and power for your swimming or other sports. 

For safety and best results, I recommend that you progress the session in the order given here, starting with Exercise 1 and, once you are familiar with it, move on to Exercise 2 and finally add Exercise 3. 

1. Stabilize your spine by using your inner corset

You will use a natural brace of muscles as you walk across the pool. It will give you the stability you need to cut through the resistance of the water without wobbling and threatening the alignment of your spine. 

Imagine you are getting into ice cold water. Feel how all the muscles around your middle can contract and make you more slender. You want to work hard enough to feel this from deep in the pelvis all the way up to your rib cage. You want to feel the muscular engagement all the way around your mid torso, like a tightly laced corset. 

Drawing of the muscles of the inner corset on a standing female figure. 
The muscles of the inner corset include the deep intrinsic back muscles, the abdominis transversus, and the obliques. 

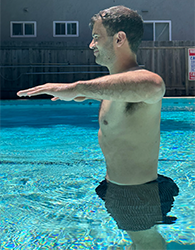
Gokhale Method teacher Eric Fernandez shows how engaging the inner corset draws the abdomen in and makes the torso slender.

This is one way of recruiting your “inner corset," which will help stabilize your spine as you walk and is key to swimming with a more streamlined, efficient stroke. We teach this technique and others in more detail in our in-person Foundations course, one-day Pop-up course, our online Elements course, plus our Gokhale Exercise program. You can read more about your inner corset here.

2. Headload to lengthen your neck and to find deep spinal support

In industrialized cultures we have an epidemic of forward head carriage, putting enormous strain on the neck and structures throughout the back. Finding healthy alignment through your neck, combined with the inner corset, helps your whole spine to support itself well. Resting even a modest additional weight on the head can help us to find our vertical axis and stand tall. This is the reason I developed the Gokhale™ Head Cushion

Drawing of the muscles of the inner corset on a standing female figure ; woman in Burkina Faso with a tall, straight neck and functional head posture.
Headloading encourages recruitment of the deepest muscles of the inner corset and the neck, especially the longus colli at the front of the spine. 

In the pool I suggest you use what you have at hand—your hands! Rest them on your head and push up against them with your head. Keep your nose and chin angled downward. Proceed very gently if you have neck issues. You can gradually build up the intensity over a number of sessions. 

Gokhale Method teacher Clare Chapman headloading her hands walking in a pool. 
Gokhale Method teacher Clare Chapman headloading in the pool using the weight of hands and arms. Create space between your shoulders and your ears—keep your shoulders down as your neck grows tall. 

Establishing healthy length in your neck will help you to retain a straighter, more spacious alignment while swimming, especially in breaststroke where people tend to crane their necks to hold their heads above water. Consider training to swim with your head in the water, if you do not do this already, which will enable a much healthier alignment of your torso, neck, and head.

Gokhale Method teacher Eric Fernandez engaging the muscles of the inner corset in the pool, hands on head.
Especially when you raise your arms, you may need to use your rib anchor muscles to prevent your back from swaying.

3. Power up your walking using your feet and glutes

Many of us compromise our walking by overusing our quads and hip flexors (psoas muscle) and underusing our glutes. We predominantly reach our front leg forward in our strides, instead of generating propulsion from the rear leg with our glutes and foot muscles. 

Woman walking in market, Odisha, India.
Our ancestors and many people living in more traditional or nonindustrialized societies—where joint and back pain are rare—walk using their glute and foot muscles more than we typically do.

As you walk in the pool, make each step a rep. Each step wants to progress through a pose that includes a straight back leg and a bent front knee. As each leg goes back behind you in turn, squeeze your buttock muscles on that side. Engage the upper outer quadrant of your glute pack. This is not the kind of glute squeeze that clenches your lower butt cheeks together and tucks your pelvis. 

Gokhale Method Alumna Christine Andrew in a glidewalking pose in the pool (underwater shot).
Gokhale Method Alumna Christine Andrew working hard to achieve healthy walking form in the buoyancy and resistance of water.

Grab the floor of the pool with the whole sole of your foot, and then push off from your toes. Focus on maintaining the convex foot shape as you do this. Propel to glide forward, not bounce upward.

Gokhale Method teacher Eric Fernandez grabs with his foot in the pool, aerial view.
Eric actively grabs the floor of the pool with each foot to pull the body forward and then push back.

Putting it all together: Aim to keep healthy form and walk as smoothly as you can through the water. This develops both healthy length and muscle power in the right places.

If you notice your back arches back as you walk, take smaller steps and lean more forward until you master the art of keeping your spine stable with the rib anchor and inner corset techniques. Enjoy!

Best next action steps for newcomers

If you would like to know which posture changes will help you be pain-free and functional, schedule an Initial Consultation, online, or in person.

You can sign up below to join one of our upcoming FREE Online Workshops. . .

How Do I Fix My Neck Pain?

How Do I Fix My Neck Pain?

Esther Gokhale
Date

Do you suffer from neck tension, muscle knots, or tingling in your fingers? Do you get frequent headaches?

Or maybe your neck is fine most of the time, but seizes up periodically, leaving you unable to function normally in your job, family life, and recreational activities.

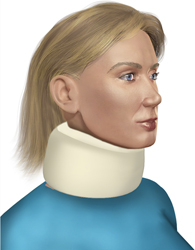
Drawing of woman wearing cervical collar
A soft cervical collar is a common prescription to alleviate neck pain. It can give welcome support in the short term, but doesn’t help to strengthen your neck or get to the source of the problem. Wikimedia Commons

Most neck pain involves compression. 

In modern cultures, the head often drifts forward as we slouch and crane our necks towards our computer screens. The weight of the head, (typically 11 lb. or 5 kg—think bowling ball), then requires the muscles at the back of the neck to contract strongly to keep the head up. This contraction compresses the relatively delicate tissues in the area. Not a recipe for a healthy, happy neck. If you have forward head carriage but are symptom-free so far, keep reading for tips that will prevent future problems with the discs, nerves, blood vessels, and bones in your neck.

Man using desk computer, slumped, with forward head carriage
In our culture slumped desk work posture and a degree of forward head carriage is common. Pexels

Restoring the natural length and position of your neck

Young children, ancestral populations, and people living in traditional societies around the world preserve a natural head carriage that stacks the neck well as part of a healthy J-spine. This allows the head to be balanced with only appropriate muscular effort, and the neck to be tall and free from compression. 

Young child with well-aligned neck
As young children we instinctively align our neck well over our body. Pexels

Restoring mobility in your neck

Perhaps you have experienced increased stiffness and reduced mobility in your neck over the years? Or unpleasant gritty sounds when you turn your head? Beware of exercises that include extreme flexion, extension, or head circles. These movements, taken to the end of your range of motion, can damage your discs and pinch your cervical nerves. If they are a part of your exercise regimen, consider reducing their range. 

Diagram showing the bones, discs, nerves, and major blood vessels of the neck.
There are many delicate and vital structures within the neck, so we first want to align it well. (front view). Wikipedia

In our experience it is best to focus on restoring the neck to a healthy baseline length and shape that centers your head well on your spine. The video below shows you how to proceed:

This gentle movement will help you to find a safe, natural trajectory to get started on gliding your head up and back.

If you have areas of long-standing rigidity or curvature in your neck, it is likely linked to your postural distortions elsewhere in your body, for example thoracic rigidity or a tucked pelvis. 

Expect this to take more time and training to change, for which you will be rewarded with additional benefits including comfort, improved circulation, and increased energy.

Finding your neck strength 

While many of the neck’s structures are delicate, they can also be strong. The deep muscles that are intended to support the neck and keep it tall tend not to get used very much in modern industrial culture and are often weak. Besides doing strengthening exercises, as is common in conventional approaches to neck problems, learning to carry weight on the head is extremely valuable. 

Woman in Odisha, India with a tall, straight neck and functional head posture.
People in traditional societies preserve a taller, straighter neck, and more functional head posture. (Odisha, India)

Cultures that headload suffer much less neck pain than we do and can teach us much about how, where, and why to headload. Not only do these people have excellent neck health, but they also have excellent posture throughout their bodies, and move with elegance and efficiency. Students in our classes begin with light weights to sense the axis along which they need to stack their bones. Over time, the weight can be increased to further strengthen the longus colli, inner corset, and other muscles. 

Student learning to head-load in glidewalking, guided by Esther Gokhale.
The small extra weight of the Gokhale™Head Cushion enables students not only to strengthen the deep neck muscles and lengthen the neck, but also to better orient their entire skeleton. 

My book 8 Steps to a Pain-Free Back has many images of people throughout the world headloading. Healthy head carriage, as opposed to forward head carriage, is an important starting point for this activity. It is not possible to carry significant weight without both the healthy neck alignment and strength to avoid compressive forces.

Woman showing an elegant, well-aligned head and neck (Thailand)
A well-aligned head and neck is both highly functional—and elegant

Because about one in three adults are affected by neck pain every year¹, we introduce techniques for the neck early on in our in-person Foundations course (Lesson 1 of 6), in our one-day Pop-up course, and our online Elements course (Lesson 4 of 18). Here students learn in detail the gentle techniques that gradually return the neck towards the length and pain-free position we all enjoyed as infants. Whatever your age, your neck is something you can learn to once again stack in your favor.

References: 

  1. Institute for Quality and Efficiency in Health Care (IQWiG), “Neck Pain: Overview,” InformedHealth.org, last modified February 14, 2019, https://www.ncbi.nlm.nih.gov/books/NBK338120/.

Best next action steps for newcomers

If you would like insight on your posture, consider scheduling an Initial Consultation, online, or in person.

You can sign up below to join one of our upcoming FREE Online Workshops. . .

Home Exercises Part 4: Low Planks

Home Exercises Part 4: Low Planks

Esther Gokhale
Date

This is our fourth blog post in the series where we put popular exercises under scrutiny to examine how they stack up—or not—against the principles of healthy posture. Here we are looking at “low plank,” a whole-body exercise that particularly develops abdominal strength and trunk stability. 

Our model for the photographs is Eric Fernandez, our Gokhale Exercise teacher who teaches the Gokhale Method in the Philadelphia area.


Low plank is done on the forearms, which avoids pressure on the wrists. 


The classic version of this exercise with straight arms. Active hands and a slight bend at the elbows will likely ease strain on the wrists, but we recommend you do low plank first.

Get all the benefits of plank, avoid any risk of damage

Plank is an excellent exercise for developing the muscular strength and coordination you need to align, support, and protect your spine. While pursuing these benefits you don’t want poor form to distort your spine and risk damage to your spinal discs and nerves. The exercise guidelines that allow you to do plank safely also train your body for healthy posture in daily life.

If you are new to this exercise, or the Gokhale Method®, I recommend that you prepare your body by learning to use your inner corset. The inner corset consists of the deep muscles of the abdomen and back which support and protect the spine. This is explained in detail in my book, 8 Steps to a Pain-Free Back.


Free Chapter of 8 Steps to a Pain-Free Back

To help you on your posture journey we are delighted to offer you two gifts:

  • A subscription to our bi-weekly informative newsletter Positive Stance™
  • A pdf of the Inner Corset chapter (ab strength) from 8 Steps to a Pain-Free Back

Please enter your email address in the field below. If you aren’t already a newsletter subscriber, you may need to respond to a confirmation email.

Free Chapter of 8 Steps to a Pain-Free Back

CAUTION: If you have back pain or a diagnosis or suspicion of herniation, stenosis, osteoporosis, or other spinal deterioration, you should consult your preferred health professional before practicing plank. 

Let’s get started

Start with a baby version of low plank in which your knees remain on the floor. This creates a shorter span and requires less abdominal strength to hold you horizontal. From a kneeling position:

  • Engage your inner corset—you will maintain it throughout the exercise.
  • Roll your shoulders back, lengthen your neck, tuck your toes under. 
  • Lower yourself into your start position, elbows on the floor directly under your shoulders and forearms forward and parallel. You can also start in a baby Cobra position and lift your trunk away from the floor. 
  • Bring your trunk to horizontal. Maintain your torso, neck, and head in this straight, horizontal line. 
  • Initially, aim to hold baby plank for 5-10 seconds at a time. Repeat 5-10 times.
  • Breathe steadily throughout. 


Baby plank develops healthy muscular strength, endurance, and coordination.

Full low plank

When doing plank on your knees is easy and you can breathe evenly, you can progress to doing the exercise with your legs straight and your weight on your toes. 


Full low plank. You may need to drop back on the duration or repetitions initially, and then build up again. 

Common Mistakes:

Neck tension:

Keep your neck lengthened with your head parallel to the floor; do not crane to look up. Tension in the back of the neck should not be attempting to lift you up. Neither do you want to drop your head down—rather, you want the deep muscles at the front of the cervical spine (longus colli) to support your neck, along with the inner corset.


Do not tense the back of your neck and pull your head up. 

Swaying the back:

It is important to not sag in the middle. Without a strong inner corset, the abdominal contents will hang downward, which will sway your lumbar spine and compress your discs and nerves. Practice the inner corset exercises consistently and you will soon be able to maintain a horizontal position.


The lower back is dipping into a sway, with tell-tale shirt creases in the lumbar area.

Tucking the pelvis, rounding the back and shoulders:

You may find yourself tucking your pelvis, especially if you have been trained to do this when working your abdominals. You may also be working your glutes inappropriately—you want your inner corset to brace you, not clenched buttocks. Work with a more relaxed feeling in your pelvis and hips and allow your behind to remain behind you. 


Rectus abdominis is flexing the spine and tucking the pelvis. Rounding the back and shoulders are also misguided efforts to push or lift up. 

It can be tempting to push away as you take your weight in plank, rounding your shoulders. Resist this habit and allow your chest to remain closer to the ground. Drawing your shoulder blades together may help.

Make sure you are not tucking your pelvis or pushing your chest away from the ground, both of which will likely result in rounding your back.

If you would like to practice this great exercise for your back health, join Eric for a “low plank” Gokhale Exercise class on Friday, November 26 at 9:45 a.m. (Pacific Time). If you have not yet subscribed to the 1-2-3 Move program, sign up now for your 7-day Gokhale Exercise Free Trial.


1-2-3 Move happens daily with Esther or guest teachers at 9:45 a.m. 
Gokhale Fitness with Eric runs Mondays, Wednesdays, Fridays from 7–7:25 a.m.
(Pacific Time), and Tuesdays, Thursdays, Saturdays from 3–3:25 p.m. (Pacific Time)
Gokhale Moving Meditation with Roberta is Mondays at 2 p.m. and with Kathleen is Wednesdays at 12 p.m. (Pacific Time)

Home Exercises Part 4: Head Rotations/Circling 

Home Exercises Part 4: Head Rotations/Circling 

Esther Gokhale
Date

This is our fourth blog post in the series where we put popular home exercises under scrutiny to examine how they stack up—or not—against the principles of healthy posture. In this post we are looking at head rotations/circling, an exercise that is often suggested to ease stiffness and mobilize the neck.

Neck pain—causes and solutions

Although not often considered in physical fitness and exercise regimens, the neck frequently becomes a problematic area for people in our culture. At that point, we look to mobilizing, stretching, and strengthening exercises to alleviate pain and stiffness.   


In traditional cultures the neck remains upright and long. It is capable of carrying the weight of the head and additional loads without injury.

The Gokhale Method point of view is that most of our neck problems arise from poor posture. The head and neck tend to drift forward and downward, causing the muscles at the back of the neck to tighten. We then lift our chins up so we can look out ahead of us. The resulting compression becomes a pain in the neck—or a headache—that we can do without. So how can we best avoid or remedy this?


Shortened, tight muscles at the back of the neck (left) are a common cause of neck pain and tension headaches. Positioning the head and neck correctly eases this compression (right).

Remedies to avoid

Tight, short muscles may well have compressed your cervical (neck) vertebrae, and perhaps caused bone spurs or bulging discs. Be especially careful to avoid exercises which take your head into circling movements. These call for extreme flexion (forward), extension (backward) and lateral bends (side), any of which could pinch your nerves and discs. By circling through these movements in rapid succession, the risk is heightened. Performing head rotations (twists) is also commonly advocated, but if done with poor alignment, head twists can also compress tissues in the neck. 


The cervical spine has seven vertebrae which support the skull. Wikipedia


There are many delicate and vital structures within the neck, including nerves, discs, and arteries (front view). Wikipedia

The right approach

You want the principles of Primal Posture™ to guide your head back where it belongs. Appropriate support from the longus colli and other deep muscles of the neck will give the cervical spine the support it needs to align well. This will encourage your outer neck muscles to relax their grip and be gently stretched. Circulation in the area will also get a boost. 


The longus colli muscles attach to the front of the cervical spine. When they contract (shown in red), they cause the neck to straighten and, therefore, lengthen.

If your neck is inflamed, it will benefit from steady, well-aligned exercise that can help to calm things down. The video clip below shows you a healthy way to lengthen tight muscles on either side of your neck. These movements do not overload your cervical discs, crunch your vertebrae, or impinge your nerves. Note that the exercise includes working at various angles to address different fibers within the same muscle.

A healthy exercise for the neck


This healthy neck stretch is from a recent 1-2-3 Move class for our Alumni.

Your checklist for this exercise is:

  • Perch on the front of your chair as shown.
  • Elongate your neck. Learn how to do this here.
  • Reach one arm across to your opposite ear and pull upward.
  • Roll open the opposite shoulder and pull that downward, leaning over sideways as you hold the rim of the chair seat. Learn how to roll your shoulders open here.
  • Don’t sway. Use your rib anchor. Learn how to use your rib anchor here.
  • Listen to some good music! It takes 20–30 seconds for muscles to relax.
  • Stretch different muscle fibers—slowly turn your head toward your armpit.


Healthy musculature allows the neck to stack in a tall, more vertical position with the head over the body, not forward.

Address the root cause of your neck pain

People usually think of their neck and any pain there as a separate issue from what is going on in their backs. From the point of view of a posture teacher, a distortion in any part of the spine will have an effect on all other parts of the spine. 

For example, people sitting or standing at a computer with their heads stuck forward may try to address neck pain locally. But the root of the problem is often in the pelvis. If the pelvis is tucked (i.e., with an imaginary tail between the legs), the spine will be curved over into a C shape. You can read more about spine shape here. In this situation, any local effort to draw the neck back is going to be hard to sustain, tense, and ultimately counterproductive. But by positioning the pelvis well, the neck will have the opportunity to stack well. At this point, local work on the neck is able to provide not only symptomatic relief but can also return your cervical spine closer to its primal, healthy structure.


A C-shaped back stresses the lumbar (lower back) discs and is also bad news for the neck.

Join me for a special new one-hour FREE Online Workshop, Posture Remedies for Text Neck,  November 12, 11 a.m. (Pacific Time), and learn helpful suggestions on how to improve the architecture and health of your neck. 

If you would like an expert one-on-one assessment of your posture, including  your neck alignment, you can arrange an Online Initial Consultation or take an in-person Initial Consultation if you have a Gokhale Method Teacher near you.

Neck Pain Tips

Neck Pain Tips

Esther Gokhale
Date

A pain in the neck really can be a pain in the neck! Here are some tips on how to address this annoying problem:

1. Stretch it out.

  • When you lie on your back, stretch the back of your neck out as you lay your head on the pillow. This way the pillow can help lengthen any tense muscles in your neck.
  • When you drive, use the headrest to stretch the back of your neck out.


2. Know which way is up.

  • Grasp a good-sized clump of hair at the base of your skull and gently pull back and up allowing your chin to angle downward in a relaxed way.
  • Place a small pillow on the top of the head (on the slightly sensitive spot where your fontanel used to be) - this marks the axis along which to align your neck and back.


Notice the alignment of this girl's head with
her torso as she hip-hinges to pound her millet

3. Keep the spine aligned

  • When sleeping on your side at night, use one large or two small pillows so your head does not flop too far out of alignment with the rest of the spine.
  • When bending, do not lead with the head as this encourages a head-forward baseline position.

4. Check your base.

The root of many neck problems is in the pelvis, the foundation for your entire spine.

  • Sit with your tail out behind you instead of under you.
  • Stand with your tail behind you instead of between your legs. 

5. Roll your shoulders back.

Periodically throughout the day, and as preparation for driving and keyboarding, roll your shoulders back into a healthy position. Having your shoulders back and down helps your trapezius muscle keep a healthy baseline, which helps your neck. (Click here for a free download on how to do a shoulder roll from my book 8 Steps to a Pain Free Back)

6. Use your muscles, spare your joints.

  • When walking, engage your buttock (gluteus) muscles to soften your landing. You don’t want your neck (or any of your weight-bearing structures) to experience an earthquake with every step you take. Bonus: making every step a rep will give you a well-toned behind and will make your walk more graceful.
  • If you are jogging or riding in a bumpy bus, imagine you are carrying a significant weight on your head and push up against it. You will be engaging your longus colli muscle and sparing your neck discs and nerves unnecessary wear and tear.

Here's to a healthy neck!
Esther


Join us in an upcoming Free Workshop (online or in person).  

Find a Foundations Course in your area to get the full training on the Gokhale Method!  

We also offer in person or online Initial Consultations with any of our qualified Gokhale Method teachers.

Subscribe to longus colli