lumbar

Home Exercises Part 5: Squats

Home Exercises Part 5: Squats

Esther Gokhale
Date

In this blog post, the fifth in our series scrutinizing popular home exercises, we are looking at squats. Is it a beneficial exercise, and how does it stack up—or not—against the principles of healthy posture?

Squats are a popular and effective exercise designed primarily to strengthen the quads, stabilize the knee joint, tone the glutes, and also work the back muscles. 

4 stages of kettlebell snatch, man squatting
A squat is an essential baseline position for many athletic movements including this kettlebell snatch. Wikimedia

How low should they go?

Deep squats have become increasingly popular in recent decades, following a trend towards cross-training and exercise based on “natural movement.” Fitness and movement trainers have sought to emulate people in non-industrialized societies or traditional cultures who squat with ease, often for long periods.

Deep squats present challenges unless you grew up in a culture that routinely sits and squats on the ground. The challenge is not only in the muscles around the hips, knees, and ankles, but also in the bony part of the joints. When you are born your hip joint is made entirely of cartilage. By age 16, it is fully ossified. If you are not continually sitting and squatting low in your formative years the ossification pattern will not facilitate the angles necessary for squatting as an adult. It is therefore impossible for most westerners to squat low without tucking the pelvis and rounding the back, just like it is hard for them to sit crossed legged and relaxed.

Woman in heels in deep squat with rounded back.  Indian woman in deep squat with straight back.
Even though her high heeled shoes reduce the angle of bend required to squat, the woman on the left rounds her back to squat. The Indian villager (right) can squat with a straight back. Unsplash

The benefits of standing/partial squats

For this reason I highly recommend partial squats, which are a safer option and offer many of the benefits of a full squat. They are also a perfect exercise to focus on and develop healthy posture.

Anyone who has ever done a fitness or yoga class may also know this exercise as Chair Pose. In some schools of fitness training, it is regarded as a foundational exercise. In traditional yoga it is known by its Sanskrit name, Utkatasana. Utkatasana translates as intense, powerful, fierce, difficult—you get the idea. 

BKS Iyengar in Utkatasana, side view.
BKS Iyengar in Utkatasana, showing the challenge of the pose. Facebook

Squats can indeed be demanding. Lowering and raising your body weight into and out of the partial squat works the biggest muscles in the body (the leg and buttock muscles) hard, as they alternately contract (concentrically), and then release their length (eccentrically). 

When you start training with squats you don’t want to go down too far—better to do a shallow, more open zigzag squat that eases you into the exercise. This avoids the risk of injury and you can increase the intensity and demands on your body by going deeper over time, as you get stronger and more flexible. 

How to do a healthy squat

   1. Preparation

To facilitate a healthy amount of external rotation in the legs and hips, softness in the groin and nestling of the pelvis, we recommend doing the paper clip stretch or figure four as it is also known. This is a good preparatory exercise before squatting, and, done regularly over time, will encourage a healthy nestling of the pelvis and alignment of the legs.


In this video I am demonstrating the paperclip stretch, which prepares the legs and hips for healthy squatting. Clip from Gokhale Method Open University video.

   2. Start from a “Ready Stance”

A well-aligned standing posture is essential to maintain healthy form as you execute squats. The Gokhale Method teaches a position we call “Ready Stance which aligns your feet, legs, and hips for correct movement. In this stance you will find the key characteristics of a squat, but in embryonic form:

  • Stand with your feet hip width apart and pointing 10°–15° outward. Have a tiny bend at the hips and knees, as if you are about to play tennis or dance, bringing softness to the groin and back of the knees. 

Eric in ready stance, side view, hands on hips.
Gokhale Fitness teacher Eric Fernandez demonstrates the Ready Stance. It is like an ultra-mini squat.

ancient Greek statue, front and side views
This ancient Greek statue captures the softness and depth you want at the groin even in everyday standing. To get there, take the Ready Stance and then stop short of locking your joints as you straighten up.  

   3. Going into a squat

  • In the Ready Stance, rest your hands on the top of your thighs in your groin crease.
  • Initiate your squat from your hips. As you fold deeper at the hips your behind will travel further back behind you. 
  • Your knees will bend in response to your bend at the hips. Keep them wide and pointing outward and your thighs out of the way as you bend.
  • As you squat, allow your torso to angle forward at the groin as your pelvis rotates on your thigh bones. Check that your stance has a zigzag shape.
  • Focus on maintaining the straightest possible spine by using your rib anchor
  • Keep your chin down. You want your neck and head to remain in the same orientation as the rest of your torso.

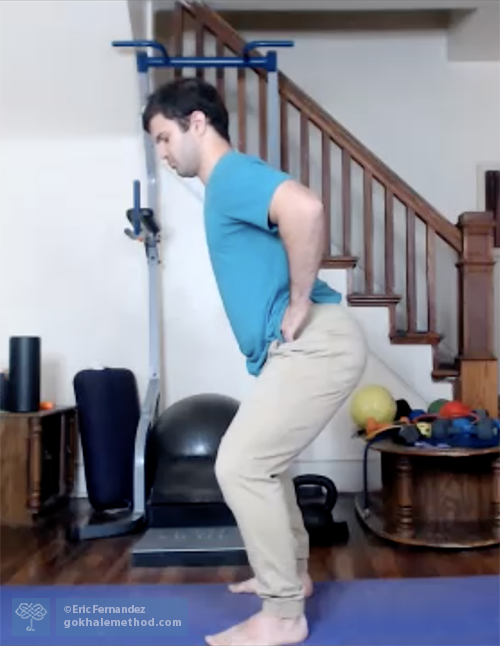
Eric in partial squat, side view, hands on hips.
A healthy squat embodies all the points above.

  • When you are confident with the above you can raise your arms smoothly as you squat. Maintain your rib anchor, especially if you have stiff shoulders and are more likely to sway to lift your arms. If possible, bring your arms to the same angle as your torso.

Eric in partial squat, side view, arms up.
Raising your arms in line with your torso requires a strong rib anchor to prevent your back from swaying.

Cecily’s spinal shape in chair pose, with SpineTracker
Gokhale Method teacher Cecily Frederick in Chair Pose, overlaid with SpineTracker™ snapshot. The SpineTracker gives real time feedback on the shape of the spine. Note that Cecily’s spine remains straight in the lumbar area and the J-shaped angle at the L5-S1 junction puts her behind behind her—she does not arch her back.

   Cecily’s spinal shape in chair pose, with SpineTracker, detail
Detail of Cecily Frederick’s spinal shape in Chair Pose, overlaid with SpineTracker snapshot.

Common Mistakes: 

  • Swaying the back. Fix this by using your rib anchor to remove the sway.

Woman swaying in partial squat, side view
Swaying the back compresses the lumbar discs and nerves. Unsplash

  • Knees and/or feet collapsing inward. Fix this by angling your feet outward.

Eric in partial squat, front view, legs in internal and external rotation 
Internal rotation of the legs (left) puts pressure on the inner knees and flattens the foot arches. Feet turned outward and knees and thighs kept wide helps support your structure while allowing the pelvis to settle.

  • Lifting the chin. Avoid looking up or ahead. Fix this by softening your gaze and aligning your head and neck with the rest of your torso.

Person in partial squat from side lifting chin.

Lifting the chin risks putting pressure on the discs and nerves of the cervical spine. It is better to cultivate a long, tall neck. Wikimedia

   4. Increasing the challenge in squat

Once you have good technique and can perform squats smoothly with good form, you can increase their intensity in several ways—though not all at once!

  • Increase the number of reps.
  • Go deeper—take your thighs towards horizontal. Make sure your torso also pivots closer towards your thighs, your behind stays behind, and your knees do not go forward of your toes. 
  • Hold a squat position for a number of breaths. Maintain a strong rib anchor so as not to flare the ribs and sway with each inhalation. 

Free Online Workshops

If you would like to find out more about how the Gokhale Method can help support you, whether through exercise or posture education, sign up to join one of Esther’s upcoming FREE Online Workshops.

The Story of the Stretchsit® Cushion

The Story of the Stretchsit® Cushion

Date

Earlier in the history of our company, we didn’t intend to create any posture products and thought education alone would be sufficient. We still stand by our philosophy that education is the most important ingredient in restoring primal posture.  


Posture braces, seat cushions, and shirts are not able to take the place of hands-on coaching to establish posture ideals or healthy ways of getting to those ideals. The Gokhale Method trains people on the look and feel of healthy posture; now you can choose aids wisely to support you.


Posture devices as seen above usually induce people to switch from one bad posture (slumping) to another (arching). Most people believe they need to "sit up straight." In fact, arched posture can do as much harm as slumping does. Hands-on training by a Gokhale Method teacher can teach you truly healthy posture; following that, a reminder system, whether like the one above or a simple alarm that goes off periodically, will induce you to reset yourself in a healthy way.  

There’s no magic cushion, or brace, or buzzing device that will give someone perfect posture without hands-on coaching. But over the years, our students' input and feedback taught us to see that there is significant value to be had from certain types of posture aids.

We still teach the use of a towel as a great stretchsitting device, but before we developed the Stretchsit Cushion, we frequently received feedback about how people found it difficult—or impossible—to use a towel on their wooden chair, their plastic outdoor furniture, or their slippery office chair. They hated trying to use rubber bands and bungee cords and clothes pegs, and having to refold or readjust the towel to be the right size.


The towel method works for some seats, but many students found it frustrating to set up or adjust.

We kept hearing, “Can’t you just make something I can throw on a chair easily?” So we listened.


Having the Stretchsit Cushion in your car means you spend significantly less time setting up and adjusting your cushions, and it can't slip out of place!

Developing and manufacturing a product was new for me and for the company, so it took a few tries to get to where we are today. I learned a lot about persistence.

Our first round of the Stretchsit Cushion, V1, had oval rubber nubs. Pro: very sticky! Con: the stitches tore through the rubber from the shear forces of stretchsitting—people stuck too well! It’s better that the compression forces went to the nubs rather than the discs in people’s back, but our customers were naturally disappointed when their cushions failed.


This was V1 of the Stretchsit Cushion.

Instead of endlessly replacing products, we moved on to a tougher, textured nub that is stuffed with foam to be more durable.


The Stretchsit cushion's nubs are now made from a strong, textured material that will provide friction without ripping.


A lot of nubs to help a lot of spinal discs!

Additionally we switched to stronger, more color-fast fabric so cushions in cars or sunlit rooms don't get sun-bleached. We also used a more durable foam for the body of the cushion - one that is malleable enough to accommodate many spine shapes, but strong enough to stand up to wear and tear over time without deteriorating.


The front panel of the cushion created by a seamstress using a sewing machine.

It took us several rounds of production to get to the great cushion we have today. We were determined to not compromise on the quality of the materials or the function of the product. When we first started designing the cushion, we didn’t know all the factors we would have to take into account to reach a really high standard. Now we are proud that our cushion receives very few complaints and an awful lot of praise!


The Stretchsit cushion is available from a teacher near you, our website, or Amazon.

FAQs

Q: Where can I purchase a Stretchsit Cushion?

A: If you are taking a Gokhale Method class, we recommend purchasing one directly from your teacher. Otherwise, you can buy them from our website or from Amazon.com. You can save on bundles of 2 or 3 cushions, available only through our website.

Q: Why is there such firm / soft foam in the cushion? Wouldn’t a softer / harder cushion be more comfortable?

A: There are research studies showing that medium-firm mattresses provide people with the most comfort and support. We’ve discovered this to be true for our stretchsit cushion as well. On one hand, we wanted it to be supportive; on the other, we wanted it to be comfortable and conform to a variety of body shapes. We played with the hardness of the foam and of the nubs, and after many iterations have come to a harmonious place, similar to a medium-firm mattress.


Each nub is stuffed with foam of an appropriate density so it will protrude from the cushion without being uncomfortable against the back.

Q: Why isn’t the Stretchsit Cushion cheaper, when I can find $25 foam cushions at stores like Bed Bath & Beyond?

A: We find our Stretchsit Cushion is actually less expensive than high-end lumbar supports or memory foam pads, but yes, there are cheaper foam cushions on the market. Many of these cheap options deteriorate quickly, and aren’t dense enough to provide significant support (although they will soften a hard or rough surface, if that is all that is desired).

In the Gokhale Method philosophy, lumbar supports do not solve, and may exacerbate, the problem of compression by causing a sway in the lumbar spine (lumbar supports are designed to encourage the S-shaped spinal ideal that we teach away from). What’s needed is a thoracic support that offers friction, which isn't possible with a simplistic single block of molded foam and a fabric cover.


A typical lumbar support cushion may exacerbate a sway and doesn't support a J-spine.

To provide function and comfort at the standard we hold ourselves to requires a higher level of sophistication, which we’re very happy to have reached in the Stretchsit Cushion. The production process for our cushion is rather intricate, and to make small high-friction nubs of appropriately strong material requires the individual nubs to be worked by someone using a sewing machine rather than industrial sewing. This, and the quality of our materials, is what dictates the price of our cushion. We receive numerous reports on how much benefit people get out of their cushions, so we consider that although it can seem expensive at first, when the cushion is considered as an investment in the health of your spinal discs, nerves, and vertebrae, it is really a steal!

Q: Should I buy your cushion and use it with my current chair or buy the Gokhale Pain Free Chair?

A: You will need the cushion for your carseat and in chairs that you have no control of. We sell a bundle of three cushions because people frequently want one for the car, one for their work chair, and one for their computer chair at home.

If you are in the market for a chair, the Gokhale Pain Free chair is a marvelous investment. It has a 10 year warranty on parts (here too we did not skimp on quality or function), and will support you in stretchsitting (it has a built-in stretchsit cushion) as well as in stacksitting (it has a built-in wedge). It has other helpful features like a “mushroom top” seat to facilitate external rotation of the legs, and no armrests so you can come in close to your work surface (if your shoulders are properly rolled open, you will not miss the arm rests). No other chair has these features.


The Gokhale Method Pain-Free Chair has a built-in Stretchsit Cushion and a built-in wedge with additional nubs in the seat for greater traction.

That said, if you are financially pressed, we recommend economizing by buying the Stretchsit Cushion and using a folded blanket for stacksitting. These inexpensive additions to your chair allow you to achieve healthy posture; the drawback is that it won’t look as elegant and you will need to adjust your implements periodically.


Watch our videos for guidance on using your Stretchsit Cushion:


Epidural steroid injections for lumbar spinal stenosis?

Epidural steroid injections for lumbar spinal stenosis?

Esther
Date

Lumbar_Spinal_Stenosis   A four-year study involving 276 spine patients ages 53 to 75 published in the journal Spine suggests that we should--at the very least--take a deep breath and think twice before choosing epidural steroid injections to relieve the pain of lumbar spinal stenosis, not only because this oft-used treatment may not work, but also because it may cause more harm than good. Better yet and instead it might make sense to simply get in the habit of breathing deeply, which naturally lengthens the spine and helps relieve unhealthy stress on the vertebrae.... But more about Gokhale Method solutions in just a bit!


Spine_15_Feb_2013

While the authors of "Epidural steroid injections are associated with less improvement in patients with lumbar spinal stenosis" caution that the unexpected results of this small, retrospective study warrant further investigation, a couple of findings leap out:

  • Using well-established scales for measuring leg and lower back pain, the researchers found significantly less improvement among patients who had the steroid injections than among those who did not; this was true even among those patients who went on to have surgery. 
  • Despite conflicting reports about the efficacy of epidural steroid injections in lumbar spinal stenosis, 69% of spinal surgeons consider ESIs to be the first-line invasive treatment when exercise and physical therapy have failed.

The Spine study—together with recent alarming reports of fungal meningitisparalysis, and other risks associated with epidural injections—prompted me to tackle this topic today.

What is lumbar spinal stenosis?

Anatomical_Exposition_of_the_Structure_of_the_Human_Body_George_Stubbs

Spinal stenosis is a narrowing of the open spaces in the spine that can compress nerve roots and cause pain and numbness in the neck, limbs and back. Lumbar spinal stenosis is the narrowing of the spinal canal in the lower back--that is, in the five vertebrae that run between the rib cage and the pelvis. If we dig a little deeper and consider the anatomy of the spine, itself, we find that stenosis can happen in a couple of places:

  • The space at the center of the spine (central stenosis)
  • The canals (or vertebral foramina) through which the spinal nerves pass (lateral stenosis)

Visualize it

I believe in the therapeutic value of mental imaging, but in order to visualize solutions to a problem, it helps to see and understand the problem, itself. Take a look at this information video.

No wonder lumbar spinal stenosis hurts! As we just saw, a number of factors can contribute to the narrowing of space in the spinal cord:

Not only do these bulges, spurs and hypertrophied ligaments and joints pinch nerves and cause pain in individual people, they represent a burden on our healthcare system and society at large.

"The growing epidemic"

In 2010, The American Academy of Orthopaedic Surgeons described lumbar spinal stenosis as "the growing epidemic," noting that with the aging of the population this already costly problem will only get worse:

  • 8% to 11% of Americans are thought to be impacted by lumbar spinal stenosis.
  • 2.4 million Americans are likely to be affected by 2021.
  • As "boomers" increasingly qualify for Medicare benefits, government spending on lumbar spinal stenosis will no doubt increase.

Additional evidence was provided by the Chairman of the American Society of Interventional Pain Physicians, who, in a 2012 review of Medicare records, found that the number of  spine injections from 2000 to 2010 increased 159%. And the Centers for Medicare and Medicaid Services reported that in 2011 it paid providers $106.4 million for 252,288 injections, which averages out to $422 each. All of which raises the question: What can we do to prevent or manage lumber spinal stenosis apart from relying on costly epidural steroid injections, which may not work as well as people had hoped and which are now also associated with contamination and infection and other risks?

Gokhale Method solutions

If you'd rather not count yourself among the the 2.4 million Americans (and untold numbers of others outside the US) likely to be afflicted by lumbar spinal stenosis between now and the year 2021—or if you are currently experiencing pain from spinal stenosis and would prefer a non-interventional approach—then I recommend the following Gokhale Method techniques:

All of these techniques involve lengthening the spine, which—by increasing the space between the vertebrae, as well as the open spaces in the spinal canal where the nerves exit—take stress off the places where stenosis occurs. One way to enhance these powerful techniques is to use imagery, a method known to promote all kinds of healing, together with deep breathing, which will improve movement of macro- and micro- elements of the spine. To begin to test this out you might now take a very deep breath and, as you feel your spine naturally lengthen, imagine what it feels like to naturally stand like the beautiful kouros figure, just below.

statue

The benefits of reestablishing good length in the spine cannot be overstated

Stretchsitting and stretchlying on back and sides

As noted above, Gokhale Method stretching techniques involve lengthening the spine (including, of course, the lumbar spine). Reestablishing natural length creates space and helps relieve unnatural stress by decompressing nerve roots as they branch away from the spinal cord via the spinal foramina. Spine-lengthening techniques also take pressure off bulging discs that can cause pain when they press in against spinal nerves. Relieving unnatural stress on the vertebrae via spine-lengthening and reshaping may also confer benefits by slowing or even halting the formation of unhealthy calcium deposits, which, when they form bone spurs, can poke into the spinal column, compress nerves, and cause pain.

Using your inner corset

Bracing the torso is also really important in preventing or managing lumbar spinal stenosis, and this can be accomplished by strengthening the deep abdominal and back muscles and making good use of what I call the "inner corset." We can actually relieve compression on the spine by transfering it to these strong central muscles, which are ideally placed to help carry the weight of the upper body. It follows that engaging the inner corset may also help minimize the pain that occurs when bone spurs intrude on the spinal cord or spinal nerves, as well as when spine instability (spondylolisthesis) narrows the spinal canal by allowing one vertebra to slip forward on another.

Complementary techniques

Breathing and mental imaging

Only when the body is in correct alignment can the natural action of breathing massage the tissues of the spinal area and confer its own therapeutic value in relieving the pain of lumbar spinal stenosis. And because mental imaging is known to help reduce stress and relieve back pain, it may be beneficial to consciously envision what's going on inside your body, every time you take a deep breath:

  • With each inhalation, the spine lengthens and massages tissues in the back while relieving stress on entrapped spinal nerve roots.
  • With the settling back that occurs with each exhalation, the natural massage-like action continues, and this goes on and on, with every breath.
  • With the natural massage that occurs with each inhalation and exhalation, blood is pumped through the tissues around the spine, normalizing circulation in the area.
  • Good circulation presumably normalizes related physiologic processes that might include calcium deposition and calcium reabsorption.
  • Good circulation also promotes the flushing away of waste products.

To sum up, stimulating circulation in the lumbar region—both of which are achieved through the Gokhale Method—are invaluable in the prevention and amelioration of stress on the vertebrae.

Feather_Washington_State_Kevmin

Imagery can help relieve stress and minimize pain

Secondary benefits of Gokhale Method techniques

Lengthening your spine and using your inner corset are things you want to be doing anyway, in the course of your usual activities—not only to clear up pain stemming from lumbar spinal stenosis, but to make you look and feel better, overall. Added perks of learning and practicing low-cost, no-hassle Gokhale Method techniques include zero risk of infection and other adverse effects, and—beyond the initial learning—no expenditure of precious time.

Where to learn more?

You will learn to lengthen your spine and use your inner corset in Sessions 1, 2, and 3 of the Gokhale Method Foundations course, and in Lessons 1, 2, 4, and 5 of the book 8 Steps to a Pain-Free Back, as well as in Scenes 1, 2, 3, and 6 of the Back Pain: The Primal Posture Solution DVD.

Image and Video Credits: Spinal Stenosis: Wikimedia Commons Journal Cover: Spine Lumbar Spine: Wikimedia Commons Spinal Stenosis YouTube Video: DuPuy Kouros, Archaic Greek Youth: Gerard Mackworth-Young Feather collected in Washington State: Kevmin, Wikimedia Commons

Subscribe to lumbar