flexibility

What Makes the Gokhale® Exercise Program Special

What Makes the Gokhale® Exercise Program Special

Clare Chapman
Date

Taking the daily classes has helped me perfect the practice and really get the nuances. I am now able to accomplish the rib anchor, which I was struggling with. Also, the daily motivation that I get from checking in and feeling the energy from the group—it has just been an amazing opportunity.
Elizabeth Kubicki, Gokhale alumna

Gokhale Method® teacher and editorial writer Clare Chapman explores the When and Why of Gokhale® Exercise with its creator, Esther Gokhale.

Clare: Can you tell us how the Gokhale Exercise program got started?

Esther: For a long time now, our teachers and I have been surprised at how much our alumni—graduates of our courses—can forget. This despite their being delighted by the courses and their results. Of course, it shouldn’t be surprising at all, given that humans have forgetting curves as surely as they have learning curves, and that our beginner courses cover a lot of material in a short time frame. 

Forgetting Curve graph with kind permission from www.organisingstudents.com.au.
The forgetting curve was developed by German psychologist Hermann Ebbinghaus and depicts the way learned information falls away over time. Research confirms that, on average, students forget 70 percent of what is taught within 24 hours of a training experience. 90 percent is forgotten within a week. Image: www.organisingstudents.com.au

On January 1, 2020, I decided to try a new format—an online 21-day challenge. Each broadcast was short, reminding alumni of one basic principle of the Gokhale Method that would be familiar, if semi-forgotten. I chose it to be an exercise program to additionally fill the well-understood need for more movement in daily life.

Esther answers a question from Gokhale alumna Elizabeth Kubicki about the posture principle of straightening the back leg in speed walking.

Clare: And before long COVID hit, correct?

Esther: Yes, along with shelter-in-place orders. It became clear people would be stuck in their homes without their usual access to sports and exercise facilities, or their usual interventions for their aches and pains. We had a tested offering whose value had suddenly increased dramatically—it felt important to continue the program, and also to open it up to a wider audience. It gathered a large number of daily participants and evolved to include a great variety of music and dance, art, anatomical education, community and mutual support. Many participants told us that this is what kept their bodies and spirits afloat through the dark period of the pandemic.

Clare: How did Gokhale Exercise evolve its current format?

Esther: Gokhale Exercise started with 1-2-3 Move, which uses dance as the vehicle for posture education and entertainment. It continues to this day without having missed a beat! The 13-minute class is our main program, focusing on 1 posture principle, 2 dance moves, and 3 images. It is preceded by a joyous, free-form, 15-minute Dance Party.

Dance is a human universal, and besides providing a fun way to revisit posture principles, it improves cognition, staves off dementia and depression, brightens spirits and community feeling, and more. Traditional dance is especially true to our ethos of taking lessons from other cultures. Various members of our teacher team contribute: Sabina has deep knowledge of blues and swing styles, Eric loves Latin, and Lang is expert in Capoeira and Brazilian dance moves. My passion is Indian, Brazilian, and Congolese dance​​. . .

Gokhale Exercise has now blossomed into multiple offerings, adding Gokhale Fitness, Moving Meditation, Fitness for Cyclists, and Yoga, with an increasing number of teachers offering their expertise throughout the day. 

Photo compilation of 8 Gokhale Exercise teachers.
Gokhale Exercise teachers enjoy sharing their movement expertise with a “Gokhale filter.” 
Top left to bottom right: Roberta, Julie, Esther, Kathleen, Eric, Sabina, Tiffany, and Lang.

Clare: Can you say more about how these different forms of exercise encourage healthy posture?

Esther: Every 1-2-3 Move class uses traditional rather than modern dance moves. This comes with a level of reassurance about their suitability for the human body; we know these moves have been vetted by entire populations who didn’t have modern pain. 

Gokhale® Yoga, Moving Meditation and Gokhale® Fitness also explore posture principles that are not emphasized or respected in the average class: anchored ribs, recruiting the inner corset, kidney-bean shaped feet, etc. Respecting the body’s natural blueprint enables us to increase fitness, strength, and flexibility without risking injury. 

Across all the classes we follow a Posture Principle of the day—for example, Healthy Rotation of the Torso—so whichever class(es) students participate in, they get the range of healthy posture reminders they need at regular intervals. 

Gokhale Exercise email image of Cornell baseball player.
Each Gokhale Exercise email comes with a daily Posture Principle image to remind and inspire. This vintage baseball illustration shows healthy rotation of the torso while keeping good form throughout the body.

Clare: Who attends the Gokhale Exercise program?

Esther: Classes span a variety of pace and challenge, so for example, our Gokhale Moving Meditation classes are gentle enough for even the most physically challenged members of the community, while Gokhale Fitness pushes almost everybody’s boundaries (while giving easier modifications of the exercises offered). 

Clare: Is the Gokhale Exercise program suitable for beginners?

Esther: The ideal starting point for beginners is to take one of our comprehensive courses (the in-person Foundations course, or one-day Pop-up course, or our online Elements course). This is especially true for those suffering pain or dysfunction. In these courses, students can learn with optimal sequencing and detail, and get the one-on-one attention they need. For students who would like a free introduction to the Gokhale Method we recommend signing up for an in-person or online free workshop. For comprehensive personal advice, consider taking an in-person or online Initial Consultation to determine which course is best for you. 

Many people start with the Gokhale Exercise program because it has a free trial week and costs very little thereafter—we are glad to be able to provide this service for people who cannot afford our courses or who are curious to see what our offerings are like. Having the program open to the public also means that alumni can invite their friends and family members along to try it without any obligations.

If you have never taken a Gokhale Method course 7-day Free Trial  

If you have taken a Foundations, Pop-Up or Elements course Free Month Online University

If you have never taken a Gokhale Method course 7-day Free Trial  

Clare: What is next for the Gokhale Exercise Program?

Esther: We want all our students to have a minimum of one month’s live support, available every day, as they approach the end of their courses. So we are delighted to announce that all our valued alumni—from the in-person Foundations, Pop-up, or online Elements courses—will be gifted a free month’s membership of our Online University, which includes the Gokhale Exercise program!

If you have taken a Foundations, Pop-Up or Elements course Free Month Online University

Online University member Claire Phillips explains how membership has inspired her progress.

In addition to Gokhale Exercise, our Online University additionally offers two 45-minute Live Chats every month with me, Esther Gokhale. Topics include flexibility, the human spine, posture and emotional health, to squat or not to squat, and more. There is also unlimited access to our On-Demand Video Library of over 60 topics including advanced posture techniques and practical applications like gardening, cooking, etc.

Clare: Thanks Esther, Gokhale Exercise is an inspiring and continuing journey!

FREE 10-Day Back to Basics Challenge

Alumni often tell us they get a lot of benefit from reviewing the basics—so we are also offering an exciting Back to Basics Challenge, designed for alumni, but also open to beginners, as part of our 1-2-3 Move program and starting September 26 for 10 days.

Here is the Challenge:

Each class will review a different Posture Principle, with exercises for practice and challenge. We have prepared a downloadable booklet for participants to print and journal their postural changes and progress. 

How to take part:

Online University and Gokhale Exercise members automatically qualify for this challenge—their daily emails will tell them about it. 

People who have not yet taken a Gokhale Method course and who are therefore not alumni are also welcome to join, and listen in to the Q&A sessions by signing up to our Gokhale Exercise program with a monthly subscription—with our free trial you can test it without any obligations.

For newcomers 7-day Free Trial

For alumni (you have taken a Foundations, Pop-Up or Elements course): Free Month Online University

For newcomers 7-day Free Trial

For alumni (you have taken a Foundations, Pop-Up or Elements course): Free Month Online University

We look forward to seeing both new and familiar faces! 

Gokhale Method alumnus Ben Bernstein PhD appreciates daily reminders of what to work on.

How Not To Do Yoga

How Not To Do Yoga

Esther Gokhale
Date

This blog post explains how some common yoga injuries occur and how applying the principles of healthy posture to yoga postures replaces this scenario with movements that are good for your body.

Yoga postures and back pain

Growing up in Mumbai, India, my Dutch mother was a student of BKS Iyengar and the Satyananda yogis, and keen for me also to learn yoga asanas, or postures. I practiced, and, being reasonably athletic as a child and already trained in Indian classical dance (Bharata Natyam), did not find it particularly difficult to choreograph the back bends, forward bends, and twists that were asked of me. I became a yoga model, demonstrating postures alongside visiting swamis’ presentations to induce the audience to sign up for upcoming yoga courses.

Esther Gokhale with yoga student in shoulder stand.
This photograph shows me teaching yoga as best as I knew how in 1979, standing with a sway in my back (and putting excess flexion into my student's neck).

Aged 15, I came to the United States as an exchange student and proceeded to go to college here. It was while doing a yoga pose in college that I first experienced a significant back episode with severe spasms. A few years later I injured my back while windsurfing; this time it took five days of bed rest to recover. I did weight training to strengthen my back, and returned to normal activity. 

When nine months pregnant with my first child, my back problem resurfaced with an onset of sciatica. After my baby’s birth, it grew worse, leading to surgery for a large disc herniation at L5-S1 a year later. Within another year the pain had returned. I declined a second surgery, and instead deepened my quest to understand the causes of back pain and how best to resolve it. 

Esther Gokhale’s MRI 1987 showing herniation L5-S1.
An MRI scan done in 1987 revealed the cause of my sciatica and severe back pain—a large herniation at L5-S1.

Yoga postures require healthy posture

I learned from my life experience, as well as that of key teachers such as Noelle Perez, that in the industrialized world we do not use our bodies well. As our posture has deteriorated, traditional ways of performing everyday tasks in sitting, standing, and bending positions have become distorted. These damaging postural patterns are now deeply embedded in our culture and have even been unwittingly carried through into therapeutic activities such as yoga. 

How is it that yoga asanas, developed to bring strength, flexibility, and relaxation to the body, are now causing frequent injury? This question has been the subject of much media coverage in recent decades, including the provocative New York Times article in 2012, How Yoga Can Wreck Your Body¹. From a Gokhale Method® perspective, the primary problem is that poor posture in the population at large, including yoga students, combined with misguided conventional wisdom shared by yoga teachers about what constitutes good posture, has created a perfect storm. 

I came to realize that much of the flexibility I had as a young yoga model came from the wrong places—it was achieved at the expense of my lumbar discs and nerves as I compressed them to sway back, round forward, and twist. Let’s take a look at how yogis are likely to be causing themselves injuries and how using the Gokhale Method to apply the principles of healthy posture will avoid them:

Back bends

A large group of yoga postures are backbends. Bending backwards is something that is generally done extremely poorly in our culture, with most of the bend occuring around waist level. This puts a great deal of pressure on discs, nerves, and soft tissue in an area of the lumbar spine already compressed by tight erector spinae (long back muscles). This shortened baseline length is due to poor posture and furniture, part of our culture’s paradigm shift away from a healthy spine shape. You can read more about spine shape in my blog post What Shape is Your Spine? 

Yoga model in Warrior pose, side view, extreme bend back.
Many versions of Warrior pose, or Virabhadrasana in Sanskrit, are taught with a significant bend in the upper lumbar spine or thoraco-lumbar junction. This is especially a problem when one or both arms are lifted, encouraging the ribs to pop up. Pixabay

Yoga model in Warrior pose, side view, mild sway.
Even mild sways perpetuate tight muscles in the lumbar area and correspond with a lack of healthy articulation at L5-S1, the lumbosacral junction. Pexels

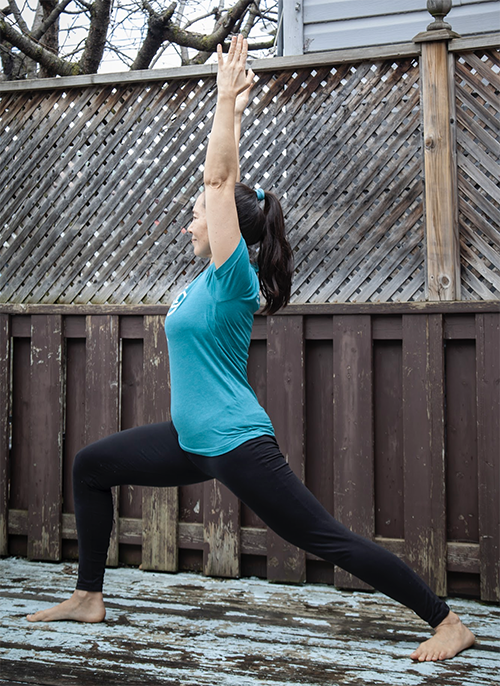
Gokhale Method teacher Lang Lui in Warrior pose, arms raised, side view.
Gokhale Method teacher Lang Liu shows how anchoring your rib cage prevents swaying and encourages healthy articulation at L5-S1. You can read more about our approach to this pose in my blog post Why Keep the Body forward in Warrior I 

Forward bends

Many yoga postures contain some form of forward bend. This can be standing, sitting, symmetrical or asymmetrical, with the legs together or wide apart. Regardless of these permutations, from a Gokhale Method perspective, the key point is to make bending healthy and avoid the damage that comes with rounding the back, distending the spinal ligaments, and pinching the front of the discs.

Yoga model in standing forward bend, side view, straight legs, rounded back.
Standing forward bends (Uttanasana) are often taught with legs straight. This leaves most students in our culture, who have tight hamstrings, straining towards the ground with their shoulders pulled forward. It also rounds the back, distending the spinal ligaments and pinching the front of the discs. Hanging off the lower back is also aggravating for the sacro-iliac joints and soft tissue in the area.
Pexels

Yoga model in standing forward bend, side view, knees bent, hands on floor, rounded back.
Bending the knees softens tight hamstrings allowing a lower bend to the floor—but this student is still rounding her torso to reach over her pelvis and legs to reach the floor. Pexels

Yoga model in standing forward bend, side view, touching blocks, rounded back.
This man is using blocks to reach the floor. He is still rounding his back, and severely compressing his neck to try and look ahead. Pexels

Mother and daughter in standing forward bend, side view, straight legs, rounded back.
Unfortunately this well-meaning mother is teaching her daughter poor bending form. This is especially regrettable as young children naturally tend to bend healthily by hip-hinging. Pexels

Yoga model in seated forward bend, side view, rounded back, compressed neck.
In seated forward bends yoga students often hunch forward. This compounds any rounding already established in the upper back, and forward rounding of the shoulders. Her head also strains forward, chin up, compressing the back of the neck. Pexels

Gokhale Method teacher Cecily Frederick in standing forward bend, side view. 
Gokhale Method teacher Cecily Frederick hip-hinges in a standing forward bend. Her pelvis rotates forward around the femoral heads (tops of the thigh bones that form part of the hip joints). Her spine remains long, rather than rounding. 

Twists

In twisting postures (Parivrtti), it is especially important that your movement is not concentrated at a particular level of the spine, but is well distributed. Levering into a twist by pushing or pulling with the arms or legs can cause a twist to concentrate at any vulnerable point. Typically people will twist most in the mid-spine at T12-L1. Here the more axially mobile thoracic spine meets the lumbar area, where the orientation of the facet joints limit rotation. This is likely to result in disc bulging or even herniation at this junction, pinching of the nerves, and undue stress on the bony spine.

Yoga model in crossed leg twist, front view, twist at waist.
This woman is twisting mostly at the waist. Pexels

Yoga model in seated twist, side view, levered twist, tucked pelvis.
This seated twist shows tucking of the pelvis. There is considerable rotation at the base of the shoulder blades as the yogini levers with her arms against a fixed pelvis and legs. Wikimedia

Yoga model in lying twist, back view, bent legs, tucked pelvis.
A lying twist with one knee reaching the floor and the opposite shoulder remaining there is an extreme rotation for most people. It will often compromise healthy posture. In this case the woman is using her forearm and tucking her pelvis slightly to get her knees down. It is better to prioritize  healthy movement over achieving the “correct” shape. Pexels

Gokhale Method teacher Clare Chapman in lying twist, head on.
Gokhale Method teacher Clare Chapman in a lying twist. Allowing the pelvis to rest back and the thighs to separate avoids tucking and encourages more rotation in the hips. 

We recommend that you initiate twists using the muscles of the torso’s inner corset, especially the obliques. The inner corset is explained in detail in Lesson 5 of my book 8 Steps to a Pain-Free Back. Using these muscles means that the lumbar spine is protected while the muscles originating in the thoracic area and connecting to the pelvis power the rotation. Engaging the inner corset also lengthens the spine avoiding the common pitfall of imposing rotation on top of flexion (rounding) or extension (swaying) or any other kind of compression. 

Twists should mainly occur and be appropriately distributed in the joints best designed for them—the ankles (standing twists), hips, the thoracic spine, and the neck. Small amounts of rotation can contribute from elsewhere, but pushing beyond natural limits anywhere by applying force is a recipe for injury and pain.

Before executing yoga bends or twists, we recommend that you first learn the basics of the Gokhale Method® in our in-person Foundations Course, Pop-Up courses, or online Elements. These courses teach you how to bend back without swaying, and how to bend forward in a way that profoundly benefits rather than damages your body. The Gokhale Method Online University has many offerings for Alumni which explore additional movements such as shearing and twisting in ways that are healthy.

If you are a yoga practitioner who suffers from recurrent bouts of back pain or strain, have stopped practicing due to injury, or have been put off even trying yoga, then a solution is at hand! 

It has long been my ambition to offer yoga classes with healthy posture. I am delighted that one of our most experienced and accomplished teachers, Lang Liu, will offer regular Tuesday and Thursday Gokhale Yoga classes, ​​7:00 am (Pacific Time), starting April 21, as part of our Alumni Gokhale Exercise program. 

We look forward to seeing you there.

Gokhale Method teacher Lang Lui in Namaste.
Gokhale Method teacher Lang Liu looks forward to seeing you in the Gokhale Yoga class.

References:

¹ William Broad, “How Yoga Can Wreck Your Body”, New York Times Magazine, Jan. 5, 2012,
https://www.nytimes.com/2012/01/08/magazine/how-yoga-can-wreck-your-body.html 

If you would like to find out more about how the Gokhale Method can help support you, sign up to join one of our upcoming FREE Online Workshops…

How to Sit on the Floor, Part 3: Sitting with Legs Outstretched

How to Sit on the Floor, Part 3: Sitting with Legs Outstretched

Esther Gokhale
Date

This is the third post in our multi-part series on floor-sitting. Read Part 1 on floor sitting and Part 2 on squatting!

It’s very common for women in Africa to sit with their legs outstretched. I’ve seen rows of women use this position to spin yarn, engage in idle chatter, sort items, and more. I’ve seen babies massaged by women using this position both in Burkina Faso and in the U.S. by a visiting Indian masseuse who does traditional baby massage in Surat, India. In Samiland I saw this position used to bake bread in a lavoo (a Sami structure very similar to a teepee).


The Sami, who I visited in July 2015 (see my post Sleeping on Birch Branches in Samiland), bake with outstretched legs in their traditional lavoos (teepees). This is my friend Fredrik’s family.

Sitting with legs outstretched is useful when you need an extended flattish lap and your hamstring flexibility allows it. The ground needs to be dry and clean to make this an inviting position. It’s a particularly useful position for childcare. In addition to the aforementioned baby massage, our team member Angela Häkkilä has observed Anatolian women using their outstretched legs as a cradle for babies and toddlers, who are rocked to sleep with a sideways motion of the legs and a gentle lullaby.

 
In this case, the Burkinabé woman at the left is leaning against a wall for extra comfort while carding wool. With her degree of hamstring and gluteus maximus flexibility, she’d be fine without a wall, too!

The problem
Many people don’t have the hamstring and gluteus maximus flexibility to sit on the floor with outstretched legs and not round the spine. Tight hamstrings and gluteal muscles cause the pelvis to tuck under, preventing upright and relaxed stacking. Over time this can lead to a rounded back, degenerated discs, and pain. 

The fix
Place something under the bottom to encourage the pelvis to antevert, and/or consider sitting against a wall, tree trunk, or other surface to counteract the tendency to round the spine. 

With the modification of adding a support under or behind you, you will not only have expanded your repertoire of healthy sitting positions and possible activities, you will also be elongating your hamstrings to better garden, clean, and hip-hinge in general.


Though this Orissa woman would probably be just fine sitting on the ground, her technique of elevating the seat is very helpful for people in modern societies.

 
This Burkinabé massage therapist is testing the temperature of the water she will use to massage a newborn baby. Note her outstretched legs, sitting stool, and seated hip-hinge, all of which support the baby, the action, and the massage therapist to be healthy.

If this way of sitting would be helpful in your life, or if you’d benefit from increased hamstring and gluteus maximus flexibility, we recommend beginning by sitting on a support that will help antevert your pelvis, or with your behind against a wall for support. Since it’s only an issue of muscle flexibility, it’s certainly possible to work up to sitting with your legs outstretched without other support.

How to Sit on the Floor, Part 2: Squatting

How to Sit on the Floor, Part 2: Squatting

Esther Gokhale
Date

This is the second post in our multi-part series on floor sitting. For Part 1 on floor sitting, click here.

Why squat? Squatting isn’t something we do much in industrialized societies beyond childhood, but if you can do it healthfully, it is an eminently practical posture for resting the body while keeping the backside elevated off the ground and the clothing clean, as this woman from Orissa demonstrates.


This woman from Orissa demonstrates a healthy, full squat with foot arches intact and a long, straight spine.

It is also the posture used for toilet activities in places with floor toilets, a trend which has recently made its way to the industrialized realm in the form of popular footstools such as the Squatty Potty. If you have ever gone camping in a place without Port-A-Potties, you have had good occasion to squat!


Using a simple footstool to sit on a toilet, supported with a straight back.

And women worldwide, especially in less-industrialized societies, have long used squatting during childbirth. Talk about ancestral posture.


Like mother, like child.


Women squatting in a tribal market in Orissa to sell vegetables. This is a very comfortable, sustainable posture they have grown up with.

The problem
Most people’s hip, knee, and ankle joints do not bend enough to allow the back to remain straight and the arches in the feet to remain intact.


People in modern societies usually don’t have the hip/knee/ankle structure to do a full squat without rounding the back and compromising the feet.

The fix
Raise the heels or resort to a partial squat or B squat (one heel raised, the other down). Do not settle down all the way down on your haunches.


For most people, squatting with raised heels makes it possible to have a straight back.


A partial squat or B squat, with one foot on the ground (not visible) and the other foot with the heel raised. This facilitates a healthy, straight back posture.

In conclusion, for modern urban people to derive the benefits but avoid the pitfalls of squatting, consider raising your heels, or doing a “B squat” or partial squat. For going to the toilet, a Squatty Potty or low foot bench is useful. We recommend on working on your calf and quad flexibility to get low to the ground towards a squat, but do not insist on a full squat because it will likely involve some unhealthy compensations. And enjoy people watching in cultures where squatting is part of daily living.  Every culture has its facilities and limitations and it’s fun that we’re all different!


This woman squats for hours to add slip onto her pots. Orissa, India.

How to Bend and How Not to Bend

How to Bend and How Not to Bend

Esther Gokhale
Date

Round-backed bending is ubiquitous in modern urban culture. It damages the back. Recognizing this, many health advocates recommend bending at the knees. Done to excess or with poor form, this damages the hips, knees, ankles, and feet.

Surprisingly, poor bending form abounds even in fitness and wellness classes.


An insistence on touching the toes can be counterproductive and result in damage

People sometimes equate being able to touch the toes with flexibility. An imprecise  and insistent pursuit of this kind of “flexibility” causes disc damage, hyper-extended spinal ligaments, and a lot of pain. Let’s examine do’s and don’t’s in bending more closely.

DO

  1. Come close in to your tasks and don’t bend if you don’t need to.


    If you can accomplish your task without bending, don’t bend.


  2. Be sure your legs are externally rotated so there’s room for your pelvis when you bend.
    If your thigh bones (femurs) are in the way of the pelvis settling between the legs in a forward bend, there’s no healthy workaround for bending. Widening your stance can help some, but a healthy bend needs external leg rotation no matter where your legs are positioned. 


    This Burkina baby has his legs externally rotated, making room for his pelvis and substantial belly!
     

  3. Maintain the shape of your back when bending
    The spine carries precious cargo - like all the nerves and nerve roots that exit between the vertebrae - and these are threatened by major distortions of the spine.

    In activities other than bending, some movement around a healthy baseline is healthy and desirable. Such movement stimulates circulation and helps maintain healthy spinal tissues.  

    For bending, I recommend strictly maintaining the baseline shape of the spine. Distorting the spine when bending loads the discs and can cause damage. It also sets a risky pattern for bends that involve weight-bearing. I recommend pure hip-hinging for all bends, whether in daily life or exercise. With practice, good form, and strengthened inner corset muscles, you will be able to move into sustained bending and lifting weights.  


    Women in the marketplace in village Orissa demonstrating excellent hip-hinging form.


  4. Maintain (or increase) the length of your spine when bending
    You don’t want to load your discs when bending. This happens when rounding or swaying the back, or from additional muscle engagement while maintaining your baseline spinal shape. Using the inner corset (go here for a free download of Chapter 5 from 8 Steps to a Pain-Free Back) while bending is excellent insurance against loading the discs unwittingly. 
     
  5. Practice bending with a teacher and with mirrors
    If you are accustomed to tucking your pelvis, it can be a real challenge to find the correct movement in the hips.  Practice bending in front of a mirror, or, better yet, with a Gokhale Method teacher, so you get the feel of healthy hip rotation with a straight back.  


    Working with a teacher helps set a healthy hip-hinging pattern


    Start off with small bends - pay attention when you are at the sink or making your bed. Keep your feet and knees pointed out 10-15 degrees, have your knees soft and only bend at the hips as far as you can before you start to round.  At that point, enjoy the gentle stretch in your hamstrings and external hip rotators. Bend your knees if you want to go any further. For more complete hip-hinging instructions and images, refer to Chapter 7 of  8 Steps to a Pain Free Back or Back Pain: The Primal Posture Solution (DVD).


DON’T

  1. Don’t Round the Lower Back. 
    The most common mistake in bending is to round the back, either distributing curvature throughout the spine or concentrating most of it in one spot. If your pattern of bending includes rounding the lower back, this is a particularly risky mistake. Being at the bottom of the heap, the lumbar discs are already particularly vulnerable to wear and tear, bulging, herniation, and sequestration. Rounding the lower back while bending puts additional strain on them. The amount of loading is high because our upper bodies are heavy (especially our heads) and the lever arm is long (Torque = weight X distance.)
     
    You may know people who bent to tie their shoelaces or perform some other seemingly innocuous task on the ground, and then couldn’t straighten back up. Those people were probably rounding their lower backs, possibly with the additional danger of a twist added in. The brain reacts to the threat / damage by seizing up muscles in the area. Ouch! In my classes I go so far as to say that people who bend well will probably never have a back problem, while people who bend poorly almost certainly will. It's very important to get bending right!


    Hugh Jackman rounding his back while bending


  2. Don’t Round the Upper Back. 
    Rounding the upper back is problematic for an entirely different reason. The discs in the upper back don’t generally herniate or get severely damaged. This is partly  because the rib attachments to the thoracic vertebrae help fortify that portion of the spine. The problem that results from repeatedly rounding the upper back while bending is that the spinal ligaments gets distended. 


    Avoid rounding your back and letting your shoulders come forward while bending


    Ligaments are like band-aids that go from bone to bone and whose function is primarily structural support. They are a backup system for our muscular support. In situations when there is more challenge and distortion than our muscles are strong enough to handle, or when muscles don’t have time to fire, such as in a jolting accident or jump, then the ligaments keep our joints safe. 

    Ligaments are supposed to have some degree of stiffness. Ligaments aren’t an elastic kind of tissue.  Once stretched too far, they are permanently distended, and no longer serve their role as the backup system to support the spine. Extreme forward bends that come from the back and not the hips cultivate ligamentous laxity more than muscular flexibility. It is counterproductive and results in losing important structural insurance. This is what we see happening in the backs, hips, and knees of athletes and yogis who push too far in poorly executed forward bends as well as other distortions.  

    Charlotte Bell, an Iyengar yoga teacher and author of Mindful Yoga, Mindful Life, had a hip replacement in 2015. She warns us “I know a number of serious practitioners who are now in their 50s—including myself—who regret having overstretched our joints back in the day. All too many longtime practitioners now own artificial joints to replace the ones they overused.” 
     
  3. Don’t bend with your legs internally rotated and/or tail tucked 
    When the legs are internally rotated (toes and knees pointed inwards), the head of the femur grinds inappropriately against the hip socket (acetabulum), wearing down the cartilage and causing arthritic change.

    In 2013, Lady Gaga canceled her “Born this Way” tour due to chronic pain from a severe cartilage tear in her hip. Lady Gaga is known for being health conscious and a yoga enthusiast. Though dancing in high heels night after night certainly puts wear and tear on the body, a yoga practice should support, not exacerbate the problem. “My injury was actually a lot worse than just a labral tear,” she told reporters. “...The surgeon told me that if I had done another show I might have needed a full hip replacement. It took over two years after my surgery to be able to correct my alignment and continue working.”


    Lady Gaga internally rotating her legs while standing


    Lady Gaga bends forward in the yoga pose with toes pointed in and a tucked pelvis.


    These pictures of Lady Gaga show that a) she has a tendency to internally rotate her legs while standing and b) she bends forward in the yoga pose with toes pointed in and a tucked pelvis.  This puts stress on the hip joint, pushes the ball of the femur into the cartilage of the hip socket, and can overstretch the ligaments of her spine, sacroiliac joint, hip, knee, and foot.  
     
  4. Don’t push beyond your range of motion in the hips 
    If you run into resistance in your hip joints when bending, don’t force past it. Dr. Chris Woollam, a Toronto sports medicine physician, says he started seeing “an inordinate number of hip problems” among women aged 30 to 50 who were practicing yoga. “Maybe these extreme ranges of motion were causing the joint to get jammed and some to wear,” Woollam says. “If you start wearing a joint down, then it becomes arthritic. So you’re seeing these little patches of arthritis in an otherwise normal hip that seems to be related to these extremes of motion or impingement or both.”

    I suspect that some of the hip problems that get chalked up to extreme range of motion, are actually due to alignment problems. Most yoga classes, Pilates training, and gym routines teach students to stand with parallel feet. By Gokhale Method standards, this constitutes internal leg rotation. Indigenous people have their feet facing outward in the range of 5-15 degrees, and their legs are correspondingly externally rotated. It is our opinion that instructions to have parallel feet contribute to stress and arthritic changes in the hip joints, especially when combined with forward bends and other hip motions.
     

How well do you stack up when bending in your daily life and when exercising? How far along are you in your hip-hinging journey?


Join us in an upcoming Free Workshop (online or in person).  

Find a Foundations Course in your area to get the full training on the Gokhale Method!  

We also offer in person or online Initial Consultations with any of our qualified Gokhale Method teachers.

Is Your Stretching Regimen Helping or Harming You?

Is Your Stretching Regimen Helping or Harming You?

Date

Stretching is a common prescription to help with back pain. At https://www.healthoutcome.org, the world’s first crowdsourcing platform to rate medical interventions, stretching is the 6th most commonly used intervention, after physical therapy, NSAIDs, heat, rest, and cortisone injections. On a scale from 0-5, stretching (rated 2.6) is the 5th most highly rated intervention after Postural Modification (3.8), Yoga (3.1), Supplements (2.9), Weight Loss (2.8), and Meditation (2.7).


Back pain caused by tight muscles is common


The Gokhale Method considers stretching to be one of many essential pieces in solving most people’s back problems. Even though stretching alone cannot give an equivalent result to that of a well-crafted Postural Modification approach, it is a good thing, and if slightly tweaked, could give better satisfaction and results in less time. If done poorly, on the other hand, stretching can harm, rather than help you.


A few key concepts that can help your approach to stretching are:

  1. Your hunter gatherer ancestors, with whom you share the vast majority of your genes, didn’t do stretches per se. In the course of their daily activities, their bodies were self-stretching, self-maintaining, and mostly, self-healing. It’s true our lifestyles are different from theirs, but this realization should provoke some enquiry about small modifications in our ways of moving that would enable us, too, to be as efficiently and effectively stretched out as our ancestors were.


This hunter gets a natural shoulder stretch from using a bow and arrow


  1. Not every muscle in your body needs to be super flexible. Unless you’re a gymnast or yogi, some stiffness here and there is well-tolerated, and can be beneficial when there isn’t great strength to balance extreme flexibility.

  2. Flexibility is very useful in the following muscles: hamstrings (allows pelvic anteversion and hip-hinging), psoas (allows a full length stride without a swayback), external hip rotators (allows deep hip-hinging), pecs and traps (allows normal shoulder alignment and prevents pathology in the shoulder, facilitates good range-of-motion for the arms), and calves (allows the heels to remain on the ground for an extended time in a stride).


Calf stretches can help achieve a healthy stride


  1. The reason these flexibilities are useful is that they facilitate normal human movement, which also gives a clue on to how to keep these flexibilities: PERFORM NORMAL HUMAN MOVEMENT! Hip-hinge well, stride well, maintain shoulder alignment well while moving the arms extensively, etc., and you’ll be largely covered for flexibility.


Hip-hinging in the garden keeps hamstrings flexible


Actor Shemar Moore keeps his shoulders rolled back when playing on the beach with some spare children


  1. If your day does not include enough movement, supplement with a few, well-chosen stretches. It’s extremely efficient to do several stretches simultaneously. It’s even more efficient if you combine this with strengthening several muscles simultaneously.


Stretching the psoas (enables a healthy stride) and pecs, while strengthening the quads


  1. Yoga and dance are two approaches to exercise that are especially efficient and effective for satisfying stretch (and strengthening) needs. Most approaches to yoga and dance could use some tweaking to “do no harm” and do more good, but it’s hard to match the possibilities with these traditional, multi-faceted, tried and true practices.


Dance is excellent for increasing flexibility - and strength


  1. Distinguish between flexibility of your muscles and laxity in your ligaments. This is a big one, folks! Flexibility in appropriate muscles is terrific; laxity in your ligaments is not! Ligaments are a type of connective tissue that connect bones and cartilage in your joints and provide stability to the skeleton. Overstretched ligaments become too loose to hold your joints together under pressure or tension. People with lax shoulder ligaments, for example, can sometimes dislocate and “pop” their shoulders back in too easily. People with lax ligaments in their spinal column are able to round their spines excessively.


    This common approach to stretching the hamstrings, done poorly, causes laxity in spinal ligaments


This person would be better off lying on his back and raising one leg at a time to stretch out his very tight hamstrings


Do you have any favorite stretches? Please share them with us! We can then talk about pro's and con's for the stretches you share.


Subscribe to flexibility