cartilage

The New Year 3 x 3 Fitness Challenge: Strength without Strain

The New Year 3 x 3 Fitness Challenge: Strength without Strain

Esther Gokhale
Date

We’re here to help with your New Year’s fitness resolution. Join us for a FREE 10-day New Year 3 x 3 Fitness Challenge, which is offered as part of the Gokhale Exercise program. It will be fun, safe, and effective, enabling you to build your strength without strain and injury, because, all the while, you are also training for healthy posture! 

The Gokhale Exercise banner showcasing six different program teachers.

Your 10-day challenge consists of three sets of three (3 x 3) popular exercises. Our approach to these well-known exercises is unlikely to be found in any standard gym or fitness program where, unfortunately, poor postural habits go undetected or are even unknowingly promoted. Here the exercises will be taught with our “Gokhale filter” to respect what is natural and healthy for your body.

The New Year 3 x 3 Challenge Exercises:

Exercise #1: Push-ups

Push-ups are a highly functional exercise that will assist you with many daily tasks and a range of activities—getting up from the floor, yoga, weight training, gardening, pushing heavy doors or strollers, etc.

A lot of people, especially women, have difficulty supporting their weight with their arms; their upper body muscles are much weaker than lower body muscles. That was certainly my story.

To this day I haven’t yet done a full push-up though I am getting tantalizingly close thanks to our Gokhale Fitness and Yoga programs. I can now lower myself to the ground with full control, (an excellent eccentric exercise, which you can read more about here), and can push up from part way up. I am hopeful that the 10-day New Year 3 x 3 Challenge will take me all the way! 

Gokhale Method teacher Eric Fernandez demonstrates a push-up with poor form.
This push-up is done at a bench rather than on the floor to be easier. However, common problematic habits can still creep in, as Gokhale Fitness teacher Eric Fernandez demonstrates.

Gokhale Method teacher Eric Fernandez demonstrates a push-up with healthy form.
This push-up shows healthy form.

Exercise #2: Squats

Growing up in India, I was surrounded by people sitting on the floor and squatting frequently throughout the day. These habits contribute to greater mobility in the formation of the hip joint, and flexibility in the tissues surrounding the hip joint. 

People in our culture rarely have this degree of mobility and flexibility in the hips and ankles, and so squat poorly in a way that does damage—rounding the back and pronating the feet. This is more of a collapse downward than a well-supported, well-aligned squatting movement. 

In the 3 x 3 Fitness Challenge, Eric will show you how to do squats in a safe way, to boost the strength of your knees, quads, glutes, thighs, and whole lower body. Done well, deep squats are not only safe—research shows that they can improve the health of knee menisci and cartilage, ligaments, and bones.

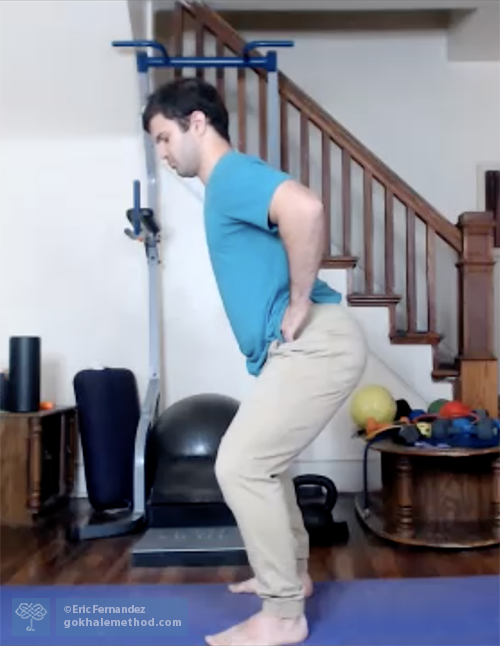
Gokhale Method teacher Eric Fernandez demonstrates a squat with poor form.
This squat demonstrates poor form, such as internal rotation of the legs. 

Gokhale Method teacher Eric Fernandez demonstrates a squat with healthy form.
This squat demonstrates healthy form.

Exercise #3: Deadlifts

Often known as a Romanian deadlift due to its popularity among weightlifters in Eastern Europe, a deadlift strengthens almost everything on the back of your upper and lower body. It is also a good exercise to test and develop hip mobility, and to develop bone density. 

The deadlift utilizes our primal way of bending, which we call hip-hinging. Hip-hinging is instinctively used by our infants, and widely by adults in many parts of the world where traditional patterns of movement have been maintained. Hip-hinging is taught in our Gokhale Method® in-person Foundations and Pop-up courses, and our online Elements course.

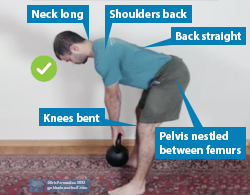
Gokhale Method teacher Eric Fernandez demonstrates a deadlift with a kettlebell and poor form.
This deadlift demonstrates common mistakes such as rounding the back.


This deadlift demonstrates healthy form.

Here’s your Challenge:

Day 1: You’ll test how many reps of each exercise you can do in a minute. You’ll take a minute’s rest between each of the three sets, and between each exercise. 

Days 2–4: You will do other exercises that compliment and build up your strength for the 3 x 3 Fitness Challenge.

Day 5: Check-in on your goals.

Days 6–9: Continue with strength training.

Day 10: You’ll go through the challenge again and see in what ways you have improved. Expect an improvement in your strength, in the number of reps you can do, and in your range of motion!

Is this fitness challenge suitable for everyone?

The 3 x 3 Fitness Challenge is designed for practically everyone, with easier options given for those taking steps towards the full exercise, and additional challenges for those who find them relatively easy. 

People are often surprised at how working with healthy posture changes their experience of an exercise—depending on the situation, you may feel stronger and lighter, for example. Or you may discover that you were unknowingly “cheating” and can benefit your body by making different, healthier efforts.

If you have had an injury or surgery recently, or have a particular health issue, we recommend that you seek the advice of your preferred physician or health professional before starting the Challenge. We encourage everybody to work within their capabilities—this is not a no-pain, no-gain program!

I look forward to meeting you as we challenge ourselves to greater fitness, and healthier posture.

If you would like to find out more about how the Gokhale Method can help support you, sign up to join one of our upcoming FREE Online Workshops. . .

Home Exercises Part 5: Squats

Home Exercises Part 5: Squats

Esther Gokhale
Date

In this blog post, the fifth in our series scrutinizing popular home exercises, we are looking at squats. Is it a beneficial exercise, and how does it stack up—or not—against the principles of healthy posture?

Squats are a popular and effective exercise designed primarily to strengthen the quads, stabilize the knee joint, tone the glutes, and also work the back muscles. 

4 stages of kettlebell snatch, man squatting
A squat is an essential baseline position for many athletic movements including this kettlebell snatch. Wikimedia

How low should they go?

Deep squats have become increasingly popular in recent decades, following a trend towards cross-training and exercise based on “natural movement.” Fitness and movement trainers have sought to emulate people in non-industrialized societies or traditional cultures who squat with ease, often for long periods.

Deep squats present challenges unless you grew up in a culture that routinely sits and squats on the ground. The challenge is not only in the muscles around the hips, knees, and ankles, but also in the bony part of the joints. When you are born your hip joint is made entirely of cartilage. By age 16, it is fully ossified. If you are not continually sitting and squatting low in your formative years the ossification pattern will not facilitate the angles necessary for squatting as an adult. It is therefore impossible for most westerners to squat low without tucking the pelvis and rounding the back, just like it is hard for them to sit crossed legged and relaxed.

Woman in heels in deep squat with rounded back.  Indian woman in deep squat with straight back.
Even though her high heeled shoes reduce the angle of bend required to squat, the woman on the left rounds her back to squat. The Indian villager (right) can squat with a straight back. Unsplash

The benefits of standing/partial squats

For this reason I highly recommend partial squats, which are a safer option and offer many of the benefits of a full squat. They are also a perfect exercise to focus on and develop healthy posture.

Anyone who has ever done a fitness or yoga class may also know this exercise as Chair Pose. In some schools of fitness training, it is regarded as a foundational exercise. In traditional yoga it is known by its Sanskrit name, Utkatasana. Utkatasana translates as intense, powerful, fierce, difficult—you get the idea. 

BKS Iyengar in Utkatasana, side view.
BKS Iyengar in Utkatasana, showing the challenge of the pose. Facebook

Squats can indeed be demanding. Lowering and raising your body weight into and out of the partial squat works the biggest muscles in the body (the leg and buttock muscles) hard, as they alternately contract (concentrically), and then release their length (eccentrically). 

When you start training with squats you don’t want to go down too far—better to do a shallow, more open zigzag squat that eases you into the exercise. This avoids the risk of injury and you can increase the intensity and demands on your body by going deeper over time, as you get stronger and more flexible. 

How to do a healthy squat

   1. Preparation

To facilitate a healthy amount of external rotation in the legs and hips, softness in the groin and nestling of the pelvis, we recommend doing the paper clip stretch or figure four as it is also known. This is a good preparatory exercise before squatting, and, done regularly over time, will encourage a healthy nestling of the pelvis and alignment of the legs.


In this video I am demonstrating the paperclip stretch, which prepares the legs and hips for healthy squatting. Clip from Gokhale Method Open University video.

   2. Start from a “Ready Stance”

A well-aligned standing posture is essential to maintain healthy form as you execute squats. The Gokhale Method teaches a position we call “Ready Stance which aligns your feet, legs, and hips for correct movement. In this stance you will find the key characteristics of a squat, but in embryonic form:

  • Stand with your feet hip width apart and pointing 10°–15° outward. Have a tiny bend at the hips and knees, as if you are about to play tennis or dance, bringing softness to the groin and back of the knees. 

Eric in ready stance, side view, hands on hips.
Gokhale Fitness teacher Eric Fernandez demonstrates the Ready Stance. It is like an ultra-mini squat.

ancient Greek statue, front and side views
This ancient Greek statue captures the softness and depth you want at the groin even in everyday standing. To get there, take the Ready Stance and then stop short of locking your joints as you straighten up.  

   3. Going into a squat

  • In the Ready Stance, rest your hands on the top of your thighs in your groin crease.
  • Initiate your squat from your hips. As you fold deeper at the hips your behind will travel further back behind you. 
  • Your knees will bend in response to your bend at the hips. Keep them wide and pointing outward and your thighs out of the way as you bend.
  • As you squat, allow your torso to angle forward at the groin as your pelvis rotates on your thigh bones. Check that your stance has a zigzag shape.
  • Focus on maintaining the straightest possible spine by using your rib anchor
  • Keep your chin down. You want your neck and head to remain in the same orientation as the rest of your torso.

Eric in partial squat, side view, hands on hips.
A healthy squat embodies all the points above.

  • When you are confident with the above you can raise your arms smoothly as you squat. Maintain your rib anchor, especially if you have stiff shoulders and are more likely to sway to lift your arms. If possible, bring your arms to the same angle as your torso.

Eric in partial squat, side view, arms up.
Raising your arms in line with your torso requires a strong rib anchor to prevent your back from swaying.

Cecily’s spinal shape in chair pose, with SpineTracker
Gokhale Method teacher Cecily Frederick in Chair Pose, overlaid with SpineTracker™ snapshot. The SpineTracker gives real time feedback on the shape of the spine. Note that Cecily’s spine remains straight in the lumbar area and the J-shaped angle at the L5-S1 junction puts her behind behind her—she does not arch her back.

   Cecily’s spinal shape in chair pose, with SpineTracker, detail
Detail of Cecily Frederick’s spinal shape in Chair Pose, overlaid with SpineTracker snapshot.

Common Mistakes: 

  • Swaying the back. Fix this by using your rib anchor to remove the sway.

Woman swaying in partial squat, side view
Swaying the back compresses the lumbar discs and nerves. Unsplash

  • Knees and/or feet collapsing inward. Fix this by angling your feet outward.

Eric in partial squat, front view, legs in internal and external rotation 
Internal rotation of the legs (left) puts pressure on the inner knees and flattens the foot arches. Feet turned outward and knees and thighs kept wide helps support your structure while allowing the pelvis to settle.

  • Lifting the chin. Avoid looking up or ahead. Fix this by softening your gaze and aligning your head and neck with the rest of your torso.

Person in partial squat from side lifting chin.

Lifting the chin risks putting pressure on the discs and nerves of the cervical spine. It is better to cultivate a long, tall neck. Wikimedia

   4. Increasing the challenge in squat

Once you have good technique and can perform squats smoothly with good form, you can increase their intensity in several ways—though not all at once!

  • Increase the number of reps.
  • Go deeper—take your thighs towards horizontal. Make sure your torso also pivots closer towards your thighs, your behind stays behind, and your knees do not go forward of your toes. 
  • Hold a squat position for a number of breaths. Maintain a strong rib anchor so as not to flare the ribs and sway with each inhalation. 

Free Online Workshops

If you would like to find out more about how the Gokhale Method can help support you, whether through exercise or posture education, sign up to join one of Esther’s upcoming FREE Online Workshops.

Subscribe to cartilage