trunk stability

What’s the Best Exercise to Strengthen Your Back? Part 1: Bird Dog

What’s the Best Exercise to Strengthen Your Back? Part 1: Bird Dog

Esther Gokhale
Date

Have you been taught cobra pose or locust pose to strengthen your back? It is a common practice to try to strengthen the back with back bends, focusing on the long back extensors on either side of the spine. This approach is used by the McKenzie Method, many yoga teachers, and physical therapists.

In the Gokhale Method® we prefer to strengthen the back by working with the muscles which collectively stabilize the trunk. Our focus is on maintaining a healthy J-spine baseline rather than backbending.

Diagram of woman headloading showing healthy muscles maintaining a J-spine.
Healthy muscle activation maintains a J-spine, protecting the spine, discs, and nerves from damage due to instability and compression.

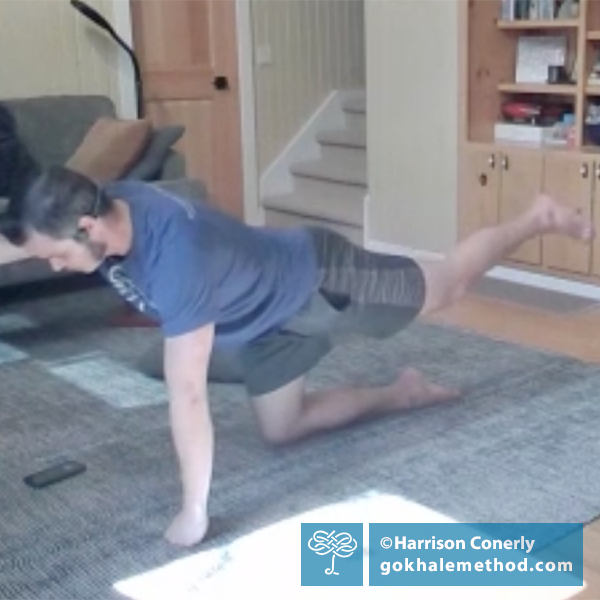
Recently in Gokhale® Fitness, our teacher Harrison has been taking our members through an exercise I rate highly, bird dog, or, as it is sometimes called, table top. Contrary to its appearance, it is not primarily a leg and arm exercise—instead, the weight and movement of the limbs provide a challenge to the stability of the torso, strengthening the muscles of the inner corset, which include the transversus abdominus, the internal and external obliques, and the intrinsic muscles of the spine. This then protects the spine against torque and distortion. 

Gokhale Fitness teacher Harrison in the basic bird dog pose.
Gokhale Fitness teacher Harrison in the basic bird dog pose. Bird dog involves lifting the opposite arm and leg—but its purpose is to work the deep trunk stabilizers, or inner corset.

Most people do this exercise any old way—perhaps with a tucked pelvis, a hung head, or flinging their arms and legs up and swaying their backs. It wants to be done in such a way that it maintains the J-spine and doesn’t encourage distortions of the spine such as excessive lumbar lordosis or thoracic kyphosis, and doesn’t pull your nerves and discs around willy-nilly. 

Caution: If your back pain is persistent or severe, we recommend you consult your medical team prior to doing this exercise.

Setting up

Especially if you are new to this exercise, or to the Gokhale Method, take your time to set up well. Without the correct set up, you can lose the exercise’s value from the get-go. You want the exercise to be safe, effective, and to pattern healthy everyday movement mechanics. 

  • Kidney bean shape your hands (use your fists if you prefer)
  • Externally rotate your legs a little
  • Pivot your pelvis forward (antevert) by relaxing your lower belly
  • Engage your rib anchor to eliminate any sway
  • Drop your spine between your shoulder blades
  • Lengthen the back of your neck. Your face will be parallel with the floor, your chin down 

Photo of Harrison in a good starting position for bird dog.

Check you are starting from a good baseline position.

Doing Bird Dog

Engage your trunk muscles to keep your pelvis and trunk level and still at all times—do not twist, round, or dip.

  • Start by lifting one arm, and the opposite leg, outwards to horizontal, in line with your torso. 
  • Return to the floor.
  • Switch sides, lifting and lowering the opposite arm and leg together.
  • Repeat on alternate sides.

This video shows the smooth, steady action that you are looking for in bird dog. Your torso remains still and horizontal while you move one leg and the opposite arm, and then change sides.

Reps, sets, and frequency

How many you do depends on your current level of fitness and strength, but for most people up to three sets of 6, 8, or 10 repetitions works well (one raise and lower of an arm and a leg is a rep). Stop short of failure—you don’t want to lose your form, but rather, protect your spine at all times. 

If you feel significant soreness in your muscles the next day, give yourself a day to recuperate before repeating bird dog. If you are working at a gentle level, you can do this exercise daily if you wish.

Common mistakes

  • Losing your form—keep checking that you haven’t tucked your pelvis, swayed your lower back, rounded your upper back, or arched your neck.
  • Doing the exercise too fast, as if it were an arm and leg aerobic exercise rather than a trunk stabilization exercise.
  • Lifting your arm and leg too high, and swaying your back.

Photo of common mistake swaying the back in bird dog.
Lifting the head and/or leg beyond horizontal will likely encourage sway in the back. Image from Pexels

Ways to progress the exercise

After you have mastered good form and smooth execution, you may want to increasingly challenge your muscles. Depending on your starting point this may take a few days, weeks, or months…don’t rush it and risk injury. There are many ways to progress steadily and vary your training:

  • If you started with just a few reps, aim to up your reps and/or sets over time. You can count numbers or breaths, or work to music.
  • Raising your hand in a fist uses more muscular engagement in the hand and forearm.
  • As you extend your leg, use your foot muscles to point your toes. Then try a set pointing your heel back.
  • Hold the extension position (lift) to work on stamina and endurance and add an isometric challenge to your muscles. Go for duration rather than lifting beyond horizontal. 
  • Bring your knee and hand together rather than down to the floor between lifts.
  • Add wrist and ankle weights.

In this video Harrison demonstrates adding further challenge in bird dog.

Take the benefits into daily life

No matter how well done, bird dog is only an exercise and can only be done so many times by a sane person. It is, however, perfect preparation for real life activities that use the arms and legs, while needing to keep the trunk steady—e.g. opening a heavy door, carrying a suitcase, lifting something off a high shelf, dancing, or bending. After a week or two of doing this exercise, you will probably notice that you feel stronger and that daily chores are more enjoyable. You may notice your running or swimming is more efficient and powerful. And that you have less back pain!

Photo of Nathan White playing ultimate frisbee.
Trunk stability enables you to undertake asymmetrical tasks which would otherwise distort and injure your spine.

Best next action steps 

If you would like guidance in moving as you are meant to, and doing bird dog, or other exercises, with healthy form and posture, book a consultation, online, or in person with one of our teachers. 

You can sign up below to join any one of our upcoming FREE Online Workshops

Home Exercises Part 4: Low Planks

Home Exercises Part 4: Low Planks

Esther Gokhale
Date

This is our fourth blog post in the series where we put popular exercises under scrutiny to examine how they stack up—or not—against the principles of healthy posture. Here we are looking at “low plank,” a whole-body exercise that particularly develops abdominal strength and trunk stability. 

Our model for the photographs is Eric Fernandez, our Gokhale Exercise teacher who teaches the Gokhale Method in the Philadelphia area.

Low plank is done on the forearms, which avoids pressure on the wrists. 


The classic version of this exercise with straight arms. Active hands and a slight bend at the elbows will likely ease strain on the wrists, but we recommend you do low plank first.

Get all the benefits of plank, avoid any risk of damage

Plank is an excellent exercise for developing the muscular strength and coordination you need to align, support, and protect your spine. While pursuing these benefits you don’t want poor form to distort your spine and risk damage to your spinal discs and nerves. The exercise guidelines that allow you to do plank safely also train your body for healthy posture in daily life.

If you are new to this exercise, or the Gokhale Method®, I recommend that you prepare your body by learning to use your inner corset. The inner corset consists of the deep muscles of the abdomen and back which support and protect the spine. This is explained in detail in my book, 8 Steps to a Pain-Free Back.


Free Chapter of 8 Steps to a Pain-Free Back

To help you on your posture journey we are delighted to offer you two gifts:

  • A subscription to our bi-weekly informative newsletter Positive Stance™
  • A pdf of the Inner Corset chapter (ab strength) from 8 Steps to a Pain-Free Back

Please enter your email address in the field below. If you aren’t already a newsletter subscriber, you may need to respond to a confirmation email.

Free Chapter of 8 Steps to a Pain-Free Back

CAUTION: If you have back pain or a diagnosis or suspicion of herniation, stenosis, osteoporosis, or other spinal deterioration, you should consult your preferred health professional before practicing plank. 

Let’s get started

Start with a baby version of low plank in which your knees remain on the floor. This creates a shorter span and requires less abdominal strength to hold you horizontal. From a kneeling position:

  • Engage your inner corset—you will maintain it throughout the exercise.
  • Roll your shoulders back, lengthen your neck, tuck your toes under. 
  • Lower yourself into your start position, elbows on the floor directly under your shoulders and forearms forward and parallel. You can also start in a baby Cobra position and lift your trunk away from the floor. 
  • Bring your trunk to horizontal. Maintain your torso, neck, and head in this straight, horizontal line. 
  • Initially, aim to hold baby plank for 5-10 seconds at a time. Repeat 5-10 times.
  • Breathe steadily throughout. 


Baby plank develops healthy muscular strength, endurance, and coordination.

Full low plank

When doing plank on your knees is easy and you can breathe evenly, you can progress to doing the exercise with your legs straight and your weight on your toes. 


Full low plank. You may need to drop back on the duration or repetitions initially, and then build up again. 

Common Mistakes:

Neck tension:

Keep your neck lengthened with your head parallel to the floor; do not crane to look up. Tension in the back of the neck should not be attempting to lift you up. Neither do you want to drop your head down—rather, you want the deep muscles at the front of the cervical spine (longus colli) to support your neck, along with the inner corset.


Do not tense the back of your neck and pull your head up. 

Swaying the back:

It is important to not sag in the middle. Without a strong inner corset, the abdominal contents will hang downward, which will sway your lumbar spine and compress your discs and nerves. Practice the inner corset exercises consistently and you will soon be able to maintain a horizontal position.


The lower back is dipping into a sway, with tell-tale shirt creases in the lumbar area.

Tucking the pelvis, rounding the back and shoulders:

You may find yourself tucking your pelvis, especially if you have been trained to do this when working your abdominals. You may also be working your glutes inappropriately—you want your inner corset to brace you, not clenched buttocks. Work with a more relaxed feeling in your pelvis and hips and allow your behind to remain behind you. 


Rectus abdominis is flexing the spine and tucking the pelvis. Rounding the back and shoulders are also misguided efforts to push or lift up. 

It can be tempting to push away as you take your weight in plank, rounding your shoulders. Resist this habit and allow your chest to remain closer to the ground. Drawing your shoulder blades together may help.

Make sure you are not tucking your pelvis or pushing your chest away from the ground, both of which will likely result in rounding your back.

If you would like to practice this great exercise for your back health, join Eric for a “low plank” Gokhale Exercise class on Friday, November 26 at 9:45 a.m. (Pacific Time). If you have not yet subscribed to the 1-2-3 Move program, sign up now for your 7-day Gokhale Exercise Free Trial.


1-2-3 Move happens daily with Esther or guest teachers at 9:45 a.m. 
Gokhale Fitness with Eric runs Mondays, Wednesdays, Fridays from 7–7:25 a.m.
(Pacific Time), and Tuesdays, Thursdays, Saturdays from 3–3:25 p.m. (Pacific Time)
Gokhale Moving Meditation with Roberta is Mondays at 2 p.m. and with Kathleen is Wednesdays at 12 p.m. (Pacific Time)

Subscribe to trunk stability