Hip-hinging

Dentists and Neck Pain

Dentists and Neck Pain

Esther Gokhale
Date

Next time you are in the dentist chair, spare a thought for your dentist’s posture and the postural demands of their job. Doing dental procedures shares many challenges with other surgical procedures, such as having to maintain a steady position for long periods, maintain a clear line of vision, and hold and manipulate tools with precision. Working in the oral cavity of a conscious patient is a pretty significant challenge. 

Dentist treating a patient, using a surgical telescope.
Dental professionals place many physical demands on their structure. They can be regarded as “occupational athletes.” Image from Pexels

Dental personnel and health

Unfortunately, these demands take a toll. Of adults in the U.S. general population, 13.8% experience significant neck pain; among dentists, that figure is a staggering 67%. Dentists and other oral health practitioners (OHPs), including dental nurses and hygienists, also report suffering from above average incidences of lower back pain, headaches, shoulder problems, and work-related tendonitis, bursitis, and carpal tunnel syndrome. Such problems can make life miserable, both in and out of the dental office. Some OHPs are forced to abandon a career they have spent up to eight years training for. Of dentists taking ill health retirement, 55% cited musculoskeletal disorders as the cause.

The Gokhale Method for Dentists and Oral Health Practitioners

Since 2008, well over 100 dental workers have sought out the Gokhale Method® to help them solve their posture puzzle and get out of pain. They are both welcome and in need of what our courses (in-person Foundations, one-day Pop-up, and online Elements) offer. Given their particular professional needs, we are now working with some of our dentist and hygienist alumni to develop a special Gokhale Method offering for oral health practitioners. 

This will be a tailored training delivered at dental offices, clinics, and teaching hospitals. The goal is  that oral health practitioners learn the posture tools they need to future-proof their careers.

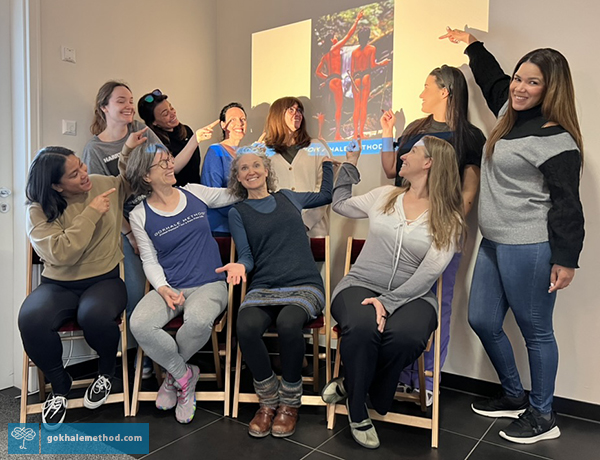
Oral health practitioners grouped at a Gokhale Method workshop.
An introductory workshop for oral health practitioners with Gokhale Method teacher Julie Johnson was recently received with great enthusiasm at a dental practice near Stuttgart, Germany. 


Dental practice team members, Bridget, Amy, and Julie, practice seated hip-hinging with teacher Julie Johnson. The Gokhale PostureTracker™ wearable gives biofeedback—and they’re having fun!

From a dentist’s perspective

One of Julie’s recent Gokhale Foundations students is Warren Blair, an American dentist living and working in Germany who, though counting himself fortunate to have had relatively few serious musculoskeletal aches and pains over his four decades of practice, understands the value of the Gokhale Method. 

Warren Blair, D.D.S., M.S.D., a specialist dentist.
Warren Blair, D.D.S., M.S.D., is a specialist in periodontology, implantology, microsurgery, and endodontics—and a student of posture!

Warren shared many things about the ergonomics of dentistry with us, both from the dentist’s and patient’s perspective:

The physical aspect is a problem—all dentists have problems. Some are in their mid-thirties and they're walking around crooked because they have a charley horse (muscle spasm). I periodically stretch the muscles around my back and shoulders, or pull away from my microscope eyepieces to reset. Doing the Gokhale Foundations I have learned that posture is key to the solution; having healthy posture early on in the profession will prevent future problems, but if problems with your musculoskeletal system do crop up then you can do something about it by changing your habits and adopting the principles of healthy posture.

Warren confirmed that dentists are taught not to round over their patients, and to work with their knees wide, but admitted that these positions are not always easy to maintain on the job. Learning and preserving healthy postural habits is especially difficult given that many dental workers, like most people in our culture, will, unfortunately, be approaching their training from a poor posture baseline. 

Healthy posture is an ecosystem

The basic instruction that trainees receive is not nearly as nuanced or integrated as the movement patterns taught in the Gokhale Method. In typical modern western fashion, we are all given stand-alone instructions, e.g., “don’t round when you bend.” The hip-hinging bend taught as part of the Gokhale Method is part of a whole movement pattern, involving nestling an anteverted pelvis, getting the femurs out of the way of the pelvis, anchoring the rib cage, engaging the inner corset, keeping the shoulders posterior, and maintaining a healthy neck position. Altogether, these elements give dentists the resilience needed for sustained bending, even with some variety of twist.

Dentist treating a patient, sitting upright with a relaxed J-spine.
This practitioner is maintaining her J-spine, with her behind behind and her back tall and relaxed. This is a healthy baseline for sitting and forward bending. Image from Pexels

Posture instructions given in isolation don't translate very effectively into practice. However, as part of a holistic education that pays attention to the way we do everyday life activities, posture training becomes transformative. For example, walking well, both in and out of the office, is a natural reset for a tight psoas muscle. Learning to stacksit allows your breath to mobilize your back. Sleeping positions, done well, can enable you to heal damage and inflammation. 

Learning the Gokhale Method at work means you immediately put posture into practice in your profession, and sets up many opportunities for colleagues to support one another. If you are a dental or medical professional and would like to know more about how the Gokhale Method can help you and your team, please email: [email protected].

If you would like to support your dentist, send them this invitation to one of our free online workshops

Best next action steps 

If you would like to improve your posture, for work or leisure, get started by booking a consultation, online or in person, with one of our teachers. 

You can sign up below to join any one of our upcoming FREE Online Workshops


The Virtues of a Hard Copy Book in Digital Times

The Virtues of a Hard Copy Book in Digital Times

Esther Gokhale
Date

It has been 14 years since my book 8 Steps to a Pain-Free Back came out in hard copy. For years I had wished I had a book to send to those people who called me from the East Coast or Midwest. These were often relatives or friends of people I had worked with in California, who were suffering terrible back pain and needed help. And so I got writing. 

A book to solve back pain

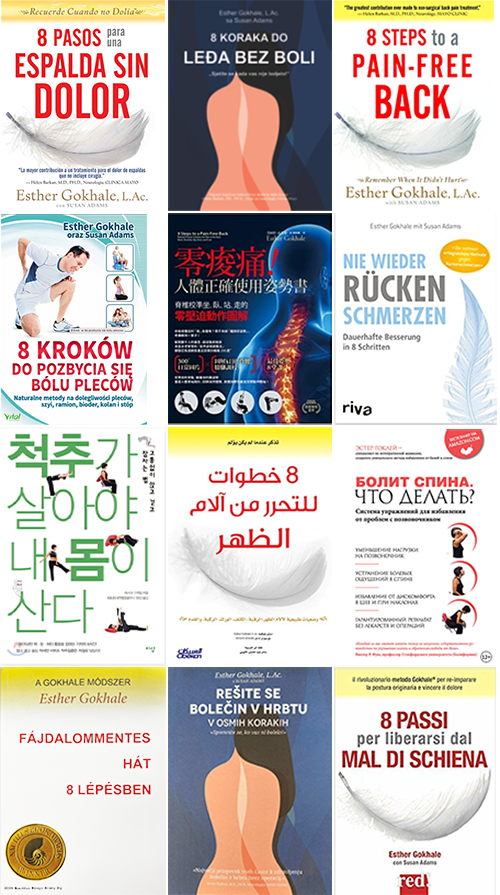
Although there was clearly a huge need for a book to solve back pain, I was still surprised to find I had written a bestseller. It reached number two on Amazon.com following our American Public Television program in 2011, and number three following the New York Times article (paywall) naming me “The Posture Guru of Silicon Valley” in 2013. It has now been published in 12 languages (Croatian later this year), and sold over 250,000 copies.

8 Steps to a Pain-Free Back - Spanish 8 Steps to a Pain-Free Back - Croatian 8 Steps to a Pain-Free Back - English

8 Steps to a Pain-Free Back - Polish 8 Steps to a Pain-Free Back - Chinese 8 Steps to a Pain-Free Back - German

8 Steps to a Pain-Free Back - Korean 8 Steps to a Pain-Free Back - Arabic 8 Steps to a Pain-Free Back - Russian

8 Steps to a Pain-Free Back - English 8 Steps to a Pain-Free Back - Slovenian 8 Steps to a Pain-Free Back - Italian
 8 Steps to a Pain-Free Back is available in many languages: Spanish, Croatian, English, Polish, Simplified Chinese, Traditional Chinese, German, Korean, Arabic, Russian, Hungarian, Slovenian, and Italian editions. 

Digital download or hard copy?

In recent times digital books have revolutionized publishing. It is perhaps surprising that figures from the US publishing industry show that, in 2020, hard copy was still outselling downloads by 2 to 1¹. 8 Steps to a Pain-Free Back is available as a digital download, but the paperback version continues to be in high demand. I have come to realize that there are numerous and perhaps unusual virtues for having a paperback edition of this book, some of which I would like to share to inspire you!

Every digital book has the primary advantages of price and portability, but can remain out of sight and out of mind. Encountering a physical book invites you to engage with it, to pick it up and thumb through it. You don’t have to sign into wifi or wait for it to load—you just start reading. 

Visual cues help pattern healthy posture

One factor which works against us developing and maintaining healthy posture in our society is that we don’t have good examples and reminders around us. In fact, we are continually exposed to a norm of bad posture, while our culture’s idea of good posture, the S-shaped spine, is deeply problematic. What we want is to be surrounded by healthy visual examples on which to model ourselves.

8 Steps to a Pain-Free Back has over 1,100 images, mostly photographs, showing healthy posture from all over the world, from history, and in infants. Students find these images a motivating and practical reminder on their posture journey. Many a person has fallen in love with the African carpenter on the frontispiece, who insisted I take his picture, or marveled at the babies stacksitting with ease. 

African carpenter standing tall by bench 
This African carpenter stands tall and relaxed by his bench. This is also excellent form for preparing food in the kitchen, or any work at a counter8 Steps to a Pain-Free Back, pg 3.

Esther Gokhale’s youngest baby stacksitting by tub
My youngest child stacksitting next to her “sitting tub.” 8 Steps to a Pain-Free Back, pg 69.

You can of course collect your own posture pinups, and I encourage you to do so. But selecting your favorites from 8 Steps to a Pain-Free Back is convenient, plus you will know the posture shown passes muster. The quality of the prints means that they look completely at home popped into a frame, or even laminated and placed around the garden or garage or in your shower stall (true story about the tallstanding image leading Lesson 6). The key thing is to place them exactly where you need the reminders. For example:

Esther Gokhale standing modeling inner corset pg 127
Here I am reaching up to engage my inner corset. Use this reminder near a high shelf or cupboard that you regularly reach up to. 8 Steps to a Pain-Free Back, pg 127.

African woman hip-hinging harvesting water chestnuts 
This African woman is hip-hinging as she harvests water chestnuts—a perfect picture reminder for your vegetable garden.  8 Steps to a Pain-Free Back, pg 151.

Esther Gokhale modeling stretchsitting 
Here I am stretchsitting. Place this reminder by your easy chair or sofa, where you may otherwise tuck and slouch. 8 Steps to a Pain-Free Back, pg 47.

If you are of a technical bent you may be drawn to the many diagrams. Students find the mechanism of a shoulder roll drawing helpful in executing this technique. The shoulder roll helps your shoulder joint to return home to a healthy posterior position. 

Gokhale Method® mechanism of a shoulder roll diagram 
The mechanism of a shoulder roll diagram is especially useful at any desk or computer. 8 Steps to a Pain-Free Back, pg 42.

Lastly, the recaps at the end of each chapter make a handy cheat sheet while you are revising a new technique. For example, the recap of stretchlying on the side may be beneficial pinned onto your bedside table. 

Starting a conversation about healthy posture

Your book can take pride of place on the coffee table, where, unlike a download, it will always be there to catch the eye. This is a nice organic way of keeping posture on your radar and introducing it as a talking point with family and visitors. We certainly know of parents who leave 8 Steps to a Pain-Free Back strategically placed for their children to discover!

8 Steps to a Pain-Free Back on a coffee table 
The coffee table is a great place for browsing a book. 

Introducing your wider circle to healthy posture 

If you are part of a wellness group, then 8 Steps to a Pain-Free Back is a natural fit for study. If you are a book club member, then this may be the book you are looking for to invite discussion beyond back pain extending into anthropology, history, health, and lifestyle. 

Given that 80% of people in the US will experience back pain², not to mention the many other musculoskeletal problems addressed in its pages, this book has broad relevance. Many of our students are grateful to have discovered 8 Steps while visiting their physician or other healthcare professional. 

To help you spread the word among your family and social networks we have created “clan packs." The launch price has an additional discount: 4 books for $79 (instead of $99), or 8 books for $119 (instead of $159), and is valid until March 13, 2022.

Sometimes when I speak at conferences or wellness events (e.g., Google, Mimosa Systems, TiE Silicon Valley, Global Fund for Women), the company offers their employees/members/donors a gift copy of my book. To encourage this, we offer special bulk discounts. For information please contact [email protected]. For speaking engagements please contact [email protected]. 

References:

¹Felix Richter, “Infographic: E-Books Still No Match for Printed Books,” Statista Infographics, August 9, 2021, https://www.statista.com/chart/24709/e-book-and-printed-book-penetration/. 

²Janet K. Freburger et al., “The Rising Prevalence of Chronic Low Back Pain,” Arch Intern Med 169, no. 3 (2009): 251-258, doi:10.1001/archinternmed.2008.543

Free Online Workshops

If you would like to find out more about how the Gokhale Method can help support you, sign up to join one of our upcoming FREE Online Workshops.

    Old Family Portraits Are a Great Posture Tool: Part 3: Hip-hinging in Small Bends

    Old Family Portraits Are a Great Posture Tool: Part 3: Hip-hinging in Small Bends

    Esther Gokhale
    Date

    The healthy posture and positive change that antique images can bring to modern people are potentially transformational. In Part 1 of this series we looked at how learning from old photographs can benefit our upper body posture and in Part 2 the lower body.

    Here we are going to focus on what antique portraits can teach us about small bends. The historical paintings for this post come from collections associated with Leland and Jane Stanford, famous for their business acumen, political influence, railroad building, and later, philanthropy as founders of Stanford University in California. 


    Leland Stanford c. 1870. His open chest and posterior shoulder position are typical of the fine posture of his day. Wikipedia

    How much do small bends really matter? After all, it is the deeper bends, perhaps with lifting involved, that pose a bigger threat to our spine. Here are three reasons to pay attention to small bends:

    1. The start of a bend usually sets its trajectory. If you have a problematic start to your bend, it will likely continue that way.
    2. Small bends are done more often. Any systematic error in your form can therefore create a significant amount of cumulative damage. They also present more opportunities for training in healthy posture habits.
    3. Some people’s backs “go out” even with small bends.

    Living on the Stanford campus for decades, I was a frequent visitor and admirer of many of the artefacts in the Cantor Arts Center (formally Stanford University Museum). Many of its artefacts represent the human story from foreign lands and ancient periods of history. But within the museum there is also a collection documenting the lives of the Stanford family, which represents a homegrown heritage that teaches us much of what we need to know about healthy posture. 

    Let’s start with a painting of the Stanford family at leisure, celebrating the 10th birthday of Leland Stanford Jr. . .  


    “Palo Alto Spring” by Thomas Hill, 1879, Cantor Arts Center, Stanford University. Kiddle


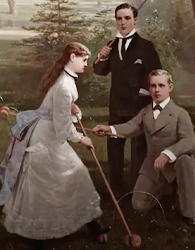
    A girl playing croquet bends forward slightly (detail, right foreground). Kiddle

    The girl playing croquet is an example of a small bend done pretty well. Notice how she angles forward almost exclusively at her hips, rather than at her waist, and also maintains an elegantly elongated spine. By angling forward at the hip joint, where the pelvis pivots around the top of the thigh bones, her hip joints get to enjoy the rotational movement they are designed for. Her spine follows her pelvis, with her back muscles and inner corset both gently working to keep her entire torso as one piece. 


    When the pelvis and torso remain aligned, bending brings beneficial work for the hips,
     deep abdominal muscles, and back muscles (fig a.). 

    This is a much healthier way to bend (fig a.) than fixing the pelvis in a tucked position and then rounding the spine to bend forward (fig b.). Rounding loads the discs, compressing them anteriorly and causing them to bulge posteriorly. With frequent repetition the microaggressions of even small bends take their toll on the discs. Rounding also overstretches the spinal ligaments, allowing for increasingly hunched posture. Even a small bend done in this way may be perceived by the brain as a threat and send the muscles into spasm, trying to prevent movement and protect against such misuse and damage. 


    Rounding the back to bend squeezes the disc contents back, where they may bulge and impinge on the nerve roots  (fig b.).  

    In the painting “The Last Spike” by Thomas Hill (below), you can see a small bend employed in a kneeling position. The two figures kneeling on either side of Stanford could be tucked and rounded, but instead, they are hinging at the hip joint and keeping their backs straight. The woman to their right, leaning on her parasol, also angles forward in a mild hip-hinge.


    A late 19th century painting shows Stanford, one of the owners of the Central Pacific Railroad, standing ready to hammer the golden and ceremonial “Last Spike” into the ground at Promontory Summit, Utah, in May 1869. Wikimedia

    Small bends can be as subtle as a nod or tiny inclination forward. In the foreground of a different painting below, also entitled “The Last Spike,” the onlooker on the left rounds his upper back as he looks downward. I suspect that his desire or need to show deference, also suggested by his removal of his cap, has overridden the prevailing bending posture of the day. Societal expectations around status and hierarchy are responsible for substantial postural degradation throughout history. More about that in a future blog post.


    An alternative composition of “The Last Spike,” showing a less healthy type of small bend. historyisnowmagazine.com

    This small degree of rounding is what many people do numerous times in a day to pick things up—perhaps to grab our car keys from a table or move things from the counter to the sink. Any forward movement with the upper back and head will often result in counter-tension in the lower back and/or pelvis to hold you there. Rather than compromise our backs, it is far healthier to keep our necks tall and bend at the hip joint. 

    If you would like to practise this important contribution to your back health, join me for a “small bends” Gokhale Exercise class on Friday, November 12 at 9:45 a.m. (Pacific Time). If you have not yet subscribed to the 1-2-3 Move program, sign up now for your 7-day Gokhale Exercise Free Trial.


    1-2-3 Move happens daily with Esther or guest teachers at 9:45 a.m. 
    Gokhale Fitness with Eric runs Mondays, Wednesdays, Fridays from 7–7:25 a.m.
    (Pacific Time), and Tuesdays, Thursdays, Saturdays from 3–3:25 p.m. (Pacific Time)
    Gokhale Moving Meditation with Roberta is Mondays at 2 p.m. and with Kathleen is Wednesdays at 12 p.m. (Pacific Time)

    Cultivating a J-Spine with Chair Pose (Utkatasana)

    Cultivating a J-Spine with Chair Pose (Utkatasana)

    Cecily Frederick
    Date

    As a student and teacher of yoga and practitioner of the Gokhale Method, I choose yoga poses that make good use of my time. “Chair pose” is well worth the time investment. In fact, it has become one of my favorite strength-building postures. It is useful for cultivating a J-shaped spine. It helps increase gluteal tone. It helps to pattern healthy hip movement. It is strengthening for the legs and spinal stabilizers. And, last but not least, it allows a yoga practitioner to smoothly transition between a standing forward fold and mountain pose — without compression of the intervertebral discs.


    Cecily Frederick in chair pose with J-spine visible, overlaid with SpineTracker™ snapshot.

       
    Detail of Cecily Frederick’s spinal shape in chair pose, overlaid with SpineTracker snapshot.


    SpineTracker snapshot of Cecily Frederick’s spinal shape in chair pose.

    Chair pose is also Esther Gokhale's favorite way to cultivate strength in all the muscles needed to tallstand well. She recommends it to students who tend to park in their joints (locking the knees and groin, flattening the feet, arching the back and introducing extra curves throughout the spine). After practicing chair pose, the small amount of muscular effort it takes to stand well becomes easy to access.

    To practice chair pose, stand with your feet about hip-width apart and kidney bean shape your feet. Reach your arms forward and up as you simultaneously bend your knees, hips and ankles as if you were sitting down and back into a chair. Hold for a few seconds and then press down through your feet (and especially through your heels) to come back to standing while lowering your arms.  

    A couple of practice sequences you could consider: 

    • Transition from tallstanding (“mountain pose” or Tadasana) to chair pose and back to tallstanding 4-6 times.

    • Transition from tallstanding to chair pose to an upward forward fold (Urdhva Uttanasana) to chair pose (Utkatasana) to tallstanding 4-6 times.


    Cecily Frederick in upward forward fold (Urdhva Uttanasana or hip-hinge).

    Five refinement tips

    1. Strengthen your butt / spare your knees
    To help develop gluteal strength and avoid knee strain, don’t let your knees come forward over your toes as your knees bend. Think about pulling your butt back behind you. Consider using a stool that you position in front of your shins while standing, and don’t let yourself push it forward as you move into chair pose.


    Cecily Frederick using a stool to cue chair pose, with help from a friend.

    2. Save your discs
    To help avoid swaying the back and compressing upper lumbar discs, don’t reach your arms up vertically. Instead let them reach forward. 

    3. Settle your pelvis
    To help the pelvis to settle well, you might not want the feet and knees too close together. Experiment with different widths between your feet. Remember what you learned in the Foundations Course or Pop-up Course about hip-hinging.

    4. Less is more
    Don’t force yourself into a deep knee, hip, or ankle bend. Allow your chair pose to begin where it begins. Less is often more in a yoga practice. 

    5. Break it down
    If you have an injured shoulder you can lower your arms, bring them to your hips or press the palms together in prayer position in front of the sternum.

    Man’s Best Friend for Posture, Part I

    Man’s Best Friend for Posture, Part I

    Esther Gokhale
    Date

    One of the great strengths of the Gokhale Method is that you learn it doing practical activities, like sitting and walking; you then practice it during your day-to-day life. Regular tasks like driving the car and household chores, and leisure activities like gardening and playing sports, become not only safe and comfortable, but actually therapeutic. If you are fortunate enough to live with a dog, you have a very special opportunity to hone your posture skills.


    Daily dog walks are great training for your posture! Photo courtesy Pixabay.


    Firstly, you will probably be walking your dog every day — maybe twice or even three times a day. The regular nature of this activity is a huge boon for establishing good postural habits. The assured minimal frequency of 1-3 times a day is also great. Back in the times of Ancient Greece, Aristotle said of repetition, “it is frequent repetition that produces a natural tendency” (Ross & Aristotle, 1906, p. 113). So your daily dog walks are not just about training your dog; they are also an amazing way to train yourself!  

    Walking your dog builds in a big “posture reminder” to your day. Even when life is busy, you will be walking your dog, and in doing so, you will likely recall your new posture habits. Aristotle observed this trait, too, saying “the more frequently two things are experienced together, the more likely it will be that the experience or recall of one will stimulate the recall of the other” (p. 35).


    A dog walk with a posture workout

    With a little ingenuity, your daily dog walk can also be a great posture workout. However far you venture, you can divide your dog’s “walkies” up so that each section of the route can be used to focus on a particular aspect of your posture. For example, one block could focus on squeezing the gluteus medius buttock muscles, the next on push-off from the rear heel. If you are out on a trail, you can change your exercise from landmark to landmark. All this practice will accelerate your progress and soon build up your strength, coordination, and confidence.


    Balance and stability come with strong glutes. Photo courtesy Pixabay.


    Well-developed gluteal muscles (buttocks) are a major contribution to an easy yet powerful stride. They also play a major role in maintaining your balance — so that you are not going to be pulled over by a large dog, or bowled over by boisterous play.
     

    Bending safely

    Dog walking includes some responsibilities, including (in urban areas) picking up your dog’s poop. The Gokhale Method comes to your service with expert advice! Bending down to the ground is often where people get into trouble: rounding their backs, distending their spinal ligaments, and loading and wearing and tearing their spinal discs.


    This woman is rounding her back, distending her spinal ligaments, as well as loading and wearing her spinal discs. Photo courtesy Pixabay.


    But when you bend well, bending is transformed into something that keeps your muscles strong and joints mobile. You can observe in the humorous picture below how the back remains straight as the bend happens deeply around the hip joint.


    This simple sign depicts a nice, straight back — a key feature of a healthy bend! Photo by Monisha White.


    If hip-hinging with a straight back is not your usual way of bending, however, then it is important to first get guidance from a Gokhale Method teacher, or work carefully through Chapter 7 of my book, 8 Steps to a Pain-Free Back, to ensure that you are able to make this natural movement correctly and safely. You will also be able to put food down for your dog without risking your back going into spasm.

    Most times, however, you will be bending down just a little to pat, groom, or put your dog on the leash. Most of our students report finding these smaller bends more difficult to remember to do well, so be super vigilant about this. Notice in the image below how the owner’s back and torso remain straight and she rests her weight on her elbows while talking to her dog.


    Remember to hip-hinge for smaller bends — even though your dog loves you no matter your form! Photo courtesy Clare Chapman.


    Protecting the upper body

    A frequent problem for owners is that their dogs pull on the leash. This is a very detrimental habit, which would best be addressed at puppy training or with a dog trainer — there is lots of experienced and expert advice available. Until this behavior is improved, it is important that you protect yourself by arranging your shoulders in the best position possible using a shoulder roll, keeping the back of your neck tall, and using your rib anchor to help you maintain this architecture rather than letting the dog pull your upper body out of alignment. Softness at the elbow (slightly bent, not straightened all the way out) and a straight wrist will also help avoid damage to the delicate structures of the forearm.


    Puppy classes and agility training are great for you and your dog! Photo courtesy Pixabay. 


    If a dog pulls strongly, you also don’t want this pulling to jar and twist your spine — engaging the deep abdominal muscles and deep back muscles of the inner corset is important. This natural corset of strong, protective trunk muscle is also important to protect your spine and alignment when you are throwing balls or frisbees for your dog to fetch.


    Are you using dog walks as posture practice time? Let us know in the comments! And, don't miss the second installment of this story!

    How to Bend and How Not to Bend

    How to Bend and How Not to Bend

    Esther Gokhale
    Date

    Round-backed bending is ubiquitous in modern urban culture. It damages the back. Recognizing this, many health advocates recommend bending at the knees. Done to excess or with poor form, this damages the hips, knees, ankles, and feet.

    Surprisingly, poor bending form abounds even in fitness and wellness classes.


    An insistence on touching the toes can be counterproductive and result in damage

    People sometimes equate being able to touch the toes with flexibility. An imprecise  and insistent pursuit of this kind of “flexibility” causes disc damage, hyper-extended spinal ligaments, and a lot of pain. Let’s examine do’s and don’t’s in bending more closely.

    DO

    1. Come close in to your tasks and don’t bend if you don’t need to.


      If you can accomplish your task without bending, don’t bend.


    2. Be sure your legs are externally rotated so there’s room for your pelvis when you bend.
      If your thigh bones (femurs) are in the way of the pelvis settling between the legs in a forward bend, there’s no healthy workaround for bending. Widening your stance can help some, but a healthy bend needs external leg rotation no matter where your legs are positioned. 


      This Burkina baby has his legs externally rotated, making room for his pelvis and substantial belly!
       

    3. Maintain the shape of your back when bending
      The spine carries precious cargo - like all the nerves and nerve roots that exit between the vertebrae - and these are threatened by major distortions of the spine.

      In activities other than bending, some movement around a healthy baseline is healthy and desirable. Such movement stimulates circulation and helps maintain healthy spinal tissues.  

      For bending, I recommend strictly maintaining the baseline shape of the spine. Distorting the spine when bending loads the discs and can cause damage. It also sets a risky pattern for bends that involve weight-bearing. I recommend pure hip-hinging for all bends, whether in daily life or exercise. With practice, good form, and strengthened inner corset muscles, you will be able to move into sustained bending and lifting weights.  


      Women in the marketplace in village Orissa demonstrating excellent hip-hinging form.


    4. Maintain (or increase) the length of your spine when bending
      You don’t want to load your discs when bending. This happens when rounding or swaying the back, or from additional muscle engagement while maintaining your baseline spinal shape. Using the inner corset (go here for a free download of Chapter 5 from 8 Steps to a Pain-Free Back) while bending is excellent insurance against loading the discs unwittingly. 
       
    5. Practice bending with a teacher and with mirrors
      If you are accustomed to tucking your pelvis, it can be a real challenge to find the correct movement in the hips.  Practice bending in front of a mirror, or, better yet, with a Gokhale Method teacher, so you get the feel of healthy hip rotation with a straight back.  


      Working with a teacher helps set a healthy hip-hinging pattern


      Start off with small bends - pay attention when you are at the sink or making your bed. Keep your feet and knees pointed out 10-15 degrees, have your knees soft and only bend at the hips as far as you can before you start to round.  At that point, enjoy the gentle stretch in your hamstrings and external hip rotators. Bend your knees if you want to go any further. For more complete hip-hinging instructions and images, refer to Chapter 7 of  8 Steps to a Pain Free Back or Back Pain: The Primal Posture Solution (DVD).


    DON’T

    1. Don’t Round the Lower Back. 
      The most common mistake in bending is to round the back, either distributing curvature throughout the spine or concentrating most of it in one spot. If your pattern of bending includes rounding the lower back, this is a particularly risky mistake. Being at the bottom of the heap, the lumbar discs are already particularly vulnerable to wear and tear, bulging, herniation, and sequestration. Rounding the lower back while bending puts additional strain on them. The amount of loading is high because our upper bodies are heavy (especially our heads) and the lever arm is long (Torque = weight X distance.)
       
      You may know people who bent to tie their shoelaces or perform some other seemingly innocuous task on the ground, and then couldn’t straighten back up. Those people were probably rounding their lower backs, possibly with the additional danger of a twist added in. The brain reacts to the threat / damage by seizing up muscles in the area. Ouch! In my classes I go so far as to say that people who bend well will probably never have a back problem, while people who bend poorly almost certainly will. It's very important to get bending right!


      Hugh Jackman rounding his back while bending


    2. Don’t Round the Upper Back. 
      Rounding the upper back is problematic for an entirely different reason. The discs in the upper back don’t generally herniate or get severely damaged. This is partly  because the rib attachments to the thoracic vertebrae help fortify that portion of the spine. The problem that results from repeatedly rounding the upper back while bending is that the spinal ligaments gets distended. 


      Avoid rounding your back and letting your shoulders come forward while bending


      Ligaments are like band-aids that go from bone to bone and whose function is primarily structural support. They are a backup system for our muscular support. In situations when there is more challenge and distortion than our muscles are strong enough to handle, or when muscles don’t have time to fire, such as in a jolting accident or jump, then the ligaments keep our joints safe. 

      Ligaments are supposed to have some degree of stiffness. Ligaments aren’t an elastic kind of tissue.  Once stretched too far, they are permanently distended, and no longer serve their role as the backup system to support the spine. Extreme forward bends that come from the back and not the hips cultivate ligamentous laxity more than muscular flexibility. It is counterproductive and results in losing important structural insurance. This is what we see happening in the backs, hips, and knees of athletes and yogis who push too far in poorly executed forward bends as well as other distortions.  

      Charlotte Bell, an Iyengar yoga teacher and author of Mindful Yoga, Mindful Life, had a hip replacement in 2015. She warns us “I know a number of serious practitioners who are now in their 50s—including myself—who regret having overstretched our joints back in the day. All too many longtime practitioners now own artificial joints to replace the ones they overused.” 
       
    3. Don’t bend with your legs internally rotated and/or tail tucked 
      When the legs are internally rotated (toes and knees pointed inwards), the head of the femur grinds inappropriately against the hip socket (acetabulum), wearing down the cartilage and causing arthritic change.

      In 2013, Lady Gaga canceled her “Born this Way” tour due to chronic pain from a severe cartilage tear in her hip. Lady Gaga is known for being health conscious and a yoga enthusiast. Though dancing in high heels night after night certainly puts wear and tear on the body, a yoga practice should support, not exacerbate the problem. “My injury was actually a lot worse than just a labral tear,” she told reporters. “...The surgeon told me that if I had done another show I might have needed a full hip replacement. It took over two years after my surgery to be able to correct my alignment and continue working.”


      Lady Gaga internally rotating her legs while standing


      Lady Gaga bends forward in the yoga pose with toes pointed in and a tucked pelvis.


      These pictures of Lady Gaga show that a) she has a tendency to internally rotate her legs while standing and b) she bends forward in the yoga pose with toes pointed in and a tucked pelvis.  This puts stress on the hip joint, pushes the ball of the femur into the cartilage of the hip socket, and can overstretch the ligaments of her spine, sacroiliac joint, hip, knee, and foot.  
       
    4. Don’t push beyond your range of motion in the hips 
      If you run into resistance in your hip joints when bending, don’t force past it. Dr. Chris Woollam, a Toronto sports medicine physician, says he started seeing “an inordinate number of hip problems” among women aged 30 to 50 who were practicing yoga. “Maybe these extreme ranges of motion were causing the joint to get jammed and some to wear,” Woollam says. “If you start wearing a joint down, then it becomes arthritic. So you’re seeing these little patches of arthritis in an otherwise normal hip that seems to be related to these extremes of motion or impingement or both.”

      I suspect that some of the hip problems that get chalked up to extreme range of motion, are actually due to alignment problems. Most yoga classes, Pilates training, and gym routines teach students to stand with parallel feet. By Gokhale Method standards, this constitutes internal leg rotation. Indigenous people have their feet facing outward in the range of 5-15 degrees, and their legs are correspondingly externally rotated. It is our opinion that instructions to have parallel feet contribute to stress and arthritic changes in the hip joints, especially when combined with forward bends and other hip motions.
       

    How well do you stack up when bending in your daily life and when exercising? How far along are you in your hip-hinging journey?


    Join us in an upcoming Free Workshop (online or in person).  

    Find a Foundations Course in your area to get the full training on the Gokhale Method!  

    We also offer in person or online Initial Consultations with any of our qualified Gokhale Method teachers.

    Holiday Health (Posture Tips)

    Holiday Health (Posture Tips)

    Esther Gokhale
    Date


    One shoulder at a time — a little forward,
    a little up, a lot back, and totally relax.

    The holidays are upon us and ‘tis the season for cooking, cleaning and entertaining. You may find yourself especially reliant upon your body as you enjoy the added festivities. We want to help keep you safe and healthy with some seasonal posture tips!

    Shoulder positioning

    Whether you are baking dozens of cookies or wrapping bundles of presents, your shoulders may feel uncomfortable if neglected. Firstly, assess your surroundings. Whatever your task, ensure that it is within comfortable reach. For example, if you are cooking, get close enough to your countertop so you can easily manage all of your ingredients. Or, if you are working while seated, find a suitable height for your chair and/or table. From here, do a shoulder roll. One shoulder at a time — a little forward, a little up, a lot back, and totally relax. Ideally you can still reach what you need without pulling the shoulders out of this position. This will alleviate tension or pulling between your shoulder blades, which over time would tax your rhomboid muscles. And, with the shoulders back and down, you will encourage healthy circulation to your arms and hands to keep up your stamina.


    Notice how the baby's knees are bent in a wide stance to
    allow his pelvis to settle comfortably between his legs.

    Hip-Hinging

    Decorating, cooking and preparing for house guests all require a lot of bending. Bending well by hip-hinging is a must to keep your back healthy. Always allow the legs to rotate open to make room for the pelvis. You want to make room for the pelvis to rotate, drop and nest between the legs.

    For shallow bends, you will likely not need to bend your knees very much if at all while standing. If you are seated, the legs usually don’t have to be very far apart. As you bend forward, nothing else along your spine and torso moves. Your shoulders want to stay back, your neck remains elongated, and your ribs stay in place.

    For deeper bends, the knees will probably need to bend more generously depending on your hamstring flexibility. If you are gathering things from the floor, you may want to take a wider stance as well, especially if those hamstrings are pulling your pelvis into a tucked position rather than the optimal tipped or anteverted position. Deep seated bends will likely feel better when the legs are opened as well.


    This man uses his inner corset to lift a box.
    Notice that his arms are still close to his
    torso and his body is squared toward
    the object.

    Lifting with your Inner Corset

    Heavy or bulky items require a great reliance upon your Inner Corset. While maintaining your hip-hinging form, add your Inner Corset AND bend your knees more generously when lifting heavy items. Often resting an elbow or two on your thigh can provide more leverage as well. And, always stay close to whatever you are handling—things feel heavier the further they are from your center.

    Hopefully you can square your body toward any object you are handling. Sometimes, however (especially in decorating or cleaning those hard to reach spots) you may find your self in a slightly twisted, distorted, otherwise compromised position. During these times, it is especially vital to use your Inner Corset for extra protection. Creating more length allows room for the spine to handle bits of distortion. And, gathering your muscles up and in will stabilize your spine and prevent unnecessary compression.

    Join us in an upcoming Free Workshop (online or in person).  

    Find a Foundations Course in your area to get the full training on the Gokhale Method!  

    We also offer in person or online Initial Consultations with any of our qualified Gokhale Method teachers.

    Wishing everyone a warm holiday season!
    Esther

    Subscribe to Hip-hinging