flexion

What’s the Best Exercise to Strengthen Your Back? Part 1: Bird Dog

What’s the Best Exercise to Strengthen Your Back? Part 1: Bird Dog

Esther Gokhale
Date

Have you been taught cobra pose or locust pose to strengthen your back? It is a common practice to try to strengthen the back with back bends, focusing on the long back extensors on either side of the spine. This approach is used by the McKenzie Method, many yoga teachers, and physical therapists.

In the Gokhale Method® we prefer to strengthen the back by working with the muscles which collectively stabilize the trunk. Our focus is on maintaining a healthy J-spine baseline rather than backbending.

Diagram of woman headloading showing healthy muscles maintaining a J-spine.
Healthy muscle activation maintains a J-spine, protecting the spine, discs, and nerves from damage due to instability and compression.

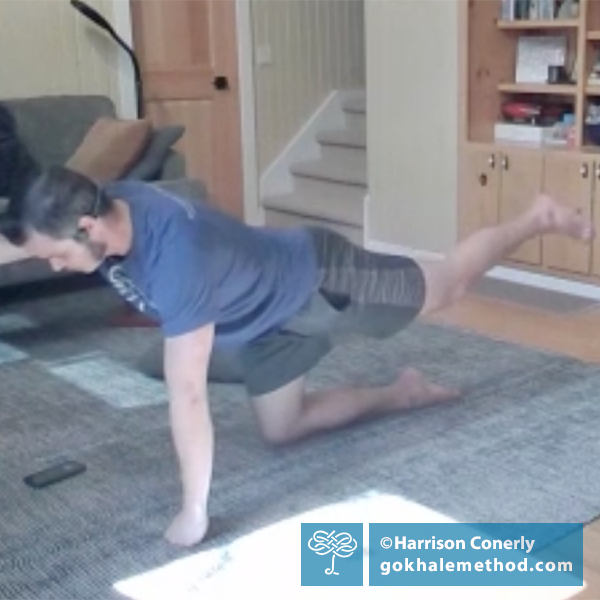
Recently in Gokhale® Fitness, our teacher Harrison has been taking our members through an exercise I rate highly, bird dog, or, as it is sometimes called, table top. Contrary to its appearance, it is not primarily a leg and arm exercise—instead, the weight and movement of the limbs provide a challenge to the stability of the torso, strengthening the muscles of the inner corset, which include the transversus abdominus, the internal and external obliques, and the intrinsic muscles of the spine. This then protects the spine against torque and distortion. 

Gokhale Fitness teacher Harrison in the basic bird dog pose.
Gokhale Fitness teacher Harrison in the basic bird dog pose. Bird dog involves lifting the opposite arm and leg—but its purpose is to work the deep trunk stabilizers, or inner corset.

Most people do this exercise any old way—perhaps with a tucked pelvis, a hung head, or flinging their arms and legs up and swaying their backs. It wants to be done in such a way that it maintains the J-spine and doesn’t encourage distortions of the spine such as excessive lumbar lordosis or thoracic kyphosis, and doesn’t pull your nerves and discs around willy-nilly. 

Caution: If your back pain is persistent or severe, we recommend you consult your medical team prior to doing this exercise.

Setting up

Especially if you are new to this exercise, or to the Gokhale Method, take your time to set up well. Without the correct set up, you can lose the exercise’s value from the get-go. You want the exercise to be safe, effective, and to pattern healthy everyday movement mechanics. 

  • Kidney bean shape your hands (use your fists if you prefer)
  • Externally rotate your legs a little
  • Pivot your pelvis forward (antevert) by relaxing your lower belly
  • Engage your rib anchor to eliminate any sway
  • Drop your spine between your shoulder blades
  • Lengthen the back of your neck. Your face will be parallel with the floor, your chin down 

Photo of Harrison in a good starting position for bird dog.

Check you are starting from a good baseline position.

Doing Bird Dog

Engage your trunk muscles to keep your pelvis and trunk level and still at all times—do not twist, round, or dip.

  • Start by lifting one arm, and the opposite leg, outwards to horizontal, in line with your torso. 
  • Return to the floor.
  • Switch sides, lifting and lowering the opposite arm and leg together.
  • Repeat on alternate sides.

This video shows the smooth, steady action that you are looking for in bird dog. Your torso remains still and horizontal while you move one leg and the opposite arm, and then change sides.

Reps, sets, and frequency

How many you do depends on your current level of fitness and strength, but for most people up to three sets of 6, 8, or 10 repetitions works well (one raise and lower of an arm and a leg is a rep). Stop short of failure—you don’t want to lose your form, but rather, protect your spine at all times. 

If you feel significant soreness in your muscles the next day, give yourself a day to recuperate before repeating bird dog. If you are working at a gentle level, you can do this exercise daily if you wish.

Common mistakes

  • Losing your form—keep checking that you haven’t tucked your pelvis, swayed your lower back, rounded your upper back, or arched your neck.
  • Doing the exercise too fast, as if it were an arm and leg aerobic exercise rather than a trunk stabilization exercise.
  • Lifting your arm and leg too high, and swaying your back.

Photo of common mistake swaying the back in bird dog.
Lifting the head and/or leg beyond horizontal will likely encourage sway in the back. Image from Pexels

Ways to progress the exercise

After you have mastered good form and smooth execution, you may want to increasingly challenge your muscles. Depending on your starting point this may take a few days, weeks, or months…don’t rush it and risk injury. There are many ways to progress steadily and vary your training:

  • If you started with just a few reps, aim to up your reps and/or sets over time. You can count numbers or breaths, or work to music.
  • Raising your hand in a fist uses more muscular engagement in the hand and forearm.
  • As you extend your leg, use your foot muscles to point your toes. Then try a set pointing your heel back.
  • Hold the extension position (lift) to work on stamina and endurance and add an isometric challenge to your muscles. Go for duration rather than lifting beyond horizontal. 
  • Bring your knee and hand together rather than down to the floor between lifts.
  • Add wrist and ankle weights.

In this video Harrison demonstrates adding further challenge in bird dog.

Take the benefits into daily life

No matter how well done, bird dog is only an exercise and can only be done so many times by a sane person. It is, however, perfect preparation for real life activities that use the arms and legs, while needing to keep the trunk steady—e.g. opening a heavy door, carrying a suitcase, lifting something off a high shelf, dancing, or bending. After a week or two of doing this exercise, you will probably notice that you feel stronger and that daily chores are more enjoyable. You may notice your running or swimming is more efficient and powerful. And that you have less back pain!

Photo of Nathan White playing ultimate frisbee.
Trunk stability enables you to undertake asymmetrical tasks which would otherwise distort and injure your spine.

Best next action steps 

If you would like guidance in moving as you are meant to, and doing bird dog, or other exercises, with healthy form and posture, book a consultation, online, or in person with one of our teachers. 

You can sign up below to join any one of our upcoming FREE Online Workshops

Back Spasm Remedies

Back Spasm Remedies

Esther Gokhale
Date

You’ve tweaked your back. It may be a stabbing pain that catches with certain movements, it may be that you cannot straighten up, or maybe it’s an electrical, nervy sensation in your buttock.  

Male jogger on a beach bending over and clutching his back.
A back spasm is never welcome—but it is a signal we can act on—when we know how. Image by: Kampus Production

It’s true that time is a great healer—and that most back pain resolves itself without intervention—but there are also things we can do to accelerate the healing, that can help us feel better immediately, and protect us in the longer term. 

Should I take pain meds?

Pain meds (muscle relaxants, anti-inflammatories, and pain signal blockers) can be useful in allowing you to remain reasonably active, preserve your mental health, work, care for dependents, and more. They can also have negative side effects and create dependence. Using pain meds is a very individual decision to be made with your medical advisors, but if you do use meds, be sure you are using the relief they give you as a window of opportunity to address the root causes of your back pain.

Should I keep moving or rest up? 

There is research showing that for back pain, maintaining normal activities as tolerated gives a better outcome than bed rest. Maintaining gentle movement is nearly always advisable as it promotes healthy circulation and healing in the injured area. It also counters joint stiffness, muscle weakness, and loss of fitness. As the saying goes, “motion is lotion.” Maintaining regular activities as tolerated also helps you keep up with your friends, hobbies, and tasks, and staves off depression. 

In our experience doing normal activities with truly normal (healthy) posture gives an even better outcome.

Couple dancing a Bachata with good form.
Activities done with healthy posture are protective against back spasms and injuries.

Move like you are meant to

Unless it was a freak accident, think back to what caused this spasm. Going forward, what are you going to do differently to make sure it doesn’t happen again? Are there movements to avoid until you have learned what is truly healthy for your body, be that in bending, twisting, or reaching? Students have sometimes discovered that certain “healthy” exercises, such as cat-cow, or roll-downs, feel wonderful at the time, but that such alternating flexion and extension provokes their backs to stiffen up or spasm later. 

Young women stretching in cat and cow poses.
Poorly designed stretch and mobility exercises such as cat-cow actually push deeper into existing curves, provoking inflammation and stiffness. Images from Freepik 

Non-drug treatments 

Alternative or additional treatment for back spasms might include massage, physical therapy, acupuncture, chiropractic, and osteopathy. It would be fair to say that while many of our students find one or more of these modalities helpful, they are seldom sufficient to get to the root cause of their back flare-ups and prevent them from recurring. When I was a practicing acupuncturist, I found that my patients responded better to treatment for back pain when I also helped them with their posture. Their bodies could heal and strengthen better when they stopped unwittingly reverting to poor bending, lifting, walking, sitting, and sleeping positions after their treatments.

Gokhale Method® solutions

I would like to offer two key Gokhale Method techniques that can accelerate your journey out of pain, plus get you started on creating the baseline conditions to keep your back healthy into the future. 

You will use readily available surfaces—a mattress or an exercise mat, and the backrest of a chair—to put your back into mild traction. You will be able to use this surface to contact and gently stretch your skin, which stretches the flesh underneath and gently eases your vertebrae apart. This will gradually tease out tension and spasm, facilitate circulation and healing, and bring peace to the area. These techniques are useful for five minute “resets” during the day, or for hours at a time, as needed.

Caution: If your back pain is persistent or severe, we recommend you consult your medical team prior to using these techniques.

Technique 1: Stretchlying

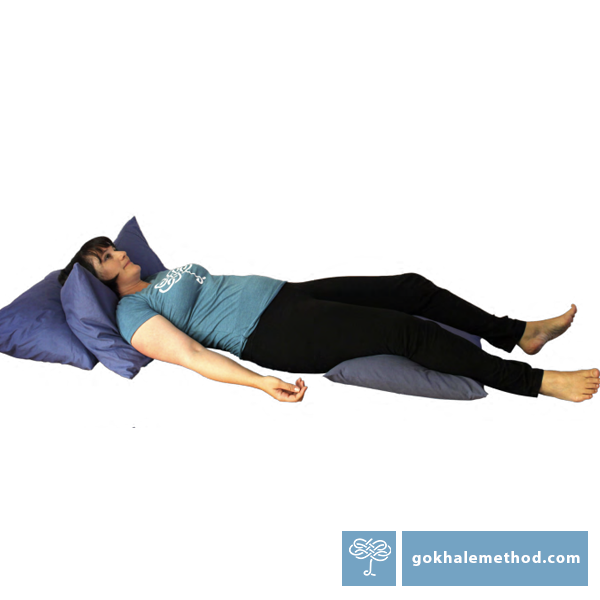
Woman stretchlying on the floor using pillows.
Stretchlying can transform lying down into therapeutic traction and comfort—even as you sleep. You can get started with this video.

Technique 2: Stretchsitting

Girl sitting on a dining chair with a stretchsit® cushion.
Stretchsitting can transform compressive sitting (and driving) into hours of therapeutic traction and comfort. You can get started with this video.

You can learn these techniques in greater detail, with modifications for your body, in our in-person Foundations Course and our online Gokhale Elements. My book, 8 Steps to a Pain-Free Back, has illustrated, step-by-step instructions. Our stretchsit® cushion is a handy tool to make poorly designed chairs more comfortable and healthy. Here you can find a video on how to attach it to just about any chair. We’ve put it on sale until April 1 for $54.90, discounted from $59.90, plus free domestic shipping.

Photo of chair with a stretchsit® cushion.
The stretchsit® cushion not only creates a healthier shape for your backrest, its soft “sticky” nubs are specially designed to give comfortable traction. 

Doing things differently

Pain is nature's biofeedback mechanism—one which alerts us to the threat or occurrence of injury, which we should act on. Unfortunately our culture has not equipped us well to interpret our pain signals, nor to understand the systematic errors we may be making in our body use. 

Once we recognize that poor postural habits are the root cause of our back pain, the process of change can begin. A teacher’s experienced eye can be invaluable in assessing your individual postural patterns and issues, helping you to steer out of trouble and into a healthier relationship with your body.

Esther Gokhale guiding a student in glidewalking.
The way we make every movement determines whether our back has length and support, or is vulnerable to damaging stress. Here I am guiding a student in glidewalking. 

Best next action steps 

If you would like to know how changing your posture can prevent your back pain, get started by booking a consultation, online, or in person with one of our teachers. 

You can sign up below to join any one of our upcoming FREE Online Workshops

Home Exercises Part 3: Cat-Cow

Home Exercises Part 3: Cat-Cow

Esther Gokhale
Date

This is our third blog post in the series where we put popular exercises under scrutiny to examine how they stack up—or not—against the principles of healthy posture. Here we are looking at “Cat-Cow,” a common exercise for mobilizing the spine.

Cow is one of the “holy cows” of conventional exercise. Done on all fours, it puts the spine into extension (swaying). It is paired with Cat, which puts the spine into flexion (rounding). Alternating between these postures is widely considered to be a good or even necessary exercise for mobilizing the spine.


Cat-Cow is widely considered to be a good mobilizing exercise for the spine—but there is a big downside. Pixahive

Alternating between extreme extension and flexion stresses the joints of the spine, which then sustain wear and tear. It also results in the surrounding muscles stiffening to protect the spine. True, it can feel good to stretch out tight muscles in this way, but rather than relying exclusively on repeated extension and flexion, it’s better to address the underlying cause of the stiffness, which is usually poor posture. People with good posture are not compelled to do this sort of exercise. 


Arching the back (above) and slumping (below) are common but damaging postural habits 
that we do not want to reinforce in our exercises.
Freepik

In addition to the real-time wear and tear in the spine, Cat-Cow reinforces the poor postural patterns of arching and slumping that are common in our culture. 

Many of us arch the lumbar spine to be “upright.” This compresses the discs, nerves, and soft tissues of the lower back which leads to degeneration, pain, and dysfunction. It is also common to slump the upper back when sitting or standing. This progressively overstretches the spinal ligaments, increasing kyphosis. Cat-Cow augments both these common characteristics of modern posture. 


Cow (above) can deepen and compress an already tight lumbar curve. Cat (below) will then overstretch an already rounded upper back.
Both movements compound common posture problems.

If the chin is lifted and the neck is swayed in Cow, this will additionally put pressure on the cervical joints.

Due to its horizontal orientation, without an awareness of healthy posture, this is an exercise that encourages the abdominal muscles to “switch off” rather than retain a healthy baseline tone. Hanging the abdomen from the lumbar area like a deadweight encourages exaggerated distortion of the lumbar spine.   

After compressing the lower back in Cow pose, most people then round into Cat to stretch it out. Training the upper back to hunch in Cat will then send the shoulders and head further forward in daily posture. Rather than mobilizing the spine, Cat-Cow can create a destructive spiral of a tight lower back and an overstretched upper back. 


Rather than encouraging even length throughout the spine, Cat-Cow pushes deeper into the existing curves. Freepik 

If you are concerned that the yoga or exercises you do could be exacerbating a habit of arching and/or slumping, we recommend exploring how to modify your regimen in an Initial Consultation. You can arrange an Online Initial Consultation or an in-person Initial Consultation if you have a Gokhale Method® Teacher near you.

The 1-2-3 program on Monday, August 9 will show you how to do a modified Cat-Cow. In Cat you will learn to stretch the upper back without overdoing it, and how and why not to round the lower back in the process. In Cow I will teach how to restrict the concave sway in the lower back while giving a satisfying stretch through the thoracic spine where it will do no harm. You will learn how to invite the right amount of movement in the right parts of your spine.

If you would like to join the Cat-Cow class but have not yet subscribed to the 1-2-3 program, sign up now for your 7-day Gokhale Exercise Free Trial.


1-2-3 Move happens daily with Esther at 9:45 a.m. (Pacific Time)
Gokhale Fitness with Eric runs Mondays, Wednesdays, Fridays from 7–7:25 a.m.
(Pacific Time), and Tuesdays, Thursdays, Saturdays from 3–3:25 p.m. (Pacific Time)

Upgrade Your Downward-Facing Dog with the Gokhale Method and SpineTracker™

Upgrade Your Downward-Facing Dog with the Gokhale Method and SpineTracker™

Cecily Frederick
Date

Studying and teaching yoga has been part of my life for several years. However, after learning the Gokhale Method, I approached the well-known yoga posture “downward-facing dog” (Adho Mukha Svanasana) in a new way.


Hip-hinging with my even spinal groove visible — GOOD! Image courtesy Cecily Frederick.

In the Gokhale Method Foundations Course, I learned how to hip-hinge and keep my spine from flexing when bending. I wanted to maintain about the same spinal shape in my “downward-facing dog” pose as I had learned when hip-hinging. This spinal shape, with an even spinal groove from the lower to the upper back, meant that my intervertebral discs, nerve roots and spinal ligaments would be protected during bends, and my hip joints would be used in a healthy way.

Also informing the adjustments I made to my downward-facing dog was receiving detailed feedback about my spinal shape from the new SpineTracker wearable device developed by the Gokhale Method Institute. This technology is available to participants of the new Pop-up Course and in private lessons with participating teachers.


Here, I’m wearing a set of SpineTracker sensors on my back to determine my lumbar spinal shape. Image courtesy Cecily Frederick.

Here is an example of the SpineTracker feedback for a hip-hinge. To contextualize, each dot is the location of a sensor.


SpineTracker snapshot of my spinal shape while hip-hinging — GOOD!

Although many yoga practitioners hip-hinge in their “downward-facing dog” posture, I had a habit of slightly flexing my lumbar spine in this pose.


The practitioner in this version of "downward-facing dog" pose shows a slightly flexed lumbar spine, putting the lumbar discs under strain. Image courtesy Form on Unsplash.

After many years of spinal flexion occurring with most hip flexion, I had developed chronic low back pain. Not all spinal flexion is easy to see (or feel internally), as my former downward-facing dog form, demonstrated below, shows.


Here I am in downward-facing dog with some lumbar spine flexion and hip flexion (knees straight, heels down) — BAD! Image courtesy Cecily Frederick.

To heal my irritated back, I began revisiting the way I approached this yoga posture. It was a worthy project since this pose shows up frequently in my yoga practice and yoga teaching sessions.

First, I needed to learn how to stabilize my overly mobile lower back and ease into deeper flexion in my hips. Luckily, hip-hinging practice had helped me learn how to achieve both of these goals. Then I needed to transfer this skill to one common yoga pose: downward-facing dog.


In this photo, I’m in downward-facing dog with my spinal groove visible (knees bent, heels up) — GOOD! Image courtesy Cecily Frederick.


Here’s another view of my downward-facing dog, wearing the SpineTracker sensors on my back (knees bent, heels up) — GOOD! Image courtesy Cecily Frederick.


The upgraded downward-facing dog pose creates an even spinal groove which I’m able to feel with my fingertips — GOOD! Image courtesy Cecily Frederick.

A great way to capture the shape of the spine in a complex yoga pose is to take an image with the SpineTracker device. The SpineTracker sensors stick directly to the skin over the spine and are able to give detailed information about the spine’s shape (and your hands can stay on the floor).


SpineTracker snapshot of my spinal shape in upgraded downward-facing dog (knees bent, heels up), more spinal extension — GOOD!


For comparison, this SpineTracker snapshot of my spinal shape in unmodified downward-facing dog (knees straight, heels down) reveals noticeably more spinal flexion than in the upgraded form — BAD!


In my upgraded downward-facing dog pose: no spinal flexion, heels up, knees bent — GOOD! Image courtesy Cecily Frederick.

To refine my downward-facing dog pose, I needed to:

  1. Learn how to hip-hinge from a Gokhale Method teacher
  2. Come to a hands and knees position (“dog pose”) with a J-spine
  3. Lift hips into downward-facing dog position without changing spinal shape and gently pull hips back, away from hands

Things that might also help if you have shortened hamstrings and calf muscles and/or internally rotated femurs:

  1. Keep knees softly bent and kidney bean shape the feet to allow the pelvis to settle well
  2. De-emphasize dropping heels to the floor
  3. Allow the pose to feel awkward at first (but not painful)

One additional advantage to structuring a downward-facing dog this way is that the pose becomes a great way to lengthen the entire spine, which can make other yoga poses healthier and more accessible. Yoga is one of many topics addressed in the Online University content for alumni.

Is there a yoga pose that causes you some back discomfort?

Subscribe to flexion